Working with Identities
An identity is the digital representation of a person or access-holding entity. Each identity contains the user's identity attributes, lists of accounts, and entitlements held by the identity on other systems. You can view and manage the identities within your tenant to govern and secure your users' accounts and access data. To learn more about the different types of identities you may work with in Identity Security Cloud, refer to Identities Overview.
Viewing Identities
You can view details about any identity in your site, view the status of your identities, and manage users' access to Identity Security Cloud and its functions.
-
To access a list of the identities in your site, go to Admin > Identity Management > Identities.
-
Select a filter to choose which identities are displayed:
-
All Identities includes all identities, including identities with errors and incomplete identities.
-
Identities with Errors shows identities that have email configuration errors, authentication source mismatching, or provisioning issues. For more information about these errors, refer to Resolving an Error Status.
-
Incomplete Identities shows identities that are missing values for required identity attributes. These identities must be completed before they can sign in or be used in other actions like access requests and certifications.
-
-
Use the search bar to find the identities you need. Identity Security Cloud searches the account ID, username, display name, email, first name, and last name attributes for values that begin with the search term you enter.
You can switch between Cards view for a tablet-friendly display or Table view for a condensed layout.
If you need to work with your identity data offline, you can also export the list to a .csv file.
Viewing Identity Statuses
You can view each identity's account status on the Identities page. You can also use the provided queries in Search to find identities by these statuses.
| Status | Description | Search Query |
|---|---|---|
| Active | The user has registered for Identity Security Cloud and can sign in. | status:ACTIVE |
| Disabled | The user's Identity Security Cloud account is disabled, preventing sign-in and any other user actions. | status:DISABLED |
| Error | The identity is in an error state due to email configuration errors, correlation problems, or other issues. Refer to Resolving an ERROR Status for details. | status:ERROR |
| Incomplete | The identity is missing a UID, email, or last name. | Not applicable |
| Locked | The user's account has been manually locked, usually due to security concerns. | status:LOCKED |
| Not Invited | The identity hasn't been invited to Identity Security Cloud as a system user. | status:UNREGISTERED |
| Pending | The user has been invited to register with Identity Security Cloud, but they haven't registered yet. | status:PENDING |
| Registered | The user has been invited and has setup a password, but they haven't logged in yet. | status:REGISTERED |
| Warning | The identity's invitation email failed to send. Verify their email address is correct and reinvite the identity. | Not applicable |
Note
The status:UNREGISTERED query returns users whose identities have been reset or disabled and reenabled in addition to those who have never been invited to register.
Resolving Error Statuses
When identities have an ERROR status, select the Information icon ![]() to display more details.
to display more details.
An ERROR status may occur because of email configuration errors, authentication source mismatching, or provisioning issues. Some errors can prevent sign-in to Identity Security Cloud, so you'll need to address the error for those users to regain access.
- Email Configuration Errors - This occurs if your identity profile is configured to send an invitation only to a user's alternate email but the user does not have an alternate email configured. Check and adjust your identity profile invitation options or attribute mappings.
- Authentication Source Mismatch - This error occurs if your identity profile is configured with a Sign-in Method that uses a Directory Connection (pass-through authentication) and an identity created in that profile does not have an account on the specified authentication source. Without an account there, the user will not be able to authenticate to Identity Security Cloud to sign in. To correct this, you must correlate an account on that directory source to the identity or change the sign-in method for the identity profile.
- Provisioning Issues - If an identity has more than one account on a source system where a provisioning event is triggered, this generates an error on the identity and no provisioning occurs. This occurs when Identity Security Cloud cannot determine which account should be changed by the provisioning event.
Managing Identities
You can manage identities by completing the following actions:
- Invite users to register for access to Identity Security Cloud.
- Set user levels to manage their level of access to Identity Security Cloud functions and data.
- Enable or disable their identity.
- Reset the identity to clear any elevated user levels, erase their security question answers, and return them to a Not Invited status.
- Delete the identity from Identity Security Cloud.
Note
Users cannot perform these actions for their own identity.
Inviting Identities
You can manually invite identities to use Identity Security Cloud. Refer to Inviting Users Manually for more information.
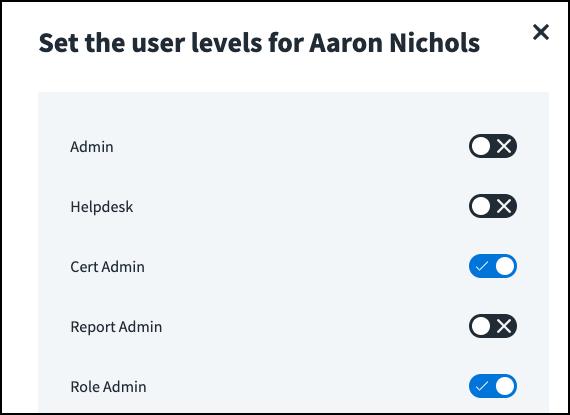
Setting User Level Permissions
By default, users have end user permissions, which grant them limited system access. Administrators can expand the default end-user access by granting different permissions grouped into user levels. The User Level Access Matrix summarizes the Identity Security Cloud pages and components that are accessible at each user level. You can also create custom user levels for your tenant.
Multiple user levels can be granted to a user. The user's access is cumulative across all granted user levels.
To set user levels:
- Go to Admin > Identity Management > Identities and find the identity you want to grant user levels to.
- Select Actions
 > Set User Levels.
 - Use the search field or sort icon
 to find the user level you want to assign.
 -
Select the checkbox for each user level you want to grant to the user. Deselect the user levels you want to revoke from the user.
-
Select View to view the user levels that have been selected for this identity.
- Select Save to save your changes. The user's new user levels will take effect the next time they log in.

To remove user level assignments, refer to Deleting Custom User Levels.
Note
User levels are managed by administrators, who can directly assign them to identities and add them to roles and access profiles. User levels can also be marked requestable on the Entitlements page. Refer to User Levels for information about expanding that oversight.
Disabling Identities
Disabling an identity immediately removes Identity Security Cloud login access from the user. For example, you might want to disable the identity of a user who has left the company or who no longer has responsibilities that require access.
Notes
- This action does not disable source accounts or otherwise revoke access to those systems.
- Disabled identities cannot be reset or invited to Identity Security Cloud.
- If the user is signed into Identity Security Cloud when their identity is disabled, this does not end their active session.
- A user whose identity is disabled cannot change their passwords.
To disable an identity:
- Go to Admin > Identity Management > Identities and find the identity you want to disable.
- Select Actions > Disable Identity.
- Select Disable Identity to confirm.
To disable multiple users, select the checkboxes next to the identities you want to disable. Select Actions > Disable Identities at the top of the list and then select Disable Identities to confirm.
Enabling Identities
If a user has been disabled, their identity must be reenabled before they can regain access to Identity Security Cloud.
- Go to Admin > Identity Management > Identities and find the identity you want to enable.
- Select Actions > Enable Identity.
To enable multiple users, select the checkboxes next to the identities to enable and then select Actions > Enable Identities at the top of the list.
Notes
- User levels assigned when the identity was disabled are retained by the user.
- This returns the identity to a Not Invited status.
Resetting Identities
You might need to reset a user's identity if they have forgotten their authentication information like their answers to knowledge-based questions. Resetting an identity de-registers the user and removes any elevated user levels they have. They must be reinvited before they regain access to Identity Security Cloud.
Note
Resetting an identity does not clear the user's multifactor authentication (MFA) settings. A user's MFA settings must be reset to clear the functionality.
- Go to Admin > Identity Management > Identities and find the identity you want to reset.
-
Select Actions
> Reset Identity.The user's status changes to Not Invited.
-
To reinvite the user, return to that identity and select Actions
> Invite Identity.Note
The invitation step is only necessary for users who sign in through a user name and password recorded in Identity Security Cloud directly. When they register again, they will also reset their Identity Security Cloud password.
Deleting Identities
You can delete an identity to resolve issues that you haven't been able to solve through more targeted actions. The user cannot access Identity Security Cloud, and their identity's correlated accounts are removed. However, it does not deprovision those accounts from their sources.
Note
Identities that are no longer correlated to a source account are deleted during a nightly process.
- Go to Admin > Identity Management > Identities and find the identity you want to delete.
-
Select Actions
> Delete Identity.Important
Identities set as the owners of sources, roles, access profiles, or access applications and certification reviewers for active certifications cannot be deleted. Select new owners and reassign certifications to delete these identities.
-
Select Delete Identity to confirm.
To delete multiple users, select the checkboxes next to the identities you want to delete, select Actions > Delete Identities at the top of the list, and select Delete Identities to confirm.
Note
Deleting is a temporary action if the user still exists in your authoritative sources. Correct underlying problems on your source systems and reaggregate an authoritative account to create a new identity for the user. The identity may be created with the same name and alias as the previous identity, but it will have a different internal ID. You can then reaggregate their other accounts so that the accounts correlate to the new identity.
To restore the user's access, the new identity must be invited and granted any elevated permissions they require since these settings were removed when the original identity was deleted.
Synchronizing Attributes
If your organization has configured attribute synchronization, you can manually synchronize an identity's attributes. Refer to Manually Synchronizing a Single Identity for more information.
Viewing the Identity Graph
If your organization has licensed the Identity Graph feature, you can use this tool to visualize a human identity’s relationships to roles, access profiles, and entitlements.
-
Go to Admin > Identity Management > Identities.
-
Select Human Identities.
-
Find or search for an identity.
-
Select the View in Identity Graph icon
 . You can now review the identity’s relationships to access items and identify possible risks through the visualization.
To return to the identity list, select the Exit Identity Graph icon
 in the upper-right corner of the Identity Graph window.
Exporting Identities
The export option generates a zipped .csv file of the current set of identities which you can download for use offline.
- Select Export to start the file generation.
- When it finishes, the bar at the bottom of the page shows Done and you can select the arrow
 to expand the panel and download the file.
 - Select Download to download the zip file to your local computer.
Notes
- Depending on the number of identities in your system, generating this file can take a substantial amount of time. You can leave the page while the process runs. The generated file will be retained as long as your current session is active.
- The file includes the list of identities as it existed when you started the export.
- When you export the list of identities from the user interface, Work Phone and Personal Phone attributes may begin with a
'if their values start with a+symbol as part of the country code.
Documentation Feedback
Feedback is provided as an informational resource only and does not form part of SailPoint’s official product documentation. SailPoint does not warrant or make any guarantees about the feedback (including without limitation as to its accuracy, relevance, or reliability). All feedback is subject to the terms set forth at https://developer.sailpoint.com/discuss/tos.