Discovering Roles
Role Discovery, part of Access Modeling, identifies user access patterns and determines potential roles, or bundles of access, that accurately align with what users actually do in an organization.
To discover potential roles, SailPoint uses a patented network graph analysis. Entitlement-based similarities are found among the identities in an organization, and identities are organized into cluster communities, or peer groups, with similar access. This network graph enables SailPoint to detect and discover roles with least-privileged access for groups of very similar identities.
You can access Role Discovery as soon as Access Modeling is enabled for your org.
After potential roles have been discovered, you can:
-
Save the role discovery session to explore and work with later.
-
Save potential roles as drafts to work with later.
-
Automatically create a new role and continue onto role assignment configuration.
-
Export potential role data and use it to evaluate the accuracy or effectiveness of their current roles and then manually create new roles that better align with the access users need.
Role Discovery Process Overview
Each process overview step is described in detail in the sections that follow.
-
Work with the potential role results and save the role discovery session to work on later.
-
Refine the entitlements for a potential role and save the role as a draft to work on later.
-
Export the potential role data to a ZIP file for evaluating offline and manually creating new roles.
Important
SailPoint also automatically discovers potential roles and makes them accessible through the Auto-Discovered Roles tile on the Role Insights page.
Discovering Potential Roles
You can launch Role Discovery from either Role Insights or Search to display potential roles based on the optimal role granularity derived from our AI algorithms.
New identities and entitlements added to your organization are available for Role Discovery on the following day.
Discover Roles from Role Insights
-
Go to Admin > Access Model > Role Insights and select Discover Roles to launch the Define a Group of Identities page.
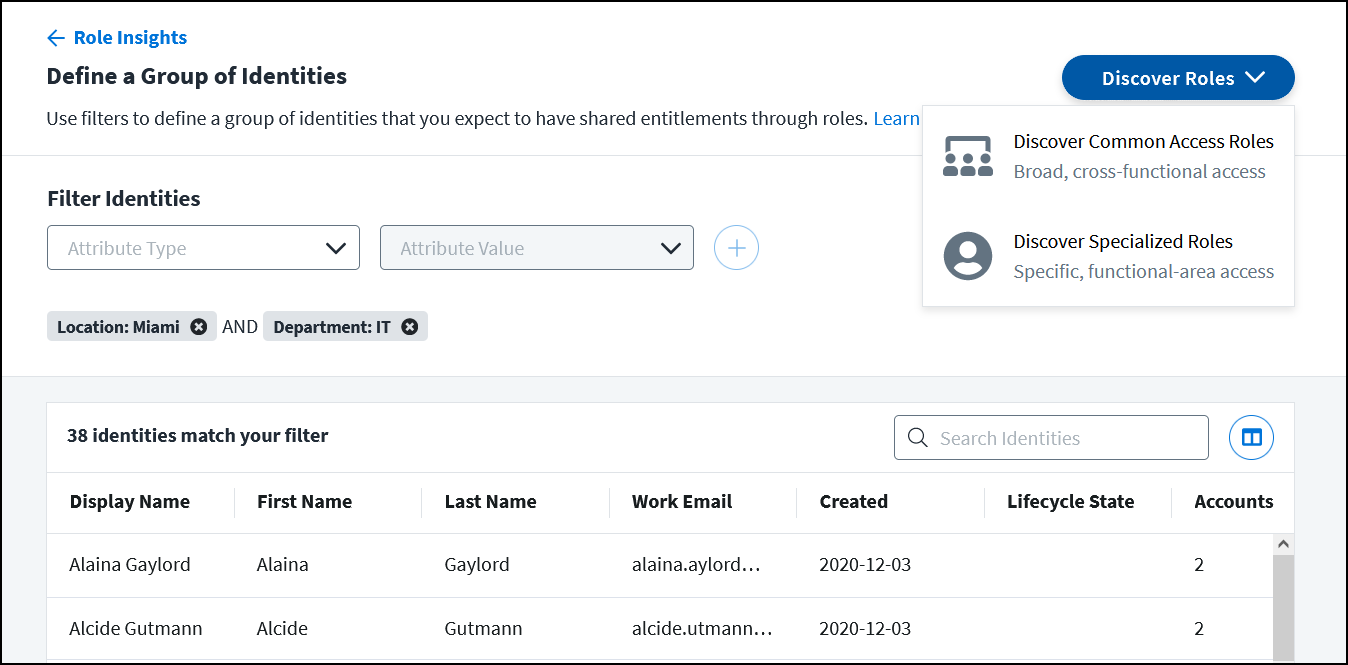
On this page you can use the filters to define a group of identities that you expect to have shared entitlements through roles.
-
Select an attribute type and value(s) from the dropdown lists. The attribute type and value dropdown lists can each hold up to 1,000 items.
-
Select the Add filter icon
 to apply the filter. Multiple filters can be applied and will be combined with AND operators to narrow the number of identities.
Caution
Searching for dates in the Attribute Value search field will result in an error. Instead, scroll through the list and select specific date attribute values.
-
After adding filters to define a group of identities, select Discover Roles.
-
Select either Discover Common Access Roles or Discover Specialized Roles.
Common access roles contain broad access that is common across an organization and not tied to a specific job function. Specialized roles contain access that is specific to a functional area within the organization.
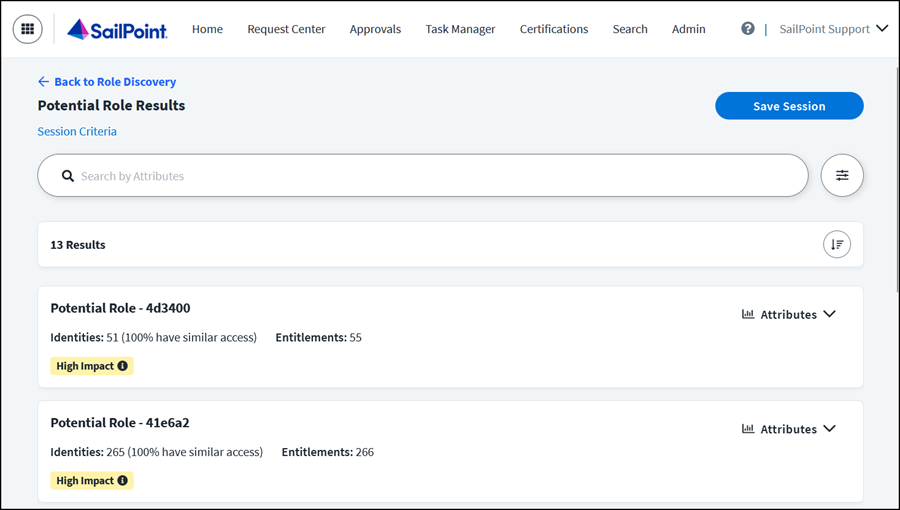
After the role discovery process completes, the Potential Role Results page lists all the potential roles that were discovered. You can work with the potential role results in various ways.
Discover Roles from Search
-
Go to Admin > Search and enter a search query.
Note
SailPoint recommends using targeted, specific search queries to narrow down the identities to groups that you want to have shared entitlements through roles.
When searching on *(all), there is a limit of 25,000 identities returned. SailPoint does not recommend searching on *(all). For more information on Search syntax, refer to Building a Search Query.
-
Select Role Discovery.
-
Select either Discover Common Access Roles or Discover Specialized Roles.
Common access roles contain broad access that is common across an organization and not tied to a specific job function. Specialized roles contain access that is specific to a functional area within the organization.
After the role discovery process completes, the Potential Role Results page lists all the potential roles that were discovered. You can work with the potential role results in various ways.
Working with Potential Roles Results
The Potential Role Results page lists the potential role results from the role discovery session.
Some of the discovered roles may have a High Impact label  . High-impact roles are unique with similar access among identities and will improve your organization’s access model the most. The Potential Role Results list can be sorted by role impact, identity access similarity, number of identities, or number of entitlements.
From the Potential Role Results page, you can work with the potential roles list in the following ways:
- Select Session Criteria to view the session criteria and identity filters applied to the session.
- Use the search bar to query across all identity attributes and narrow down the potential role list.
- Select the Settings icon
 to edit session settings.
 - Select the Sort icon
 to sort the list by role impact, identity access similarity, number of identities, or number of entitlements.
 - Save the role discovery session.
Viewing Session Criteria
Select Session Criteria at the top of the Potential Role Results page to view the session settings and identity filters applied to the session.
To change the identity filters, select Start a New Session to return to the Define a Group of Identities page and begin a new session.
To edit the session settings, close the Session Criteria window and then select Settings on the Potential Role Results page.
Editing Session Settings
Select the Settings icon ![]() to modify the potential roles displayed in the list:
to modify the potential roles displayed in the list:

-
Use the Role Granularity slider to adjust the size and specialization of the potential roles. The orange pin on the slider represents the smart default value that our AI algorithms used to discover the initial set of potential roles displayed.
A lower role granularity percentage displays potential roles with broader access. The potential roles discovered will each include higher numbers of identities with less entitlement similarity. In general, the included identities are less similar to each other. The roles are easier to manage, but it is possible that some identities might gain access that isn’t completely essential to their job function.
A higher role granularity percentage displays potential roles with more specialized access. The potential roles discovered will each include fewer identities with more entitlement similarity. It can take longer to evaluate and maintain a large number of potential roles with higher specialization. However, the potential roles will have a higher level of relative security due to more entitlement similarity.
-
Adjust the Minimum Number of Identities to display only the potential roles that include at least that number of identities.
-
Select Apply to update the list of potential roles based on your changes.
Exploring Potential Roles
Potential roles can be explored from newly discovered potential role results, a saved role discovery session, or saved draft roles. You can explore the properties and attributes of a potential role as follows:
-
Select Attributes for any potential role to quickly view the role’s top 4 AI core attributes (by percentage) shared among the included identities.
Note the following conditions for how attributes are displayed:
-
The attributes available depend on the AI core attributes that were selected after AI services setup.
-
If the attributes show Not Applicable, it means those attributes were not mapped for any identities included in the potential role. For example, this could be the case for a potential role that includes contract workers not assigned any AI core identity attributes.
-
-
To see detailed information for a potential role, select the potential role name or Work On This Role in the Attributes view. The Composition screen for the potential role displays an entitlement popularity visualization.
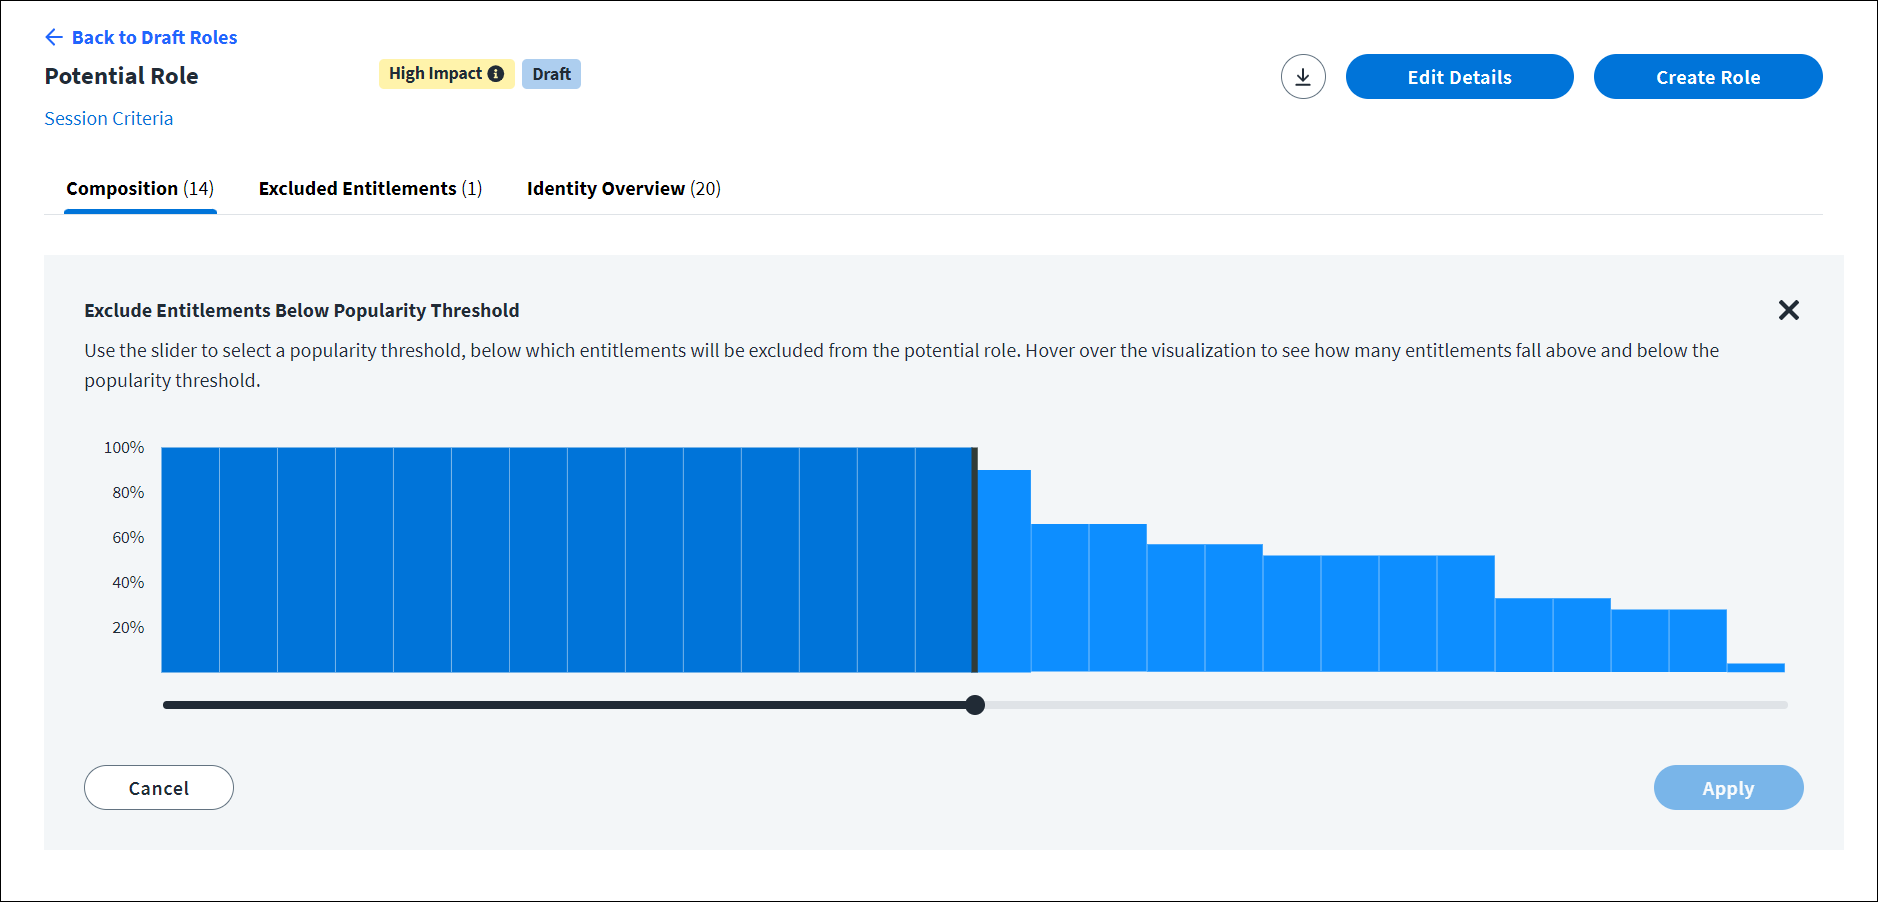
The table below the visualization lists the role’s entitlements along with their % Popularity.
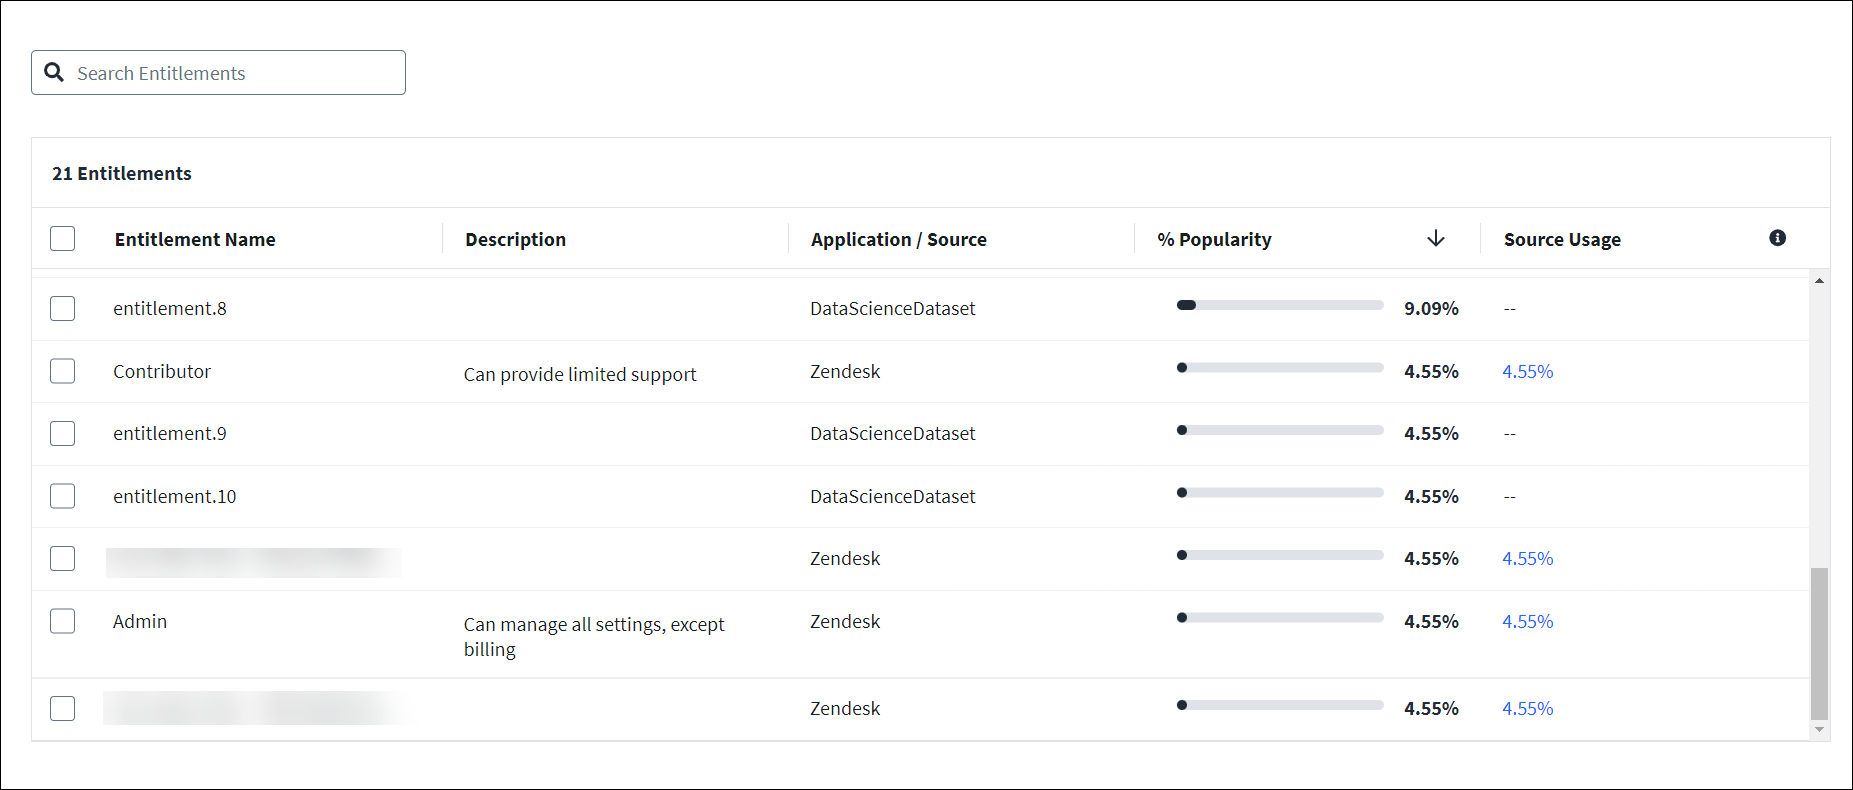
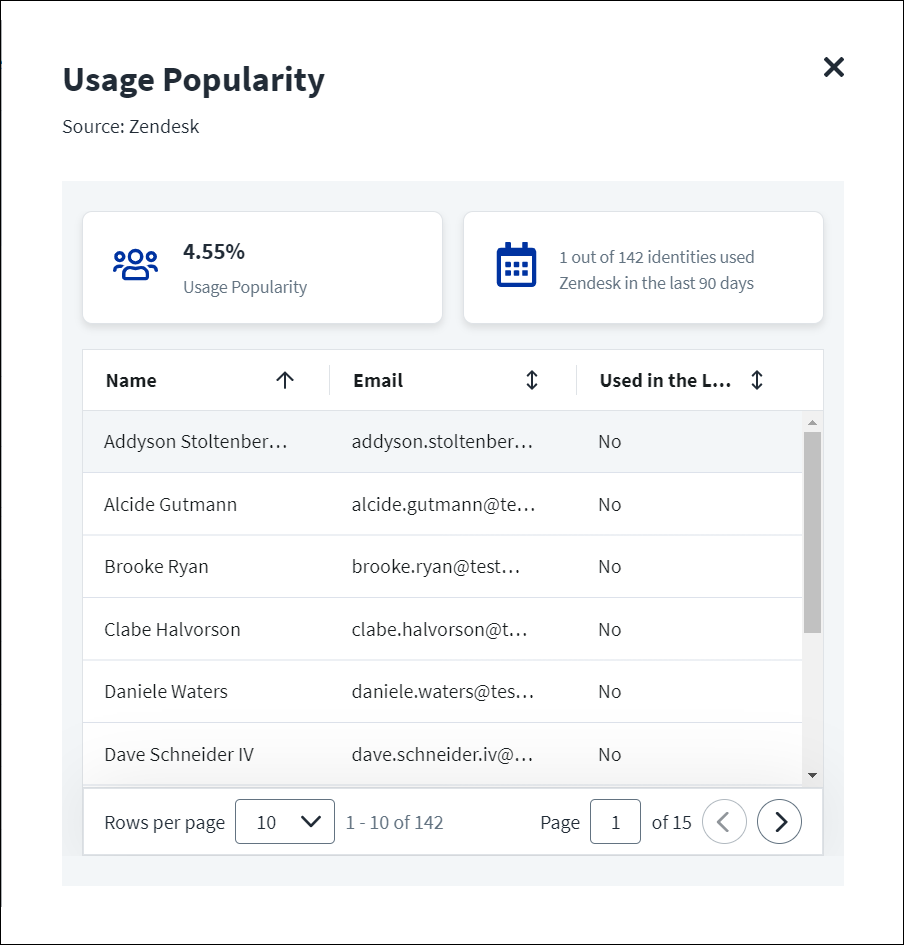
If your organization has Activity Insights and has set up the relevant connectors, Source Usage data will also display in this table. This data shows the percentage of identities who have used the related source in the past 90 days. Selecting the percentage displays further information about the identities and their usage.
-
Select the Excluded Entitlements tab to see the entitlements that are excluded from the potential role. The Reason Excluded column indicates why the entitlement is excluded: Common Access, User Excluded, or Duplicate.
-
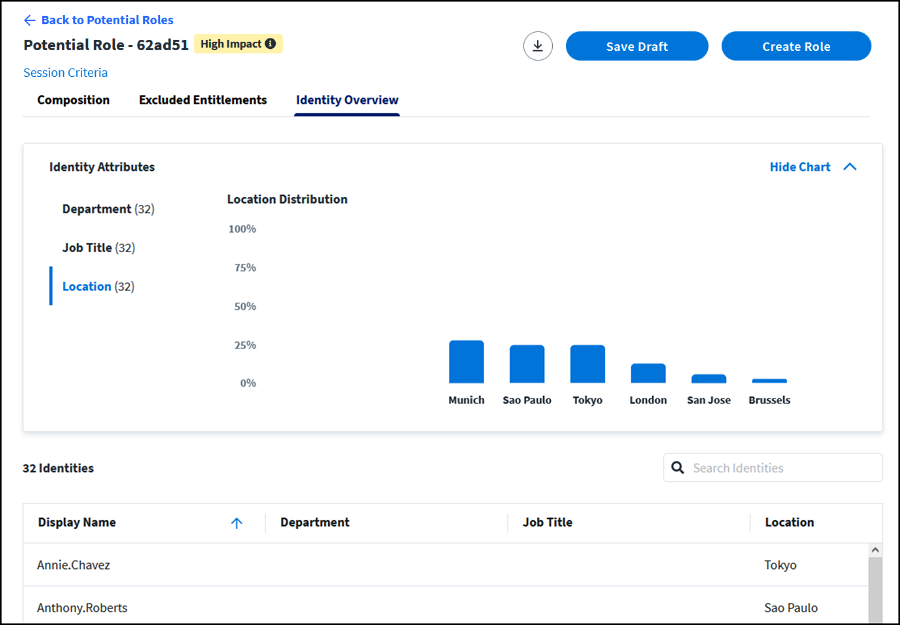
Select the Identity Overview tab to display a list of all identities in the potential role and their job title, department, and location attributes. You can also select Show Chart to see distribution graphs for these identity attributes. The Identity Overview tab reflects only the identities in the original potential role discovered and does not update based on entitlement changes made in the Composition tab.
Reviewing the Identity Overview tab is a way to double-check that the initial identities in the potential role composition should have the included entitlements.
You can customize an individual potential role by refining the entitlements and save the role as a draft.
Refining Entitlements for a Potential Role
You can refine the entitlements for a potential role. Refining entitlements changes the contents of the potential role data you will export and the roles you can automatically create.
You should refine entitlements first in bulk and then individually.
Bulk Entitlement Exclusion
The first part of refining entitlements is to exclude all entitlements below a certain popularity threshold or all entitlements considered common access.
To exclude entitlements from a potential role in bulk:
-
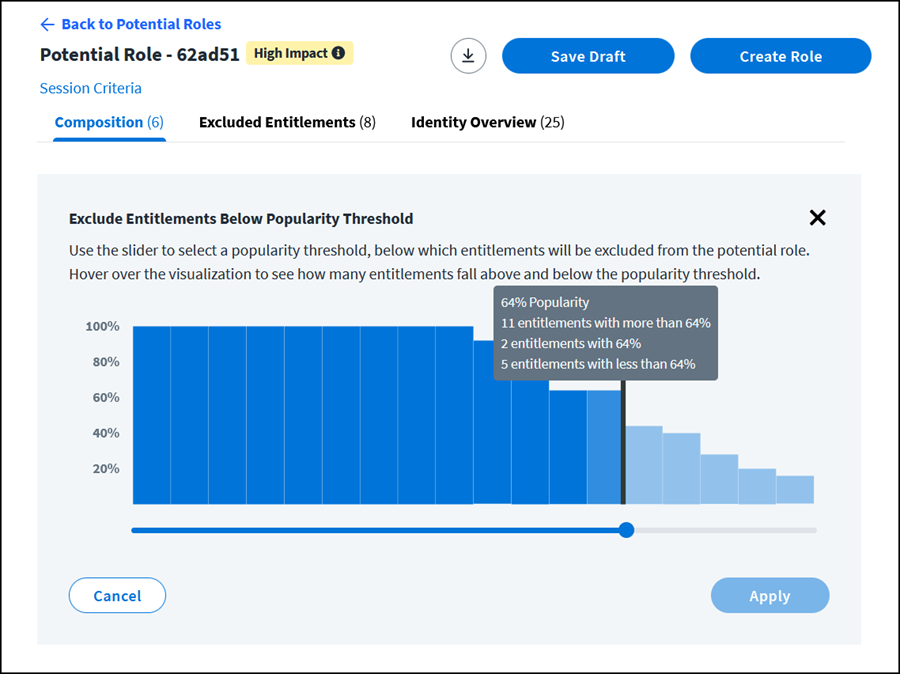
Select a potential role. The potential role opens on the Composition tab.
-
Exclude entitlements below popularity threshold.
This visualization allows you to see the popularity distribution of the entitlements in the potential role. Hover over different steps in the visualization to see how many entitlements fall above, at, and below different percentages of popularity.
Note
The steps in the visualization will change if you individually exclude all the entitlements in a step.
Use the Popularity Threshold slider to select a popularity threshold, below which entitlements will be excluded from the potential role.
Best Practice
To avoid entitlement proliferation, SailPoint recommends removing low-popularity entitlements (< 70%) from your role definitions.
-
Select Apply when you are finished. The Apply button becomes selectable only if you made changes.
-
To hide the visualization section of the Composition tab, select the X icon. To display the visualization again, select Refine Entitlements.
Caution
If you select Back to Potential Roles to return to the initial Potential Roles screen before exporting or creating a new role, all applied changes for bulk entitlement exclusion will be lost and you’ll have to repeat the steps you took to refine the entitlements in bulk for a potential role.
Individual entitlement exclusions are remembered if you select Back to Potential Roles.
If you have made bulk entitlement exclusions, save the role as a draft to avoid losing your changes.
Individual Entitlement Exclusion
The next part of refining entitlements is to select specific entitlements to exclude from the potential role.
To exclude specific, individual entitlements from a potential role:
-
On the Composition tab, select the checkboxes next to the entitlements you want to exclude, or select the checkbox in the table header to exclude all entitlements in the table.
-
Select Exclude. The selected entitlements are removed from the Composition tab and are now listed on the Excluded Entitlements tab.
To add excluded entitlements to a potential role:
-
On the Excluded Entitlements tab, select the checkboxes next to the entitlements you want to include, or select the checkbox in the table header to include all entitlements in the table.
-
Select Include. The selected entitlements are removed from the Excluded Entitlements tab and are now listed on the Composition tab.
When you have finished adjusting the entitlements in the potential role, you are ready to export the potential role data or create a new role from the potential role.
Saving Role Discovery Sessions and Draft Roles
To allow time for thorough access model development and review, Role Discovery lets you save role discovery session results and draft roles to work on later. Saved sessions and draft roles are accessible in the left pane when you go to Admin > Access Model > Role Insights.
Saving Role Discovery Sessions
Saving a role discovery session allows you to return to the saved session at your convenience for further evaluation and modification.
To save a role discovery session:
- On the Potential Role Results page, select Save Session.
- Enter a session name and select Save.
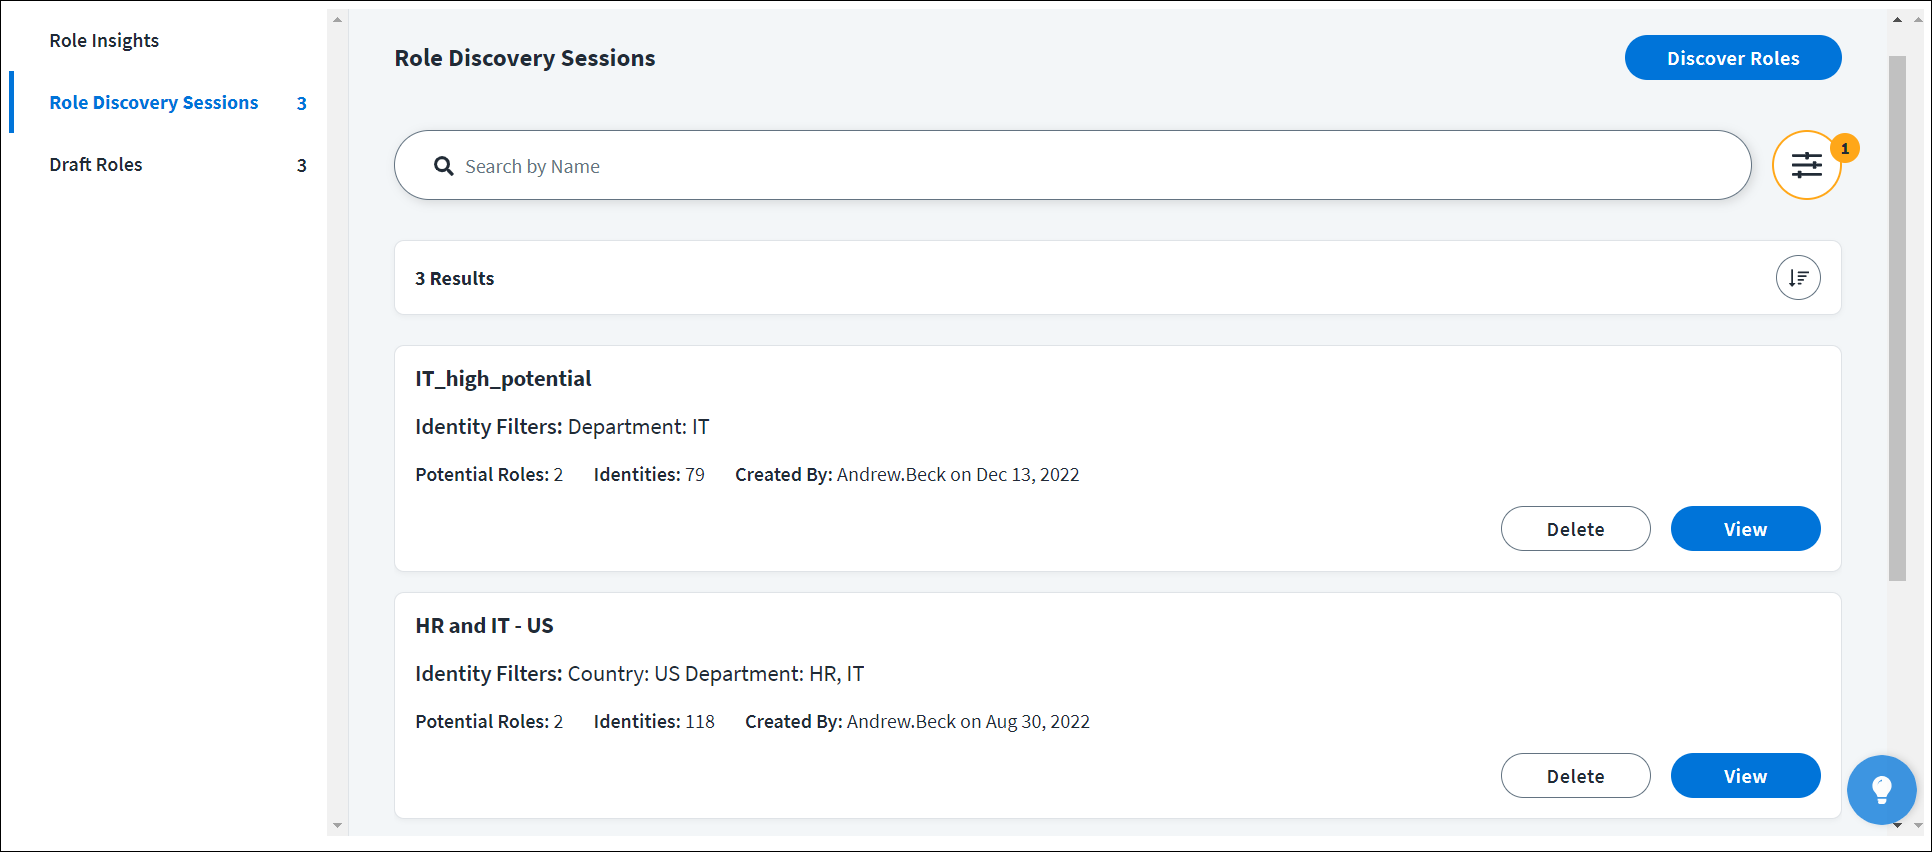
To access your saved role discovery sessions, go to Admin > Access Model > Role Insights > Role Discovery Sessions. Each saved session is listed with the identity filters (search criteria) used for the session, the number of potential roles discovered, the total number of identities returned by the identity filters, who created the session, and the date created.
You can work with your saved sessions in the following ways:
- View the saved session potential role results
- Rename saved sessions
- Edit saved session settings
- Delete saved sessions
Saving Draft Roles
Saving a potential role as a draft allows you to return to the draft role at your convenience for further refinement and evaluation before implementing it in your organization.
To save a draft role:
- On the Potential Role page, select Save Draft.
- Enter a Role Name and Description.
- If the draft role's session has not already been saved, Save Session is enabled an you will also need to enter a Session Name.
- Select Save.
To access your saved draft roles, go to Admin > Access Model > Role Insights > Draft Roles. You can work with your saved draft roles in the following ways:
- View entitlements and identity attributes
- Use the Popularity Threshold slider to exclude entitlements below the selected popularity threshold
- Include and exclude individual entitlements
- Edit role details such as role name and description
- Create a new role from the saved draft role
- Delete saved draft roles
Once a draft role has been saved, the draft stays in the saved session until deleted, even if the session settings are changed in such a way that the potential role would no longer be included in the session’s results.
Exporting and Using Potential Role Data
On the Potential Role page, select the Export Data button  to save the entitlements, identities, and identity distribution data for the potential role in a ZIP file.
Use the exported potential role data to add identities or membership criteria to auto-created roles, share with stakeholders, evaluate your current roles, or manually create new roles.
Creating New Roles from Potential Roles
After you have explored a potential role and customized/refined it, you can automatically create a new role.
Complete the following steps:
-
On the Potential Role page, select Create Role. The Create a New Role dialog box appears.
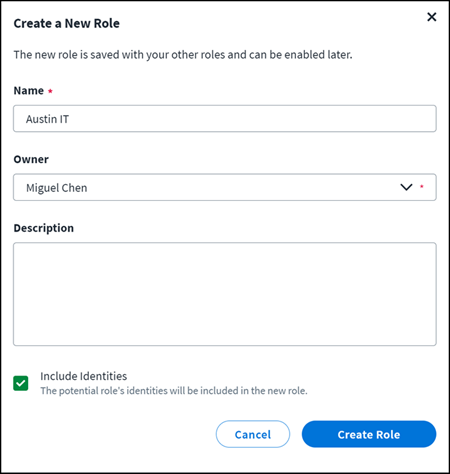
-
Fill in the information for the new role. The role name entered must be unique from other role names in your organization. If you enter an preexisting role name, you will not be able to create the role and will be prompted to choose another name.
-
Select Include Identities to include the identities in the new role. Identities can also be added later from exported potential role data.
-
By default, entitlements will be directly assigned to the new role. To bundle the entitlements in access profiles, deselect the Assign entitlements directly to the role checkbox.
-
Select Create Role. The new role is created and you'll be navigated to Admin > Access Model > Roles > Edit Role > Define Assignment to continue configuring the role assignment.
Note
The created role is in a disabled state. When you enable the role, Access Requests are sent to the appropriate owner for each identity.
Working with Created Roles
The newly created role is saved with your other roles (Admin > Access Model > Roles) in a disabled state. If you selected Include Identities, identities are included in the new role. You can also add identities later from exported potential role data.
When the role is enabled, access requests are sent to the appropriate owner for each of the identities, and the role is saved with your other roles in an enabled, requestable state. Users that request the new role must be approved by the role owner.
The role creation process creates one or more access profiles that are included only in the new role. It also generates an AI_CREATED tag for each new role and access profile.
Optionally, you can generate a role composition certification campaign so others in your organization can review the role before enablement.
-
Add identities to the new role if not already included.
-
Go to Admin > Search and enter
"AI_CREATED"in the query field.
Important
If you delete a role, be sure to also delete the access profiles that were created.
To delete access profiles, go to Admin > Access Model > Roles or Admin > Access Model > Access Profiles.
Deleting access profiles and roles that were already assigned to identities does not automatically remove the entitlements from those identities. For information about deprovisioning entitlements related to access profiles or roles, refer to Managing Access Profiles and Managing Roles.
Documentation Feedback
Feedback is provided as an informational resource only and does not form part of SailPoint’s official product documentation. SailPoint does not warrant or make any guarantees about the feedback (including without limitation as to its accuracy, relevance, or reliability). All feedback is subject to the terms set forth at https://developer.sailpoint.com/discuss/tos.