Managing Non-Employee Identities
Contractors, interns, consultants, and other non-employees might require special governance treatment.
Within Identity Security Cloud, you can use the Non-Employee Lifecycle Manager to create records for these users. This allows you to track their access to your other sources and data even when those users are not represented in any external personnel system.
The Non-Employee Lifecycle Manager within Identity Security Cloud solves for many common use cases. Managers can create, approve, and manage non-employee accounts so they can be associated with identities.
Our Non-Employee Risk Management product features more advanced use cases, such as automated workflows, self-service onboarding, delegated administration, and external collaboration portals. Refer to the documentation for more information.
Important
By using our Non-Employee Lifecycle Manager, you agree to the following:
- SailPoint is not responsible for storing sensitive data. You may only add account attributes to non-employee identities that are necessary for business operations and are consistent with your contractual limitations on data that may be sent or stored in Identity Security Cloud.
- You are responsible for regularly downloading your list of non-employee accounts for all sources you create and storing this list in a managed location to maintain an authoritative system of record and backup data for these accounts.
To create and manage non-employee identities directly in Identity Security Cloud, you must:
- Define a non-employee source.
- Define an identity profile for that source's identities.
- Create accounts for the source.
Based on these configurations, Identity Security Cloud creates an identity for each non-employee account. You can then use non-employee identities in your identity program like any other identity. You can correlate accounts from other sources to these identities, provision accounts and access for them, or include them in certification campaigns.
Creating a Non-Employee Source
You can have up to 50 non-employee sources in your org. Each non-employee source defines the review process for approving the creation of new accounts for it, so each population of non-employee users that requires a different approval process should have its own source.
Non-Employee Lifecycle Manager sources do not support provisioning.
-
Go to Admin > Connections > Sources.
-
Select Create New.
-
Search for the Non-Employee source type and select Configure.
-
Specify these source attributes:
- A unique source name
- A description of the source
- A source owner who is responsible for oversight of this set of non-employee users
- Optionally, a governance group to manage this source. This allows source sub-admins in this governance group to access and manage this source. Unlike Org Admin and Source Admin users, source sub-admins will not be able to manage accounts on this source.
-
If you want to be able to create an identity profile for this source, select the checkbox beside Authoritative Source.
-
Select Continue.
The non-employee source's Configuration page is displayed.
-
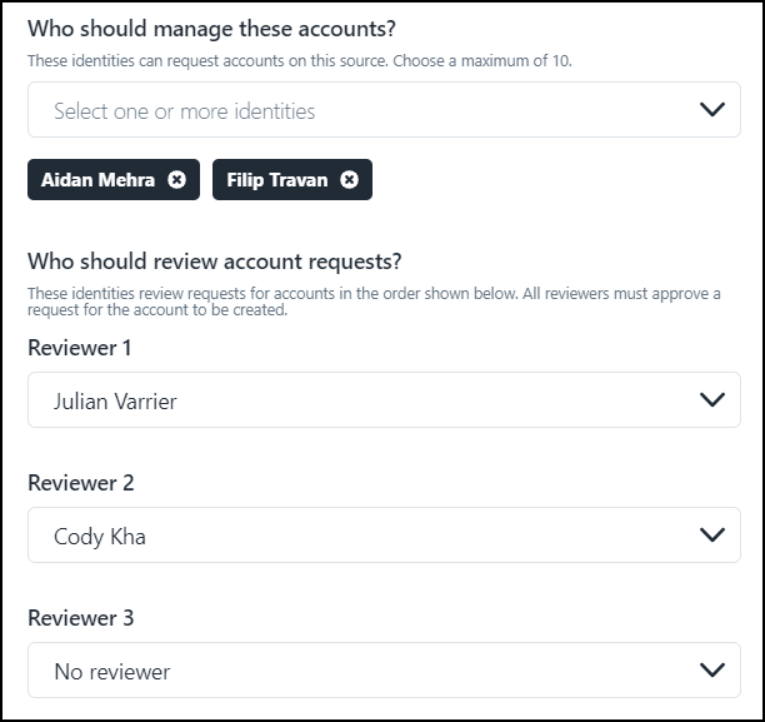
(Optional) Choose up to 10 account managers in Who should manage these accounts?.
These users can request new accounts on this non-employee source.
Note
Specify non-administrator users as account manager. Administrators automatically have access to create accounts, individually or in bulk, on non-employee sources and do not need to be included in this list.
-
(Optional) Choose up to 3 account reviewers under Who should review account requests?.
These users review all account requests made by the account managers. All reviewers are prompted to review each request in the order you choose here, and if any reviewer denies the account request, the account won't be created.
Note
Requests made through the Manage Non-Employees widget on the user dashboard require this review. Administrators bypass this review process when they create accounts through the source's Accounts page.
-
Select Save.
Refer to the Identity Security Cloud User Help for details about actions available to non-employee account managers and account reviewers.
Adding Custom Attributes to a Source
The account schema built into non-employee sources contains the required attributes for non-employee identities. You can add custom attributes to your non-employee source to represent other important information about these identities needed for your identity governance and administration program.
-
Go to Admin > Connections > Sources.
-
Select or edit the non-employee source you want to add custom attributes to.
-
Select the Account Schema tab.
-
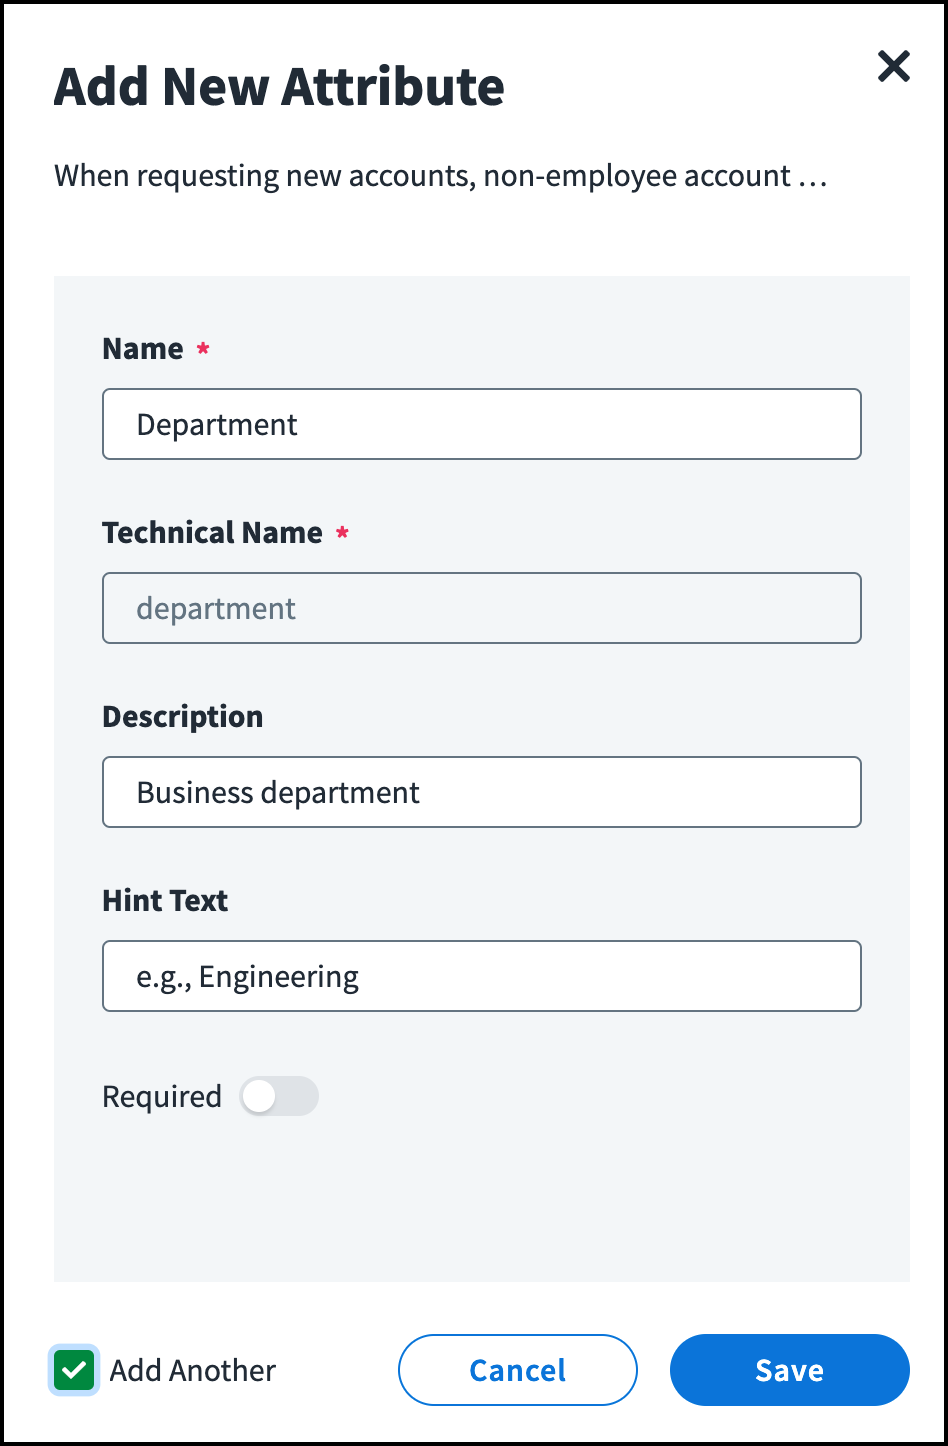
Select Add New Attribute.
-
Define the attribute:
- Name - Enter a unique name for this attribute. The Technical Name is generated automatically. Attribute names cannot contain periods.
- Description - (Optional) Provide a description for this attribute that will help other administrators understand the purpose of the attribute data.
- Hint Text - (Optional) Enter text to display inside of the attribute's text box to give account managers guidance on what data to provide for the attribute.
-
Choose whether the attribute should be required for accounts on this source.
Best Practices
- If an attribute you configure here is mapped to an identity attribute used in account correlation, it should be marked as required.
- Add all required attributes to this source before adding accounts. If you add more required attributes after accounts have been created, you'll be required to add a value for any missing required attributes any time you edit existing accounts, manually or through a bulk upload.
-
If you want to add another new attribute after saving this one, select the Add Another checkbox.
-
Select Save.
You can add up to 10 custom attributes to your source.
To delete an attribute from the schema, select it in the account schema list and select the Delete icon ![]() in the overlay. Only custom attributes can be deleted.
in the overlay. Only custom attributes can be deleted.
Creating an Identity Profile
To create identities from a non-employee source, you must create an identity profile for the source to designate it as an authoritative source. Refer to Creating Identity Profiles for details.
By default, only the user name (UID) and display name identity attributes are mapped in the identity profile for non-employee sources, both linked to its unique identifier (accountName) attribute. You must manually map other identity attributes for this identity profile, including all required attributes. You can also change the default mappings.
Adding Accounts
For non-employee sources, you can add accounts individually or through a bulk upload. Each non-employee source can have a maximum of 20,000 accounts.
Uploading a List of Accounts
Non-employee accounts can be uploaded from a .csv file. The file's column names are case-sensitive and must match the account schema attributes' technical names, specified in the same order. Uploaded accounts do not go through a review process by the source's account reviewers.
-
Go to Admin > Connections > Sources.
-
Select or edit the non-employee source you want to add accounts to.
-
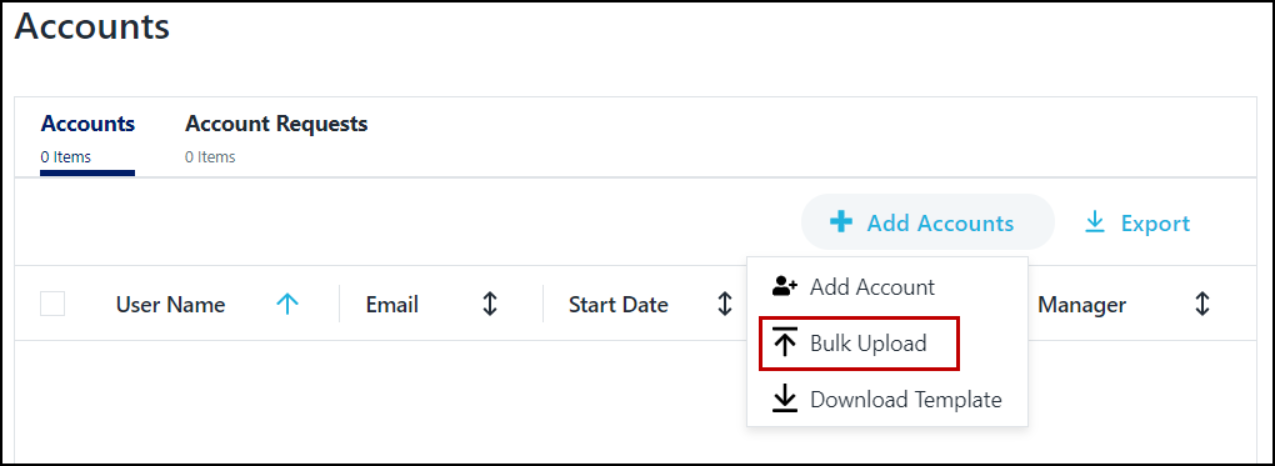
On the Accounts page, select + Add Accounts and choose Download Template to download the template to build your .csv file. Uploaded account files must follow this template.
- To edit existing accounts through a bulk upload, use Export to download a file with the correct template that also includes your current account data.
-
Edit the file to add or modify account records.
-
Select + Add Accounts and choose Bulk Upload. Select the .csv file you want to upload.
This menu option is disabled when a bulk upload is in progress.
Note
- If accounts already exist for the source, uploading a file overwrites records with the same unique identifier (accountName) and adds any accounts that do not match an existing account.
- An existing account's unique identifier can't be modified through a file upload. Uploading a record with a changed accountName creates a new account and new identity. You can manually delete the old account, which also deletes the old identity.
Creating a Single Account
You can manually create new accounts on the source's Accounts page. These accounts do not go through a review process by the source's account reviewers.
-
Go to Admin > Connections > Sources.
-
Select or edit the non-employee source you want to add an account to.
-
Select Accounts.
-
Select + Add Accounts and choose Add Account.
-
Enter the user's information:
- Unique Identifier - Enter a unique identifier that will serve as the identity's user name. The non-employee will use this to sign in.
- First Name - Add the non-employee's first name.
- Last Name - Add the non-employee's last name.
- Phone - Enter a phone number for the non-employee, including the country code.
- Email - Enter an email address for the account.
- Manager - Choose a manager from the dropdown list, or start typing to see names that match the characters you've added.
- Start Date - Select the anticipated start date for this non-employee.
- End Date - Select an anticipated end date for this non-employee.
Set values for any other attributes required by your schema.
-
If you want to add another new account after saving this one, select the Add Another checkbox.
-
Select Add.
Editing Accounts
Administrators can edit any attribute on non-employee source accounts.
-
Go to Admin > Connections > Sources.
-
Select or edit the non-employee source you want to update.
-
Select the Accounts tab.
-
Select the non-employee account you want to edit.
-
Edit the field values and select Save.
Notes
- Unique identifier and email are protected to prevent accidental updates. Select Edit above either field to enable editing.
- Be cautious about updating the unique identifier. It is usually mapped to the user name identity attribute which users enter when they sign in to Identity Security Cloud. Changing this value could prevent them from accessing Identity Security Cloud. If your correlation logic for other sources relies on this identity attribute, changing it could also cause those accounts to become uncorrelated, interrupting your oversight of these users' access to those sources.
Account managers can edit the end date for non-employees on sources they manage.
Deleting Accounts
You can manually delete non-employee accounts from the source's Accounts list.
-
Go to Admin > Connections > Sources.
-
Select or edit the non-employee source you want to update.
-
Select the Accounts tab.
-
Select the checkboxes on the account rows to be deleted and select the Delete icon
 in the header bar. Select Yes to confirm deletion.
If you have defined an identity profile to make this an authoritative source, this also deletes the identity. Any accounts from other sources which had been correlated to the identity become uncorrelated accounts which can then be correlated to other identities manually or through a non-optimized aggregation of their sources.
Email Notifications
Several events related to non-employee management generate emails in Identity Security Cloud. Like other email templates, these emails can be modified to suit your business needs.
| Email Template | Usage |
|---|---|
| Non-Employee Account Request | Sent to the account manager who requests a new account for a non-employee, as a request confirmation. |
| Non-Employee Account Request Decision | Sent to the account manager when all applicable account reviewers have made a decision about a non-employee account, notifying them that their account request was either approved or denied. |
| Non-Employee Account Review | Sent to account reviewer after a new non-employee account request is submitted, to notify them that a request needs their attention. |
| Non-Employee End Date Reminder | Sent to all account managers for a non-employee source when one or more of the non-employees on that source has an end date in 7 days. |
Searching for Non-Employee Data
Use these Search queries to explore non-employee data.
type:NON_EMPLOYEEreturns audit events related to non-employee management.@accounts(source.type:"Non-Employee")returns identities which have an account on a non-employee source.
Documentation Feedback
Feedback is provided as an informational resource only and does not form part of SailPoint’s official product documentation. SailPoint does not warrant or make any guarantees about the feedback (including without limitation as to its accuracy, relevance, or reliability). All feedback is subject to the terms set forth at https://developer.sailpoint.com/discuss/tos.