Managing Saved Searches
If you create a search query that you find especially helpful, you can save it so that you can use it at a later date. These searches are stored in the vertical toolbar and you can access them at any time.
You can save each unique query once. After it's saved, you can edit some basic information about the saved search.
Saved searches are only visible to the user that created them.
Saving Search Queries
Creating a saved search automatically stores it so that it can be used again later.
-
Go to Search.
-
Enter your search query that you want to save and run the query. You can also save searches generated from natural language searches.
Select Save Search.
The Save Search window appears.
-
Enter a name and description for your saved search, then select Save.
Your saved search appears in the vertical toolbar under the heading Saved Search Queries.
If you used natural language searching to generate this query, your natural language entry will be used as the name of the saved search, and the query it generated will be included in the description.
To run this search and view the results of the query, including the columns displayed at the time you saved it, select the name of the query in the vertical toolbar.
Viewing and Editing Saved Searches
You can view the details of your saved search, including its name, description, and other settings.
Note
The search query you saved isn't editable. To save a different search query, create a new saved search.
-
Go to Search.
-
In the toolbar, select the Star icon
 to access your saved searches.
 -
Select the Menu icon
 next to the saved search you want to view and select View.
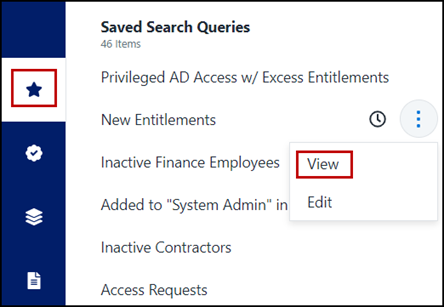
The details of your saved search are displayed. You can select Edit to make changes to the name or description of this search or Delete to delete the saved search.
Once you have completed your changes, select Update.
Subscribing to Saved Searches
You can configure Identity Security Cloud to generate automatic emails on a regular schedule that contain the results of a saved search query. You can define how often these emails are sent and who they are sent to. Each saved search can have up to 10 subscriptions configured.
Scheduled searches return items from the results tab that was selected when you created the saved search.
To subscribe to a saved search:
-
Select the Star icon
in the side menu in Search to view your saved searches.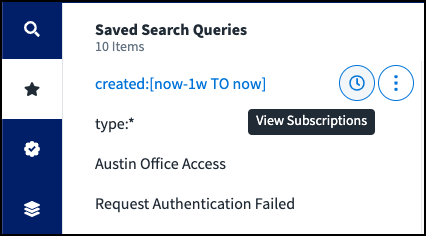
-
Select the Clock icon
 next to the search to display existing subscriptions. To create a subscription, select New Subscription on the displayed page or in the dropdown list of subscriptions.
 -
Select a time zone for this search subscription and select Next.
-
Choose a schedule for your subscription. The following options are available:
- Daily - Select the times of day you'd like to receive an email about your subscription The times you select will show up on the right next to the drop-down. Select the x next to the time to remove it from the list. Daily is the default option.
- Weekly - Select the days of the week and times you'd like to receive an email about the subscription using the checkboxes. The times you select will show up on the right next to the drop-down. Select the x next to the day or time to remove it from the list.
- Monthly - Select the numerical days of the month and times you'd like to receive an email about the subscription using the checkboxes. The days and times you select will show up on the right next to the drop-down. Select the x next to the day or time to remove it from the list.
You can only use one schedule option at a time. For example, if you start with a weekly schedule but move to monthly, your weekly subscription will end.
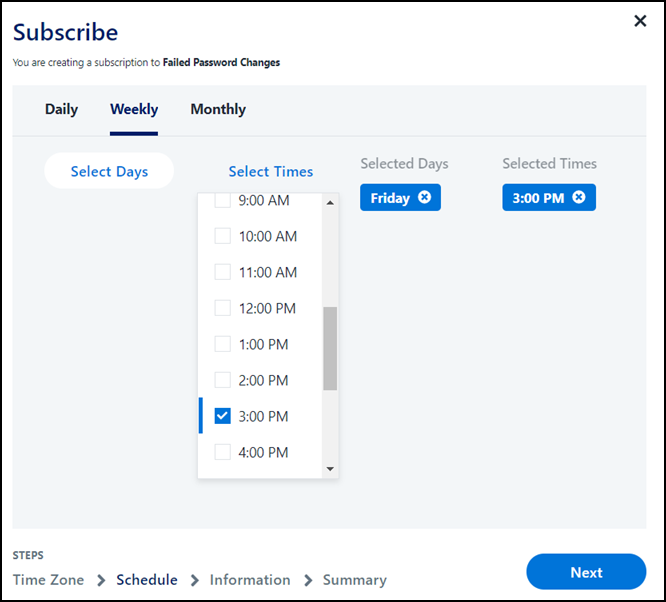
Select Next.
-
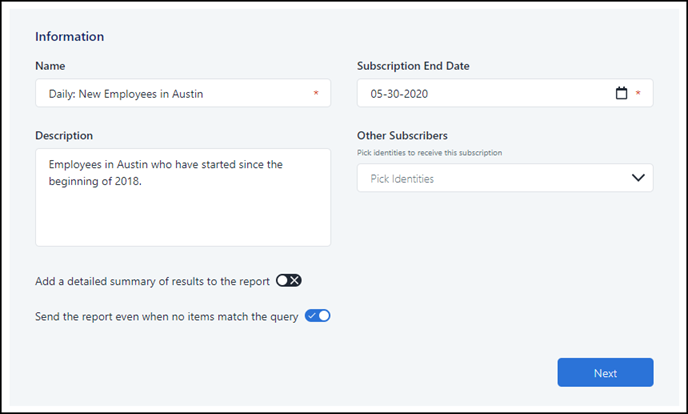
On the Information page, define the details used to create the email subscription including Name, Description, and the following other options:
- Other Subscribers - You are automatically subscribed to subscriptions you create. You also can add other people who'll receive the email subscription.
-
Add a detailed summary of results to the report - This causes detailed information about your identities and access data to be included in the email generated by this subscription.
Caution
Including these details in an email could present a security risk.
-
Send the report even when no items match the query - Select this checkbox if you want to receive subscription related emails even when there are no results to report.
-
Select Subscribe.
You can edit this subscription at any time. Selects its name in the dropdown list under the clock icon in the list of saved searches, then select Edit.
While viewing this subscription, you can disable or delete it by selecting the menu icon. A disabled subscription doesn't send emails to any recipients. It can be enabled again if needed.
The links to generated reports within the emails users receive are valid for 90 days.
You can review and make changes to the email users receive. Refer to Search Subscription Notification Email Template for details.
Documentation Feedback
Feedback is provided as an informational resource only and does not form part of SailPoint’s official product documentation. SailPoint does not warrant or make any guarantees about the feedback (including without limitation as to its accuracy, relevance, or reliability). All feedback is subject to the terms set forth at https://developer.sailpoint.com/discuss/tos.