Deploying Virtual Appliances
To deploy a virtual appliance (VA), complete the steps specific to your virtualization platform. Then, proceed to starting a new virtual machine and subsequent steps.
Start with the section for your deployment type.
Local VA Deployment with vSphere
To deploy a VA locally with vSphere:
-
Unzip the package.
-
Copy it to your virtualization platform following the standard process for your platform.
-
Proceed to Starting a New Virtual Machine.
Local VA Deployment with Hyper-V
To deploy a VA locally with Hyper-V:
-
Unzip the package.
-
Copy the
sailpoint-va.vhdfile to your virtualization platform. -
In Hyper-V, select New > Virtual Machine. The New Virtual Machine Wizard launches.
-
On the Before You Begin screen, select Next > to create a virtual machine with custom configuration.
-
On the Specify Name and Location screen:
a. Enter a name for your new virtual machine.
b. Select the checkbox for Store the virtual machine in a different location.
c. Enter the desired location for your new virtual machine.
d. Select Next >.
-
On the Specify Generation screen, select Generation 1, and then Next >.
-
On the Assign Memory screen, enter the amount of startup memory for the VA, and select Next >.
-
On the Configure Networking screen, select External for the V-Switch connection, and then Next >.
-
On the Connect Virtual Hard Disk screen, select Use an existing virtual hard disk, enter the path to the extracted file in the Location field, and select Finish.
-
Verify the Summary.
-
Proceed to Starting a New Virtual Machine.
Cloud VA Deployment with AWS
To support connections to other cloud-based applications, you may want to deploy SailPoint VAs on your AWS infrastructure.
VA deployment with AWS must be completed by an experienced admin of your company’s AWS tenant with knowledge of the following:
- The VPC, networking, and security group requirements for your AWS tenant.
- The AWS regions where the VA will reside.
To deploy a VA in the cloud with AWS:
-
Ensure that your environment meets the following prerequisites:
- Meets the AWS EC2 instance size requirements.
- In the security group, Port 22 is open from your IP range.
-
Open a support ticket requesting an Amazon Machine Image (AMI) ID to install a VA in AWS. You will need to provide your AWS account number and region, such as us-east-1.
SailPoint Support will then share the AMI with your account and provide you with an AMI ID.
Tip
To locate the shared AMI image, select EC2 > Images > AMIs and filter your search by Private Images.
-
In AWS, select the AMI, and select Launch.
-
In the Instance Type page, select the appropriate AWS EC2 instance size based on the system requirements.
-
Select Configure Instance Details.
-
Select the appropriate VPC and Subnet for your environment.
-
Select Add Storage, and leave the defaults on this page.
- Select Instance Metadata Service.
-
Enable Metadata accessible, and set Metadata response hop limit to 2.
-
Select Add Tags, and complete this page as appropriate for your organization.
-
Select Configure Security Group, and select the appropriate security group.
-
Select Review and Launch > Launch.
-
In the Select an existing key pair or create a new key pair dialog box, select the option appropriate to your company policy.
-
Proceed to Starting a New Virtual Machine.
Cloud VA Deployment with Azure
To support connections to other cloud-based applications, you may want to deploy SailPoint VAs on your Azure infrastructure.
VA deployment with Azure must be completed by an experienced admin of your company’s Azure tenant with knowledge of the following:
- The Azure CLI
- The networking and security group requirements for your Azure tenant
- The regions where the VA will reside
To deploy a VA in the cloud with Azure:
-
Ensure that your environment:
- Meets the Azure VM instance size requirements for storage account, blob container, and resource group to hold the VA resources.
- Has sufficient bandwidth to upload a 132 GB image to Azure
-
Unzip the package.
Important
The extracted VHD file will be around 132 GB. Check your disk space before extracting.
-
Log in to your Azure command line tool. Refer to the Azure CLI Command Reference as necessary.
-
Upload
sailpoint-va.vhdto an Azure storage container with the following az storage blob upload command:az storage blob upload --container-name "$container_name" --file "sailpoint-va.vhd" --name "sailpoint-va.vhd" --connection-string "$connection_string"Note
Given the large size of the image, this step might take hours.
-
Create a managed disk from the blob with the following az disk create command:
az disk create --resource-group "$resource_group" --name "sailpoint-va" --source "$vhd_blob_url"Where:
$vhd_blob_urlis the URL of thesailpoint-va.vhdblob.For example:
https://${storage_account}.blob.core.windows.net/$container_name/sailpoint-va.vhd -
Create the VM from the managed disk with the following az vm create command:
az vm create --resource-group "$resource_group" --location "$region" --name "$name" --os-type linux --attach-os-disk "sailpoint-va" --nsg "$network_security_group" --size "Standard_B4ms"Note
The network security group you associate with the VM must allow traffic over port 22 in order for you to SSH into the VA.
-
To test the VM, SSH in using the default login:
Username:
sailpointPassword:
S@ilp0int -
Proceed to Starting a New Virtual Machine to change your password.
Cloud VA Deployment with GCP
VA deployment with Google Cloud Platform (GCP) must completed by an experienced admin of your company’s GCP environment with the following:
- Google SDK
- Admin permissions for GCP account
- A bucket to hold the VA image with admin permissions
- Knowledge of the networking and security requirements for your GCP environment
- A project on GCP
To deploy a VA in the cloud with GCP:
-
Extract the
.ovafile using 7-Zip or similar software. -
Launch a Google Cloud SDK Shell.
-
Authenticate to GCP.
-
Upload the unzipped VA-latest folder to the bucket you will use for the VA.
-
In Google Cloud Shell SDK, execute a command to import the VA disk as a non-bootable virtual disk into GCP.
For example:
gcloud compute migration image-imports create sailpoint-va-disk --source-file gs://(cloud storage bucket)/sailpoint-va.vmdk --location (location) --skip-os-adaptation -
After the import completes, log in to Google Admin Console and go to Computer Engine > VM Instances > Create an Instance.
a. On Boot disk section go to Change > Custom Images.
b. Select the Project you created and where the VA Disk was updated.
c. Choose the image you imported.
d. Size the disk to 128G.
-
Create the instance. After the instance is created it will appear on the instances tab and you will be able to log in via SSH using the default username and password for the VA.
-
Log in as the SailPoint user through SSH and register the VA to your tenant.
-
Proceed to Starting a New Virtual Machine.
Starting a New Virtual Machine
-
Start the virtual machine (VM) you previously downloaded and copied to your local virtualization platform or launch your VM instance.
-
Sign in to the VM:
Username:
sailpointPassword:
S@ilp0int -
Change your password immediately:
a. At the command prompt, type
passwd.b. Enter the current password
S@ilp0int.c. Provide a new password.
d. Repeat the new password.
Important
- It is very important to save your
sailpointuser password. If the password is lost, a new VA must be created. - If you are performing a cloud VA deployment and receive a failed unit message for the
esx_dhcp_bump.serviceafter login, run the following command to disable the service:sudo systemctl disable esx_dhcp_bump.service
- It is very important to save your
-
For local VA deployments, set a static IP address for your virtual appliance.
-
For cloud VA deployments, proceed to Creating Virtual Appliances.
Setting a Static IP Address for Local VA Deployments
-
Find the name of your virtual NIC card for your VA:
a. In the command line, type
ip addr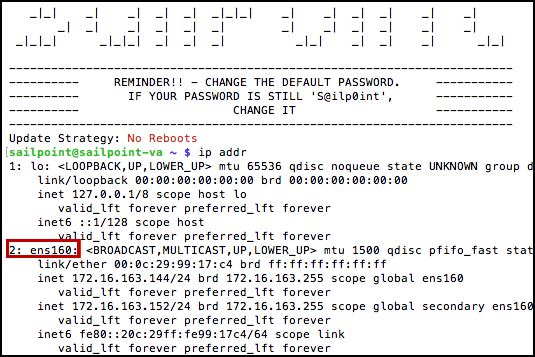
b. From the list of virtual NICs displayed, find the second one.
Note
Virtual NIC names are dynamically assigned upon initial VA creation, so you will need to perform this step for each VA to enter the correct name into your static.network file in the steps that follow.
-
Create the
static.networkfile:a. From the /home/sailpoint/ directory, enter:
sudoedit /etc/systemd/network/static.networkb. Enter the following:
[Match]Name=<NICname>[Network]DNS=<DNS>Address=<IPaddress and CIDR>Gateway=<Gateway>Where:
<NICName>is the name of your VA's virtual NIC card and the values under Network are specific to your VA's IP address.CIDRin the Address field is required if you want to set a subnet mask
Note
To set a custom DNS Search Domain, add
Domains=<search domain>to the bottom of the[Network]section. -
Reboot the VA:
sudo reboot -
Proceed to Creating Virtual Appliances.
If using Hyper-V:
Hyper-V images ship with the waagent Azure service enabled by default. This can cause DNS issues and irregular network routing on virtual appliances running on Hyper-V. To prevent these issues, disable the waagent service:
systemctl status waagent
sudo systemctl mask waagent
sudo reboot
Creating Virtual Appliances
After you get your URL from SailPoint, you can securely connect the virtual machine to your tenant by creating VAs.
This section describes how to create VAs with the standard configuration.
Note
If you are using non-standard VA configurations, be sure to complete the additional configuration steps for HTTP proxy VAs or Network Tunnel VAs before creating VAs.
Creating a VA Cluster
-
Go to Admin > Connections > Virtual Appliances.
-
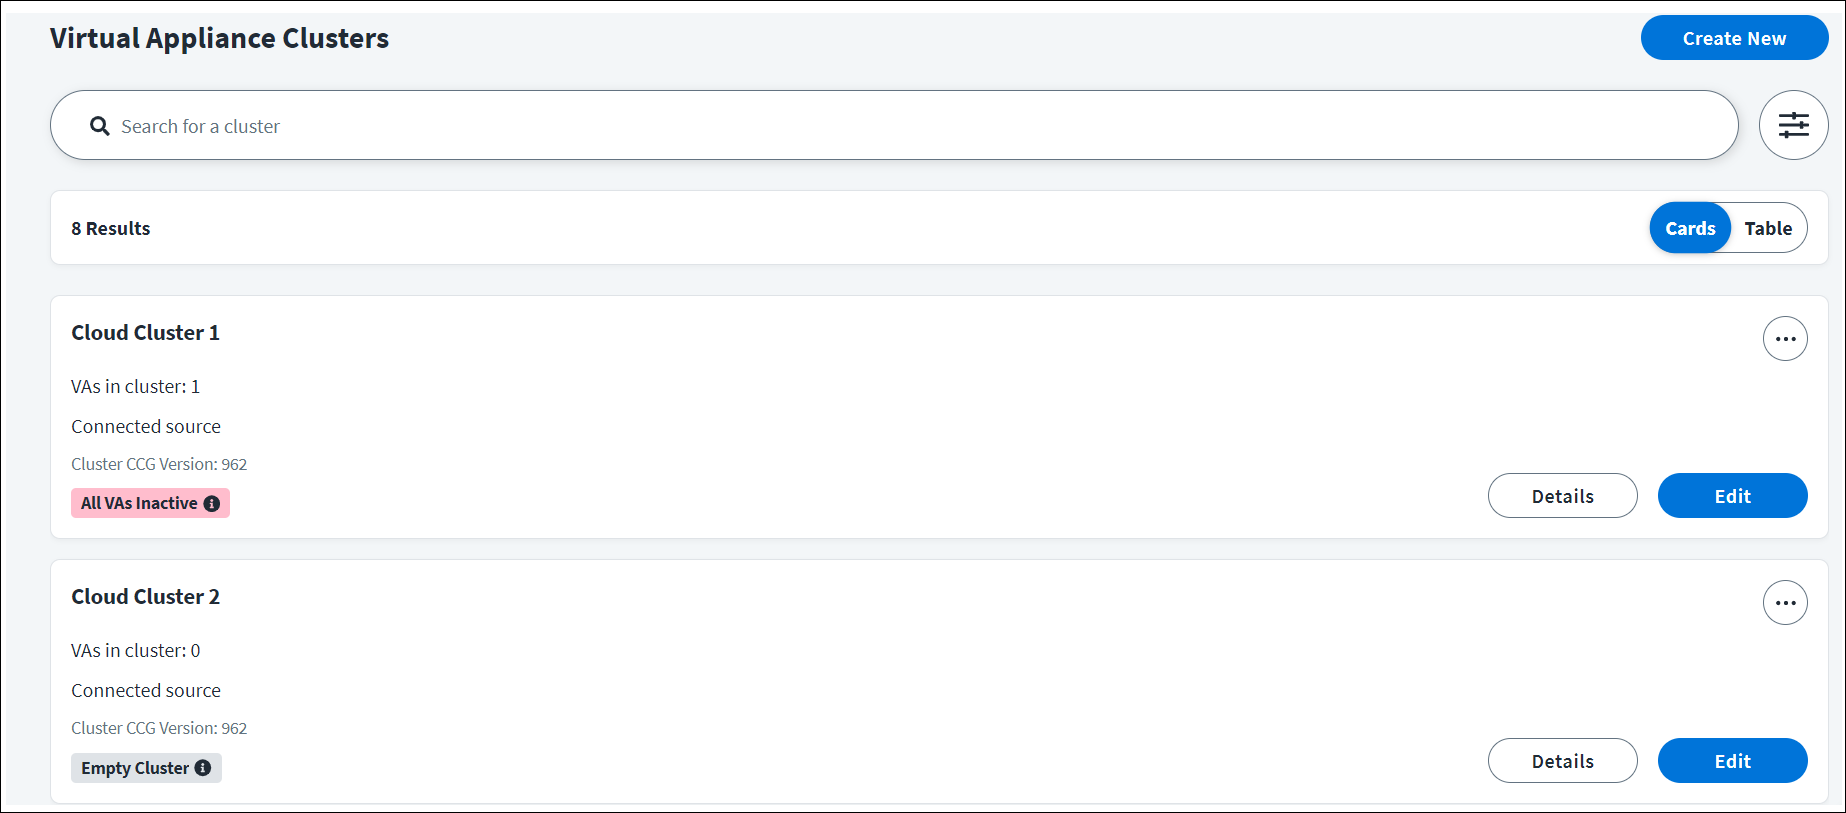
On the Virtual Appliance Clusters page, select Create New.
-
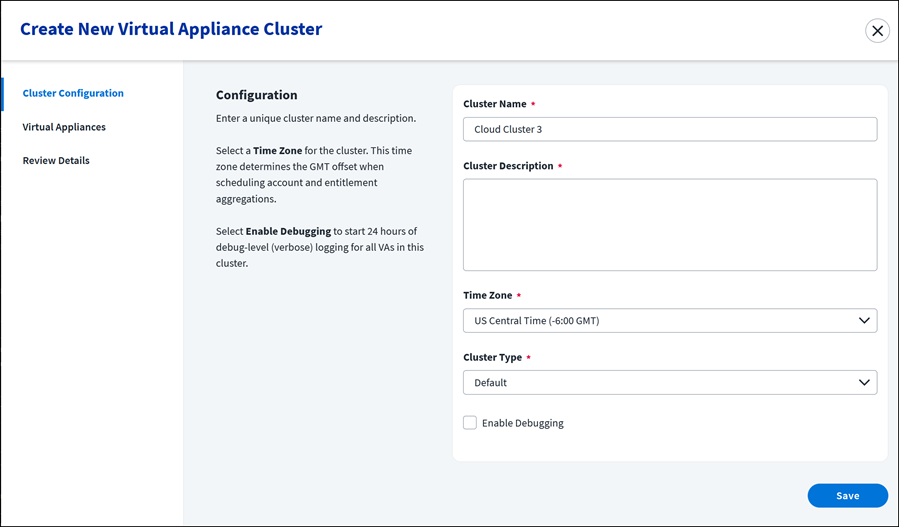
Enter a unique Cluster Name and Cluster Description for the virtual appliance cluster. You cannot have two clusters with the same name in your organization.
-
Select a Time Zone. The cluster time zone determines the GMT offset when scheduling account aggregations and entitlement aggregations for the connected source.
-
Select the Standard cluster type unless your organization uses IdentityIQ.
If your organization has AI-Driven Identity Security for IdentityIQ, select the IAI Harvester cluster type.
Important
You cannot change the cluster type for an existing cluster. If the wrong cluster type is selected for a cluster, you must delete the cluster and start over.
-
(Optional) Select Enable Debugging to start 24 hours of debug-level (verbose) logging for all VAs in this cluster. It is not required to enable debugging, but it can be helpful in case you need to troubleshoot anything.
When debugging is enabled, all log information is saved to log files for 24 hours regardless of file size. When debugging is not enabled, log files are replaced once they reach 512 MB.
-
Select Save.
-
If your organization has licensed Data Access Security or SailPoint Privilege, select Cluster Components to enable cluster components for these products.
If your organization does not have these products, you can now add VAs to the cluster.
Enabling Cluster Components
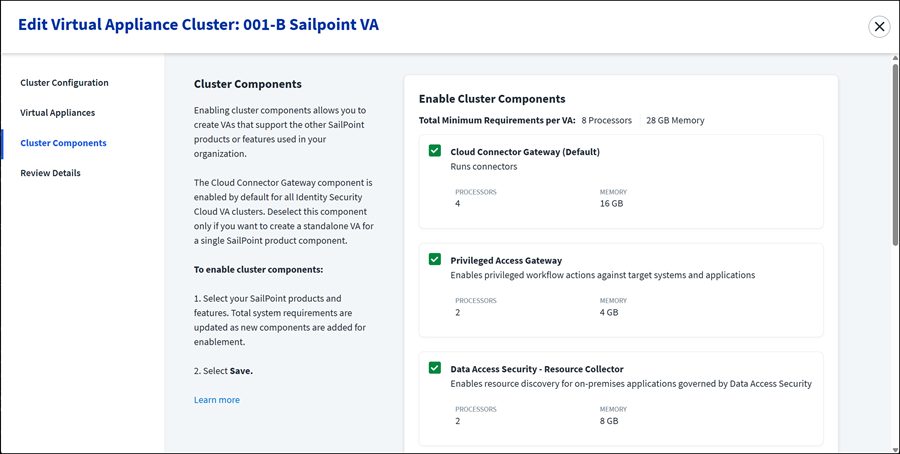
Enabling cluster components allows you to create VAs that support the other SailPoint products or features used in your organization.
The Cloud Connector Gateway component is enabled by default for all Identity Security Cloud VA clusters. Deselect this component only if you want to create a standalone VA for a single SailPoint product component.
To enable cluster components:
-
After saving a Standard cluster, select Cluster Components.
-
Select component checkboxes for only your licensed SailPoint products and features.
The total minimum system requirements per VA are updated as new components are selected for enablement. You are responsible for allocating enough resources for the total minimum requirements per VA. The following cluster components are available:
VA Cluster Components
Privileged Access Gateway - Select this component to run privileged workflow actions against target systems and applications. The Privileged Access Gateway VA cluster component supports standard and HTTP proxy VA configurations, but not the network tunnel configuration. For more information, refer to SailPoint Privilege Overview.
Data Access Security - Data Access Security VA cluster components support only standard VA configurations and not HTTP proxy or network tunnel configurations. For more information, refer to SailPoint Data Access Security.
-
Data Access Security - Resource Collector - Select this component to enable resource discovery for on-premises applications governed by Data Access Security.
-
Data Access Security - Permission Collector - Select this component to enable permission collections and access rights analysis tasks for on-premises applications governed by Data Access Security.
-
Data Access Security - Data Classification Collector - Select this component to enable data collection, classification and cataloging tasks for applications governed by Data Access Security.
-
Data Access Security - Activity Monitor - Select this component to enable event collection for on-premises applications governed by Data Access Security.
-
-
Select Save.
VA cluster components can be added to existing Standard type clusters. For more information, refer to Editing a VA Cluster.
Adding VAs to a Cluster
-
Select Edit on the VA cluster you want to work with.
-
Select Virtual Appliances.
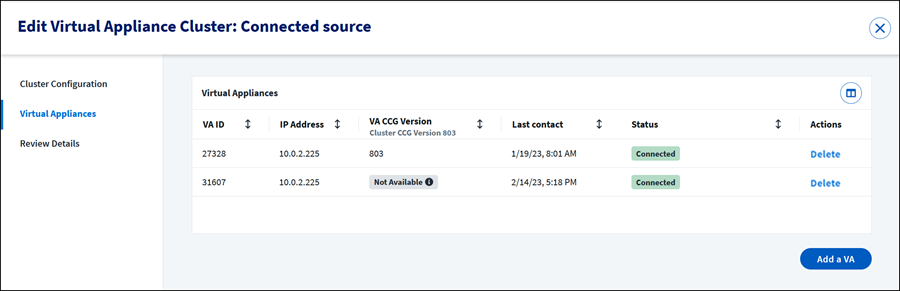
-
Select Add New > VA. The Configure Virtual Appliance page displays.
Note
A new VA can be saved to the cluster without pairing, but is not operational.
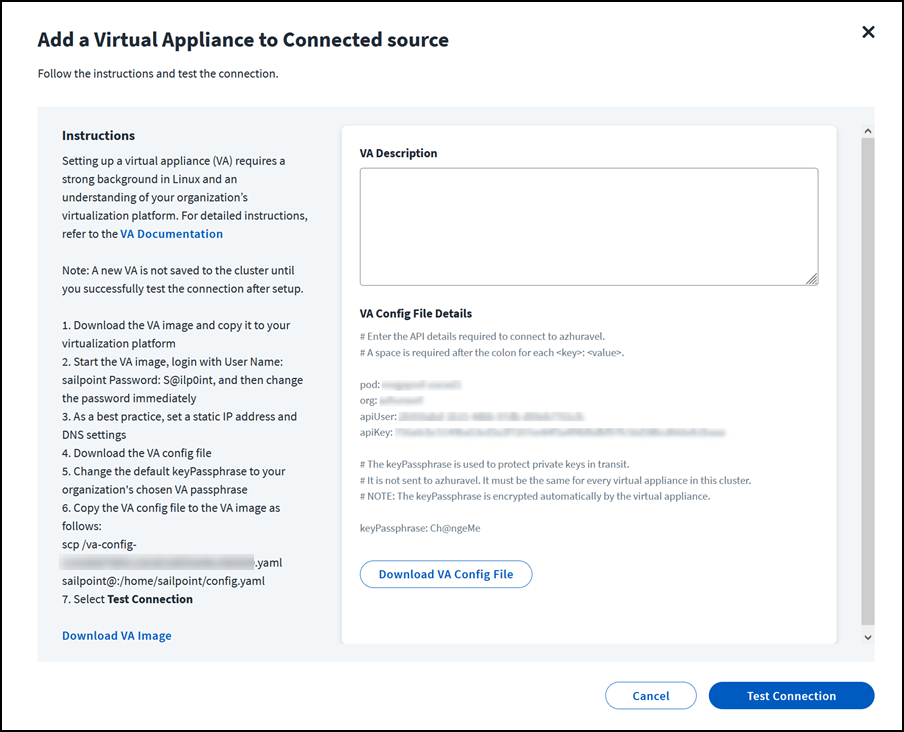
-
Download the VA image and copy it to your virtualization platform.
If you are adding HTTP Proxy VAs, stop here and complete the rest of the process using the steps in Configuring HTTP Proxy VAs.
-
Start the VA image.
-
Sign in with User Name: sailpoint, Password: S@ilp0int, and then change the password immediately.
-
Enter the command to set up your passphrase:
va-bootstrap set-passphraseFedRAMP customers enter this command instead:
va-bootstrap -t govcloud set-passphraseThe value of keyPassphrase must be identical for every virtual appliance in the cluster. The keyPassphrase cannot start with a special character, and cannot include !, /, \, or spaces.
The VA automatically encrypts the keyPassphrase. Encrypted keyPassphrases are denoted by a leading set of colons (::::).
-
Enter the command to get a pairing code:
va-bootstrap pair -
Enter the pairing code within 4 hours and select Pair.
-
Wait about 30 minutes for configuration to finish. When VA configuration is complete, the VA Status will change to Connected.
If the VA connection is successful, you can now connect the VA cluster to a source and enable Transport Layer Security if the source supports it.
Deploying VAs for High Availability and Disaster Recovery
The need to factor High Availability (HA) and Disaster Recovery (DR) into your deployment decisions may be obvious, but it might help to also understand the following:
- Each source is associated with a specific VA cluster.
- Any actions performed on that source, such as aggregation, test connection, authentication, or provisioning are sent as requests to the VA cluster and form a queue.
- Each VA that's running continually polls the queue of requests sent to its associated VA cluster.
This section outlines different strategies for handling high availability and disaster recovery scenarios in virtual appliance deployments.
High Availability means ensuring that there are enough VAs running to meet the processing needs of the business, as well as sufficient redundancy to be able to compensate for a single VA becoming temporarily unavailable due to an upgrade process, loss of connectivity, or other activity that could otherwise result in downtime.
Disaster Recovery means making sure that your organization has VAs deployed in more than one location, as part of a failover strategy that ensures business continuity in the face of a disaster (natural or otherwise).
All VAs Running
In this strategy, all VAs are deployed in a single VA cluster, with all VAs running concurrently. Some VAs are in the primary datacenter, and others (called DR VAs) are deployed in a DR datacenter.
As work is assigned to the VA cluster, either primary VAs or DR VAs can pick up and perform requests. A problem could arise if there are latency issues between the source that the VA is communicating with and the VA's deployment location. This is especially true for DR VAs, which may be farther from the sources they are communicating with.
During a failover event, no action is needed. If the primary VAs go down, the DR VAs continue to respond to requests.
| Advantages | Disadvantages |
|
|
Switch Clusters
In this strategy, two VA clusters are deployed. One VA cluster is the 'primary VA cluster', with all member VAs in the primary datacenter. The other VA cluster is the 'DR VA cluster', with all member VAs in the backup DR datacenter. All VAs in all clusters are powered-on and receiving updates.
As work is assigned to the primary VA cluster, the primary VAs can pick up and fulfill requests. This mitigates any sort of latency issues between the source that the VA is communicating with and the VA deployment location. Even though the DR VAs are powered on, they are not receiving requests, because they are not associated with the primary VA cluster that the sources are using.
During a disaster event where the primary VAs go down, there would be an outage until the sources are reconfigured to use the DR VA cluster.
Note
On failover, switching clusters requires reentering the source credentials. This can complicate the failover process if these credentials are not readily available to the administrator, or if there are many sources to manage.
| Advantages | Disadvantages |
|
|
Standby Reactive Deployment
In this strategy, primary VAs are deployed in a single VA cluster. Only the VAs in the primary datacenter are running concurrently. There are existing standby VAs set up and tested in a DR zone, but not yet deployed to a VA cluster. These VAs can be left powered up or down.
As work is assigned to the primary VA cluster, the primary VAs can pick up and fulfill requests. This mitigates any sort of latency issues between the sources that the VA is communicating with and the VA deployment location.
During a disaster event where the primary VAs go down, there would be an outage until the standby DR VAs are deployed to the primary VA cluster. As the new standby DR VAs come online, they start to fulfill requests.
| Advantages | Disadvantages |
|
|
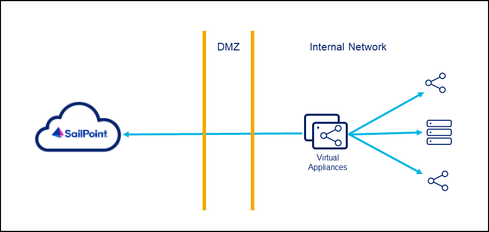
Deployment in the DMZ is Not Recommended
While there are no technical reason prohibiting it, we strongly recommend that you not deploy virtual appliances in the DMZ, or perimeter network. For the most secure and highest performing communication with target sources, we recommend that you deploy VAs near their sources on internal networks as shown in the following diagram.
Why Not Deploy in the DMZ?
We recommend against deploying the VA in the DMZ for the following reasons:
-
Security - The most important consideration against DMZ deployment is security. A DMZ is a less-secure perimeter network by design. SailPoint VAs are hardened against attack, but they are a communication backbone with sources, and could be an attack vector. Each VA also contains the 2048-bit RSA asymmetric private key (generated from the chosen key passphrase), which is used to decrypt credentials when talking to various sources. Placing a VA in a less-secure zone could put your information at risk.
-
Proximity - Virtual appliances connect to various sources, and both read (aggregation) and write (provisioning) activities can occur via API on these connections. Some connector APIs can be latency-sensitive. Deploying the VAs closer to the sources they are communicating with yields better performance.
-
Connectivity - VAs are designed to communicate with internal sources, not perimeter sources. The purpose of a DMZ perimeter network is for externally-facing components to communicate with each other, not with components on the internal network. If a VA is deployed in the DMZ and needs to communicate with internal sources, you might have to open more ports on your internal firewall to facilitate that communication.
Documentation Feedback
Feedback is provided as an informational resource only and does not form part of SailPoint’s official product documentation. SailPoint does not warrant or make any guarantees about the feedback (including without limitation as to its accuracy, relevance, or reliability). All feedback is subject to the terms set forth at https://developer.sailpoint.com/discuss/tos.