Discovering Enterprise Applications
You can find enterprise applications your organization can onboard automatically using a discovery connector or by manually uploading a .csv of application source information. This can speed up the process of adding enterprise applications to be governed in Identity Security Cloud.

Available Discovery Connectors
Discovery connectors are SaaS connectors that can discover applications in your organization. Discovery connectors have connector categories, which encompass a group of discovery connectors that can find enterprise applications.
The following SailPoint connector types can be configured as discovery connectors:
| Discovery Connector Type | Discovery Connector Category |
| PingOne SaaS | SSO |
| Microsoft Entra SaaS | |
| Okta | |
| ServiceNow | CMDB |
| Application Visibility Browser Extension | Browser Extension |
| CyberArk Privilege Cloud Shared Services | PAM |
Note
App names are formatted on the Discovered Applications page using the primaryAppName or secondaryAppName of the application.
Discovery Connector Categories
Discovery connector categories are groupings of discovery connectors that help identify the enterprise applications in your organization. You will select the connector category, like SSO, CMDB, or PAM when discovering applications automatically.
Single Sign-On (SSO)
An SSO solution provides insights into the applications used within an organization by acting as a centralized point for user authentication and access to applications. SSO solutions create logs of user authentication events to document when users access enterprise applications. This creates a centralized record of application usage that SSO discovery connectors can leverage.
Configuration Management Database (CMDB)
CMDB is a central repository within the ServiceNow platform that stores information about the technical services and assets within an organization. It acts as a digital inventory system, detailing Configuration Items (CIs) like hardware, software, networks, and virtual environments, and their relationships. CMDB provides a single source of truth for IT assets, like software applications and hardware devices, and their configurations.
Browser Extension
The Application Visibility browser extension enables discovery of web applications accessed by users across the organization. It captures user access activity to identify applications, usage patterns, and potential risk indicators such as compromised credentials or risky access. The collected data helps prioritize applications for governance based on risk and adoption.
Note
The Application Visibility browser extension is currently available only for Europe Central customers in the eu-central-1 region. Availability for other regions is coming soon.
Privileged Access Management (PAM)
A PAM solution provides insights into the privileged accounts and critical systems accessed within an organization by acting as a centralized control point for managing and monitoring privileged user activity. PAM solutions create detailed logs of privileged session events to document when users access sensitive systems, applications, and credentials. This creates a centralized record of privileged applications that PAM discovery connectors can leverage.
Discovering Applications Automatically
You can automatically discover enterprise applications by creating discovery connectors, which search for and aggregate applications your organization has onboarded or can onboard.
If you have a source that supports both account aggregation and application discovery, create a separate connector for each purpose. Refer to Loading Account Data for more information on aggregating accounts.
To create an SSO, CMDB or PAM discovery connector:
-
Go to Admin > Connections > Discovery Connectors.
-
Select Create Connector.
-
Select the SSO or CMBD category, and select Continue.
The list of available connector types is displayed.
-
Select Configure beside the type of connector you want to create.
The available connectors depend on the connector category you selected.
-
Select Start Connector Setup.
-
Review the connector's name, owner, and description and make changes if necessary.
-
Select Next.
-
Enter the authentication information necessary to connect to your external system. The fields that appear here depend on the connector you selected. Refer to the SailPoint Connector documentation for details about configuring the connector you chose.
-
Select Finish to create your discovery connector.
-
If you want to run an aggregation to discover applications on your new connector, select Discover. You can make additional configurations to this connector. Refer to the SailPoint Connector documentation for details about configuring specific connectors, or go to Scheduling Recurring Application Discovery Aggregations for information on scheduling aggregations.
To create a browser extension discovery connector:
-
Go to Admin > Connections > Discovery Connectors.
-
Select Create Connector.
-
Select the Browser Extension category, and select Continue.
The list of available connector types is displayed.
-
Select Configure beside the type of connector you want to create.
-
Select Start Connector Setup.
-
Review the connector's name, owner, and description and make changes if necessary.
-
Select Finish to create your discovery connector.
-
If you want to run an aggregation to discover applications on your new connector, select Discover. You can make additional configurations to this connector. Refer to the SailPoint Connector documentation for details about configuring specific connectors, or go to Scheduling Recurring Application Discovery Aggregations for information on scheduling discovery aggregations.
-
Go to Admin > Connections > Sources > Discovered Applications and select a name from the list to display it's base details. If you have SailPoint Accelerated Application Management and have configured the Browser Extension discovery connector additional details and the following columns will be displayed:
Attribute Description Risk Score A score out of 100 indicating application risk. Risk Level An assigned level of risk, categorized as Low, Medium, or High. Total Account Total number of accounts discovered. -
You can make additional configurations to this connector. Refer to the SailPoint Connector documentation for details about configuring specific connectors, or go to Scheduling Recurring Application Discovery Aggregations for information on scheduling aggregations.
Using your discovered applications, you can create sources and assign source configurations to a subject matter expert in your org.
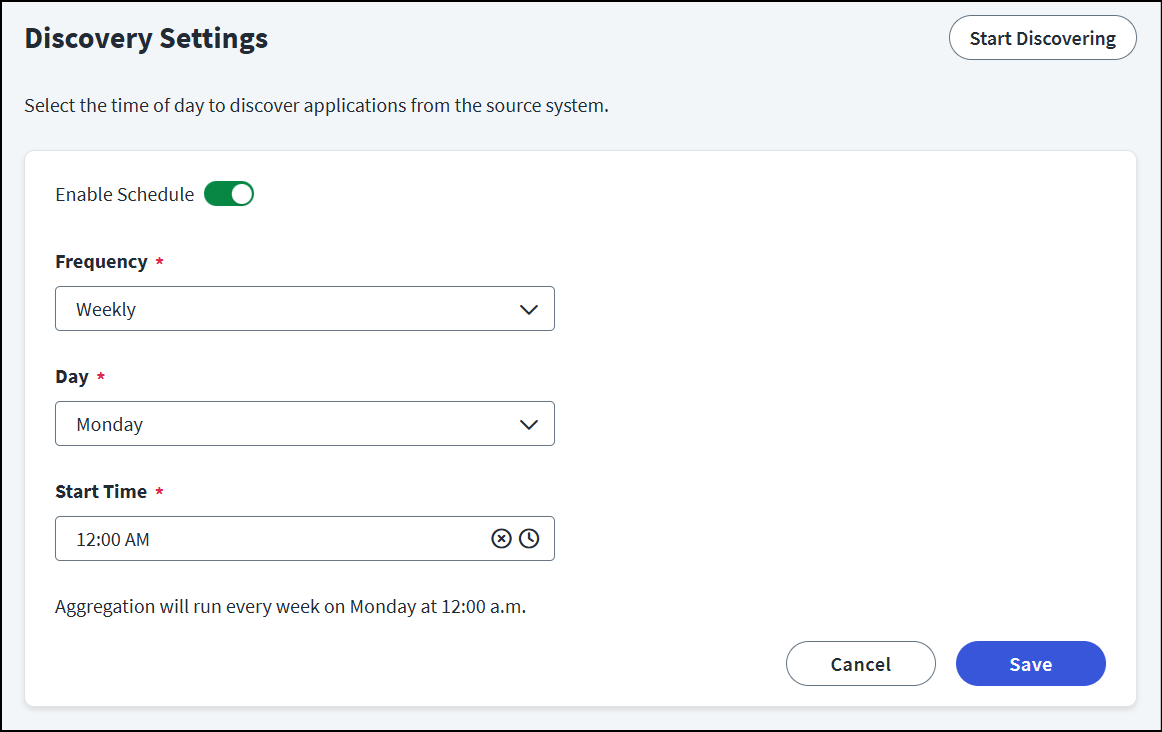
Scheduling Recurring Application Discovery Aggregations
You can configure your discovery connectors to regularly aggregate applications associated with them so that your list of applications is always up to date.
-
Go to Admin > Connections > Discovery Connectors.
-
Select your discovery connector.
-
In the Additional Settings section, select Discovery Settings.
-
Select Enable Schedule to schedule recurring discovery aggregations.
-
Choose how often discovery aggregations should run:
- Daily: choose starting time
- Weekly: choose day of week and time
- Monthly: choose day of month and time
Notes
-
Manual aggregation limits within a 24-hour period are as follows:
- Organization Admins are limited to 3 manual discovery applications per day per source. This limit is cumulative across all org Admins.
- Regular users are limited to 1 manual discovery application per day per source.
These limits ensure that individual compliance statuses are kept up to date while maintaining continuous compliance monitoring. If you need to run additional aggregations beyond these limits, contact SailPoint Support.
-
Applications discovered by the Application Visibility browser extension are available for aggregation once a day. Running multiple manual discovery aggregations in one day might not result in additional applications being displayed in Identity Security Cloud.
-
The time zone (GMT offset) for the entitlement aggregation schedule is determined by the connected virtual appliance cluster time zone.
Information about the most recent application discovery aggregation is displayed under Discovery Activity.
The discovery aggregation is added to the processing queue at the time you defined. Other queued or in-progress operations might delay the start of your discovery aggregation.
-
Select Save.
Using your discovered applications, you can create sources and assign source configurations to a subject matter expert in your org.
Manually Uploading Applications
You can manually add a list of applications to be governed in Identity Security Cloud.
Important
Each .csv should contain a unique set of applications. Adding the same application to multiple .csv uploads will result in duplicate applications in Identity Security Cloud.
- Go to Admin > Connections > Sources.
- Select Discovered Applications from the left navigation bar.
- Select Manual Upload.
- Select Download Template and update the .csv with the names and descriptions of the new applications to add.
- Choose Upload CSV and select the template you updated.
The applications will be processed and added to the Discovered Applications list.
Hiding Applications
You can select Actions ![]() > Hide Application to hide an application from the Discovered Applications page. Select Actions
> Hide Application to hide an application from the Discovered Applications page. Select Actions ![]() Show Application to unhide the app.
Show Application to unhide the app.

To view the hidden applications, select the Filter icon ![]() and enable Show Hidden Applications. You can also filter by discovery connector type, the first time it was found by a discovery connector, or the most recent time the application was discovered.
and enable Show Hidden Applications. You can also filter by discovery connector type, the first time it was found by a discovery connector, or the most recent time the application was discovered.
Creating Sources from Discovered Applications
After you have added a discovery connector or uploaded a .csv of applications, you can create sources for the applications from the Discovered Applications page.
Identity Security Cloud uses a smart logic keyword matching to discover application sources by matching the Source Type and Source Name from the discovered application. If no matches are found, you will receive recommendations for generic connectors like JDBC, SCIM 1.1, Web Services, and Delimited Files.
To create a source from a discovered application:
- Go to Admin > Connections > Sources.
-
Select Discovered Applications from the left navigation bar.
-
Find the discovered application in the list and select Actions
 > Create Source.
You can also select the discovered application from this list to view its details, then select Actions > Create Source on the details page.
-
Select Configure on the source you want to create and complete the configuration. Refer to the SailPoint Connector documentation for guidance on specific configurations.
The application the source was created from is displayed in the Application column on the Sources page.
If there are multiple sources created from the application, you can choose to associate the discovered applications with their related sources to maintain clarity in your organization.
Some source configurations can be assigned to non-admin experts in your organization to work from a draft version of the source before a Source Admin or admin reviews and confirms the proposed changes. Refer to Source Configuration Assignment for more information.
Associating Applications with Sources
Each discovered application can have multiple sources created from it, and sources created from an application are automatically associated with that application in the UI.
If you've discovered multiple applications of the same type, this labeling can help distinguish which sources go with which application.
Editing Associations
While applications are automatically linked with the sources created from them, you can edit those associations and manually associate existing sources related to a discovered app.
- Go to Admin > Connections > Sources.
- Select Discovered Applications from the left navigation bar.
- Find the discovered application in the list and select Actions > Edit Association.
-
In the Associated Sources dropdown list, select a source to associate with the application. You can associate an application with multiple sources.
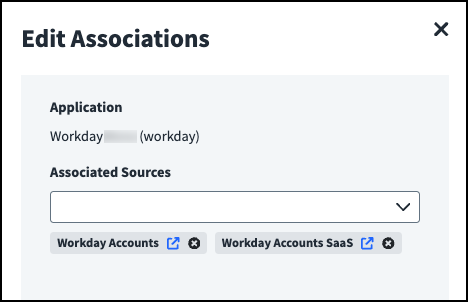
Sources can be associated with one application.
-
To remove an association, select the x icon on the source name.
- Select Save to save your associations.
The application name will be displayed next to the associated sources in the Application column on the Sources page.
Documentation Feedback
Feedback is provided as an informational resource only and does not form part of SailPoint’s official product documentation. SailPoint does not warrant or make any guarantees about the feedback (including without limitation as to its accuracy, relevance, or reliability). All feedback is subject to the terms set forth at https://developer.sailpoint.com/discuss/tos.