Assigning Source Accounts to Identities
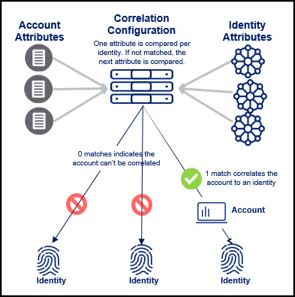
Correlation is the process of matching and assigning source accounts to identities. Correlation configuration compares the values of specific account attributes with the values of related identity attributes. When those attribute values match, the account is assigned to the identity.
Important
Account attributes cannot exceed 128 characters.
If Identity Security Cloud is unable to match account attributes to identity attributes, the account is considered uncorrelated and is not assigned to identities.
Configuring Account Correlation
To correlate accounts to identities, you will map, or pair, account attributes to the identity attributes in your tenant. These mappings are configured using correlation criteria, which compare the values of account and identity attributes. Whenever one correlation criteria is met, the account is correlated to the identity.
Configure account correlation before you load, or aggregate, source accounts for the first time. If you change the account correlation for a source that has already been aggregated, you should run another aggregation where optimization has been disabled for that source. This allows unchanged accounts to be reexamined for correlation.
If your org has licensed SailPoint application onboarding ![]() , you can view attribute pairing suggestions for the highest correlation percentage and automatically optimize the order of your criteria in sources. Refer to Using Recommendations to Correlate Accounts.
, you can view attribute pairing suggestions for the highest correlation percentage and automatically optimize the order of your criteria in sources. Refer to Using Recommendations to Correlate Accounts.
Prerequisites: Identities and at least one identity profile exist.
To configure account correlation:
- Go to Admin > Connections > Sources.
- Select or edit the source you want to correlate accounts on.
-
In the Account Management section, select Account Correlation.
-
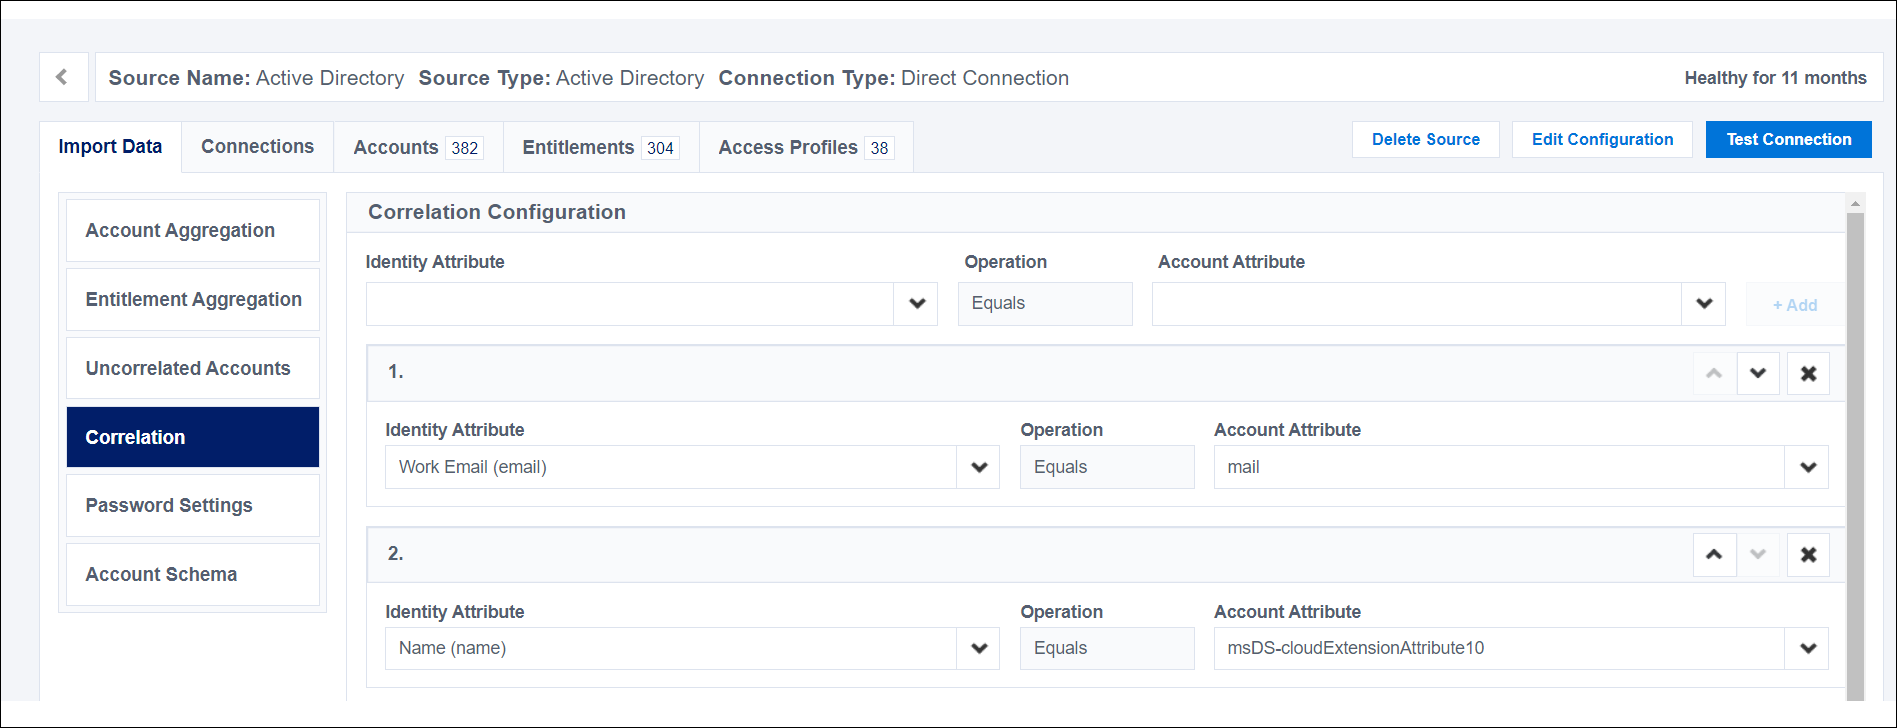
Review the attributes for configuring the source:
- The Identity Attribute is the attribute from the identity profile used to match the accounts.
- The Account Attribute is the attribute on the source that Identity Security Cloud tests against the identity attribute.
- The Operation field is always set to Equals. This field is not editable.
-
Use the Identity Attribute dropdown list to select an identity attribute such as
email,displayName, oruid. For effective correlation, attribute values should be unique among other accounts and identities. Refer to Using Custom Identity Attributes in Correlation for guidance on using custom identity attributes. -
Use the Account Attribute dropdown list to choose the account attribute that corresponds to the identity attribute you selected.
-
Select Add Criteria to add identity attribute and account attribute fields to the correlation configuration.
-
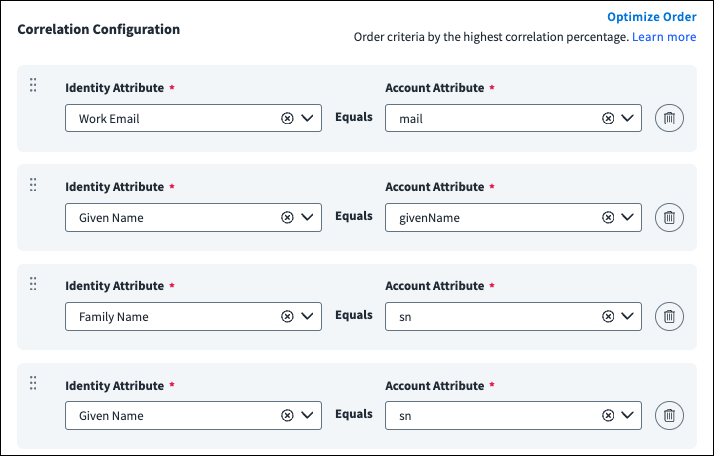
If your organization has a preferred attribute for identifying unique accounts, drag and drop the attribute pairing to determine the order in which attributes will be used to correlate accounts.
-
To remove attribute pairings, select the Delete icon
 beside the pairing.
 -
Select Save to save your changes.
Note
Correlation is case insensitive. You can change this on a per source, per correlation config basis. To do this, edit the ignoreCase option in the attributeAssignments array in the Update Correlation Config API. This can be helpful if you're correlating from a legacy system with account IDs like 123abc and 123ABC.
Using Recommendations to Correlate Accounts
If your organization has licensed SailPoint application onboarding ![]() , you might receive suggestions on which criteria to select based on correlation percentages. The number and quality of account correlation recommendations depend on the quality of your identity data and account data.
, you might receive suggestions on which criteria to select based on correlation percentages. The number and quality of account correlation recommendations depend on the quality of your identity data and account data.
Refer to Account Correlation Recommendations for information on how recommendations are generated.
Prerequisite: At least one identity profile exists.
To use recommendations to configure account correlation:
- Go to Admin > Connections > Sources.
- Select or edit the source you want to use correlation recommendations on.
-
If you are configuring a flat file source for the first time, select Review and Import Accounts to import a .csv file of your accounts to be used for recommendations. Importing at this stage does not aggregate those accounts, but you can use this file when aggregating your accounts later.
-
In the Account Management section, select Account Correlation.

-
If you do not see recommendations, select Refresh Recommendations to display a list of recommended criteria. Recommendation generations can take several minutes.
Note
Recommendations are provided based on how well they match your account attributes. By default, recommendations that match fewer than 50% of your accounts are filtered out. You can select the Filter icon
 to change this threshold percentage. To view more recommendations, lower the accuracy percentage. If you have too many recommendations, increase the accuracy threshold to return the best matching recommendations.
 -
You can select Why was this recommended? on a mapping suggestion to view the percentage of accounts that can be correlated to identities using the attribute pairing.
-
Select Add Recommendation to add the pairing to the top of your correlation configuration. If multiple identity attributes can fit with an account attribute, select the attribute pairing that best fits your needs.
-
Identity Security Cloud correlates accounts one attribute at a time in the order they are listed in the correlation configuration form. Select Optimize Order to automatically order criteria by the highest correlation percentage or drag and drop the attribute pairing to determine the order of attributes used to correlate accounts.
-
Review the attributes for configuring the source:
- The Identity Attribute is the attribute from the identity profile used to match the accounts.
- The Account Attribute is the attribute on the source that Identity Security Cloud tests against the identity attribute.
- The Operation field is always set to Equals. This field is not editable.
-
Select Add Criteria to add identity attribute and account attribute fields to the correlation configuration.
-
Use the Identity Attribute dropdown list to select an identity attribute such as
email,displayName, oruid. For effective correlation, attribute values should be unique among other accounts and identities. Refer to Using Custom Identity Attributes in Correlation for guidance on using custom identity attributes. -
Use the Account Attribute dropdown list to choose the corresponding account attribute.
-
To remove attribute pairings, select the Delete icon
beside the pairing. -
You can test your account correlation configuration using a sample of your accounts.
-
Select Save to save your changes.
Dismissing Recommendations and Leaving Feedback
If you don't want to use a recommended criteria pair, you can dismiss the recommendation to prevent it from being shown in the future. You'll be given a prompt requesting feedback on why you dismissed the recommendation.
You can select one or more of the following options:
-
The account attribute is not used because it is too common.
-
Too few accounts are correlated using this recommendation.
-
The identity attribute is not used because it is too common.
-
Other - this opens a free text field for you to enter your feedback.
After leaving feedback, select Send. Feedback is reviewed to improve the quality of future suggestions.
Select Dismissed to view the recommendations you've hidden. You can add dismissed recommendations to your correlation configuration from here or select Give Feedback to open the feedback prompt for that recommendation.
Testing Account Correlation
You can test the effectiveness of your correlation configurations to ensure you have a high level of correlation.
When you select Test, Identity Security Cloud checks the correlation configurations against a sample of your accounts to estimate the number and percentage of your accounts that will be correlated. You can use this information to determine if the order or number of criteria should be adjusted.
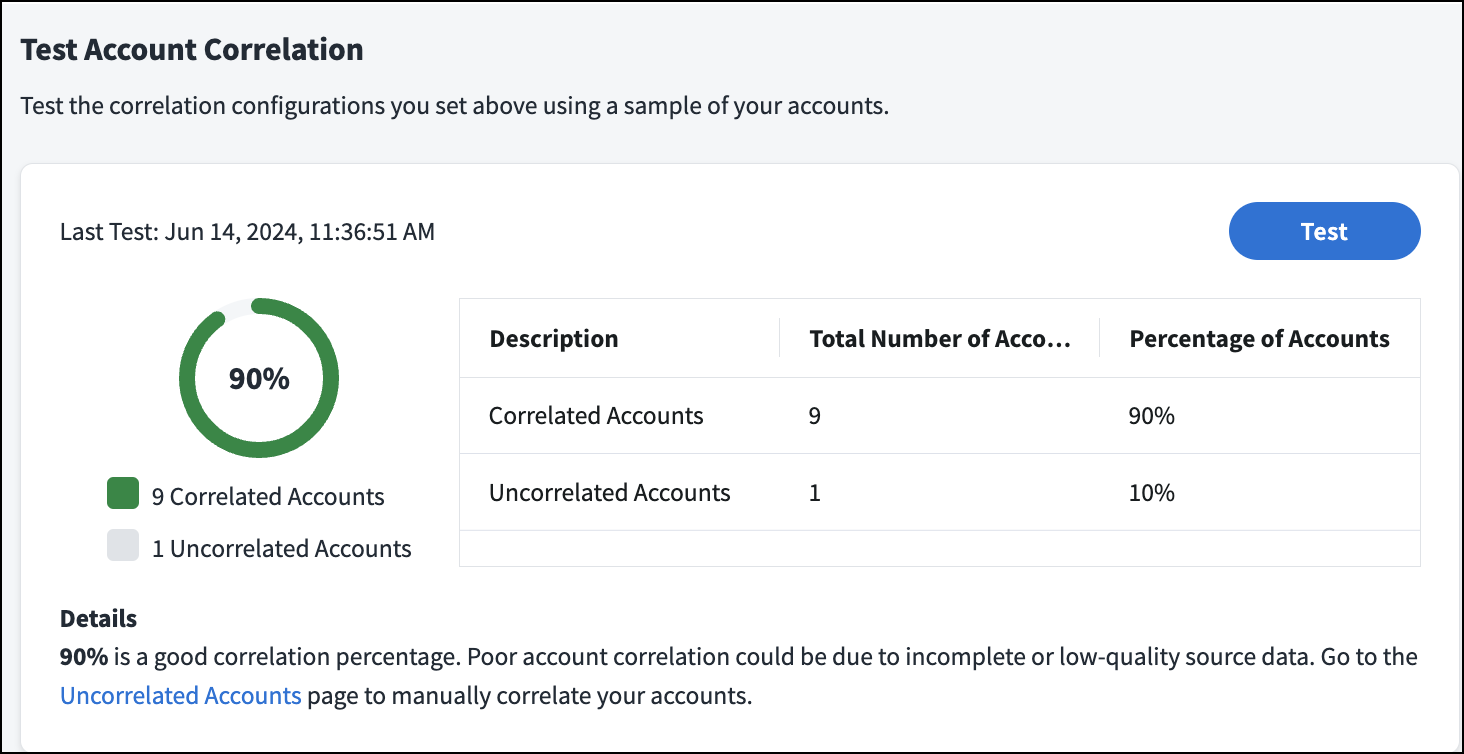
If a low number of accounts are correlated, this may indicate there is inaccurate or incomplete source data. You can increase your correlation percentage by optimizing the order of your criteria or reviewing your account information. You can also manually correlate accounts.
When you are satisfied with the correlation results, select Save in the Correlation Configuration form above.
Using Custom Identity Attributes in Correlation
Identity attributes must be configured as searchable to be included in the Correlation Configuration's Identity Attribute list. By default, a subset of the predefined identity attributes are set as searchable. You can use the Create Identity Attribute or Update Identity Attribute endpoint to add up to 6 additional searchable attributes. These are typically chosen from the custom identity attributes you have defined for your site.
Notes
- In order for searchable identity attributes to be applied during correlation, you must perform manual processing for all identities before running aggregation for the source.
- This configuration is not related to enabling searches in Search based on your custom attributes. Built-in or custom identity attributes can automatically be used as a search query filter there.
Resolving Uncorrelated Accounts
When you load accounts onto a source using a direct connector or flat file, you may have some source accounts that are not linked to identities in the source system. These unlinked source accounts are called uncorrelated accounts.
Accounts might be uncorrelated for a number of reasons. Some accounts simply need to be removed from a source, while others require updates to a source or to information in your system. The following table presents some possible reasons for uncorrelated accounts and how to resolve them.
| Reason for Uncorrelated Account | Resolution |
|---|---|
| Accounts belong to former employees. | Remove the old accounts from the source and aggregate the updated source accounts. |
| Unusual, incomplete, or incorrectly entered account data does not match any identities. | Correct the account names on the source and aggregate those accounts. |
| The identity the accounts are supposed to be linked to has not been created in Identity Security Cloud. | Create an identity profile that includes identities your uncorrelated accounts can link to. |
Uncorrelated accounts must be resolved before the identities associated with those accounts can be granted access to systems and apps. Account resolution is required for access, regardless of how access is granted.
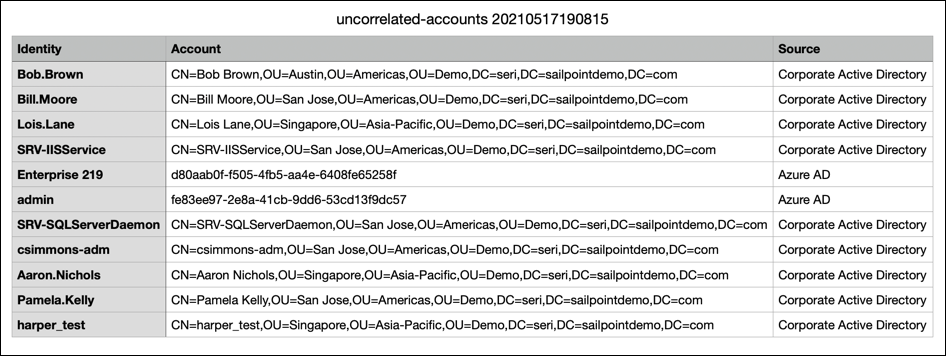
After aggregating a source, run and download an Uncorrelated Accounts report to verify whether newly loaded source accounts have been correlated. This report lists uncorrelated accounts by source, so you can easily find and then resolve any uncorrelated accounts.
Resolving Mismatched Attribute Values
The Uncorrelated Accounts report can be a global report listing all the uncorrelated accounts and their sources or a source-specific report of uncorrelated accounts. Use the global report to display uncorrelated accounts and their sources. The global report can also be used for resolving uncorrelated accounts from one source.
Refer to third-party source documentation or contact Support for additional help.
Resolving Uncorrelated Accounts on Sources
To resolve mismatched attribute values across multiple sources, you can use the global Uncorrelated Accounts report:
-
Go to Admin > Global > Reports.
-
Select Actions
 > Generate .pdf or Generate .csv in the Uncorrelated Accounts row to generate a list of all uncorrelated accounts.
 -
Download the report and review the list of uncorrelated accounts and their sources.
-
On each source listed in the report, edit at least one attribute on each uncorrelated account, including the value of an attribute used for correlation.
For example, if you’re editing an account in Active Directory, you can update the
sAMAccountNameto match theuidof an identity in your system, if those attributes are paired in the correlation configuration. -
Save your changes and aggregate the source's accounts again. The number of uncorrelated accounts updates to reflect your changes.
Manually Resolving Uncorrelated Accounts
You can use manual correlation to resolve uncorrelated accounts by creating a permanent link from the account to the identity. Even if the source data for the account changes, the account will still be linked to the identity.
To correlate the account to a different identity after it was manually correlated, you must manually remove the account from the identity.
Note
You can manually correlate up to 100 accounts to a single identity.
To manually resolve uncorrelated accounts:
-
Go to Admin > Connections > Sources.
-
Select or edit the source with uncorrelated accounts.
-
In the Account Management section, select Uncorrelated Accounts.
-
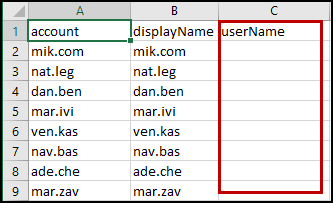
Select Download Correlation File to download a .csv file of uncorrelated accounts.
-
In the .csv file, add the Account IDs of the associated identities to the userName column beside the uncorrelated account.
To find the Account IDs:
- Go to Admin > Identity Management > Identities.
- Find and select the name of the identity you want to correlate with an account.
- In the Details tab, review the Attributes list to find the value of the Account Name for the identity.
When you're finished making changes, save the file.
-
On the Uncorrelated Accounts page, upload the .csv file either by selecting the Upload icon
 or by dragging the file onto the page.
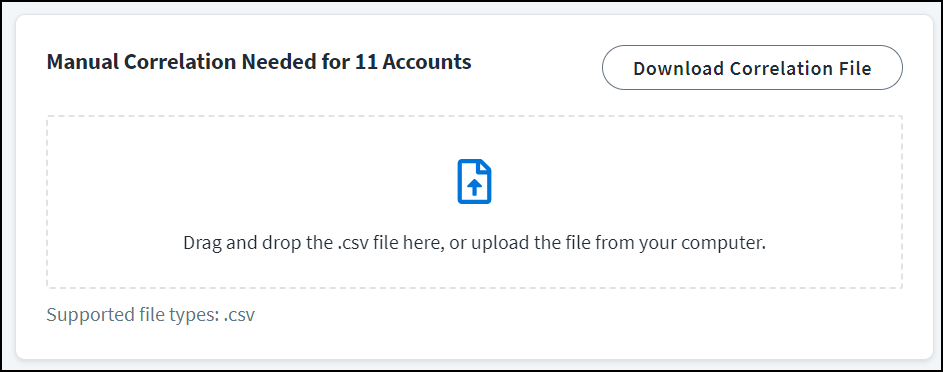
The listed number of uncorrelated accounts adjusts to reflect your changes.
In the Latest Manual Correlation section, you can see a summary of the most recent manual correlation. This section includes a badge indicating the status of the upload, including whether there were issues with the file.
You can view a complete history of manual correlation imports and other aggregations by selecting Aggregation History above this panel. Select the Manual Correlation filter on the page that is displayed to view correlation file imports.
Note
Accounts that have been created by Identity Security Cloud have the account attribute manuallyCorrelated=true. If you need to uncorrelate the account, you must remove the account or change the attribute to false. Unoptimized aggregation does not remove correlation.
Removing Manual Correlation
When an account has been manually correlated to an identity, it will not be recorrelated to another identity even if the account attributes change. You must manually remove the account from the identity to correlate it to a different identity.
The account can then be updated on the source so that during the next aggregation, the account is assigned to a new identity.
You can remove a manually-correlated account from an identity in several ways:
-
Remove the account you need to uncorrelate from Identity Security Cloud.
Go to Accounts and select Actions
> Remove Account beside the account you want to remove. -
Manually move the account to the new identity by updating the correlation file and re-uploading it to the source.
-
Reset all aggregated source accounts and entitlements. This option removes all of this source's accounts and entitlements from Identity Security Cloud. When you aggregate again, the source accounts and entitlements are loaded and the correlation logic is recalculated.
Preset and Default Configurations
Most supported source types have a preset correlation configuration, which is a set of two to four mapped attributes from the predefined account schema.
If you edit or delete a source’s preset correlation configuration, you can manually restore those settings.
-
Create a source of the same type to identify the preset correlation attributes.
-
Enter and save the same attributes in the existing source.
Note
You may need to work with Support to reset your source, so you can apply the preset settings to existing identity data.
Identity Security Cloud also uses a default correlation logic if an account can't be correlated using the source's correlation configuration. This logic associates accounts to identities if the attribute marked as the Account Name matches the name attribute of an identity. Correlation value comparison is case insensitive, so an account with the Account Name User1 will be correlated to an identity with the name user1. The default correlation is not configurable.

Documentation Feedback
Feedback is provided as an informational resource only and does not form part of SailPoint’s official product documentation. SailPoint does not warrant or make any guarantees about the feedback (including without limitation as to its accuracy, relevance, or reliability). All feedback is subject to the terms set forth at https://developer.sailpoint.com/discuss/tos.