Configuring Virtual Appliances
There are three virtual appliance (VA) configuration options: standard, HTTP proxy, and network tunnel. You can also optionally enable transport layer security for encrypted communication.
Standard VA Configuration
Standard is the default VA configuration option, as it allows the VA to connect to SailPoint and other required endpoints directly through the firewall.
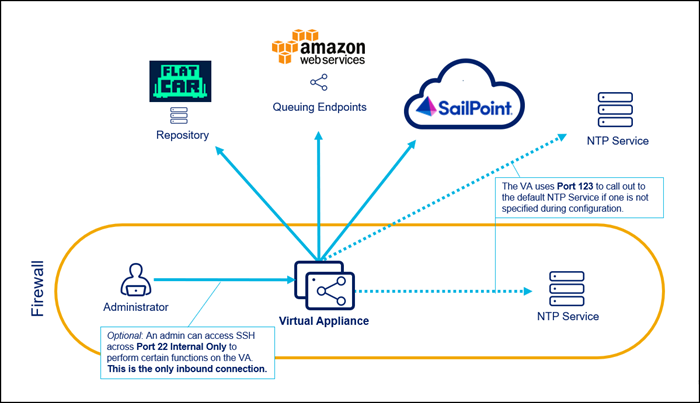
Standard VA Considerations
-
There is no additional setup required to achieve connectivity after the network requirements are met.
-
You will have to add URLs to the allow list.
-
SailPoint reserves the 10.255.255.241/28 IP range. If any sources reside in this range, traffic will not route properly.
Configuring Standard VAs
To configure standard VAs, refer to Creating Virtual Appliances.
HTTP Proxy VA Configuration
This configuration option requires additional setup to achieve connectivity through a previously configured proxy service. The VA connects to SailPoint and other required endpoints through the proxy.
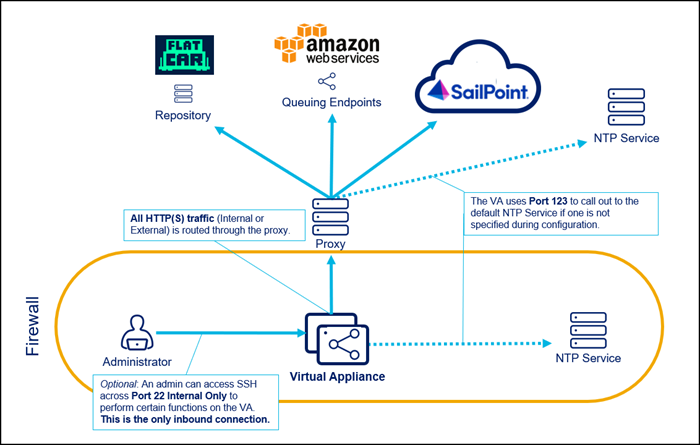
HTTP Proxy VA Considerations
-
All HTTP/HTTPS traffic (VA communication, updates, internal or external) is routed through the proxy.
-
SailPoint reserves the 10.255.255.241/28 IP range. If any sources reside in this range, traffic will not route properly.
-
This configuration is not compatible with the network tunnel configuration.
-
Traffic to external sources such as Salesforce, Box, ServiceNow, Office365, GoogleApps, GoToMeeting, WebEx, and Workday is also routed through the proxy. You may be able to allow traffic to these external sources; consult your network administrator for more information.
-
The connection from the VA to the proxy can be authenticated only if your proxy supports basic authentication over the connection string. If not, the connection must be unauthenticated. We do not currently support other authentication mechanisms. However, adding IP address sources to the allow list may be used.
-
You will have to add URLs to the allow list.
Configuring HTTP Proxy VAs
After you have downloaded the VA image and copied it to your virtualization platform, complete the following steps to configure the HTTP proxy and create a VA:
-
Start the VA image.
-
Download the
proxy.yamlfile (SailPoint Compass login required), and copy it to/home/sailpoint/. -
Uncomment the https and http lines and replace the
<proxyserver>and<port>values. A space is required afterhttps_proxy:andhttp_proxy:but before the URL.https_proxy: http://<proxyserver>:<port>/http_proxy: http://<proxyserver>:<port>/Where
<proxyserver>is either a host name or IP address. Typically both the http and https lines will point to a single server.Important
If you choose to use the HTTP proxy VA configuration in a cloud environment, be sure to allow traffic to all required URLs and avoid connectivity to the cloud environment's metadata API. The typical metadata IP address is 169.254.169.254, but it is not standard across cloud environments.
Important
If you have a host that needs to be reached directly over HTTP/HTTPS, you can bypass the proxy configuration by adding an exception to the
proxy.yamlfile. For example, you might have a custom connector that needs to reach locally-hosted APIs. In this case, add the following line to theproxy.yamlfile:no_proxy: <host1>|<host2>Where
<hostN>can either be a domain or an IP address. This can contain any number of hosts separated by pipe (|) symbols. -
Save the
proxy.yamlfile and exit the editor. -
Sign in to the VA with User Name: sailpoint, Password: S@ilp0int, and then change the password immediately.
-
Enter the command to set up your passphrase:
va-bootstrap set-passphrase --http-proxy <http://host:port> --https-proxy <http://host:port>The value of keyPassphrase must be identical for every virtual appliance in the cluster. The keyPassphrase cannot start with a special character, and cannot include !, /, \, or spaces.
The VA automatically encrypts the keyPassphrase. Encrypted keyPassphrases are denoted by a leading set of colons (::::).
-
Enter the command to get a pairing code:
va-bootstrap pair --http-proxy <http://host:port> --https-proxy <http://host:port> -
Enter the pairing code within 4 hours and select Pair.
-
Wait about 30 minutes for configuration to finish. When VA configuration is complete, the VA Status will change to Connected.
Network Tunnel VA Configuration
If you are required to add outbound traffic to the allow list, and your firewall does not support domain entries, consider using a network tunnel configuration. This option requires additional setup for the VA to connect to SailPoint and other endpoints through network tunnel servers.
For considerations and configuration information, refer to Virtual Appliance Network Tunnel Configuration using your SailPoint Compass login.
Transport Layer Security
Transport Layer Security (TLS) is recommended for encrypted communication between VAs and sources that support it.
To enable TLS for a supported source:
-
In your tenant, go to Admin > Connections > Sources, and select your supported source.
-
In the Source Setup section, select Use Transport Layer Security (TLS) on the relevant config pages.
-
Select Save.
The TLS certificate should be automatically copied to the VA cluster associated with the source.
For example, Active Directory sources include checkboxes to enable TLS support in the following source configuration settings:
- Forest
- Domain
- IQ Service
- Exchange
For information about IQService TLS configuration and manually adding certificates to VAs, refer to TLS Configuration on Virtual Appliances.
FIPS VA Configuration
FedRAMP users may need to configure their VAs to be compliant with Federal Information Processing Standards (FIPS).
FIPS configuration is performed on each individual VA at the Linux kernel level.
Important
FIPS configuration on a VA cannot be reversed or disabled. If you decide later not to use FIPS mode, you must create new VAs from a fresh VA image.
For instructions and more information, refer to Configuring Virtual Appliances for FIPS Compliance using your Compass login.
Configuring a Hosts.yaml File
Source connectors may need a host entry in the hosts.yaml file to complete an Identity Security Cloud Connector implementation.
To add a source host entry in the hosts.yaml file:
- Go to
/home/sailpoint/. - Create the file or edit an existing
hosts.yamlfile using the commandvim hosts.yaml. -
Add an entry for the source host.
Important
Example hosts.yaml
Spacing and indentation in the hosts.yaml file must be precise:
- The second line must start with 2 spaces followed by a valid IP address matching the IP address configured for the host.
- The third line must start with 4 spaces followed by a dash and one additional space. It must contain a fully qualified hostname matching the fully qualified hostname configured for the source.
- The fourth line must start with 4 spaces followed by a dash and one additional space. It must contain a hostname matching the hostname configured for the source.
- Repeat second to fourth lines for multiple entries.
- For Data Access Security, hosts.yaml lookups on Alpine are case-sensitive, so hostnames in the hosts.yaml file will need to match case used by the Data Access Security application (or Kerberos).
-
Save the
hosts.yamlfile. -
Restart the
charonservice using the commandsudo systemctl restart charon.
Documentation Feedback
Feedback is provided as an informational resource only and does not form part of SailPoint’s official product documentation. SailPoint does not warrant or make any guarantees about the feedback (including without limitation as to its accuracy, relevance, or reliability). All feedback is subject to the terms set forth at https://developer.sailpoint.com/discuss/tos.