Viewing Access History for IdentityIQ
SailPoint Access History enables organizations to view historical access data for identities.
The SailPoint Identity Platform uses historical access analytics to provide a richer experience and understanding of access transactions for individual identities. You can view access history in different ways and quickly identify abnormal access, validate that changes in access occur as you expect, and identify access that may need to be removed for an identity.
Before using Access History, ensure that all setup, connection, and configuration steps have been completed.
To launch Access History, go to your tenant and select Admin > Identity Management > Access History. Use Access History's top navigation to access the following:
- Access History - A timeline of access events, including detailed information about change events for an identity.
- Compare Access - A calendar to compare the difference in access between two dates, including details about what was added and removed during that time
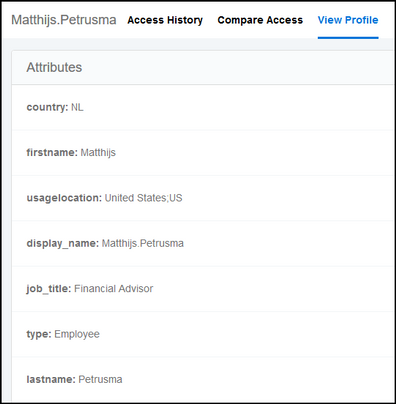
- View Profile - A view of identity attributes
Best Practice
To follow the principle of least privilege, grant report admin user level permissions to employees that you want to have view access to the Access History interface. For more information, refer to Report Admin User Level.
Searching for Identities
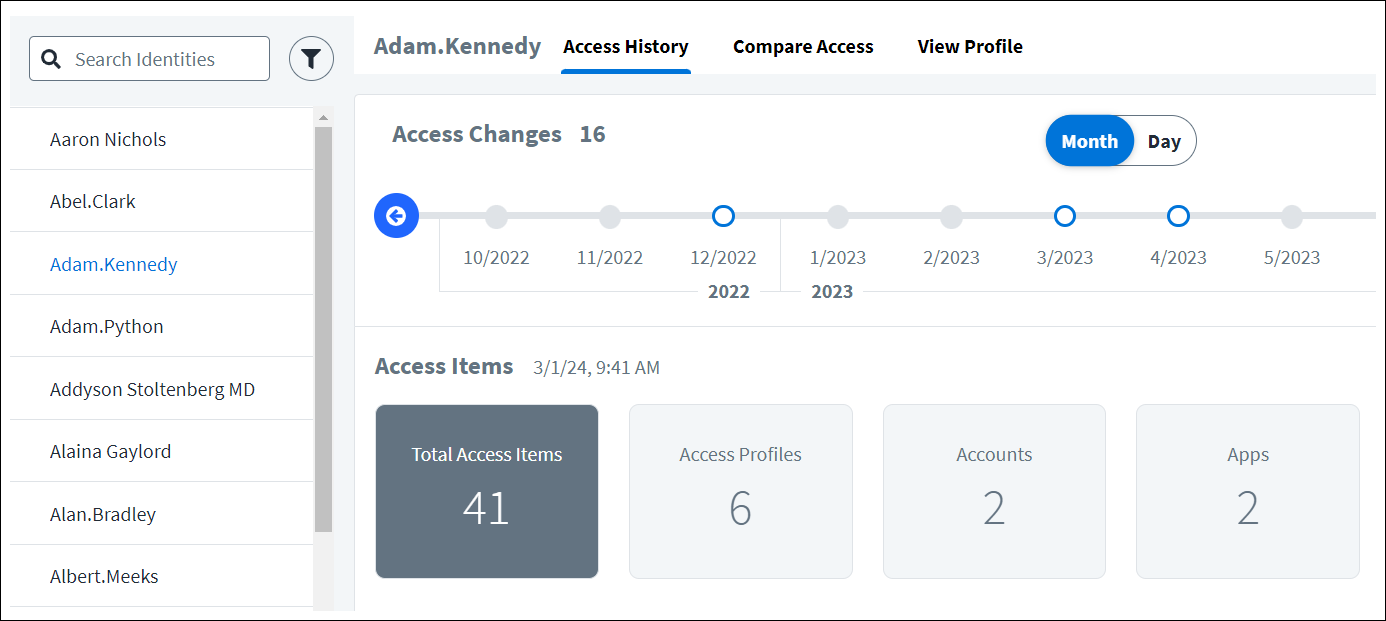
The Access History identity list includes active and deleted identities in your organization. The first 20 identities are presented in alphabetical order along with a search field and filter to find any identity in the organization.
Identities that are no longer found in IdentityIQ are marked with the Deleted icon ![]() . Having access to historical data for deleted identities can be helpful for auditing purposes.
. Having access to historical data for deleted identities can be helpful for auditing purposes.
To view access information for an identity, complete the following steps in the Access History interface:
-
Use one of the following methods to find a specific identity:
-
Start entering an identity name in the Search Identities box
-
Select the Filter icon
 to filter identities. Enabling a filter reduces the identity list to only identities of that type.
Note
If your tenant was created recently, you will not be able to access the Identity Filter.
-
-
Select the identity name.
-
After you have found a specific identity, select Access History, Compare Access, or View Profile to display data related to the identity.
Viewing IdentityIQ Access Changes in the Access History Timeline
The Access History page highlights an identity's access changes, displays general information about access items, and provides a record of change events.
Select Access History in the top navigation to display the Access History page.
Finding Access Changes
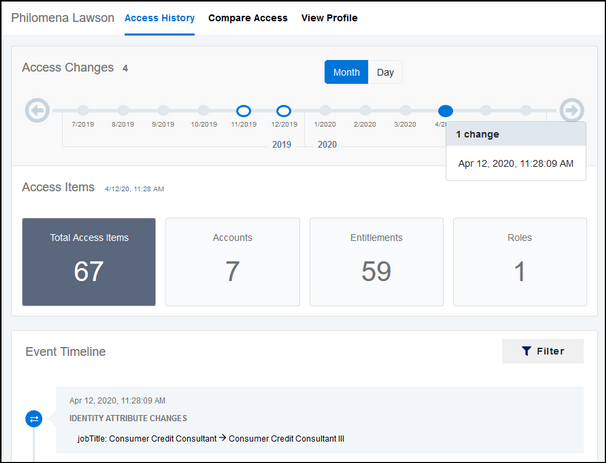
Use the Access Changes panel to navigate changes by month or day as follows:
-
Select an identity name. The Access History page for that identity displays.
-
Select Month or Day to change the scope of the timeline.
-
Use the arrows to scroll through the timeline. A node outlined in blue indicates a change occurred during that month or day. Gray indicates no change.
-
Select a blue node to view the timestamp for each change in a drop-down menu.
-
Select a timestamp to view details about that specific change in the Access Items and Event Timeline sections below.
Reviewing Access Items
After selecting a timestamp, the Access Items panel displays tiles with counts for Accounts, Entitlements, and Roles.
Use the Access Items panel to review access items as follows:
-
Select the tile for an access item type to display the list of relevant access items. For example, select the Accounts tile to display a list of accounts that an identity had access to on the day of the selected timestamp.
-
Select the tile again to collapse the view.
Reviewing the Event Timeline
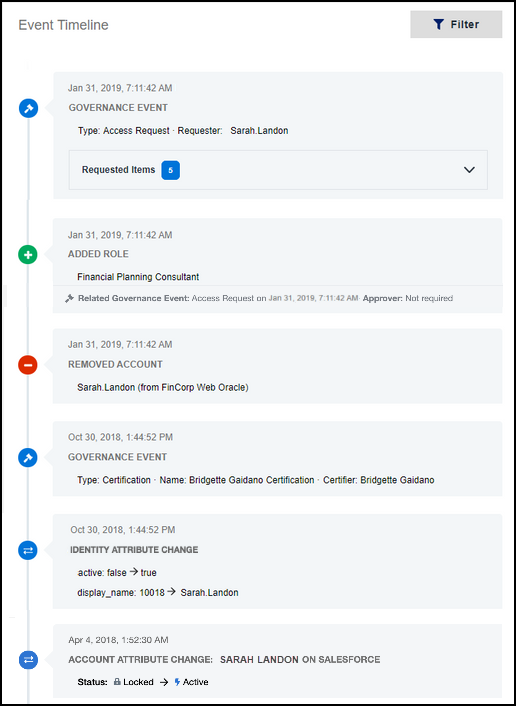
In the Event Timeline panel, you can scroll through a chronological list of all access changes that were made to the identity on the day of the selected timestamp, as well as any other changes leading up to that time.
The following changes are displayed in the event timeline:
-
Governance events such as certifications and access requests
Note
If your tenant was created recently, you will not be able to view governance timeline events.
-
Access items added or removed, along with information about the related governance event
- Attribute changes for accounts and identities
There are a couple ways to change what is displayed in the Event Timeline:
-
Select Filter to filter the timeline by specific access items (added, removed, or all), access requests, certifications, or attribute changes.
-
Select Requested Items to view an expanded list of access requests, along with general information such as description, approver, and decision.
Comparing Access Over Time
Select Compare Access in the top navigation to display the Compare Access page and compare access snapshots between two dates for an identity.
To compare access for an identity between two dates, complete the following steps:
-
Select an identity name.
-
Select Compare Access in the top navigation.
-
Under Date Compare Access, enter two dates.
Access History takes a snapshot of the access items on each entered date at the time of the last access change of the day. If there were no access changes on the entered date, Access History goes back in time and compares a snapshot of access from last access change before the entered date.
-
Select Compare.
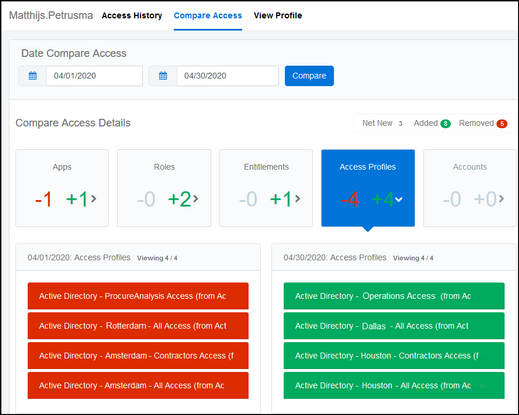
The Compare Access Details panel displays tiles with counts for Accounts, Entitlements, and Roles that were added or removed.
Compare Access only shows details if access changes occurred, so if you compare two dates and only zero counts are displayed in the tiles, then no change occurred between those dates.
-
Select a tile to display a detailed side-by-side comparison about what access was added or removed in the area below the tiles.
For example, the expanded Access Profiles list below shows that between April 1 and April 30 this employee's Netherlands access profiles were removed and U.S. access profiles were added. This likely indicates that the employee transferred from the Netherlands location to the U.S. location during this time.
To find out exactly when such a change occurred, you could navigate to Access History and select the timestamp associated with April change events.
Viewing Identity Profile Attributes
You can view the specific attributes associated with an identity as follows:
-
Select an identity name.
-
Select View Profile in the top navigation to display identity attributes such as job title, department, country, and usage location.
Documentation Feedback
Feedback is provided as an informational resource only and does not form part of SailPoint’s official product documentation. SailPoint does not warrant or make any guarantees about the feedback (including without limitation as to its accuracy, relevance, or reliability). All feedback is subject to the terms set forth at https://developer.sailpoint.com/discuss/tos.
