Managing Roles
Roles allow you to group related sets of access, from a single source or across multiple sources, to simplify access management for your users. Roles often group access according to job functions or other shared user attributes such as departments or locations. You can then configure roles for automated provisioning or for access requests so they can be granted to your users.
You must have Provisioning to use roles.
There are two types of roles: standard and dynamic.
Standard roles group access from entitlements and access profiles and provision the access based on assignment criteria.
Dynamic roles allow you to additionally grant birthright access based on definable role dimensions. This provides for more granular access and assignment options within one role. For more information refer to Working with Dynamic Roles.
Note
In addition to org admins, who have full system access, users granted the Role Admin or Role Sub-admin user levels can also create, manage, and edit roles.
- Role Admins can do this for all roles.
- Role Sub-admins can perform these actions only for roles they are authorized for.
Creating Roles
-
Go to Admin > Access Model > Roles.
-
Select Create New.
Tip
The top navigation bar includes a shortcut to this page. Select the Add icon
 , then Role.
 -
Complete the Configuration page to define the role's most basic information.
- Select Save.
The role has been saved and will appear in the Roles list. It will need further configuration for access and assignments before it can be enabled.
Configuring Roles
Once you've created a role, you can define its basic details.
-
Select Standard or Dynamic for Role Type.
-
In the Name field, enter a unique and descriptive name for your role. Role names cannot exceed 128 characters.
-
Select the Primary Owner dropdown list to choose an identity to own this role. This identity can be configured as a reviewer for access requests or certifications.
-
(Optional) You can also add Additional Owners by selecting Identities or Governance Group. You can add up to 10 identities or 1 governance group as additional owners. Additional owners can be configured as reviewers for access requests.
-
In the Description field, provide additional details about the role and the access it grants. This field allows a maximum of 2,000 characters.
Best Practice
Provide user-friendly, informative names and descriptions for your roles. Both are visible in certifications, access requests, and approvals. A detailed description will improve the quality and speed of reviewer decisions.
-
Select Common Access if this role represents access that applies to large sets of users in your organization, generally granted only through automated processes. This field is present for customers who have licensed AI-driven Identity Security.
Designating a role as Common Access means it will be omitted from access request recommendations in the Request Center.
-
Select Save.
Managing Role Access
Roles can contain entitlements and access profiles. Each role should contain at least one entitlement or access profile.
To add access items to a role:
-
Select the Manage Access tab.
-
Select Add Access.
-
Select Entitlements or Access Profiles, depending on what access you want to add.
-
Select the checkboxes next to the access items that will be added to the role. Access items that are already assigned to a role have an Assigned status in the Assigned to Roles column.
-
Select Review.
-
If you want to remove any of the access items from the list, select the X action for that item.
-
Select Add Access.
To remove access items from a role:
-
On the Manage Access tab, select Entitlements or Access Profiles.
-
Select the Remove action for the access item to be removed. If you decide to keep the access item in the role, select the Cancel action.
-
Once you have finished removing access items, select Save.
Adding Optional Role Configuration
You have the option to complete additional role configuration on the following tabs:
- Define Assignment – Specify criteria for automatic role assignment. For more information, refer to Automating Role Assignment.
- Access Requests – Enable access requests on a role and set a review process for requests. For more information, refer to Configuring Roles for Requests.
- Metadata Attributes - Add contextual information to roles with default or custom metadata attributes. For more information, refer to Managing Access Model Metadata.
Enabling Roles
Roles usually get enabled after automated assignment criteria are configured or when they are enabled for access requests.
To enable a role:
- Go to Admin > Access Model > Roles.
- Select Edit for the role you want to enable.
- Select Enable Role.
Important
Any new or updated role configurations must be applied to your identities through identity processing. Refer to Applying Changes for details.
Working with Dynamic Roles
In addition to standard roles comprised of access profiles and entitlements, dynamic roles allow you to grant birthright access based on definable role dimensions. The dimension criteria determine which users are assigned the dimension and are provisioned with the dimension's access items. Even when a dimension's criteria are valid, no provisioning takes place if there are no identities that match that criteria.
Dynamic roles provide more granular access and assignment options within a single role, instead of having multiple, separate roles with mostly overlapping access.
For example, a retail store chain could have one, dynamic store clerk role that has a dimension for each location. Each location dimension will have criteria mapping the clerk’s store location to the location-related access they need for their job.
Dynamic roles require configuration of dimensional attributes and dimensions. Once you have configured a role with the Dynamic role type, you can select Edit for the dynamic role to access these tabs.
Enabling Dimension Attributes
You must enable identity attributes to be selectable in role dimensions.
- Select the Dimension Attributes tab.
- Select the checkboxes under Enable for Dimensions for the identity attributes you want to be available.
- Select Save.
Creating Role Dimensions
To use role dimensions with dynamic roles, you must create the dimension, configure the criteria, and add access items.
To add a dimension to a role:
- Select the Dimensions tab.
- Select Create New.
- On the Configuration page, give the dimension a Name and meaningful Description.
- Select Save.
To configure the dimension criteria:
- Select the Dimension Criteria tab where you will use enabled dimension attributes to define the dimension and which identities will be assigned the role dimension.
- Select an Attribute.
- Type values in the Values field, pressing enter after each value.
- After all attribute values have been entered, select + Add Criteria.
- Continue adding criteria attributes and values until the dimension criteria is complete.
- Select Save.
To add access to the dimension:
- Select the Manage Access tab.
- Select Add Access.
- On the Add Access page, select entitlements and access profiles to add to the dimension.
- Select Review.
- Review the listed access items that will be included in the dimension.
- If necessary, remove items by selecting X, and use the Back button to add more items on the previous screen.
- When the reviewed access items are as you want them, select Add Access.
- When all access items have been added, select Save.
Once all desired dimensions have been configured, you can enable the role.
If you later delete a dimension from a role, the dimension is removed from identities, but not the access, unless role change propagation is enabled.
Editing Roles
You can change most of the attributes you defined for the role while creating it.
If your organization has licensed SailPoint Identity Graph, you can select the Identity Graph icon ![]() for an existing role. A visualization is displayed showing the roles's relationships with other access objects.
for an existing role. A visualization is displayed showing the roles's relationships with other access objects.
To edit an existing role:
-
Go to Admin > Access Model > Roles.
You can search for a specific role based on characters contained in the role name. You can also use the Sort icon
 to sort roles by their name, the date they were last modified, or the date they were created.
 -
Select Edit on the role you want to edit.
-
Make changes to the role’s configuration, dimensions, access, assignment criteria, metadata attributes, or access request configurations. Select Save on each page you change.
Important
Changing a role's type from Dynamic to Standard deletes all associated dimensions and dimensional configurations.
Removing Access with Role Changes
Changes to a role’s definition may or may not result in the removal of access from users. Access removal is based on several factors.
Assignment Changes
If Identities are removed from a role because of changes to the role’s assignment criteria or membership list, the access assigned by the role will be removed, or deprovisioned, from those identities unless the access is also assigned by a different role.
Access Changes
If access is removed from a role definition, the removal of access depends on whether or not role change propagation is enabled:
Role Propagation Enabled - If role change propagation is enabled, entitlements are removed, or deprovisioned, from identities after the following role changes:
- Removing directly assigned entitlements
- Removing directly assigned access profiles
- Removing entitlements from an access profile associated with the role
- Removing or modifying dynamic access role dimensions
- Removing entitlements from a role dimension or access profile on a dimension
Role Propagation Disabled - If role change propagation is disabled, entitlements are not removed, or deprovisioned, from identities after the following role changes:
- Removing access profiles from the role
- Removing entitlements from the role
- Removing entitlements from an access profile associated with the role
- Deleting an access profile previously attached to the role
- Deleting a role
- Deleting a dimension from a role
Important
- Role change propagation must be enabled and roles must be in an enabled state for access changes to propagate. Removal of entitlements with role change propagation does not apply to disabled roles.
- Access changes made to a disabled role will not be propagated when the role is later enabled.
Enabling Role Change Propagation
Enabling the role change propagation feature for your organization ensures that access is automatically removed from identities when you make certain role changes instead of having to remove access with a certification campaign. Role change propagation does not affect access additions. Access additions are handled by the identity refresh process.
To enable role change propagation:
- Go to Admin > Global > System Settings > Other Features.
- Select Enable Role Access Removal Propagation.
- Select Save.
Identity processing to propagate role changes runs on a daily schedule or can be started manually by selecting Apply Changes on the Roles page.
Revoking Entitlements with Role Changes
If you need to revoke entitlements for users based on role changes, you must:
-
Define and assign a new role with the access you want the users to retain.
- For auto-provisioned roles, specify its assignment criteria to match the old role and let identity processing assign the new role.
- For roles managed by access requests, request the new role for the users.
-
Remove the old role from all users.
- For auto-provisioned roles, change the role’s assignment criteria so users do not meet it and let identity processing revoke the old role from the users.
- For roles managed by access requests, use a certification or manager removal request to revoke the old role from users.
-
Delete the old role once you verify that it is no longer needed.
Important
- Deprovisioning entitlements does not remove source accounts, even if the accounts were created by role provisioning or if all entitlements are removed from the account.
- If any of the role’s entitlements overlap with another assigned role for the user, the user will retain the entitlements for the role they still have.
Deleting Dimensions
When deleting a dimension from a dynamic access role, the dimension is automatically removed from all identities that hold the dimension. The access included in the dimension is not removed from the identities, but it is no longer associated with the dimension.
Applying Changes
Role configuration changes are not immediately applied to identities. When a user's identity attributes change, event-based processing can adjust role assignments and provision access changes based on the new information. Otherwise, you must select Apply Changes on the role list page to initiate identity processing for all identities in your organization, to recalculate users’ access based on your changes.
Best Practice
For best system performance, wait to select Apply Changes until you are ready to apply the whole set of configuration changes to your whole set of identities. Selecting it for roles, access profiles, or applications automatically processes all three.
Disabling or Deleting a Role
You can temporarily or permanently disable roles, or you can delete them if you no longer need them.
To disable a role:
-
Go to Admin > Access Model > Roles.
-
Select Actions
 > Edit on the role you want to edit.
 - Select the Enable Role toggle to turn it off.
To delete a role:
-
Go to Admin > Access Model > Roles.
-
Select Actions
> Delete on the role you want to edit.
You can also select the checkbox beside the name of each role you want to delete and select the Delete button.
Disabling or deleting a role has these implications:
- Removes the role from the Request Center
- Prevents future automated assignment of the role
- Removes the role from your identities
- Does not deprovision the role’s access for identities which previously held it. Identities will keep entitlements they were granted through this role, but they will no longer be associated with the role.
Viewing Role Assignments
-
Go to Admin > Access Model > Roles.
-
Select View Details for a role to view its details.
-
Select Identities in the details overlay.
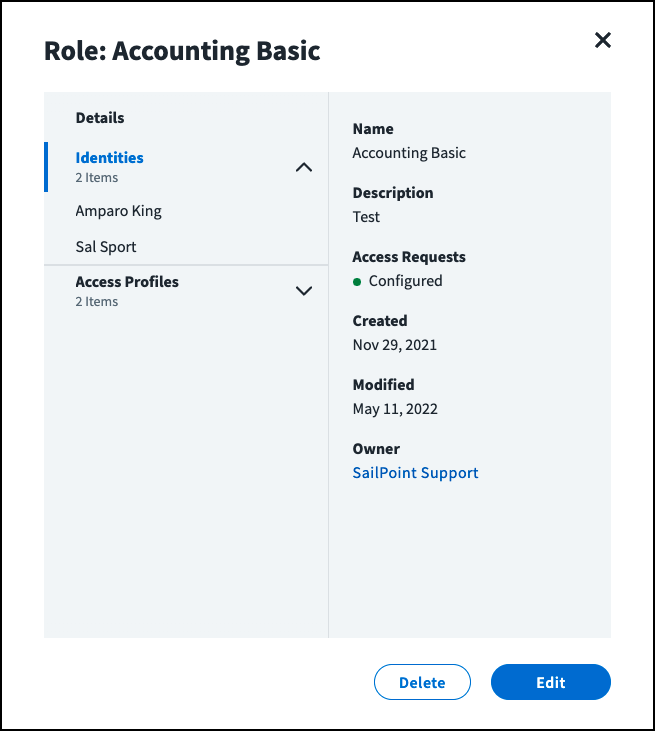
This list includes identities who obtained this role through automated assignment and access requests.
Revoking Requested Roles
Role assignments obtained through access requests can be revoked from the user by someone with Admin, Role Admin, or Role Sub-Admin access to the role. Auto-assigned roles cannot be manually revoked.
Tip
Access to requested roles can also be revoked by administrators through lifecycle states and by managers through revocation requests for their team members.
- Go to Admin > Access Model > Roles.
- Locate the role you need and select View Details.
- Select Identities from the left navigation.
- Locate an identity and select View Assignments.
- On the Assignments page, if the role is revocable, you can select the option to Revoke Assignment for the selected identity. If a user has more than one assignment, verify the account target details first to make sure you revoke the access you intend to.
- Enter a comment in the Request Revocation dialog explaining why this access should be removed.
- Select Revoke. A success message confirms that your revocation request was submitted.
Roles obtained through an access request can also be revoked from the user by someone with Access Revoker access:
- Select Admin.
- Select an identity from the Identities page.
- Review information on the Details page to make sure you have the right identity.
- On the left navigation, select Access.
- On the left navigation, select an Assignment.
- On the Assignments page, if the role is revocable, you can select the option to Revoke Assignment for the selected identity. If a user has more than one assignment, verify the account target details first to make sure you revoke the access you intend to.
- Enter a comment in the Request Revocation dialog explaining why this access should be removed.
- Select Revoke. A success message confirms that your revocation request was submitted.
Notes
- Revocation of the role's entitlements from the user's source account may be automatic and immediate or may require the source owner to complete a manual task.
- No notification is sent for this administrative revocation, but the action is captured in audit records.
Adding or Editing Access Start and End Dates
You can add or change the start or end date for an assignment.
- On the Admin > Identity Management > Identities page, select an identity.
- Select Access from the left navigation, then select an access item.
- Go to the Assignment page and select Add or Edit in the start or end date field.
-
In the Access Start Date and Time or Access End Date and Time field, select a date.
Note
The Access End Date and Time field is required for access items with a maximum duration. The last allowed access end date and time is calculated by adding the configured maximum duration to the current date, even when the current end date (before edits) is beyond the maximum duration. When an access start date is specified, any configured max duration requirement is applied for the access end date based on the selected start date and time instead of the moment of request.
When you change an end date, the new date needs to be within the allowed duration.
-
If required, add comments.
- Select Save.
When you edit an access start date or an access end date to extend access time, the request goes through the Add Access approval process. If you edit an end date to remove access early, the request goes through the Remove Access approval process, which may be configured to not require approval. Refer to Configuring Access Requests. When requests to modify access start or end dates are shown to approvers, they are clearly labeled so approvers understand what they are being asked to review.
Documentation Feedback
Feedback is provided as an informational resource only and does not form part of SailPoint’s official product documentation. SailPoint does not warrant or make any guarantees about the feedback (including without limitation as to its accuracy, relevance, or reliability). All feedback is subject to the terms set forth at https://developer.sailpoint.com/discuss/tos.