Connecting Azure and CIEM
Once you have configured your Microsoft Entra ID account, you can connect it to CIEM using a SaaS connector or VA-based connector:
Choose your next step based on your configuration
When you have completed the steps for your connection type, aggregate and mark the entitlement types that grant cloud access. You can then view the effective access those entitlements grant on aggregated Azure cloud resources and include cloud entitlements in certification campaigns.
Using the Microsoft Entra ID SaaS Connector
If you are using Microsoft Entra SaaS, follow the connector guide to enable SailPoint CIEM.
After a successful test connection, you can optionally set the source scope before aggregating accounts and marking the entitlement types that grant cloud access.
Note
If you previously configured both the Microsoft Entra ID SaaS and SailPoint CIEM Azure connectors, you do not need to take additional action to continue receiving your data.
Setting Source Scope for SaaS-Based Connections
By default, SailPoint CIEM reads and automatically discovers changes to your cloud infrastructure. You can choose to exclude scopes to prevent SailPoint CIEM from including data for those accounts.
When you exclude scopes, SailPoint CIEM will only read and include data from selected scopes. When Auto-Include Scopes is disabled, new and deleted subscriptions in your cloud system will be detected, but SailPoint CIEM will not automatically include data from new scopes until you select the subscriptions individually or reenable Auto-Include Scopes.
You can use the CIEM event triggers in workflows to be notified about scope changes.
Scope Limits
There are limits to the number of scopes you can select based on whether you are gathering inventory data to view effective access, activity data to view last access, or both. To gather both inventory and activity data, you must adhere to the smaller of the two limits.
- Inventory Data (Effective Access) - 4,500 subscriptions
- Activity Data (Last Access) - 1,600 subscriptions
- Both - 1,600 subscriptions
To change the scope of your included source data when using a SaaS-based connector:
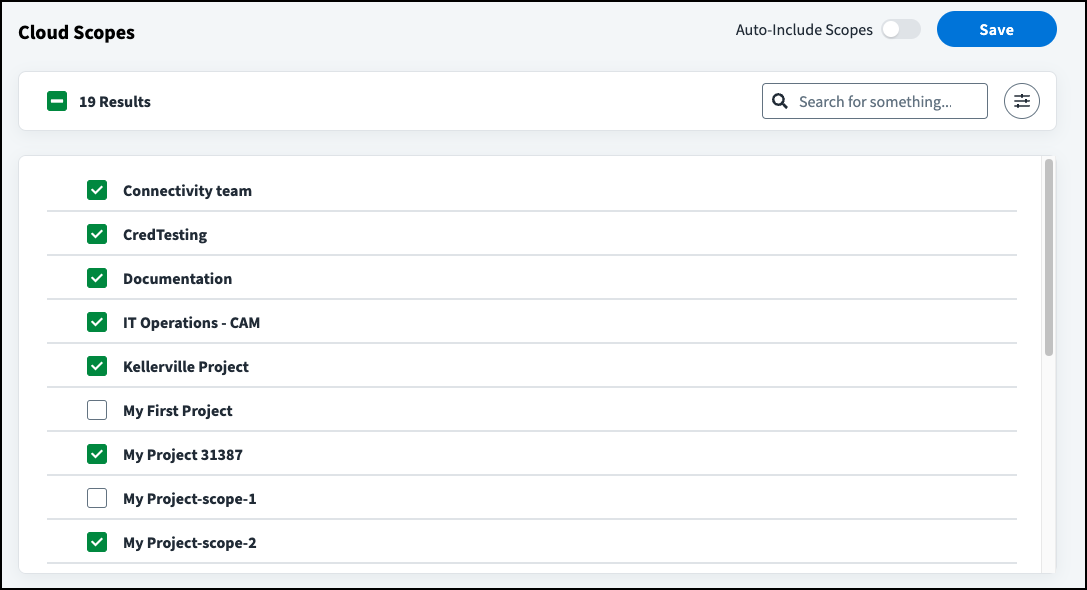
- In the Microsoft Entra ID SaaS source, select Cloud Scopes under Additional Settings.
-
Select which cloud scopes to include:
- To automatically include data from all subscriptions, enable Auto-Include Scopes. Deselecting a scope disables Auto-Include Scopes.
- To include a subset of subscriptions, use the checkboxes to change which scopes are included.
-
Select Save.
Notes
- You can search for scopes as well as filter by excluded scopes and scopes with errors.
- The Discovered by CIEM column displays when changes to your source inventory were last detected by SailPoint CIEM. This is separate from aggregation.
You will next aggregate accounts and mark the entitlement types that grant cloud access.
Using the Microsoft Entra ID VA-Based Connector
If you are onboarding SailPoint CIEM using a VA-based connector instead of SaaS, you must configure both the Microsoft Entra ID (formerly Azure Active Directory) identity governance connector and the SailPoint CIEM Azure connector.
| Microsoft Entra ID (formerly Azure Active Directory) VA-based connector | Allows you to manage your Azure users and groups in Identity Security Cloud on virtual appliances. If your organization has licensed a SailPoint cloud management solution, it will also gather data about the cloud access granted to users through their Azure management groups, subscriptions, resource groups, and role assignments. |
| SailPoint CIEM Azure connector | Works with your Microsoft Entra ID identity governance connector to collect cloud resource data and display the effective access an identity has on aggregated cloud resources from your Azure systems. |
You may connect the VA-based and SailPoint CIEM Azure sources in any order.
Connecting the Microsoft Entra ID VA-Based Connector
-
Follow the SailPoint Connector guide to configure or edit the Microsoft Entra ID (formerly Azure Active Directory) connector.
-
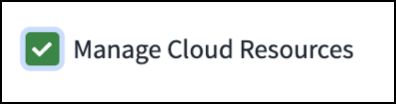
In the Feature Management configuration, select the Manage Cloud Resources checkbox to enable it to gather cloud data.
For more information about the cloud objects managed through the identity governance connector, refer to Group Management for Azure Cloud Objects.
You must then configure the CIEM Azure connector to display all access users have to your cloud resources.
Connecting SailPoint CIEM Azure
The SailPoint CIEM Azure source pulls daily data about the cloud resources your Azure IaaS users can access.
To register SailPoint CIEM Azure:
-
Go to Admin > Connections > Sources > Create New.
-
Find the CIEM Azure source type and select Configure.
-
Enter a source name.
-
Enter a description for your source.
-
In the Source Owner field, begin typing the name of an owner. Matches appear after you type two letters.
-
(Optional) Select a governance group for source management.
-
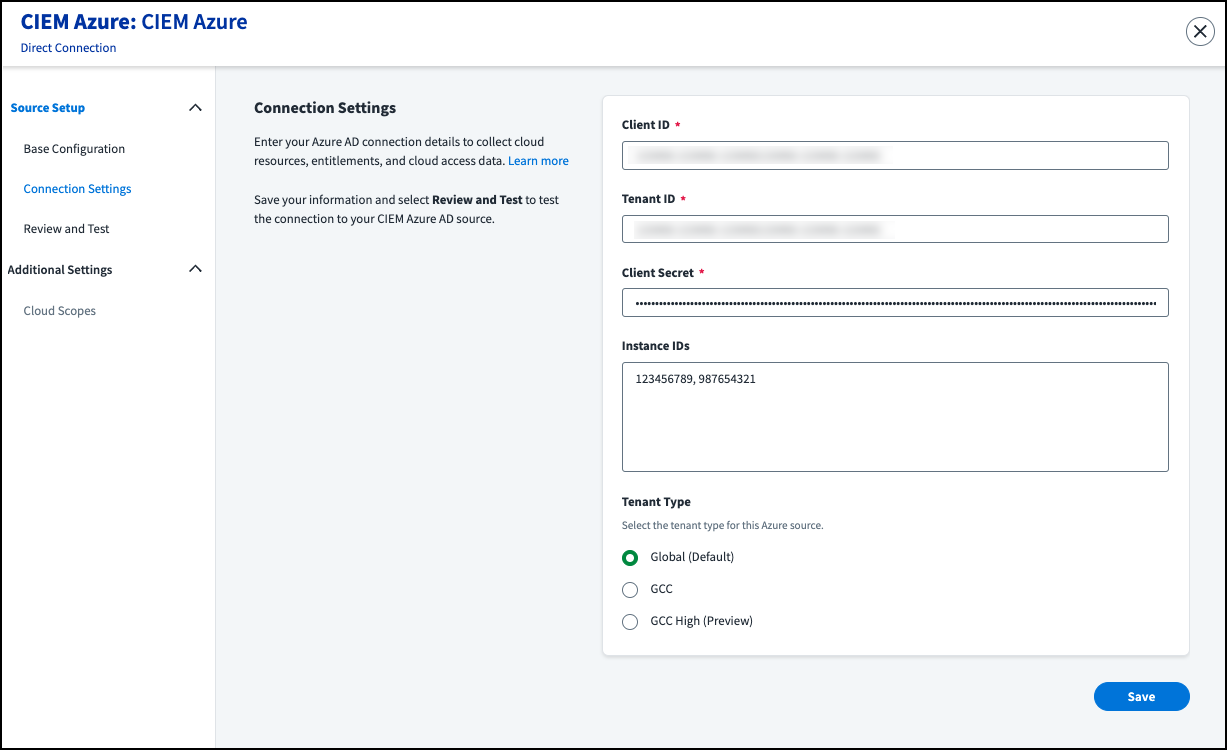
Select Connection Settings.
-
Enter your client ID.
- Enter your tenant ID.
- Enter your client secret.
- (Optional) Enter up to 250 instance IDs, separated by commas. These are the Application IDs used to resolve Microsoft Entra ID accounts with federated IAM roles in AWS. Refer to the Microsoft Entra ID documentation for more information and guidance on finding your application IDs.
- If you are using GCC or GCC High, select the tenant type.
- Select Save.
- Select Review and Test.
-
Review the configuration details and select Test Connection. A successful test is required for SailPoint CIEM to gather data for this source.
Note
If the test connection fails, you can use the Search query
name:“Test_connection Source Failed”for more information. -
(Optional) After a successful test connection, you can set the source scope.
When you have completed your configuration, follow the directions to aggregate your data and then mark the entitlement types that grant cloud access.
Setting Source Scope for VA-Based Connections
By default, SailPoint CIEM reads and automatically discovers changes to your cloud infrastructure. If you are using a VA, you can choose to exclude scopes to prevent SailPoint CIEM from including data for those accounts.
When you exclude scopes, SailPoint CIEM will only read and include data from selected scopes. When Auto-Include Scopes is disabled, new and deleted subscriptions in your cloud system will be detected, but they will not be automatically included in your SailPoint CIEM data until you select them individually or reenable Auto-Include Scopes.
You can use the CIEM event triggers in workflows to be notified about scope changes.
Scope Limits
There are limits to the number of scopes you can select based on whether you are gathering inventory data to view effective access, activity data to view last access, or both. To gather both inventory and activity data, you must adhere to the smaller of the two limits.
- Inventory Data (Effective Access) - 4,500 subscriptions
- Activity Data (Last Access) - 1,600 subscriptions
- Both - 1,600 subscriptions
To change the scope of your included source data when using a VA-based connector:
- In the CIEM Azure source, select Cloud Scopes under Additional Settings.
-
Select which cloud scopes to include:
- To automatically include data from all subscriptions, enable Auto-Include Scopes. Deselecting a scope disables Auto-Include Scopes.
- To include a subset of subscriptions, use the checkboxes to change which scopes are included.
-
Select Save.
Notes
- You can search for scopes as well as filter by excluded scopes and scopes with errors.
- The Discovered by CIEM column displays when changes to your source inventory were last detected by SailPoint CIEM. This is separate from aggregation.
Documentation Feedback
Feedback is provided as an informational resource only and does not form part of SailPoint’s official product documentation. SailPoint does not warrant or make any guarantees about the feedback (including without limitation as to its accuracy, relevance, or reliability). All feedback is subject to the terms set forth at https://developer.sailpoint.com/discuss/tos.