Loading Account Data
After you've configured a source, you can aggregate data from your connected systems to Identity Security Cloud.
Aggregation Methods
There are three methods of aggregating account data.
| Aggregation Type | Description |
|---|---|
| Optimized aggregation (default) | Retrieves all records from the source and evaluates them for changes. If the account exists and no changes are detected, the record is skipped and neither account correlation nor manager correlation are evaluated. |
| Unoptimized aggregation | Unoptimized aggregations scan every account and attribute from the source and recalculate account correlation and manager correlation logic even for accounts without data changes. These changes are added to the identity regardless of whether the attribute values have changed. |
| Delta aggregation | An aggregation that only loads data that has changed, been added, or been removed from the source. Only some sources support this. |
Best Practices
- Aggregate only necessary and important accounts. Use filtering on the connector to aggregate only the most recent records for active users.
- Aggregate as infrequently as possible based on your business needs. It is rarely necessary to aggregate more than once a day for non-authoritative sources.
- When possible, aggregate outside of business hours.
- When available, use delta aggregation to lower aggregation times and minimize load on the system.
Scheduling Aggregations for Direct Connect Sources
You can schedule aggregations to automatically load data from the source to Identity Security Cloud on a regular basis.
-
Go to Admin > Connections > Sources.
-
Select or edit the source you want to schedule aggregations for.
-
In the Account Management section, select Account Aggregation.
-
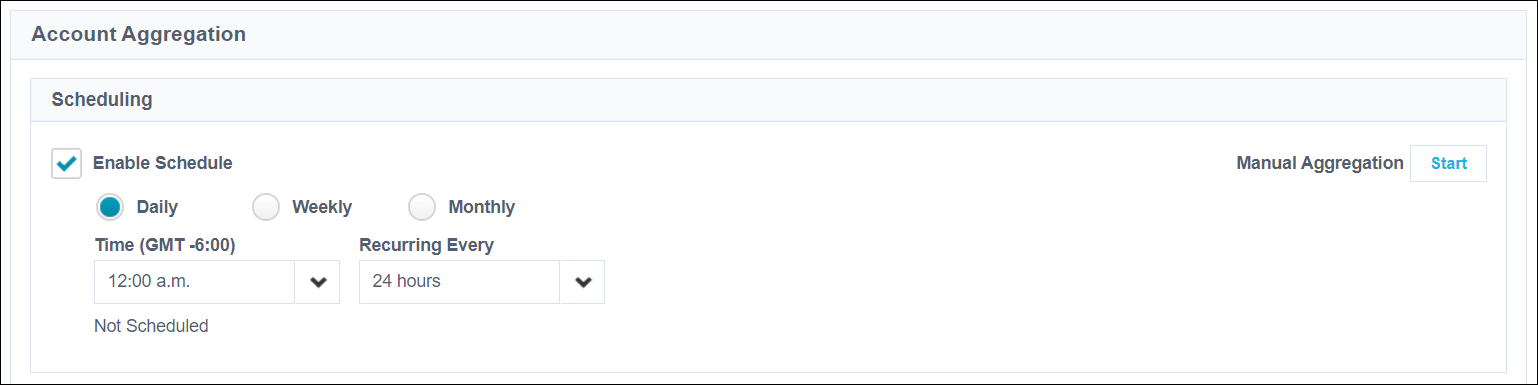
Select Enable Schedule to enable scheduled aggregations for this source.
-
Choose how often the aggregation should run and the time you want each aggregation to start. Refer to Scheduling Aggregations for guidance on configuring regular aggregations.
Note
The time zone (GMT offset) for the account aggregation schedule is determined by the time zone set for the connected virtual appliance cluster. Since time zones are set as an offset of GMT, standard time for the selected time zone is always used. Schedules do not shift for daylight saving time.
-
Select Save to save your account aggregation schedule. Aggregations will begin at the next scheduled date and time.
You can also start a one-time aggregation manually.
-
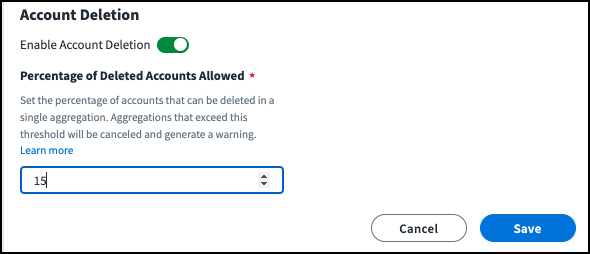
(Optional) In the Account Deletion card, select Enable Account Deletion to allow accounts to be deleted from Identity Security Cloud if they are not detected during an account aggregation.
Under some circumstances, identity deletion on authoritative sources can be blocked. Refer to Deleting Authoritative Accounts and Identities for more information.
-
If account deletion is enabled, choose a value in the Percentage of Deleted Accounts Allowed field. This is the maximum percentage of accounts that can be deleted during an aggregation before the aggregation is canceled and a warning is generated.
Account Deletion Limitations
In sources with small numbers of accounts, the Percentage of Deleted Accounts Allowed value will be rounded to the nearest whole account. If the percentage you select does not round to at least 1 account, the aggregation will only be canceled if 100% of the accounts on the source would be deleted by the aggregation. Ensure you always set a Percentage of Deleted Accounts Allowed value to represent at least 1 account.
For example, if you are aggregating a source with 10 accounts, set the Percentage of Deleted Accounts Allowed to at least 5%. This will be rounded to 10%, or 1 account, and the aggregation will be canceled if 1 or more accounts would be deleted during the aggregation.
-
Select Save to save your account deletion settings.
These settings also apply during manual aggregations.
If you need to cancel an account aggregation after it has started, go to the Latest Account Aggregation section and select Menu > Cancel on the aggregation card.
You can also cancel an in-progress aggregation from the Aggregation History page.
The aggregation is added to the processing queue at the time you defined. Other queued or in-progress operations might delay the start of your aggregation.
Scheduling Aggregations
You can choose an aggregation schedule to suit your business needs.
Note
Quick Compliance sources can be scheduled to aggregate accounts up to 3 times per day, with a minimum frequency of 8 hours between aggregation. These limits do not apply to Org Admins.
In the Frequency field, select one of the following options and configure the additional options that appear.
-
Daily - The aggregation will run every day.
-
Reoccurs Every - The aggregation will run at this interval beginning at the selected time and ending at midnight.
-
Start Time - The time of day to start the first aggregation.
Notes
-
Daily recurrences end at midnight. The start time and interval determine how many times an aggregation runs during a day. For example, if the start time is set to 2 PM and the recurrence is set to 8 hours, the aggregation will occur twice daily at 2 PM and 10 PM.
-
When the value in the Reoccurs Every field is less than every 24 hours, the Start Time dropdown displays the possible start times that will result in at least two aggregations per day.
For example, if you select 8 hours in the Reoccurs Every field, the latest time in the Start Time dropdown will be 3 PM, and if you select that value, aggregations will take place at 3 PM and 11 PM.
-
-
Weekly - The aggregation will run on a specific of the week.
-
Day - Choose the day of the week to begin the aggregation on.
-
Start Time - The time of day to start the aggregation.
-
Monthly - The aggregation will run on one day each month.
-
Date - Choose which day of the month to begin the aggregation.
-
Start Time - The time of day to start the aggregation.
Note
For monthly aggregations, you can choose any date between 1 and 28.
Manually Aggregating Accounts from a Direct Connect Source
You can run a one-time aggregation for a source manually.
Note
Quick Compliance sources can be manually aggregated once per day or scheduled to aggregate accounts up to 3 times per day. These limits do not apply to Org Admins.
- Go to Admin > Connections > Sources.
- Select or edit the source you want to schedule aggregations for.
-
In the Account Management section, select Account Aggregation.
-
(Optional) In the Account Deletion card, select Enable Account Deletion to allow accounts to be deleted from Identity Security Cloud if they are not detected during an account aggregation.
Under some circumstances, identity deletion on authoritative sources can be blocked. Refer to Deleting Authoritative Accounts and Identities for more information.
These settings also apply during scheduled aggregations.
-
If account deletion is enabled, choose a value in the Percentage of Deleted Accounts Allowed field. This is the maximum percentage of accounts that can be deleted during an aggregation before the aggregation is canceled and a warning is generated.
Account Deletion Limitations
In sources with small numbers of accounts, the Percentage of Deleted Accounts Allowed value will be rounded to the nearest whole account. If the percentage you select does not round to at least 1 account, the aggregation will only be canceled if 100% of the accounts on the source would be deleted by the aggregation. Ensure you always set a Percentage of Deleted Accounts Allowed value to represent at least 1 account.
For example, if you are aggregating a source with 10 accounts, set the Percentage of Deleted Accounts Allowed to at least 5%. This will be rounded to 10%, or 1 account, and the aggregation will be canceled if 1 or more accounts would be deleted during the aggregation.
-
Select Save to save your account deletion settings.
-
At the top of the page, select Start Aggregation.
While an aggregation is running, the Start Aggregation button will be disabled. You can view the progress of this aggregation in the Account Aggregation section on this page. You can cancel the aggregation by selecting Menu > Cancel on the aggregation card.
You can also view aggregation activity on the Aggregation History page. You can also cancel the aggregation from this page.
Manually Aggregating Accounts from a Flat File
If you choose a flat file connection type for any source type, you must use a file import to manually aggregate the source's data.
- Go to Admin > Connections > Sources.
-
Select or edit the flat file source you want to aggregate. For best results, flat files should not exceed 500 MB.
-
In the Account Management section, select Account Aggregation.
-
(Optional) If you haven't created a .csv file with the account data, select Download Account Schema to download a template that can be used for the file import. Fill out the columns in this template based on the required attributes on your source.
-
(Optional) Under Account Deletion, select Enable Account Deletion to allow accounts to be deleted from Identity Security Cloud if they are not detected during an account aggregation.
Under some circumstances, identity deletion on authoritative sources can be blocked. Refer to Deleting Authoritative Accounts and Identities for more information.
These settings also apply during scheduled aggregations.
-
If account deletion is enabled, choose a value in the Percentage of Deleted Accounts Allowed field. This is the maximum percentage of accounts that can be deleted during an aggregation before the aggregation is canceled and a warning is generated.
Account Deletion Limitations
In sources with small numbers of accounts, the Percentage of Deleted Accounts Allowed value will be rounded to the nearest whole account. If the percentage you select does not round to at least 1 account, the aggregation will only be canceled if 100% of the accounts on the source would be deleted by the aggregation. Ensure you always set a Percentage of Deleted Accounts Allowed value to represent at least 1 account.
For example, if you are aggregating a source with 10 accounts, set the Percentage of Deleted Accounts Allowed to at least 5%. This will be rounded to 10%, or 1 account, and the aggregation will be canceled if 1 or more accounts would be deleted during the aggregation.
These settings also apply during scheduled aggregations.
-
Select Save to save your account deletion threshold settings.
-
Import the list of accounts by selecting the Upload icon
 and choosing the .csv file of accounts, or select Aggregate Using Latest File to use a previously uploaded accounts list.
While an aggregation is running, the aggregation option will be disabled. You can view the progress of this aggregation in the Account Aggregation section on this page. You can cancel the aggregation by selecting Menu > Cancel on the aggregation card.
You can also view aggregation activity on the Aggregation History page. You can also cancel the aggregation from this page.
Configuring Delta Aggregations for Supported Sources
Delta aggregations on a supported source only load the accounts that have been created or changed since the most recent aggregation. For example, if one user's group memberships change in Active Directory, you can aggregate account information for that user only instead of all accounts on the source.
Note
Delta aggregation does not support OU moves. If you perform any type of OU move, you need to perform full account aggregations to avoid unexpected behavior such as the creation of duplicate user accounts.
Supported Sources
The following sources support delta aggregation:
To configure delta aggregations on a supported source:
- Go to Admin > Connections > Sources.
- Select or edit the source you want to configure delta aggregations for.
-
Select Aggregation Settings and enable Delta Aggregation.
Note
For JDBC, delta aggregation requires some addition configurations. Refer to the JDBC connector documentation for details.
Aggregating Account Information on a Direct Connect Source Using APIs
If you prefer to aggregate a direct connect source using the available REST API, you can do so using the loadAccounts API. In some cases, this is necessary, such as when you need to force reprocessing of all source accounts by disabling aggregation optimization.
Note
To use APIs, you'll need to use one of our supported authentication methods. For details, refer to the supported Authentication Methods in our API documentation.
-
Go to Admin > Connections > Sources.
-
Select or edit the source you want to aggregate information on.
The source ID is displayed at the end of the URL in your browser address.

-
Make note of the source ID, as you'll need to refer to in the next step.
-
Use your preferred tool to call the following API:
POST <api-url>/beta/sources/<source_id>/load-accountswhere
<api-url>is the URL to the API on your SailPoint org (e.g., https://org-name.api.identitynow.com).<source_id>is the ID of the direct connect source you want to aggregate.
To scan every account using an unoptimized aggregation:
If you have changed the correlation configuration for the direct connect source, you can disable optimization by including form-data: disableOptimization=true in the Body of the call. This will reprocess every record whether or not the data has changed.
Note
This parameter setting applies to the current aggregation only. Subsequent aggregations performed using the API will have optimization enabled unless you set this flag to true each time. Scheduled or manual aggregations performed using the UI will always run with optimization enabled.
Aggregation Activity
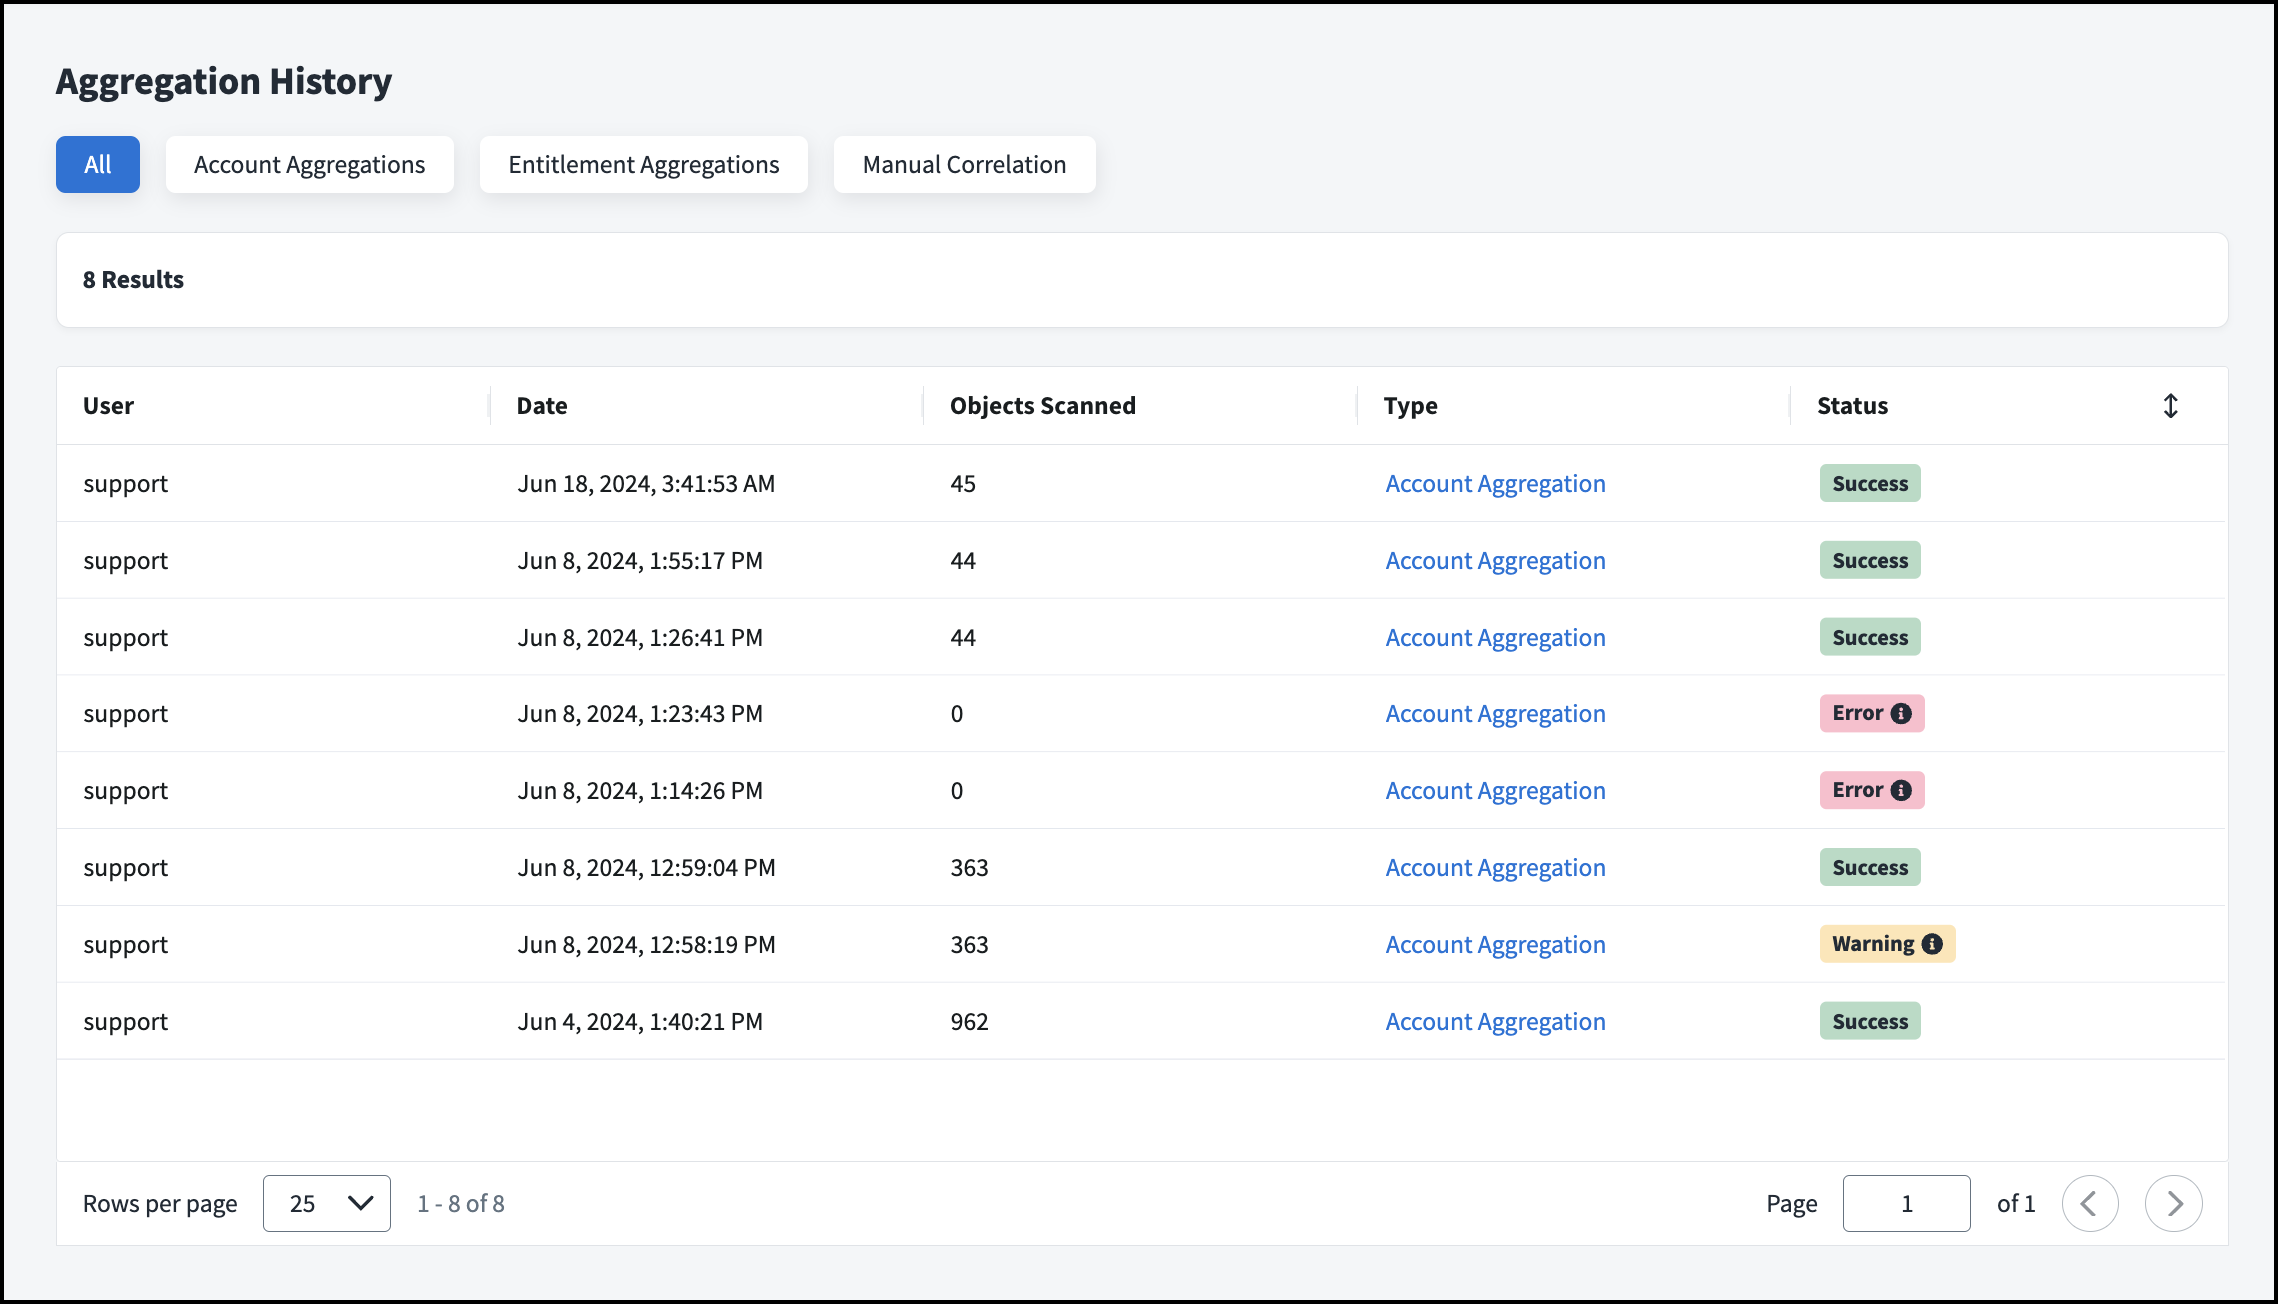
To view aggregations from the past 90 days, go to Admin > Connections > Aggregation Activity. The 5 most recent aggregations are displayed by default. Select View All to view a complete list.
Viewing Account Aggregation History
When a source's accounts are being aggregated, an entry is added to the Aggregation History section. This includes information like the admin who started the aggregation (for manual aggregations), the date and time the aggregation occurred, the number of objects scanned, and its current status.
Aggregations are ordered by most recent aggregation task. You can also sort by status to quickly find success, warning, error, and terminated tasks.
To view account aggregation history:
- Go to Admin > Connections > Sources.
- Select or edit the source you want to view aggregation activity for.
- In the Aggregation History and Connections section, select Aggregation History.
-
Select Account Aggregations at the top to filter by account aggregations. You can view information about each aggregation, like its start and stop time, number of accounts scanned, and whether optimization was enabled.
You can also select Manual Correlation to display manual correlation file imports.
-
If the aggregation was terminated, encountered an error, or has a warning, you can select the Info icon
 on the status badge to view more information.
Viewing Account Changes in Search
Data changes that impact identities and their access are usually accessible in Search immediately or within a few minutes, though longer delays might occur in a busy environment. Updates which do not directly result in identity changes can take as long as 24 hours to be reflected in Search results because they are added to Search through a nightly job, which appears on the Dashboard > Monitor page as SYNCHRONIZE_IDENTITIES.
Canceling an Aggregation
To cancel an aggregation that is in progress, select the Terminate icon ![]() next to it in the Aggregation History section and choose Terminate in the confirmation message.
next to it in the Aggregation History section and choose Terminate in the confirmation message.
Select Account Aggregation to view information about the job execution and data aggregated before the job was terminated. This includes the aggregation’s status, starting date and time, duration, accounts scanned, whether optimization was enabled, and number of unchanged accounts.
Select the Info icon ![]() to view the name of the user who terminated the task in the warning message.
to view the name of the user who terminated the task in the warning message.
Aggregating Data for a Single Account
If you are a Helpdesk admin or an administrator, you might need to reload or aggregate the data from a single account to have the most current information. For example, if a user calls the Helpdesk for help unlocking their account, their locked status might not display immediately. Aggregating that person's account updates it data and status without taking the time and resources to update the source's entire contents.
-
Go to Admin > Identity Management > Identities.
-
Find and select the name of the identity whose account you want to aggregate.
-
Select Accounts from the left pane.
-
Select the Actions icon
 on the account and choose Aggregate Account.
This action updates the related identity's account data, but it does not synchronize the new data with the identity attributes. It also does not have any impact on provisioning. It only loads any changes from the account source data.
Note
Account deletions are only processed during full source aggregations. If the account is not found on the source during single-account aggregation, it will remain unchanged in your system.
Deleting Authoritative Accounts and Identities
When Enable Account Deletion is selected and an identity’s account on its authoritative source is deleted, aggregating that source deletes that authoritative account from Identity Security Cloud, which removes the account from the identity. The identity is then analyzed to determine whether it should be reassigned to another identity profile, deleted, or hidden in Identity Security Cloud.
If the identity has an account on another, lower priority authoritative source, it will be reassigned to that source’s identity profile, and its identity attributes will be recalculated based on that identity profile’s mappings.
If the identity does not belong to another authoritative source, the system will attempt to delete the identity during the nightly job that runs automatically.
Blocking Deletion
Deletion can be blocked if the identity:
- has accounts from other sources correlated to it.
- is the owner of any role, access profile, application, or source.
- is the owner or requester of an active work item, such as an access request approval.
- is designated as another identity’s manager.
- has elevated user levels, such as role admin, org admin, or helpdesk.
- is marked as a protected identity. This is an API-level configuration.
- is linked to an active campaign or certification.
If any of these conditions prevent the identity from being deleted, it will remain in Identity Security Cloud as a hidden identity.
When an identity is hidden:
- Since it is not connected to an identity profile, its last name, email, and UID values are no longer mapped, and the identity does not appear on the Identities page.
- All accounts previously correlated to the identity remain attached to the hidden identity, but they are treated as uncorrelated accounts since their associated identity is not an authoritative identity. In an uncorrelated accounts certification that includes the accounts' sources, these accounts will be grouped together under a shared uncorrelated identity.
Errors and Retries
On supported sources, Identity Security Cloud can automatically recognize some aggregation error messages, such as "Connection Reset" and "Failed to connect to server", as retryable errors.
When Identity Security Cloud receives a retryable error during aggregation on a supported source, it will retry the action. You can configure additional retry errors for a source by using a Patch request to add the aggregationRetryErrors field to a source within its connectorAttributes. You can also add the retryWaitTime and maxRetryCount fields to configure the retry process.
You can use these three fields to configure a supported source's retry errors:
-
aggregationRetryErrors: The errors to retry. -
retryWaitTime: The time span to wait before retrying. 5000 milliseconds is the default and recommended value. This value must be entered in milliseconds. -
MaxRetryCount: The maximum number of retries. Three is the default and recommended value.
Important
Retyrable errors are not supported for all connectors. To determine whether your connector supports retryable errors, refer to the SailPoint Connector documentation.
Troubleshooting Common Aggregation Issues
The following list describes common aggregation issues that might occur and their typical causes:
When I import a delimited file, only a single entitlement is aggregated for each account.
Ensure that the delimited file is sorted by account ID.
Accounts that contain emojis within their names are not aggregating.
SailPoint supports the UTF8MB3 character set, which excludes many emojis and some special characters. Refer to the Basic Multilingual Plane for more information.
When I attempted to aggregate a delimited source, I received a "<123456789> is not a valid phone number" error message.
Ensure a country code is specified for the phone number.
An uncorrelated account did not correlate after running an aggregation, even after the correlation logic had been updated. After running a non-optimized aggregation, the account correlated correctly.
This is expected behavior. An optimized aggregation does not reevaluate correlation logic for accounts with no data changes. By running a non-optimized aggregation, correlation logic was reevaluated, and the account was correlated once more.
Aggregation retries are failing.
Retry errors like "java.net.UnknownHostException," "Read timed out," or "Connection Reset" indicate that the connection between your virtual appliance and source system is failing and interrupting aggregations.
This could be caused by:
- Networking time outs or latency issues.
- Temporary or permanent DNS resolution issues.
- Firewall or other network appliance interruptions.
- Source server-side processing delays causing timeouts.
- Source server-side crashing or restarting.
Refer to Errors and Retries for guidance on configuring retries when errors are encountered.
Aggregations are timing out on the source.
-
Follow the directions to Generate a JWT/bearer token.
-
Call the Update Source API. The content-type is
application/json+patch+json. -
Add the following:
Notes
- The
sourceIdcan be found using the list sources API. - The
aggregateTimeoutvalue is in seconds. The maximum value is 600 seconds.
Aggregations failing after change to source.
Occasionally, cached jobs on a VA will not release settings for connectors, or your VA may not be communicating correctly with Identity Security Cloud.
To clear out the cached jobs, complete the following steps for each VA in the cluster that manages the source:
-
Run the following command:
sudo rm -rf /opt/sailpoint/share/jobs/* && sudo reboot -
Reboot the VA.
Rebooting prompts your VAs to update and redownload their configuration and driver files, and this too can sometimes help resolve this issue.
-
Confirm the VA reboots correctly and is functioning.
-
Repeat the process for all VAs in the cluster, one at a time.
Documentation Feedback
Feedback is provided as an informational resource only and does not form part of SailPoint’s official product documentation. SailPoint does not warrant or make any guarantees about the feedback (including without limitation as to its accuracy, relevance, or reliability). All feedback is subject to the terms set forth at https://developer.sailpoint.com/discuss/tos.