Active Directory Onboarding Guide
SailPoint Entro reads your on-premises Active Directory from a Worker Group (connector) that you run inside your network. The connector opens an encrypted LDAPS connection to one domain controller, signs in with a read-only service account, and reads users, groups, computers, domains, trusts and ACLs. It never writes to the directory.
Tip
The simplest setup: pick a DC that is also a Global Catalog, ideally in the forest root domain. The connector then needs to reach only that one host, on TCP 636 and TCP 3269.
How the Connection Works
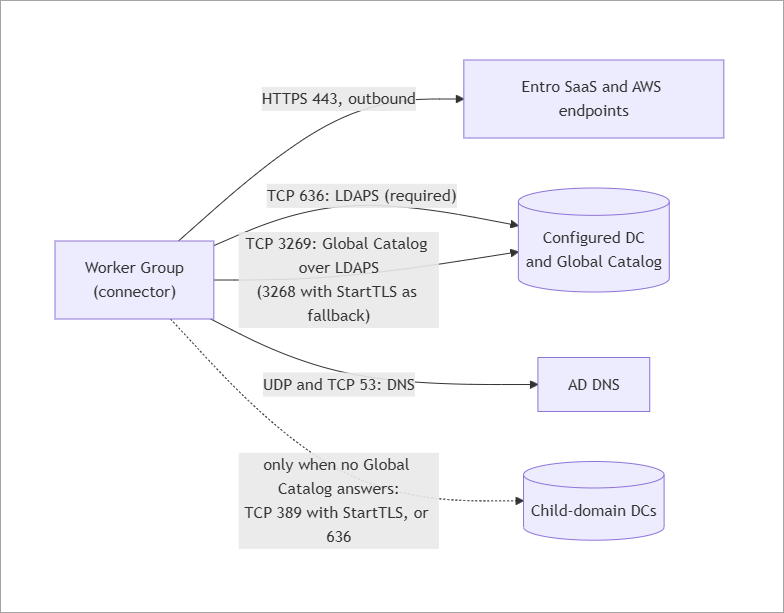
-
The connector signs in with a simple bind over TLS. It never sends the password over an unencrypted connection. If TLS cannot be set up, the connection fails instead of falling back to plain LDAP.
-
Kerberos, NTLM, SMB and RPC are not used.
-
Trusted domains in other forests are recorded as trusts, but the connector never connects to them or sends them the service account's credentials. Onboard each forest separately.
Before You Start
| Item | Where |
|---|---|
| A connector (Worker Group) that is deployed and online | Connector Network Requirements |
| A DC that is also a Global Catalog, and its FQDN | Step 1 |
| An LDAPS certificate on that DC, and the root CA that issued it | Step 3 |
| A read-only service account | Step 2 |
Step 1: Network and DNS
Ports (Connector to DC)
| Port | Protocol | Target | Needed? |
|---|---|---|---|
| 636/TCP | LDAPS | The configured DC | Always. All reads go through it. |
| 3269/TCP | Global Catalog over LDAPS | The configured DC | Required for forests with more than one domain. Without it the account is not Verified. Optional for a single-domain forest. |
| 3268/TCP | Global Catalog, plain LDAP upgraded with StartTLS | The configured DC | Fallback when 3269 is closed. |
| 53/UDP and TCP | DNS | Your AD DNS servers | Required to resolve the DC's name, and to find Global Catalogs and child-domain DCs. |
| 389/TCP | LDAP upgraded with StartTLS | DCs of child domains | Only when no Global Catalog answers. |
Is My DC a Global Catalog?
Being a Global Catalog is a per-DC setting, and some DCs don't have it, often older or branch-office ones.
Check:
Or:
Simplest fix: configure a DC that is a Global Catalog.
Otherwise, in a multi-domain forest the connector uses the Global Catalogs that DNS lists, on TCP 3268 with StartTLS. Those DCs must then be resolvable and reachable from the connector, and their certificates must chain to the Root CA you paste (a bundle is accepted). A single-domain forest needs no Global Catalog.
The ports are not configurable in the SailPoint Entro Console. If your DCs serve LDAPS on non-standard ports, contact SailPoint Entro Support.
The connector also needs outbound HTTPS to SailPoint Entro and AWS endpoints. Refer to Connector Network Requirements.
DNS
The connector must be able to resolve the DC's FQDN from where the connector runs:
-
Docker or Kubernetes: the connector uses the container's or the cluster's DNS, which is often not the host's. A check on the host can pass while the connector still fails with
does not resolve from the connector. Test from inside the container (see Step 4: Validate from the Connector). -
Azure: Azure's default DNS does not know your AD zone. Point the VNet's DNS at your DCs, or add a conditional forwarder for your AD domain.
If fixing DNS isn't practical, enter the DC's IP address in the Console's Domain Controller (DC) field and keep its FQDN in DC FQDN. The connector then connects to the IP and checks the certificate against the FQDN. A single-domain forest whose DC is a Global Catalog then needs no DNS at all.
Docker Compose Connector: Point It at Your AD DNS
In the connector's docker-compose.yaml, add one of these to the connector service, then run docker compose up -d:
extra_hosts:
  - "dc01.corp.example.com:10.0.0.4"   # maps the one name; enough for a single-domain forest
dns: also covers the SRV records the connector uses to find Global Catalogs. extra_hosts covers the DC's name only.
In the connector shell, you could also run nslookup <DC/GC HOSTNAME> <IP ADDRESS> to see if you get the correct IP as response.
Step 2: Create the Service Account
Account Settings
| Setting | Value | Why |
|---|---|---|
| Name / UPN | svc_entro / svc_entro@corp.example.com |
Enter the UPN in SailPoint Entro's Username field. |
| Group membership | Domain Users only | No built-in, admin or operator group is needed. |
| Password never expires | On, or rotate on a schedule and update SailPoint Entro each time | An expired password stops scans (AD error 532). |
| Logon hours / "Log On To" | Unrestricted | Restrictions fail the bind (AD errors 530 / 531). |
| Account expires | Never | AD error 701. |
| Service Principal Name | None | An SPN makes the password crackable offline (Kerberoasting). |
| Account is sensitive and cannot be delegated | On (optional hardening) | — |
Create the account (PowerShell on a DC, as Domain Admin):
New-ADUser -Name svc_entro -SamAccountName svc_entro -UserPrincipalName svc_entro@corp.example.com `
  -AccountPassword (Read-Host -AsSecureString 'Password') -Enabled $true `
  -PasswordNeverExpires $true -CannotChangePassword $true `
  -Description 'Entro Security - read-only LDAP bind account'
Set-ADAccountControl svc_entro -AccountNotDelegated $true
Directory Permissions
On a default Active Directory, you do not need to grant anything. Domain Users can already read everything the connector reads, through the default Authenticated Users permissions.
If those defaults were tightened, or you want the grant to be explicit, add exactly this, on the root of every domain in the forest:
| Object | Allow | Applies to |
|---|---|---|
Domain root, for example DC=corp,DC=example,DC=com |
Read: List contents, Read all properties, Read permissions | This object and all descendant objects |
CN=AdminSDHolder,CN=System,<domain>, only if AdminSDHolder was hardened |
Read | This object only. AD copies it to protected accounts within 60 minutes. |
What each permission is for:
-
List contents and Read all properties: to read users, groups, computers, the domain object, trusts (
CN=System) and the forest's domains. The domains come fromCN=Partitionsin the Configuration partition, which is readable by default and needs no change. -
Read permissions: to read each object's ACL. The connector requests the owner, group and DACL only, never the SACL, so "Manage auditing and security log" is not needed. This is optional: without it, objects are still collected, but without their ACLs, so there is no attack-path data.
Warning
Never needed, so don't grant: Domain Admins or any admin/operator group, any write/create/delete right, All extended rights, Replicating Directory Changes (DCSync), or Manage auditing and security log.
Read does not expose confidential attributes: LAPS passwords, BitLocker recovery keys and gMSA passwords stay unreadable. For LAPS, SailPoint Entro reads only the schema IDs, to report who can read LAPS passwords.
Step 3: LDAPS Certificate and Root CA
What the DC's LDAPS Certificate Must Meet
-
An LDAPS certificate is enrolled on the DC, usually from AD CS (Kerberos Authentication or Domain Controller Authentication template). Without one, port 636 drops the connection during the TLS handshake. The DC requests this certificate itself, since its private key must stay on the DC: the Domain Controllers group can enroll in these templates by default, and a local admin on the DC can trigger enrollment with
certutil -pulse. -
Its Subject Alternative Name (SAN) contains the DC's FQDN, which is the value you enter in DC FQDN. The connector ignores the subject's CN.
-
Signed with SHA-256 or stronger. SHA-1 is refused, including on intermediate CAs.
-
Server Authentication extended key usage, and in date.
-
The DC accepts TLS 1.2 or 1.3 with ECDHE cipher suites. Suites that use RSA key exchange only are refused.
Export the Root CA
SailPoint Entro's Root CA (PEM) field takes the text of the CA certificate that issued the DC's certificate:
-
PEM text, including the
-----BEGIN CERTIFICATE-----and-----END CERTIFICATE-----lines. -
A bundle (root plus intermediates) is accepted, and so is a Base-64 export without the header lines.
The quickest way is to read the certificate the DC actually serves on 636 and export the root of its chain. The snippet below runs on the DC or on any Windows machine that reaches the DC on TCP 636, and needs no admin rights:
-
It builds the chain from the machine's certificate stores. A domain-joined machine already trusts your enterprise root CA.
-
If the chain stops short of a root, it reads the CA certificates that Active Directory publishes (over TCP 389). Any domain account can read them. On a machine that isn't domain-joined, first start PowerShell as a domain user with
runas /netonly /user:CORP\svc_entro powershell.
Set $fqdn to the DC's FQDN, then run:
$fqdn = 'dc01.corp.example.com'   # the DC's FQDN, as you'll enter it in Entro's DC FQDN field
$addr = $fqdn                      # or the DC's IP, if the name doesn't resolve from this machine
$X509 = 'Security.Cryptography.X509Certificates.X509Certificate2'
$tcp  = New-Object Net.Sockets.TcpClient($addr, 636)
$ssl  = New-Object Net.Security.SslStream($tcp.GetStream(), $false, ([Net.Security.RemoteCertificateValidationCallback] { $true }))
$ssl.AuthenticateAsClient($fqdn)
$leaf = New-Object $X509 -ArgumentList (, $ssl.RemoteCertificate.GetRawCertData())
$tcp.Close()
$chain = New-Object Security.Cryptography.X509Certificates.X509Chain
$chain.ChainPolicy.RevocationMode = 'NoCheck'
[void]$chain.Build($leaf)
$root = $chain.ChainElements[$chain.ChainElements.Count - 1].Certificate
if ($root.Subject -ne $root.Issuer) {
    try {   # the chain stops short of a root: add the CA certificates Active Directory publishes
        $config = ([ADSI]"LDAP://$addr/RootDSE").configurationNamingContext
        foreach ($c in 'Certification Authorities', 'AIA') {
            ([ADSI]"LDAP://$addr/CN=$c,CN=Public Key Services,CN=Services,$config").Children | ForEach-Object {
                foreach ($raw in $_.Properties['cACertificate']) { [void]$chain.ChainPolicy.ExtraStore.Add((New-Object $X509 -ArgumentList (, [byte[]]$raw))) }
            }
        }
        [void]$chain.Build($leaf)
        $root = $chain.ChainElements[$chain.ChainElements.Count - 1].Certificate
    } catch { Write-Warning "Could not read the CA certificates from Active Directory: $($_.Exception.Message)" }
}
"DC certificate : $($leaf.Subject), signed $($leaf.SignatureAlgorithm.FriendlyName), valid to $($leaf.NotAfter)"
"Names (SAN)    : $(($leaf.Extensions | Where-Object { $_.Oid.Value -eq '2.5.29.17' }).Format($false))"
if ($root.Subject -ne $root.Issuer) {
    Write-Warning "No root CA found for '$($root.Issuer)': ask your PKI team for it."
} else {
    "Root CA        : $($root.Subject), thumbprint $($root.Thumbprint), valid to $($root.NotAfter)"
    $pem = "-----BEGIN CERTIFICATE-----`n" + [Convert]::ToBase64String($root.RawData, 'InsertLineBreaks') + "`n-----END CERTIFICATE-----"
    $pem | Set-Content "$HOME\root-ca.pem" -Encoding Ascii
    $pem | Set-Clipboard
    $pem
}
Check the printed Names (SAN) line: it must include the FQDN you'll enter in SailPoint Entro. The PEM is saved as root-ca.pem in your user folder, and copied to the clipboard.
Other Ways to Export the Root CA (Certificate Manager, OpenSSL)
Windows Certificate Manager
-
Run
certlm.mscon the DC and open Trusted Root Certification Authorities > Certificates. -
Right-click the root CA that issued the DC's certificate, then choose All Tasks > Export.
-
Choose No, do not export the private key, then Base-64 encoded X.509 (.CER).
-
Open the
.cerfile in Notepad and copy all of its text.
OpenSSL (convert an existing file):
openssl x509 -inform DER -in rootCA.cer -out root-ca.pem         # DER .cer to PEM
openssl x509 -in root-ca.pem -noout -subject -issuer -enddate    # check it: subject = issuer for a root
Step 4: Validate from the Connector
Run these checks from where the connector runs. For a containerized connector, that means inside the container.
Linux Connector Host
Needs openssl, ldap-utils (or openldap-clients), and dnsutils (or bind-utils).
DC=dc01.corp.example.com

getent hosts $DC                                   # 1. the name resolves
timeout 5 bash -c "</dev/tcp/$DC/636" && echo "636 open"
timeout 5 bash -c "</dev/tcp/$DC/3269" && echo "3269 open"

# 2. TLS and certificate: expect TLSv1.2/1.3, the FQDN in the SAN, and "Verify return code: 0 (ok)"
openssl s_client -connect $DC:636 -servername $DC -verify_hostname $DC -CAfile root-ca.pem \
  -cipher ECDHE </dev/null 2>/dev/null | grep -E 'subject=|issuer=|^New,|Verify return code'

# 3. Service-account sign-in (prompts for the password)
LDAPTLS_CACERT=root-ca.pem ldapsearch -x -H ldaps://$DC:636 -D svc_entro@corp.example.com -W \
  -b "" -s base defaultNamingContext rootDomainNamingContext isGlobalCatalogReady

# 4. The Global Catalog's DNS records
dig +short SRV _ldap._tcp.gc._msdcs.corp.example.com
Inside the Connector Container (Docker)
The connector image is Alpine Linux, so its shell has nslookup, nc, and getent. Open a shell with docker exec -it <connector-container> sh, then run:
DC_IP=10.0.0.4
cat /etc/resolv.conf                                        # the DNS the connector uses
getent hosts dc01.corp.example.com                          # resolves as the connector does; empty = the DNS error
nslookup dc01.corp.example.com $DC_IP                       # asks the DC's DNS directly (not a cached answer)
nslookup -type=SRV _ldap._tcp.gc._msdcs.corp.example.com $DC_IP
for p in 636 3269 3268 53; do printf '%s: ' $p; nc -w 5 $DC_IP $p </dev/null && echo open; done
If getent is empty but nslookup ... $DC_IP answers, the container can reach the DC and only its DNS is wrong; see DNS. To test straight away, add the line 10.0.0.4 dc01.corp.example.com to the container's hosts file: the running connector then resolves the name until the container is recreated.
If docker commands return 500 Internal Server Error, it should be restarted.
Windows Host (PowerShell)
Resolve-DnsName dc01.corp.example.com                      # the host's own DNS
Resolve-DnsName dc01.corp.example.com -Server 10.0.0.4     # the DC's DNS
Test-NetConnection 10.0.0.4 -Port 636                      # expect TcpTestSucceeded : True
Test-NetConnection 10.0.0.4 -Port 3269
A container can use different DNS from its host. Confirm with the Docker tab.
Step 5: Add the Integration in the SailPoint Entro Console
Go to Management > Accounts & Integrations > Add New Account > Active Directory.
| Field | What to enter |
|---|---|
| Domain Controller (DC) | The DC's FQDN (dc01.corp.example.com) or its IP (10.0.0.4). An IP avoids depending on the connector's DNS. |
| DC FQDN | The DC's FQDN, exactly as it appears in the certificate's SAN. Required whenever the DC field holds an IP. |
| Root CA (PEM) | The full PEM text from Step 3. Required, even though the form doesn't mark it. |
| Domain | The DC's AD domain, for example corp.example.com. |
| Username | The service account's UPN, for example svc_entro@corp.example.com. |
| Password | The service account's password. |
| Environment Nickname / Environment Type | A label, for example PROD-AD, and Production / Staging / Dev. |
| Display Name | Optional label for the account. |
| Worker Group (Connector) | The connector that can reach the DC, as validated in Step 4. |
Select Connect. The connection test then runs these checks:
| Check | Required? | If it fails |
|---|---|---|
| LDAPS connection and service-account sign-in | Yes | See Troubleshooting. |
| Read domains, users, computers and groups | Yes | Grant Read as in Step 2. |
| Root CA is in date | Yes | Export a current root CA. |
| Global Catalog | Only for forests with more than one domain | Open 3269 (or 3268) to the DC, or configure a DC that is a Global Catalog. |
| Read ACLs | No | Objects are collected without their ACLs, so there is no attack-path data. Grant Read permissions. |
What SailPoint Entro Collects
| Object | Data |
|---|---|
| Users | UPN, sAMAccountName, display name, email, title, department, description. Group membership, including primary group. Account state: enabled, password not required, Kerberos pre-authentication not required, delegation, sensitive. Last logon, password last set, expiry, SPNs, adminCount. |
| Groups | Members (including large groups), type, adminCount, description |
| Computers | DNS host name, operating system and version, SPNs, last logon, password last set, unconstrained delegation |
| Domains and trusts | The forest's domains and SIDs; each trust's partner, direction, type and transitivity |
| ACLs | Owner, group and DACL of domains, users, groups and computers, turned into permission edges such as GenericAll, WriteDACL, AddMember, ForceChangePassword and ReadLAPSPassword |
SailPoint Entro does not collect passwords or hashes, LAPS/BitLocker/gMSA secrets, SACLs, GPOs or password policies.
Troubleshooting
The connection test names what failed. Find the message text below.
| Message contains | Cause | Fix |
|---|---|---|
does not resolve from the connector |
The connector's DNS doesn't know the DC's name. The error shows which DNS server was asked. | Fix DNS where the connector runs, or enter the DC's IP in Domain Controller (DC). See DNS. |
timed out, so a firewall or route is dropping the traffic |
A firewall, NSG or route blocks the connector. | Allow TCP 636 (and 3269) from the connector to the DC. |
refused the connection, so nothing is listening on this port |
Nothing listens on 636. | Enroll an LDAPS certificate on the DC (Step 3). |
the DC closed the connection during the TLS handshake |
No LDAPS certificate on the DC, TLS 1.2 disabled, or plain LDAP on the port. | Enroll a certificate; enable TLS 1.2. |
the port does not speak TLS |
The port serves plain LDAP. | Use 636 for LDAPS. |
the certificate was not issued by the account's root CA |
The pasted Root CA isn't the one that issued the DC's certificate. | Export the root of the DC's chain (Step 3); a bundle with intermediates is accepted. |
the certificate does not name |
DC FQDN isn't in the certificate's SAN. | Set DC FQDN to a name on the certificate, or reissue the certificate. |
signed with an algorithm the connector refuses, such as SHA-1 |
SHA-1 certificate. | Reissue it from a SHA-256 template. |
root CA ... expired / Invalid certificate date range |
The Root CA is out of date. | Paste a current root CA. |
refused the bind |
Wrong username or password, or the account is restricted. | See the AD error codes below. |
read only through a Global Catalog, and none answered |
Multi-domain forest without a reachable Global Catalog. | Open 3269 to the DC, or configure a DC that is a Global Catalog. |
cannot read nTSecurityDescriptor |
No Read permissions on the domain. | Grant Read as in Step 2. |
AD Error Codes in Bind Failures
| Code | Meaning |
|---|---|
525 |
User not found: check the UPN |
52e |
Wrong username or password |
530 |
Logon hours do not allow this time |
531 |
"Log On To" does not allow the connector |
532 |
Password expired |
533 |
Account disabled |
701 |
Account expired |
773 |
User must change password at next logon |
775 |
Account locked out; a wrong password saved in SailPoint Entro can cause this |
After a fix, check that the account shows Verified in Management > Accounts & Integrations, then compare the user and group counts in SailPoint Entro with AD's. If validation still fails, send SailPoint Entro Support (support@entro.security) the connector logs and the output of Step 4: Validate from the Connector.
Security and Compliance
-
Read-only access: the connector never writes to AD.
-
The service account signs in only over TLS 1.2+ (LDAPS, or StartTLS on 3268/389). The password is never sent in cleartext.
-
Works with DCs that require LDAP signing, because every bind runs over TLS.
-
Store the service account's password in your secrets vault, and update SailPoint Entro whenever you rotate it.