Active Directory Identity Collector
The Active Directory Identity Collector is used to collect the user's and group's existing data.
General Details
To create an Active Directory Identity Collector:
- Open the Identity Collectors panel by navigating to Admin > Identity Collectors.
-
Select Create New to open the Identity Collector Configuration Wizard.
Identity Collector General Details:
- Select Active Directory as the type.
- Provide a name for the Identity Collector you are creating.
- In the Advanced Options section, choose whether you would like to enable Access Fulfillment. If enabled, the system can add and/or remove users from groups within this identity collector.
-
Select Next to continue.
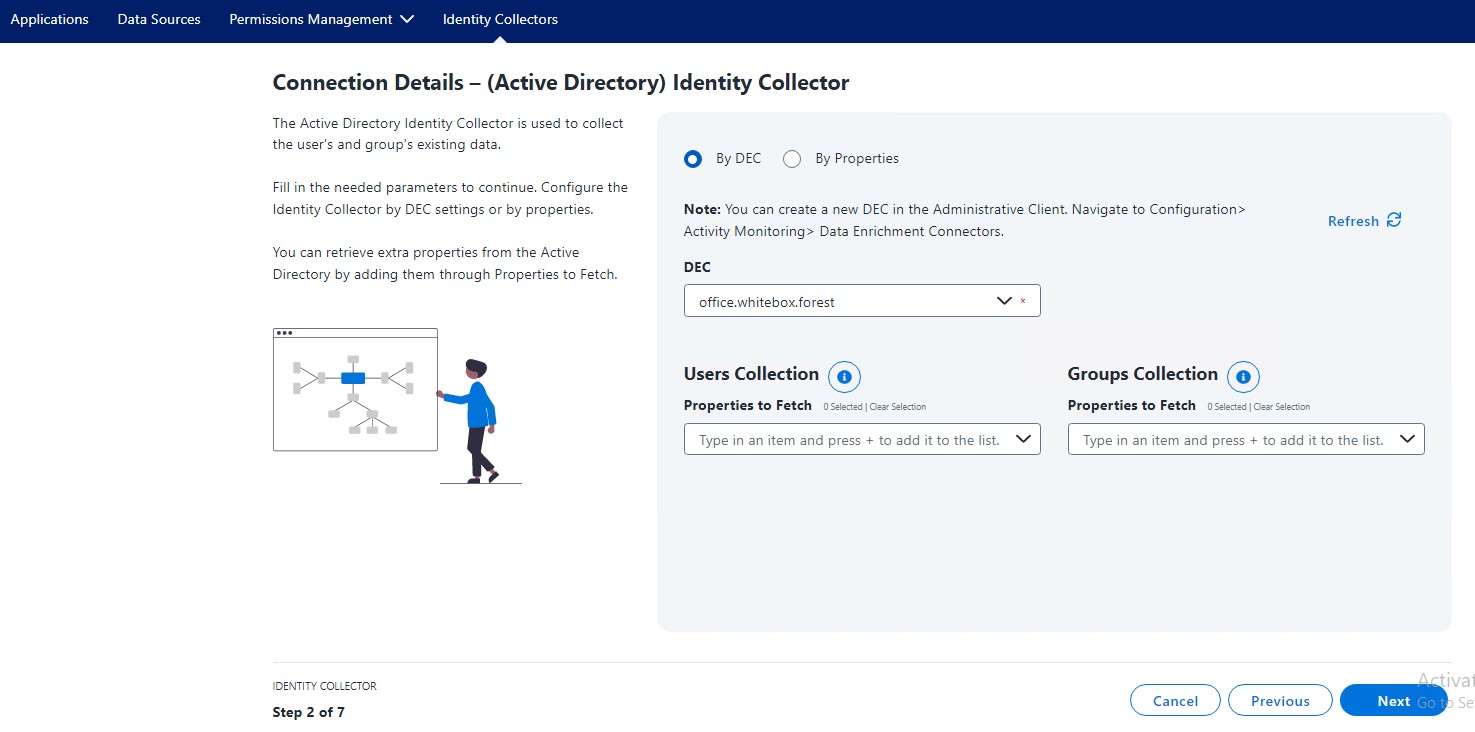
Connection Details by DEC
You can configure the Identity Collector using either an existing DEC (Data Exchange Connector) or by manually entering connection properties.
- Select By DEC to populate the Identity Collector with pre-configured data from a DEC.
- Select By Properties to manually enter connection properties from a list of defined properties.
If you selected By DEC:
- Select the relevant Active Directory DECs from the dropdown list.
Note
If you have configured a DEC to connect to Active Directory, you can reuse that configuration here.
If by Default Properties:
By default, File Access Manager retrieves several properties from Active Directory, such as Domain, Display Name, and others.
To add more properties:
- Type the desired property in the Properties to Fetch field.
- Select the plus icon to add the property.
The properties you retrieve from Active Directory will be available for mapping to Data Dictionary fields later.
Note
This process can be done for both User Collection and Groups Collection. You need to complete the process by either joining Data Sources as the local key or configuring the Identity Collector in the Dynamic Field Mapping step.
Select Next to continue.
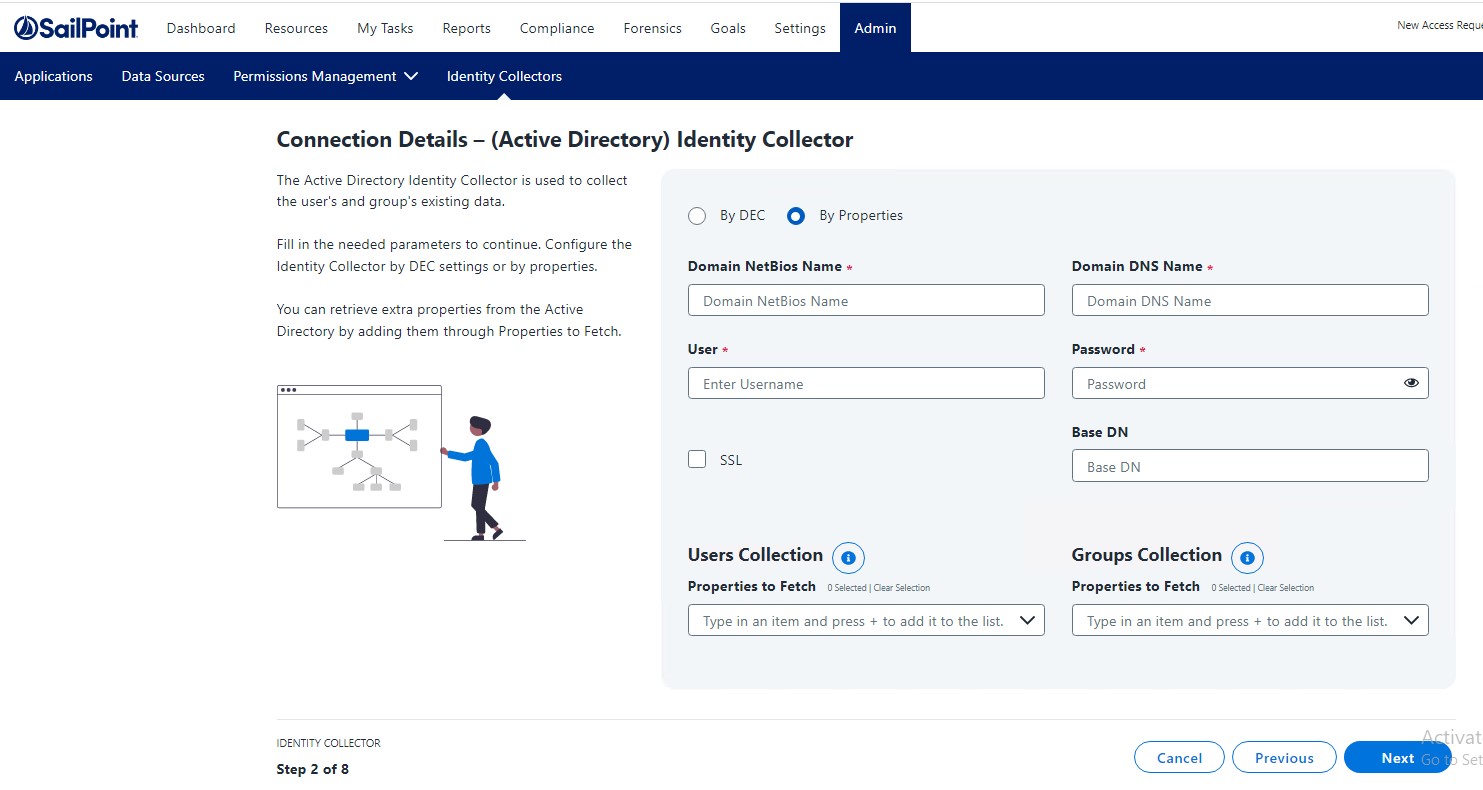
Connection Details By Properties
If you select By Properties, enter the following details in the relevant fields:
- Domain NetBios Name - Enter the NetBios name of the domain.
- Domain DNS Name - Enter the system domain name.
- User - Provide the username associated with this Identity Collector.
- Password - Provide the password for the Identity Collector.
- SSL - Select this option if the connection to Active Directory is secure.
- Base DN - Define the distinguished name of the folder from which identities (users and groups) will be collected. If left empty, the Base DN will default to the root, and File Access Manager will collect users and groups from the existing Active Directory server.
By default, File Access Manager retrieves several properties from Active Directory, such as Domain, Display Name, and more. You can add additional properties by typing them into the Properties to Fetch field and selecting the plus icon to add the property.
Trusted Domains
When configuring an Active Directory Identity Collector By Properties, you need to complete the configuration by selecting the relevant Trusted Domains.
An internal list of Trusted Domains that were retrieved displays.
Users Collection
Verify that the system has successfully retrieved the requested data.
The table displays the first fetched results from the connected Identity Collector, as well as the fetched properties.
-
Select Yes or No to join this Identity Collector with any existing data sources. A user may want to join data sources to gain additional attributes that can be configured to the Identity Collector.
If you select No, select Next to proceed to the Dynamic Field Mapping screen (optional).
If you select Yes, you can use one of the Identity Collector fields as the local key to gather additional user fields from other data sources by joining those data sources.
Join Data Sources (Users)
Complete the following steps:
- Select the desired data source you want to join with from the first dropdown.
- Select a Local Key you want to join.
- Select a Remote Key you want to join it to.
Note
Select the plus icon to join more data sources.
Dynamic Field Mapping (Users)
This feature allows the user to rename the previously fetched properties by mapping them to a dictionary field, effectively changing their name.
Note
Dynamic Field Mapping is not mandatory.
To create a new data dictionary field:
- Use the link provided.
- Once created, select Refresh to have the new data dictionary field display in the User Dictionary Field dropdown.
- From the Users Dictionary Field dropdown, select a mapped property.
- From the Mapped Field dropdown, select a value that is to be mapped to the new data dictionary field.
Note
To add more dictionaries, select the plus icon.
Select Next.
Group Collection
Verify that the system has successfully retrieved the requested data.
The table displays the first fetched results from the connected Identity Collector, as well as the fetched properties.
-
Select Yes or No to join this Identity Collector with any existing data sources. A user may want to join data sources to gain additional attributes that can be configured to the Identity Collector.
If you select No, select Next to proceed to the Dynamic Field Mapping screen (optional).
If you select Yes, use one of the Identity Collector fields as the local key to gather additional group fields from other data sources by joining those data sources.
Join Data Sources (Groups)
Complete the following steps:
- Select the desired data source you want to join with from the first dropdown.
- Select a Local Key you want to join.
- Select a Remote Key you want to join it to.
Note
Select the plus icon to join more data sources.
Select Next.
Dynamic Field Mapping (Groups)
This feature allows the user to rename the previously fetched properties by mapping them to a dictionary field, effectively changing their name.
Note
Dynamic Field Mapping is not mandatory.
To create a new data dictionary field:
- Use the link provided.
- Once created, click Refresh to have the new data dictionary field display in the Group Dictionary Field dropdown.
- From the Groups Dictionary Field dropdown, select a mapped property.
- From the Mapped Field dropdown, select a value that is to be mapped to the new data dictionary field.
Note
To add more dictionaries, select the plus icon.
Select Next.
Final Configurations
On the final screen in the Identity Collector wizard, a user can set a couple of final configurations and set the scheduler task.
Users Collection
The following final configurations are optional:
-
Email Field Mapping – Select an email field to be used to send alerts. If your Active Directory is integrated with Microsoft Exchange, you can map the
proxyAddressesfield. Otherwise, select a Users Dynamic Field that is already mapped from the wizard. -
Unique User Accounts Mapping – This is used to connect the Authentication Store Identity Collector to other Identity Collectors by setting the Same User Field between two or more Identity Collectors, mainly Cloud Identity Collectors, which extends the Access Request's Usage list.
Scheduler
If you wish to create a scheduled task, check the Create a Schedule toggle and complete the following:
-
Provide a name for the schedule.
-
The Scheduler is Active by default. If you wish to turn the scheduled task inactive, switch the toggle to Inactive.
-
If you want to start the Identity Collector process immediately, select Schedule. If you want to schedule the Identity Collector after a specific task completes, select Run After.
Note
If Run After is selected, all Schedule options will disappear.
-
Select how frequently you want the Identity Collector task to run:
- Once – One-time run. Verify the date selected is in the future.
- Hourly – Select the time and date for the run. Verify the date selected is in the future. Either select a specific end date or select Never.
- Daily – Same as hourly.
- Weekly (Set as default) – Select a day or multiple days for recurring runs. Either select a specific end date or select Never.
- Monthly – Same as hourly.
- Quarterly – Same as hourly.
- Half Yearly – Same as hourly.
-
Yearly – Same as hourly.
-
If you want the task to end on a specific future date, select On and then provide the ending date. If the task should run without an end date, select Never.
-
Select Save to store the Identity Collector without running synchronization or select Save & Run to create and synchronize the Identity Collector.