Enabling Access Fulfillment
Access Fulfillment is supported by the following applications:
-
Active Directory
-
Windows File Server
-
SharePoint
-
NetApp CIFS
-
EMC Celerra CIFS
-
EMC Isilon CIFS
-
Hitachi HNAS
-
Windows DFS CIFS
To enable access fulfillment, the application has to be enabled for fulfillment and the business resources under the application have to be normalized.
Important
Access fulfillment can be used on non-normalized resources for removal of direct permissions.
Enabling Fulfillment for an Application
For applications that support Access Fulfillment only.
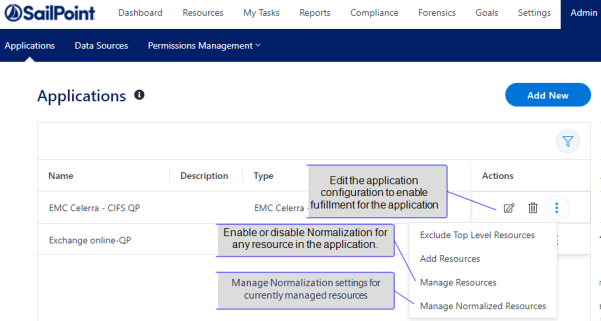
Configured on the application configuration page. (Admin > Applications. Find application. Select Edit button. Change configuration)
See Enabling Access Fulfillment for an Application for a full description.
Normalizing a Business Resource
To normalize a resource, open the Manage Resources page (Admin > Applications. Find application. Open the options menu and select Manage Resources)
-
Select the resource to normalize.
-
Select Manage Normalization > Enable Normalization for this resource.
-
Define How to Handle Inexact Permissions Matches.
Normalizing a List of Business Resources
To normalize a list of resources, use the Bulk Set option on the Manage Normalized Resources page (See Adding or Removing Resources in Bulk)
-
Open the Manage Normalized Resources ( Admin > Applications. Find application. Open the options menu and select Manage Normalized Resources)
-
Open the Global Options menu and select Bulk Set.
-
Upload a list of resources to normalize
Disabling Normalization for a Resource
Select a resource on the Manage Resources page, and disable the normalization from the action menu or open the Manage Normalized Resources page, and disable the normalization (See Editing Normalized Resources)
Disabling Normalization for a List of Resource
For a list of resources use the Bulk Remove option on the Manage Normalized Resources page.
Create a file with a list of resources to disable, and upload them using Adding or Removing Resources in Bulk.
Enabling Access Fulfillment for an Application
Access fulfillment is enabled per application in the application setting screen, for applications that support fulfillment (See the compatibility table in Compass for the full list).
To enable Access Fulfillment for an application:
- Open the configuration screen of the required application .
- Go to Admin > Applications.
- Scroll through the list, or use the filter to find the application.
- Select the Edit icon
 on the line of the application.
-
Press Next until you reach the Access Fulfillment settings page.
Note
The setting pages and entry fields vary according to the application type.
-
For non-normalized resources, you can select Enable Access Fulfillment for Revoking Explicit Permissions. See Enabling Removal of Explicit Permissions.
-
Select Enable Access Fulfillment for Normalized Groups.
Identity Collector
Fulfillment requires an identity collector in order to run. If you did not select an identity collector in the General Details configuration page, you can select one from the drop down list now.
If there is no identity collector defined for this application, or if you want to use a different identity collector than the ones in the dropdown list, you can create a new identity collector in the Administrative Client (Applications > Configuration > Permissions Management > Identity Collectors).
See Create/Edit an Active Directory Identity Collector for more details on creating an identity collector.
Managed Group OU (DN)
The organizational unit in which the managed permission groups will be created. Make sure that the chosen identity collector’s user has permissions to create groups under this location (e.g. OU=FileAccessManagerManaged, DC=SailPoint, DC=COM)
OU refers to an Organizational Unit, and DN refers to a Distinguished Name.
How to Handle Inexact Permissions Matches
During the normalization process, the application has to decide what to do with permissions that do not match the normalized permissions.
- Fail the normalization process
- Elevate to the nearest permission match
- Revoke the permission
-
Open the Advanced Settings panel for additional settings:
Group Cache Sync Interval(sec)
This setting will add a pause to the process of setting normalize permissions on the resource. This will allow the endpoint's local AD groups cache to sync the newly created managed groups.
The default Is 0 - signifying the process will not pause by default.
Use Template Permission Group
Template groups are created per application and added as a template to every managed resource. These groups are not managed by File Access Manager, and are usually used to ensure that users who need application-wide access such as backup or archiving users have access.
Select for each permission group whether File Access Manager should create a group or whether to use an existing group, for the following groups:
If you select Use an Existing Group, select the required group to use from the dropdown list.
Once an application is enabled for access fulfillment, you can set specific resources to be normalized.
Enabling Access Fulfillment for Business Resources
To enable access fulfillment for a resource, it has to meet the following conditions:
- The application has to support access fulfillment (see the compatibility matrix in Compass for a full list for this release).
- The Application has to be enabled for access fulfillment. This setting is in the application configuration pages.
- The business resource has to be normalized.
Important
Access fulfillment can be used on non-normalized resources for removal of direct permissions. See Removing Explicit Permissions from Business Resources
Enabling Normalization for a Resource
Note
For a list of resources: Create a file with a list of resources to disable, and upload them using Adding or Removing Resources in Bulk.
- Open the Manager Resources page.
- Go to Admin > Applications and find the application.
- Open the options menu and select Manage Resources.
- Select a resource and select Manage Normalization > Enable Normalization for this Resource.
- Determine How to Handle Inexact Permissions Matches.
During the normalization process, the application has to decide what to do with permissions that do not match the normalized permissions.
- Fail the normalization process
- Elevate to the nearest permission match
- Revoke the permission
Disabling Normalization for a Resource
Note
For a list of resources: Create a file with a list of resources to disable, and upload them using Adding or Removing Resources in Bulk.
Using the Manager Resources page:
- Open the Manager Resources page.
- Go to Admin > Applications and find the application.
- Open the options menu and select Manage Resources.
- Select a resource and select Manage Normalization.
- Deselect Enable Normalization for this Resource.
Using the Manage Normalized Resources page:
- Open the Manage Normalized Resources page.
- Go to Admin > Applications and find the application.
- Open the options menu and select Manage Normalized Resources.
- Select a resource and select Actions.
- Deselect Enable Normalization for this Resource.
The resource will be removed from the Manage Normalized Resources page.