Alert Rules
Alert Rules define activity-based criteria for generating system alerts, including notifications and customized responses, such as email, SysLog, or UserExit.
For defining alert rules, go to Compliance > Alert Rules. For viewing and investigating alerts, Go to Forensics > Activities
Examples of alert rules include:
-
A file under \\FileStorageApplication\HR is deleted by a user who is not a member of the HR department.
-
A specific user reads more than 1000 files in one minute (considered a suspicious activity, regardless of whether the user or malware initiated the activity).
To view existing alert rules:
-
Go to Compliance > Alert Rules.
Note
All alerts, including alerts in the Resources section, display in this screen.
-
Select Include Resource-based Rules to view alerts from Resources.
-
You can filter the screen by:
-
Rule Name
-
Status - activate or deactivate an alert rule from the main screen - there is no need to access the rule.
-
Creating Alert Rules
To create an alert rule:
-
Go to Compliance > Alert Rules.
-
Select New Rule at the top right of the screen to open the New Alert Rule screen.
-
Select the Rule Type in the Trigger section.
-
For a “Single Activity” trigger, a single activity matching the Rule Criteria creates an alert.
For example, an Email notification will be sent for each Add Permission action on a Sensitive resource. -
For a Threshold trigger, multiple activities matching the Rule Criteria, and occurring within a specific time window, create an alert.
Users can configure threshold alerts, based on suspicious behavior, and not just based on a single action.
For example, the fact that one user has performed 500 activities on a specific resource might be more suspicious than if the user had performed a single activity on that resource.
-
-
Save the rule.
Managing Alert Rules
To access the alert rules, Go to Compliance > Alert Rules.
To edit an alert rule:
- Select the alert rule.
- Edit the General, Scope, Filters, Triggers, and Response sections of the Rule Criteria section as needed.
Note
An Administrator can define and customize response options in the administrative client.
To duplicate an alert rule:
-
Select Duplicate from Actions in the alert rule to be edited.
-
The Duplicate Alert Rule screen displays, with all the definitions of the duplicated rule already filled in.
-
Make any required modifications.
Note
Duplicate a discard rule to create a new rule with definitions that resemble those of an existing discard rule.
To delete an alert rule:
-
Select Delete from Actions in the alert rule to be deleted.
-
A delete confirmation question displays.
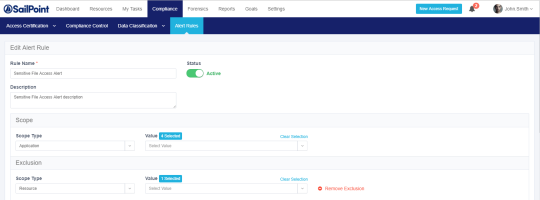
Selecting Scope for Alert Rules
Use Scope to select a relevant running target.
-
Scope inclusion enables users to specify application type, application, or specific business resource to run an alert rule.
-
Scope exclusion allows users to avoid running a rule on an irrelevant application type, application, or specific business resource.
-
If the same resource is selected for both inclusion and exclusion, the resource will be excluded since exclusions always overrule inclusions.
-
Resource scope selection allows users to select or unselect a subfolder to run a rule by checking the Including subfolders checkbox:
- For example, if the business resource “Sensitive folder” has a sub-folder, called “Non-sensitive folder” if the user deselects the “Including subfolders” checkbox, the rule will only run on the main resource, which is “Sensitive folder."
Filters
Note
If an application has a Data Enrichment Collector (DEC), the attributes of that DEC also display. However, you select more than one application from same application type, and the applications share the same DEC, only the DEC attributes common to all of the applications’ DECs display. If there are no DECs in common, only attributes relevant to the application type of the selected applications display.
Filter criteria allows users to specify suspicious behavior, based on the selected filter criteria parameters.
The available filter criteria attributes depend on the scope selected.
The list below is the basic list of attributes:
-
Action Type
-
Category
-
Domain
-
Event Date
-
Event Time
-
Path
-
User Name
If you limit the application selection by selecting an application type or one or more applications, only the attributes relevant to the selected application type display.
Users can use queries saved in Forensics > Activities queries by selecting Load Query, to display a list of all saved queries.
When the query is loaded, all the information in the Rule Criteria section (Scope and Filters) is overridden by the loaded query filters. If a query cannot be loaded, an error message displays.
The following queries are not available:
-
Queries on alerts (since only existing queries on activities can be loaded)
-
Mismatched queries
-
Queries involving users from more than one domain
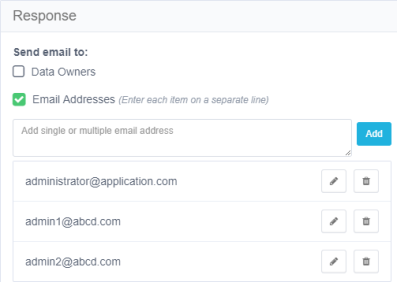
Alert Rule Response
The Response section allows users to define a response for an alert.
For example, when a new permission is added to a sensitive resource, all the Data Owners of that resource can receive an email, notifying them that a new permission was added.
To set an alert rule response:
-
Open the Alert Rules page, at Compliance > Alert Rules.
-
Double-click the alert rule to edit and scroll to the Response section. A Response may be one of the following:
- Email to specific email addresses, and / or to the Data Owners who own the resource.
Note
The Data Owners option is available for Single Activity Alerts, but not for Threshold Alerts.
-
Syslog
-
User Exit
-
A Response object is created / edited in the File Access Manager administrative client.
-
Select Advanced Settings to select additional option responses.
Notes
Use the administrative client to define and customize response options.
File Access Manager Alert Response is the automatic default, since it retains the alert in the database. A user cannot opt out of the File Access Manager Alert Response.
Configuring a Response
-
Within the Administrative Client, go to System > Configuration > Activity Monitoring > Responses > Manage Response Configurations.
-
Select Syslog in the Showing Response Configuration of Type drop-down.
-
Select New.
-
Enter the syslog configuration.
-
Select Save.
-
Go to System > Configuration > Activity Monitoring > Response > Manage Responses.
-
Create a new Syslog response type. Use the selections on the right side to add variable information to the syslog message.
-
Select Save.
The response is now available to use in Advanced Settings > Other Responses of Alert Rules in the Web interface under Compliance.
Resource-Based Alert Rules
Data Owners can activate Resource-Based Alert Rules (out-of-the-box alert rules) in the Resource > Alerts screen.
Administrators can go to Compliance > Alert Rules to perform the following operations on Resource-Based rules that were created by Data Owners:
-
View the rule
-
Change the rule’s name/description
-
Change the rule’s status (active/inactive)
-
Delete the rule
Troubleshooting Activities
The best way to troubleshoot activities is to follow their activity trail.
Use a specific Collector Installation and Configuration Guide to troubleshoot a specific monitoring issue for that Activity Monitor.
The table below contains suggestions of what to look for in the various services.
| Service | Suggestion |
|---|---|
| Application | - All prerequisites were completed successfully - Activities are generated when relevant (For example, check that relevant activities are generated in the Event Log in Active Directory or that they are included in the Exchange Audit log.) |
| Activity Monitor Log | - The log has errors - Events were received (by viewing the Monitor Statistics file) - Events were monitored, but not sent (by checking the monitoring mode - full, semi, and discard) |
| Event Manager | - New events were entered (by viewing Event Collector statistics) and then moved to the memory queue - Events were saved in the Event Manager (one Connector at a time, or through a dedicated Event Manager) - The Event Manager log has errors |
| Events Backup | File Access Manager includes a backup mechanism for events streaming into the Event Manager. Incoming events are serialized to disk as compressed bulk events. - This backup mechanism allows for re-streaming the backed-up event bulks into the event manager in case of a failure in the events processing flow. - A separate file is created daily, containing the bulk events received that day. |
The behavior of the Events Backup mechanism is defined by several parameters under the <appSettings> tag in the Event Manager’s app.config files:
| Parameter | Type | Description | Default |
|---|---|---|---|
| BackupEvents | True/ False | Enables / Disabled the Events Backup mechanism | True |
| WaitForBackupSeconds | Number | Number of seconds the Event Managers service waits for the backup process to finish serializing in-memory events, on service shutdown, before it terminates the process | 5 (seconds) |
| BackupEventsDir | Text | Directory path for the event backup files | EventsBackup in the service home dir |
| RestoreBackedupEvents | True/False | Activates backed up events restore on service startup | False |
| BackupRetentionDays | Number | Number of days to retain events backup files, before backup files are deleted. | 7 (days) |
| CleanOldBackups | True/False | Enables/Disables automatic cleanup of expired backup files (older than BackupRetentionDays) | True |
Enabling Events Backup
- Set the BackupEvents to True (default). This will cause the Backup mechanism to start
- The BackupEventsDir by default will be set to EventsBackup in the service’s home directory. This folder will be created by the service if it is not already there. If you wish events to be backed up to another location, change the BackupEventsDir parameter accordingly before the service is started, or restart it after the change. Make sure the drive containing the backup folder has enough space. (Space requirements depend on events traffic).
- Make sure the RestoreBackedupEvents parameter is set to false - if you don’t wish to restore existing backups.
- Ensure all other parameters suit your needs, or configure accordingly.
Restoring Events from Previous Backup
- Set the RestoreBackedupEvents to True before you start the service, or restart it after the change .
- Once the service is running with RestoreBackedupEvents set to True, it will attempt to restore all backup files, and will stream all backed up events, back to the Event Manager, to be processed and stored.
- If you do not wish to restore all the backup files, but only specific files (days), you should copy the unnecessary files to another location .
- In case restoring the events fails, a new file contained the un-restored events will be created, with the .recreated suffix, indicating this file contains events that failed to be restored, and will not be re-attempted.
Retaining Backups for Specific Dates or Periods
- Either disable the automatic cleanup of backup files, by setting the CleanOldBackups parameter to True, or modify the BackupRetentionDays parameter to suit the retention policy you wish to configure.
- When modifying app.config parameters, changes will take place only the next time the service is started, as app.config parameters are read on service startup.
Threshold Alert Rules
The Activity Analytics service is responsible for the threshold calculation and issuing threshold-based alerts.
Activities are evaluated against threshold alert rules by the Event Manager during the processing of the activities, and if they match, they are marked as candidates for a threshold calculation.
The Activity Analytics queries the Elasticsearch every defined interval to bring activities candidate for threshold alerts. It then aggregates the activities and when the threshold is met, issues an alert and a response according to the definition in the threshold alert rule.
Limitations
Activities received more than 15 min after the Activity time (as the result of a temporary disconnection between the Activity Monitoring and the Event Manager) will be kept in the Database with the original Activity time, but will not be included in the Threshold Alert Rules calculation. However, if an Alert has already been created, the Activities that originated in the Alert timeframe, but were received after the 15-minute time window, will be updated in the relevant existing Alert record. (As a result, the total number of Activities in the existing Alert record will increase.)
The 15-minute time window helps limit the memory required for the Threshold Alert Rules calculation.
Please review the Compass forum for best practices. If required, the PS team can change the time window in the Database.
If Windows activities have more than one shared path, the system will send duplicate activities for a threshold alert calculation. For example, if Folder1 can be accessed by \\MyServer\Folder1 and by \\MyServer\C$\Main\Folder1, each activity performed in Folder1 will appear twice in the Database, each time, with a different shared path.
To prevent duplicate activities from being calculated in the total number of activities required to create a threshold alert, select “Windows” as the application type in the scope, and set the following filter in the Alert Rule > Rule Criteria Filter section:
Attribute = Original Access Path (OAP)
Operator = Empty
All duplicated Activities have the OAP field as part of the original path. Adding this filter causes the Threshold Alert Rule to ignore all duplicated Activities and to calculate only the original Activity.
Creating and Editing Threshold Alert Rules
Refer to Creating Alert Rules.
Only administrators (not data owners) can view threshold alerts in Activity Forensics or in Reports.