Access Requests
With Access Requests, users can:
-
Request permission to perform operations on an application (consisting of a business resource and a permission type)
-
Join Identity Collector groups
Administrators use access requests (which are part of the access certification process) to revoke access to, or change permissions for, BRs.
When reviewers revoke a permission as part of an access certification campaign, an access request can be created to determine whether revoked permissions should be removed. Reviewers follow the same process as they do for an Access Certification.
File Access Manager can also fulfill access requests automatically.
At the end of the access request process, the system sends an email to the original requester to notify him or her of the final status of the request.
Note
Even if the request was created on behalf of a different user, the originator will receive the email notification.
Refer to Review Process for additional information on the review process as it affects Access Requests.
New Access Request Wizard
Users can initiate an access request using the New Access Request Wizard. This wizard is available using the New Access Request button, which is accessible from any screen in the web application. See the chapter New Access Request Wizard in the User Guide.
If required, this functionality can be disabled for all users, as part of the setup process.
Access Request Template
An administrator must create a review process for the application or identity collector to which a user requested access. This can be a multiple level process, with one or more reviewers at each level. Afterwards, the administrator creates an access request template to indicate which request process to use in granting permissions. For each review process, the administrator configures the capabilities and fields available to requesters and reviewers in the review process.
Creating an Access Request Template
To create an Access Request template, perform the following steps:
-
In the administrative client, go to Permissions > Access Requests > Configuration > Manage Access Requests Templates.
-
Select New. The Access Request Template displays.
-
Enter a unique name in the Name field.
-
Select a review process from the Review Process dropdown menu.
-
Select the applications/identity collectors in the available fields list to be moved to the Chosen list, using
>or<.Notes
The available objects depend upon the selected review process.
- A static identity collector review process will display all applications/identity collectors.
- A dynamic one will display the identity collector itself or will only display applications associated with the review process identity collector.
- A dynamic application review process will display only the selected application.
This section includes the list of applications and identity collectors included in this template (updated according to the selected review process).
Notes
- Application and Identity Collectors can only be associated with one access request template.
- Applications and identity collectors that are already associated with an access request templates do not display in the list of available objects.
-
Maximum Duration is the maximum time for management of an access request, after which the system highlights the request to indicate an expired duration.
-
Fulfillment adds a fulfillment step for the permissions to the access request. Refer to Access Fulfillment for additional information.
Select the fulfillment method:
- None: The access request will end after the last reviewer in the review process has reviewed all the request permissions, without a fulfillment step.
-
Fulfill Access Requests: The review step will be followed by a fulfillment step, depending on the business resource type and manual fulfillment type selected:
- Managed BRs: Fulfillment is handled automatically by File Access Manager.
- Unmanaged BRs: Selecting File Access Requests will open a drop-down list to select the Manual Fulfillment Review Process - a one-step review process defining the user or group responsible for the fulfillment process.
Note
If selecting Fulfillment, Bypass review process when a Data Owner issues a Revoke request will display. If this option is selected, an additional review process will not be triggered if a data owner directly revokes access from a user on this resource.
-
Custom Script: The review step will be followed by a fulfillment step, depending on the business resource type and manual fulfillment type selected:
- Managed BRs: Fulfillment is handled automatically by File Access Manager.
- Unmanaged BRs: Fulfillment is handled by a script prepared by the user. See Access Fulfillment for Unmanaged BRs for a full description of fulfillment using a user script.
Note
The system only displays single-level review processes.
-
Select Next. The Review Data Fields window displays.
Note
The Reviewer Data Fields display what the reviewer will see when reviewing permissions. All built-in fields display, and the relevant Identity Collector fields do not display if you selected an Identity Collector.
-
Select the fields in the Available Data Fields to be moved to the Review Data Fields list, using
>or<. -
Select a field, and use the up and down arrow keys above the Review Data Fields list to change the order of the Reviewer Data fields. The fields will display to the user in the order selected in the Reviewer Data Fields list.
-
Check the Display the same fields in the File Access Manager client checkbox to display the same fields in the administrative client as displayed in the Web interface.
Note
The administrator may want to provide the user of the Web interface with fewer fields if it is not necessary for the user to view all the fields.
-
Select Finish (only if you checked the checkbox). This will appear in the web client at My Tasks > Access Request on the web application.
-
If you do not check Display the same fields in the File Access Manager client, the Administrators Data Fields window displays, so the administrator can select a list of data fields that differ from the list of the Reviewer Data Fields.
-
Select Finish.
Managing Requestable Permission Types
This feature allows an Administrator to determine which permission types will be available to users who request access to specific application types.
Note
The list of available permission types for managed resources cannot be modified. If you add requestable permission types for a resource type, it will take affect only for non-managed resources i.e. only resources that take the manual fulfillment path.
To manage requestable resources:
-
In the administrative client, go to Access Requests > Configuration > Manage Requestable Permission Types.
The Manage Requestable Permission Types window displays.
-
Select an application.
-
Select Edit. The Edit Requestable Permission Types window displays.
-
Select permission types from the Available (left) pane, and use the arrows to place them in the Chosen (right) pane.
Note
You can also move the default Chosen permission types to the Available pane so that they are not displayed to users.
-
Select Save.
-
Expand the resource tree.
-
Select a resource.
-
Select Add. The selected resource is displayed in the right pane.
Notes
-
The right pane displays a Path column, which displays the full path of the selected resource, an Include Sub-Resources column with a checkbox to include (or not) the sub-resources of the selected resource, and an Action column with an option to remove the resource.
-
There is an option to add a label to easily identify the right resource to request.
-
-
Select a business resource from the Available (left) pane, and use the arrows to move them to the right pane, where you can decide whether to include their sub-resources or remove them.
-
Select Save.
Note
If you select New to create a new requestable resource, any saved applications will no longer be available in the Application selection, but will be available for editing.
-
Select Edit to edit the resources within the displayed applications or Delete to delete the application’s requestable business resources. When an application is deleted, all its business resources will be available for a user making an access request.
Managing Requestable Resources
This feature allows an Administrator to determine which resources will be viewable by users who request access to resources.
To manage requestable resources:
-
In the administrative client, go to Access Requests > Configuration > Manage Requestable Resources. The Manage Requestable Resources window displays.
-
Select New or select an application, and select Edit. The Requestable Resources for Application window displays.
-
Select an application.
-
Expand the resource tree.
-
Select a resource.
-
Select Add.
-
The selected resource is displayed in the right pane.
Notes
- The right pane displays a Path column, which displays the full path of the selected resource, an Include Sub-Resources column with a checkbox to include (or not) the sub-resources of the selected resource, and an Action column with an option to remove the resource.
- There is an option to add a label to easily identify the right resource to request.
-
Select a business resource from the Available (left) pane, and use the arrows to move them to the right pane, where you can decide whether to include their sub-resources or remove them.
-
Select Save.
Note
If you select New to create a new requestable resource, any saved applications will no longer be available in the Application selection, but will be available for editing.
-
Select Edit to edit the resources within the displayed applications or Delete to delete the application’s requestable business resources. When an application is deleted, all its business resources will be available for a user making an access request.
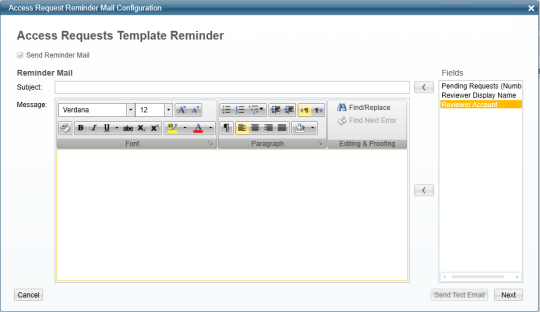
Configuring Reminders
To set reminders for access requests:
-
In the administrative client, go to Access Requests > Configuration > Configure Reminders. The Access Requests Template Reminder displays.
Note
The Access Requests template reminder sends bulk emails to reviewers regarding all access requests pending their review.
-
Select the Send Reminder Mail checkbox. An empty email template displays.
-
Enter free text in the email template and transfer information from the fields displayed in the Fields box to the right of the email template.
-
You can use the following fields either in the subject or in the body of the email, or in both locations:
-
Pending Requests - these pending requests are per reviewer.
-
Reviewer Display Name - this is the display name, and not the unique user name.
-
Reviewer Account - this is the unique user name.
-
-
Select Next. The Reminder Email Scheduler displays.
-
Select the Create a Schedule check box to create a schedule.
-
Fill in the Name, Schedule, On (date), and At (time) fields with the relevant information.
-
Select Finish.
List Access Request Templates
To view a list of Access Request templates, perform the following steps:
-
In the administrative client, go to Access Requests > Configuration > Manage Access Requests Templates.
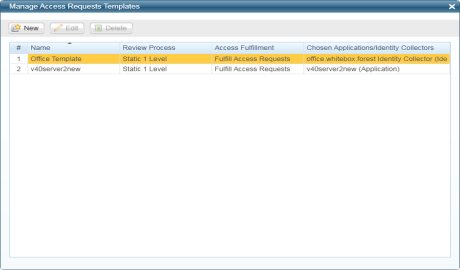
-
Right-click any of the Access Request templates to open an editing option menu:
- Edit template
- Delete template
- Copy Cell Content
Overview of Access Requests
The Access Requests screen centralizes all access requests in the system.
It contains a filter mechanism, a main data grid (with displayed access requests) and a toolbar for the Actions, Reports, and Configurations menus.
This section describes how to list, view, and reassign access requests.
The main access request data grid contains the following information for each access request:
The main access request data grid contains the following information for each request:
-
# (assigned by the system)
-
ID
-
Type
-
Status
-
Application
-
Origin
-
Issued By
-
Review Conclusion
-
Progress
-
Fulfillment Status
-
Issued At
-
Due Date
To access the Access Requests panel, go to Permissions > Access Requests.
The default view of the navigation filter displays pending access requests, issued in the past seven days.
Filter the list of access requests first, and then select one or more access requests from which to drill down to more information.
Filtering Access Requests
Note
Not all fields are mandatory.
-
Select an ID for the Access Request.
-
Select one of the following campaign statuses to display from the Status Field dropdown menu:
-
Pending Creation - access request has not been created
-
Pending - access request is pending
-
Closed - all access review processes have finished
-
All - all access requests
-
-
Fill in the following Access Requests fields:
-
Due Date
-
Application
-
Origin (the campaign in which the permission was revoked)
-
Issued By
-
Issue Date
Note
These fields are static and filter revoked permissions.
-
-
Fill in the following Advanced fields:
-
Resource
-
User
-
Permission
-
Group
Note
These fields are dynamic and the fields displayed may differ from those listed above.
-
-
Select Apply to apply the selected filters or select Clear Filter select different filters.
-
The filtered access requests display in the main Access Requests screen.
-
Select the In Summary expander to view summary charts of all the access requests (which are the same regardless of the selected filters).
-
Three separate access request summaries display:
-
The summary on the left is a bar graph that shows Open Requests by Due Date.
-
The summary in the middle lists Pending Access Requests by Reviewer (top 10), as well as the number of review items for each reviewer.
-
The summary on the right is a pie graph that displays In Process Access Requests by Application.
-
-
The section under the In Summary section lists the selected filtered status.
-
Double-click on a selected access request to view its details.
Inside Access Requests
Filter access requests by:
-
Pending Permissions by Reviewer (which lists pending permissions by reviewer)
-
All Permissions (which provides full filtering of all permissions)
In addition, it is also possible to reassign permissions or revert the permission review process.
The following subsections describe permission filtering, reassignment, and reversion of the permissions review process.
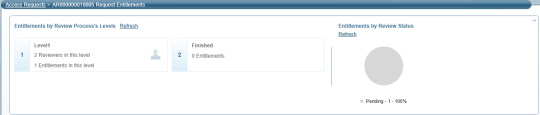
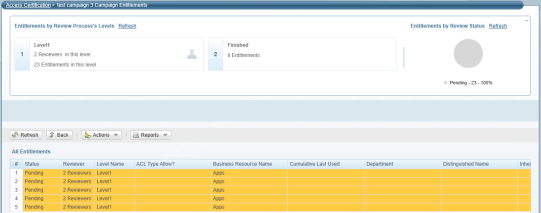
Viewing Pending Permissions by Reviewer
To view pending permissions by reviewer, perform the following steps:
-
To view pending permissions by reviewer, select Pending Permissions by Reviewer as the filter view. The reviewers list will be displayed on the right with the number of permissions waiting for them to review.
-
Select In Summary expander to see a summary of the campaign’s permissions.
Note
Since the charts in the In Summary view reflect all the permissions, they will remain the same, regardless of any filter applied.
-
The information on the left displays permissions by review process levels. The pie chart on the right displays permissions by review status (approved, rejected, or pending).
-
You can select Refresh to refresh the summary view.
Viewing All Permissions
All Permissions fall into the following filtering categories:
-
Permissions - Standard (fixed) search fields, including:
-
Resource- business resource
-
User - user name
-
Permission - permission level
-
Group - user group
-
Rev. Conclusion - select from All, Rejected, Approved, Pending Conclusion, or Not Relevant.
-
Fulfillment Type - select from All, Automatic, Manual, or None.
-
Fulfillment Status - select from All, Not Relevant (Rejected by Reviewer), Not Fulfilled, Fulfilled, Pending Conclusion, and Not Relevant.
-
Level Name - name of the level
-
-
Dynamic Fields - Use these customizable fields for additional searching, for example:
- Business Resource Name
- Department
To view all permissions:
-
Select All Permissions as the filter view.
-
Select each of the Permissions fields, and select an option from the options displayed in the popup window.
-
Select Apply.
The filtered permissions displays in the Access Request list to the right.
-
Double-click one or more of the entries from the list.
-
Review Process details display, with the following information on that permission:
-
Level ID
-
Level Status
-
Level Name
-
Reviewer
-
Response
-
Time
-
Comment

-
Reassigning Permissions
An administrator can reassign a permission review from one reviewer to another reviewer (for any reason).
To reassign a single permission:
-
Right-click on a permission line from Reassign Permissions.
-
Select a user for reassignment of permissions and enter a reason (mandatory).
-
Enter the new reassignment destination and select Reassign.
To reassign all permissions:
-
Go to Actions > Reassign Permission Review > All Permissions, and enter a reason (mandatory).
The Permissions Reassignment window displays.

-
Enter the new reassignment destination and select Reassign.
To reassign multiple permissions:
-
Press and hold the Shift key and select the permissions to reassign.
-
Right-click outside of the highlighted area (on the grid), and then select Reassign Permissions.
-
Enter a reason for this action (mandatory).
-
The Permissions Reassignment window displays.
-
Enter the new reassignment destination and select Reassign.
Reverting Permissions
An administrator (not a reviewer) can revert permissions to a previous review level.
To revert permissions, perform the following steps:
-
Press and hold the Shift key and select the permissions to reassign.
-
Right-click and then select Revert Review Process.
-
Select the level (for example, Level 1) to which to revert.
-
The Confirmation popup displays, noting the consequences of resetting the review process to a previous level.
-
Select Yes to revert or No to return to the previous screen.