Task Management
In the web client, go to Settings > Task Management.
-
Tasks
-
Scheduled Tasks
-
Task AutoRetry
General
File Access Manager is a task-oriented system, with both interactive tasks (such as querying events) and background tasks (producing reports).
Scheduling tasks with parameters allows them to comply with various requirements.
File Access Manager has long-running processes, including crawling, permissions collection, and reports. The system executes and tracks these processes using tasks, and runs them in batches. It is thus possible to work in the administrative client while tracking the progress of various processes.
Most reports throughout the system have a button or menu item to create a scheduled task, or produce now. Select Produce Now to create ad-hoc tasks in the administrative client to run the report. You can track the tasks in the File Access Manager web application, under Settings > Task Management > Tasks.
When the system creates a task, the following Information popup displays.
An File Access Manager service runs this task, and polls the File Access Manager Database periodically to search for new pending tasks. Each service polls the specific types of Tasks for which it is responsible. For example, the Reporting Service polls and handles Report Tasks. User-created tasks and scheduled tasks display in the Tasks screen.
Note
The permission “Show Tasks from All Users” is required to view all system tasks. This permission is granted by default to the administrator role. Without this permission, the system only displays user-created tasks.
Navigation and menus
-
Checkbox on the left of a task - select task.
-
Checkbox on the top of the table - select all tasks on this page.
-
Select all x items on the top menu - select all tasks on all pages according to the filter.
-
Unselect all items - unselect all items on other pages except for the current one.
-
Filter icon on the top right corner - open the filter.
-
Rows per page on the bottom of the table - select the number of entries per page.
Tasks
This screen shows table with the tasks selected according to the user’s permissions and the filter. The data are updated in real time. On this screen you can cancel, rerun or delete task instances. The filter allows selecting tasks by various parameters, including status, type and date.
Selecting a task opens the Task Details panel listing with details detailed description of the task details and status of submitted tasks.
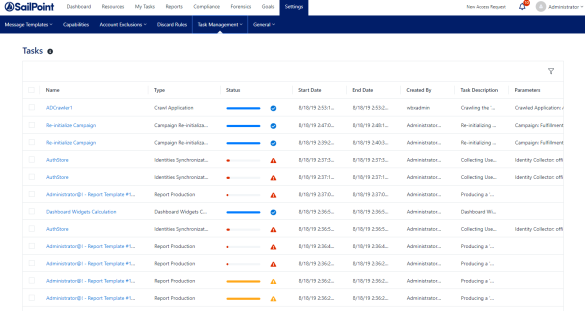
Task Fields
Name, Type
Task name, task type
Service
The service related to this task.
Server
The server this task is running on.
Status
This field shows the current status of the task, including a progress bar.
| Status | Icon | Description |
|---|---|---|
| Completed | The task was successfully completed. | |
| Completed with Warnings | The task completed, but there were warnings. | |
| Failed | The task failed to complete. | |
| Canceled | The task was canceled before completion. | |
| In Progress | The task is currently in progress. | |
| Pending | The task is pending and has not started yet. |
Start / end date
Create By
Parameters
Task Filter
The task screen includes a filter to narrow down the selection of tasks. Select the filter on the top-right corner of the Task screen to open the filter.
Note
The filter is not visible if there are tasks selected.
Filter fields: Name, Type, Service, Status, Task that ended before (date field), Created by me only
The service filter dropdown lists services that have tasks.
Select Apply to set the filter
Task Screen Actions
Select one or more tasks using the checkbox to the left of each task. Selecting a task will open the top option menu:
-
Re-run - rerun the task(s) selected. Selected tasks that cannot be run will not run. Selected tasks that depend on other tasks to complete before running will run after the prerequisite task runs.
-
Cancel - cancel the running tasks out of the list selected.
-
Delete - delete.
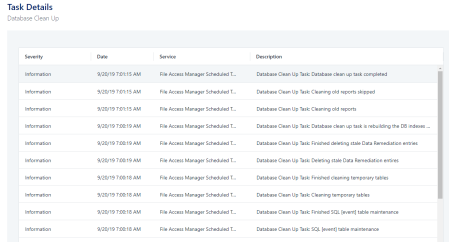
Task Details Screen
Selecting a task opens the Task Details screen, with a description of the task stages.
To close the detail screen, select outside the details screen, or select the X in the upper corner.
Tracking Progress in the Task Detail Pane
To track a task, perform the following steps:
-
Go to My Tasks.
-
Select the task type from the menu bar:
-
Access Certification
-
Access Request
-
Owners Election - suggest owners for a given resource
-
My Requests
Each menu will open a list of active tasks assigned to the current user.
Select the selection from the actions column to view or perform the assigned task.
Scheduled Tasks
A Scheduled Task tells File Access Manager when, and how often, to execute a specific task repeatedly. For example, a weekly scheduled task can run a weekly Activities Report.
The wizards in the File Access Manager administrative client help create Scheduled Tasks. Every wizard with a scheduling screen has a checkbox for creating a scheduled task in the background. While deselecting a checkbox deletes a scheduled task, an attempt to delete a Scheduled Task via the Scheduled Tasks screen results in the display of a warning popup, indicating that another object or process is dependent on this Scheduled Task.
The Schedule Task Handler service creates and processes Scheduled Tasks for the relevant services to handle.
Except for a few types of scheduled tasks, it is only possible to edit task scheduling (not parameters) from within the Scheduled Tasks screen.
Scheduled Tasks Filter
The Scheduled tasks screen includes a filter to narrow down the selection of scheduled tasks. Select the filter button on the top right corner of the Task screen to open the filter.
Note
The filter icon is not visible if there are tasks selected.
Filter fields:
Name - The scheduled task name
Type - A drop down list of scheduled task types
Status - All, Active, Inactive
Select Apply to set the filter.
Scheduled Tasks Fields
-
Name
-
Task Name
-
Type
-
The type of a Scheduled Task indicates the task actions.
The table below lists and describes the task types:
| Type | Description and Task Source |
|---|---|
| Access Certification Campaign | Tasks related to Access Certification Campaigns, created from the Access Certification screen. |
| Access Certification Campaign Reminder Emails | Reminder emails for a campaign. This task is created for each new campaign that is configured to send reminders. The task is controlled through the Edit Campaign wizard. |
| Access Requests Reminder Emails | Controlled through the Access Request screen. |
| Application Deletion | One-time task created when deleting an Application. You cannot schedule this task type. |
| Archive Events by Filter | Created from the Activities to Archive events. |
| Built-in Application Permissions Only Collection | Created from the Permissions Collector or the Edit Application wizard. |
| Built-in Business Resource Permissions Only Collection | Created by right selecting a business resource in the Permissions/Permissions and Identities Forensics screen and starting a specific business resource permissions’ collection. You cannot schedule this task type. |
| Business Resource Deletion | One-time task created when deleting a Business Resource You cannot schedule this task type. |
| Classify Behavioral Rules | A Scheduled Task that classifies data, based on behavioral rules. This task can be scheduled from the File Access Manager Administrative Client under Policies > Data Remediation Policy > Configuration > Schedule Classify Behavioral Rules. |
| Crawler | Controlled through the Edit Application Wizard. |
| Daily Statistics Calculation | An internal, built-in, system-scheduled task that calculates daily statistics on collected activities. |
| Data Classification | Different Data Classification tasks. |
| Database Clean Up | An internal built-in, system-scheduled task that maintains the File Access Manager database. |
| Homegrown Application Identities and Permissions Collection | Controlled through the Permissions Collector wizard of a Homegrown Application. |
| Identity Collector Synchronization | Controlled through the Edit Identity Collector wizard. |
| Reassign Review Process | A one-time task, created when a review process is reassigned to Access Certification, or Access Request. You cannot schedule this task type. |
| Report | Created during report creation or in the Edit report wizard. |
| Revert Review Process | A one-time task, created when a review process is reverted in Access Certification or Access Request. You cannot schedule this task type. |
| Scheduled Events Deletion | Created in Activities to delete events periodically. |
| Service Log Level Update | A one-time task that changes the log level of a service created in the Health Center when performing a service drill down You cannot schedule this task type. |
| Users Logical Drives Mappings | Controlled using Access Fulfillment configuration. |
Status - This field shows the current status of the task, including a progress bar. A scheduled task can be either active, or inactive.
Schedule Type - The schedule type describes the frequency of running the tasks.
-
Schedule Types and Intervals
-
Once - Single execution task runs.
-
Run After - Create dependency of tasks. The task starts running only upon successful completion of the first task.
-
Hourly - Set the start time.
-
Daily - Set the start date and time.
-
Weekly - Set the day(s) of the week on which to run.
-
Monthly - The start date defines the day of the month on which to run a task.
-
Quarterly - A monthly schedule with an interval of 3 months.
-
Half Yearly - A monthly schedule with an interval of 6 months.
-
Yearly - A monthly schedule with an interval of 12 months.
-
Last run - The last time the task ran. Whether successful or not.
Next run - For scheduled tasks that have future runs scheduled
Parameters - The run parameters of the scheduled task.
Editing Schedules
To edit the schedule of one or more scheduled tasks, select the scheduled task from the Scheduled Task screen, and select Edit.
This will open the Edit Schedule panel. Scroll down the panel to see all the input fields.
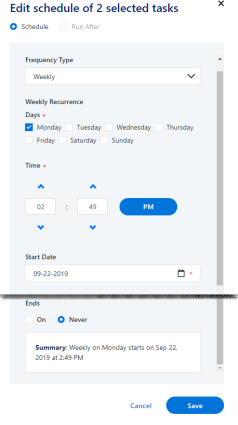
Frequency type - see above
Run After - If selecting Run After, select the task after which this task should run.
Note
When editing more than one task at the same time, you cannot select Run After.
Start date - All tasks, except for Once & Run After, have a Start Date. That date defines the baseline date for all calculations. For example, daily tasks with two-day intervals run first on the start date. The next run will be two days after the start date (not two days after the scheduling date).
End Date (Ends)
-
Never - tasks without an end date.
-
On - select an end date.
If set, the system does not schedule new tasks beyond the End Date.
Related Tasks
Selecting a task will open the Related Tasks panel, listing the instances of the scheduled task that were run, the run dates, task status, and running user. Select outside the panel, or select the X on the top right corner of the panel to return to the previous screen.
Running Tasks
To run a task, perform the following steps:
-
In the web client, navigate to Task Management > Scheduled Tasks.
-
Select a task or tasks from the list of tasks.
-
Using the filter to narrow down the list of tasks.
-
Marking the boxes at the left of each task to select it.
-
Using the**select all**checkbox at the top of the list-this selects all the tasks on the page.
-
-
This will open the task menu bar at the top of the Task table.
-
Edit:
-
Run Now:
-
After running a task or tasks, a popup message opens, with a link to the Tasks screen to view the task progress.
-
Activate - turn on the Activate flag for all schedule tasks selected. This will enable the scheduling to run, as it is configured.
-
Deactivate - turn off the activation flag for all scheduled tasks selected.
-
If you deactivate scheduled task, the next run field for these tasks will remain empty.
Task Auto Retry
File Access Manager can set an auto-retry on task, whereby tasks will be automatically run again a preconfigured number of times in case of failure. The tasks that can be retried are configured by task type.
By default, most task types are set to auto retry twice. See list below for task types set to auto retry:
-
Access Certification Campaign Reminder Emails
-
Access Requests Reminder Emails
-
Application Deletion
-
Built-in Application Permissions Only Collection
-
Business Resource Deletion
-
Classify Behavioral Rules
-
Classify Composite Rules
-
Crawler
-
Dashboard Widgets Calculation
-
Data Classification
-
Global Campaign Reminder
-
Identity Collector Synchronization
-
Import Data Classification Results
-
Import User Scope
-
eMail Reminder
-
Report
-
Report Template
-
Scheduled Alerts Deletion
-
Users Logical Drives Mappings
Access to this panel is controlled by the permission Settings > Task Management > Task Auto Retry.
Enabling Auto Retry for Tasks
-
In the web client, go to Settings > Task Management > Task Auto Retry.
-
Select Enable Auto Retries for Failed Tasks.
-
Set the number of retry attempts – the number of additional tries the system will run the task.
To set the task types that will be retried, complete the following:
-
Select task types from the drop-down list.
Note
The drop-down list includes all available task types that are not already selected for auto-retry. If all the task types are enabled, the Add Task Type field is disabled.
-
Select Add to add the task type to the list.
To delete a task type from the list of task types to retry, complete the following:
-
Locate the task type from the task type list
-
Select the trash icon on the row of the task type to delete.
-
Select Save or Discard to save or discard the changes made on this panel.