Creating Campaigns
Compliance managers and administrators can create an Access Certification campaign, with or without an Access Certification template.
Creating an Access Certification campaign without an Access Certification template
-
In the web client, go to Compliance > Access Certification > Campaign Management.
-
Select + New Campaign.
-
The Create Campaign screen displays, and includes the following steps:
-
General Details
-
Filter Selection
-
Review Process
-
Summary
-
Save
An asterisk after the name of a field marks it as mandatory.
-
-
In General Details, type or select the relevant data in the following fields:
-
Name - Enter the name of the campaign. This is a mandatory field.
-
Description - Enter a description of the campaign.
-
Instruction to Reviewers - This instruction text will display to the reviewer in the approval screen. It can also be used in the campaign email templates.
-
Duration
-
Select Days, Weeks, or Months from the dropdown menu, and type in the relevant number of days, weeks, or months. This is a mandatory field.
- The system sets the due date of a campaign, based upon the campaign duration. The due date is the recommended end date of a campaign, although the campaign does not end automatically on that date.
Note
If the access certification / access revoke request was created from a filter defined with a classification category, the classification category column is displayed in the access certification / access revoke request.
-
-
Select Next.
-
The Filter Selection tab is highlighted and the tab fields display.
-
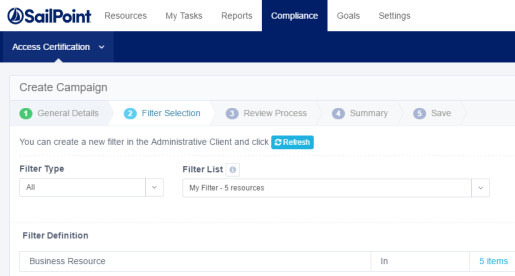
In Filter Selection, type or select the relevant data in the following fields:
-
Filter Type - Select a filter type (All, Permissions, or Identities) from the dropdown list. You can update the filter selection in the administrative client (if you have permission to do so), and then select Refresh.
-
Filter List - Select a filter from the dropdown list. Some of the filters are predefined, out-of-the-box Permissions and Identities filters.
-
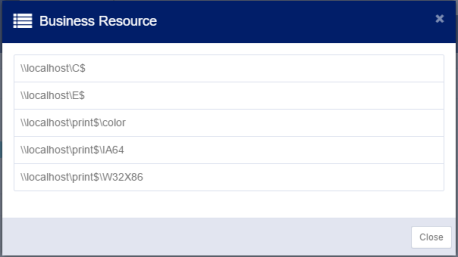
Filter Definition - The displayed filter definition is based on the administrative client definitions.
Note
If there are several items included in the definition, select the number of items (for example, 5 items).
-
-
Select Next.
-
The Review Process tab is highlighted and the tab fields display.
The predefined review process sources are “By Data Owner” or “By Selected Reviewer(s).” If you select “By Data Owner,” the review process is only available for Permission type filters.
-
In Review Process, type or select the relevant data in the following fields:
-
Source - Select a source (All, Predefined, or Custom) from the dropdown list.
-
Review Process - Select a review process from the dropdown list. The processes available depend upon the Source you selected. You can update the review process list in the File Access Manager administrative client (if you have permission to do so), and then select Refresh.
-
Type of Account - Select either User Account or Group Account from the dropdown list. This option is only displayed if you chose the By Data Owner review process or the By Selected Reviewer(s) review process
-
Default Reviewer(s) - This option is only displayed for the By Data Owner predefined review process, since default reviewers are the reviewers when no data owner was found.
-OR-
- Selected Reviewer(s) - This option is only displayed for the By Selected Reviewer(s) predefined review process to set a static list of reviewers. You can choose multiple users or groups.
-
-
Select Next
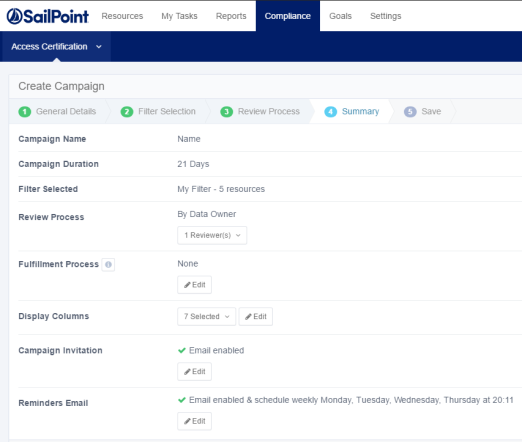
The Summary tab is highlighted and its fields display.
-
In Summary, you can view a summary of your Create Campaign selections in the following fields:
-
Campaign Name
-
Campaign Duration
-
Filter Selected
-
Review Process
Notes
- When a campaign is complete, no records will display. Only when a campaign is in progress, will a record display.
- This view is available for a predefined review process. Select the dropdown list to display the selected reviewer(s).
-
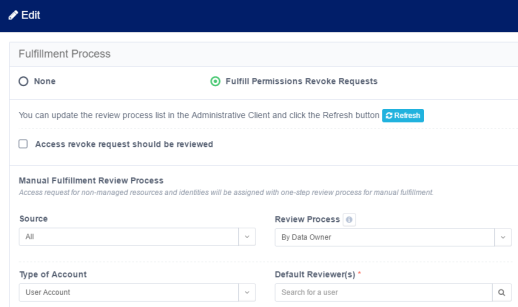
Fulfillment Process - select Edit to edit this selection. In the Edit screen, select:
-
None or
-
Fulfill Permissions Revoke Requests. This will open the fulfillment process panel.
-
Note
An access revoke request is created at the end of the campaign if any records were rejected. This request contains all the permissions that the campaign reviewers revoked. To review the access revoke request, select Access revoke request should be reviewed.
-
Manual Fulfillment Review Process - if an access request involves non-managed resources and identifies, a one-step review process is assigned to be fulfilled manually.
-
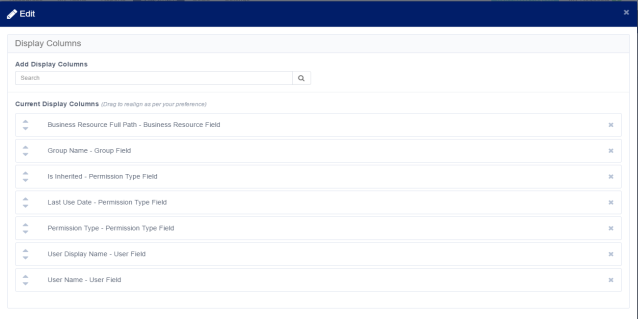
Display Columns - select the dropdown list to display the selected columns. Select Edit to edit this selection. The columns available are based on the filter selected in Step 2. Therefore, if the filter has changed, the columns will also change accordingly.
-
To add columns in the Edit screen, type free text in the Add Display Columns field.
-
To delete items in the Edit screen, select the x to the right of the name of a display column in the fields under Current Display Columns.
-
To change the order of items in a column, drag and drop the items to the desired location in the column.
-
-
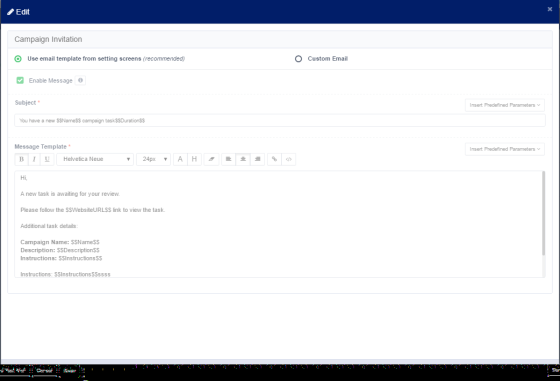
Campaign Invitation - select Edit to edit this selection.
-
-
In the Edit screen, select Use email template from setting screens (recommended) or Custom Email to create an email that differs from the default email.
-
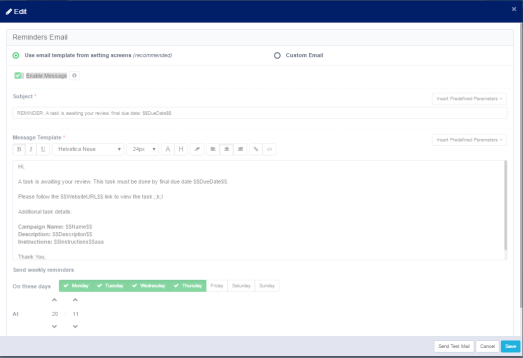
Reminder Emails - select Edit to edit this selection.
In the Edit screen, select Use email template from setting screens (recommended) or Custom Email to create an email that differs from the default email. -
You must select the days and the time of day to send weekly reminders.
-
-
When you have completed all edits, select Next. The Save tab is highlighted and the tab fields display.
-
Select one of the following options under Scheduling Campaign:
-
Save & run manually - Run the campaign when you choose after the campaign has been created and is ready to run
-
Save & run automatically - Run the campaign after it has been created and is ready to run.
If desired, check the Save as template & add schedule recurrence checkbox.
-
-
You may create a campaign template with or without a scheduler. Also, you may either run the template-created campaign automatically after creating the template, or you may run it manually in the future.
-
Select Save.
-
An Information pop-up window displays to indicate that the campaign has been saved successfully, and a task is created to create the campaign, itself. A “Campaign Management” link displays to redirect you to a screen to view the campaign. Alternatively, you can view the campaign by navigating to Compliance > Access Certification > Campaign Management.
-
Select Close.