Permission Forensics
The Permission Forensics screen lets the user monitor and analyze the user and group permissions. On this screen you can create queries to analyze the permissions of specific groups of users, save and share queries for selecting users and groups, generate reports, run permission scans, and revoke explicit permissions of users.
This page supports reports and campaigns.
This component answers questions, such as:
-
Which users have access to what resources?
-
Which users have not used permissions granted to them?
-
Which permissions were granted to each group?
-
Which groups are not being used?
The table displays the permissions, according to the level of granularity selected in the filter.
When creating a filter, you can define the granularity of the report using the View by field, and can mark stale permissions on the table, according to the unused time selected.
Note
The query will retrieve the first 100,000 results. Narrow the search to obtain a better fit.
Reports - See Generating Reports
Filters - See Creating and Editing a Forensics Query.
Viewing Permission Forensics
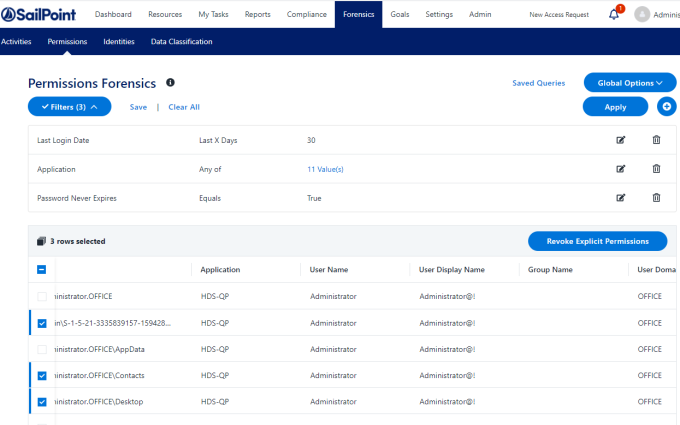
The Permission Forensics table displays the permissions retrieved by the query run.
The data displayed, by default, includes the following columns for each permission:
- What resource
- Business resource full path
- Application
- Who the user is
- User name
- User display name
- Group name
- User domain
- Group domain
- User entity type
- Group entity type
- The permission type
- Permission type
- Classification Category
- Is Inherited
- Inherits Permissions
- ACL Type Allowed?
To change the order of the columns, drag the column titles.
Additional Columns
- Application group
- Application type
- Business Resource Logical Path
- Business Resource Name
- Business Resource Type
- Creates Loop
- Creation Timestamp
- Cumulative Last Used
- Department
- Distinguished Name
- Group Path
- Is Effective
- Is Owner Permission
- Is Riskiest
- Is
- SID History
- Last Login Date
- Last Used Date
- Loop Path
- Password Never Expires
- Password Not Required
- Permission Type Description
- User Disabled
- User Email
- User Locked
Selecting Columns to Display
- Select the Column chooser icon on the table header bar.
- Select the columns to display from the drop-down list.
- Select Show All / Show Less to display a full list of columns / only the default columns in the column chooser. This does not change the selection of columns to display in the table.
- Use the search field to narrow down the list of columns in the column chooser.
- Select Reset Columns to reset to the default selection and order of the columns in the table.
View by
You can change the granularity of the output by selecting the View By type. These options will determine whether to check a user’s direct permissions, or permissions granted by groups the user belongs to, as described below:
-
Groups & Users direct Permissions
This view displays direct Users’ and Groups’ permissions but does not display the Group members. -
Users direct & Group membership Permissions
This view displays user permissions based on direct permission, group membership, and nested group membership. This view doesn't list the users in the groups Everyone and Authenticated Users. -
Everyone Groups expanded, Users direct & Group membership Permissions
This view displays user permissions based on direct permission, group membership, and nested group membership, including listing the members of the Everyone and Authenticated Users groups.
Notes
- The default view is the Users and Groups view.
- In the permission forensic screen, the View By field can be changed after setting or restoring the filter.
Mark Stale Permissions
Select the time period for stale permissions. The user permissions which were not in use for X time (configurable) will be marked in red.
Scope and Hierarchical Search
By default, when you select a business resource (BR) to scope its permissions, only the direct BR permissions (not the child BR permissions) displays.
Special Groups - Group Entity Type
When creating a filter, you can select the group entity type from the Field field.
In Windows-based environments, the user groups are Everyone, Authenticated Users, and Domain Users.
-
Everyone - Includes all users.
-
Authenticated Users - Includes all users without a guest.
-
Domain Users - Includes a group with all users in the domain. By default, any user created is a member of this group (but it is possible to remove that user).
Owner Permission Field
File Access Manager permissions forensics allows identification and tracking of Owner permissions in the AFM interface:
-
A proprietary column, called “Is Owner Permission” indicates whether a given permission is an Owner permission.
-
A proprietary query attribute is dedicated for filtering Owner permissions (allowing queries and/or reports listing the owners of resources).
Permission Scan for Business Resource
The Permission Scan collects the security information from the scanned BRs, and stores it in the File Access Manager database. This includes which users or groups have access to the BR, and whether the access is inherited. The permission scan stores access types such as read, write, full control, etc., depending on the application type.
When requesting a permission scan, you can set the resources to scan, and the number of levels below the requested BR to scan.
To perform a permission scan:

-
Open the Permission Forensics screen
Forensics > Permissions. -
From the Global Options dropdown menu, select Start Permission Scan.
-
This will open the Permission Scan panel. Select the scan level:
-
This Business Resource only
-
This Business Resource and levels 'Level 1-4' and 'All Levels'
-
Select Scan to start the scan, or Cancel to return to the Permission Forensics screen.
DFS Support
-
For DFS resources, the Permission Forensics table will show the physical, as well as the logical path of resources.
-
You can create a filter for DFS resources by logical path only. To select a logical path, select Resource on the Select Field drop down menu, then go to the required path on the resource tree on the Select Resource dropdown list. Refer to Searching for Resources Using a Resource Tree.
Removing Explicit Permissions Using the Permission Forensics Page
Note
This process will revoke explicit permissions from non-normalized resources that are configured for access fulfillment. Permissions that are inherited will not be removed.
-
Go to Forensics > Permissions.
-
Set a filter, as described in Creating and Editing a Forensics Query.
-
Select Apply to run the filter.
-
Set the View to Groups and Users direct permissions.
-
In the permission results, select the permission rows to remove, by selecting the checkbox on the row.
Before selecting which permissions to remove, be sure that:
-
The Application in which the BR resides is configured to support Access Fulfillment for Direct Permission Removal. Section Configuration in Enabling Removal of Explicit Permissions has additional information on how to configure removal of explicit permissions.
-
The permission is defined directly on the BR (the value in the Is Inherited column is False).
-
The selected permission is not a normalized group, created and managed by File Access Manager.
-
-
Select Revoke Explicit Permissions.