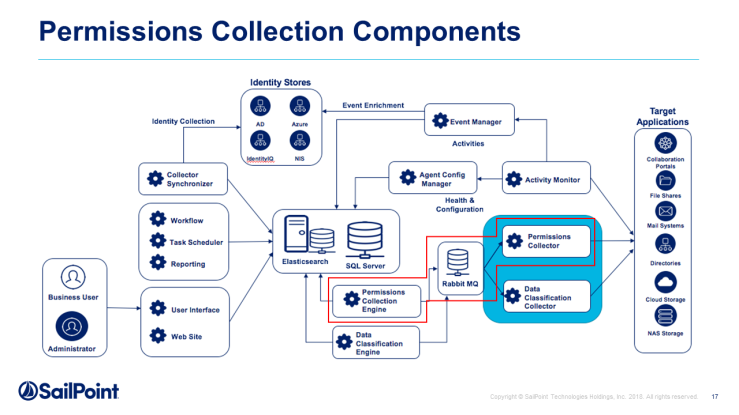
Permissions Collection Process
Permissions Collection is a process that discovers and collects permissions on the BRs (business resources, such as folders) of an application. These permissions are later used and displayed in Permissions Forensics, Access Certification campaigns, Access Requests, and in other locations.
The task itself is a Permissions Collection task.
The permission collection uses one Permissions Collector Engine and zero or more Permissions Collectors.
Permissions Collector
Collects permissions from the application, usually installed near (network wise) the application itself so it will be easier for it to read the permissions.
This service must be linked to exactly one existing Permissions Collector Engine, which will supply the work. By work we mean how to connect to the application and which resources to get the permissions for.
Prerequisites for installation
-
There is at least one engine
-
RabbitMQ is configured
Permissions Collector Engine
There are two configuration modes:
-
With one or more Permissions Collectors.
In this case, the engine will give work to the collectors, get all the permissions back from them and write everything to the DB.
The Engine and Collectors communicate through the RabbitMQ.
-
Without any Permissions Collectors.
RabbitMQ is not relevant in this case.
In this case, it acts as both an Engine and Collector.
This service is usually installed near the DB, in order to increase the performance of reading / writing the data.

Configuring and Scheduling the Permissions Collection
Permissions can be analyzed to determine the application permissions of an out-of-the-box application, provided you have defined an identity store for File Access Manager to use in its analysis, and you have run a crawl for the application.
The permission collector is a software component responsible for analyzing the permissions in an application.
The Central Permission Collector Service is responsible for running the Permission Collector and Crawler tasks.
If the “File Access Manager Central Permission Collector” wasn’t installed during the installation of the server, this configuration setting will be disabled.
To configure the Permission Collection:
-
Go to Admin > Applications.
-
Scroll through the list or use the filter to find the application.
-
Select the Edit icon
 on the line of the application.
 -
Press Next until you reach the Crawler & Permissions Collection settings page.
The actual entry fields vary according to the application type.
-
Select a central permission collection service from the dropdown list. You can create permissions collection services as part of the service installation process. See section "Services Configuration" in the File Access Manager Administrator Guide for further details.
Permission Collection Setup Notes for NetApp
The permissions are managed either on the NTFS level, or on the Share Level.
When the shares are configured with Full Control to Everyone, and all the permissions are defined in the folders, you should select NTFS, which is the default.
Permissions Comments on Isilon for the CIFS server
The permissions are managed on the NTFS level, or on the Share Level (as when the shares are configured with Full Control to Everyone, and all the permissions are defined in the folders, in which case you should select NTFS, which is the default).
Scheduling a Task
-
Create a Schedule - Select this option to view the schedule setting parameters.
-
Schedule Task Name
- Enter a name for the scheduling task.
- The system generates a default name in the following format:
{appName} - {type} Scheduler. - You can override or keep this name suggestion.
-
Select a scheduling frequency from the dropdown list.
- Once: Single execution task runs.
- Run After: Create dependency of tasks. The task starts running only upon successful completion of the first task.
- Hourly: Set the start time.
- Daily: Set the start date and time.
- Weekly: Set the day(s) of the week on which to run.
- Monthly: The start date defines the day of the month on which to run a task.
- Quarterly: A monthly schedule with an interval of 3 months.
- Half Yearly: A monthly schedule with an interval of 6 months.
- Yearly: A monthly schedule with an interval of 12 months.
-
Fill in the Date and Time fields. These fields differ depending upon the scheduling frequency selected.
-
Select the Active Check Box to activate the schedule.
Note
When scheduling a task, be aware that the default time is in UTC, not local time.
-
Select Next.