Configuring the Permissions Collector
To open the Permissions Collector Configuration wizard:
-
Select Open Permissions Collection Wizard at the end of the Homegrown Application definition, or by
-
Select a homegrown application to the context by double-clicking on it, and then selecting on Permissions Collection.
The Permissions Collection Wizard displays.
Welcome Tab
Welcome Tab Directions
-
Select Next to open the Identities Collection window.
- Use Existing Collector - Select a collector from the dropdown list
- Edit the Selected Identity Collector - To edit an existing collector
- Create a New Collector - To create a new collector
-
If you want to create a new collector, select This application uses Groups check box in the Groups Configuration section if applicable. Unchecking this box precludes the need to map the Group data or Group Permission types of Business Resource relations and you can skip those steps in the wizard.
If you chose to create a new collector, the page Identity Collector: Users Collection (1 of 3) displays.
Under Main Data Source, the Data Source displays automatically.
-
Under Mandatory Fields, select a User Name from the dropdown menu.
-
Under Optional Fixed Fields, check the check box next to each relevant optional fixed field, and select the field from the corresponding dropdown menu.
-
Select Next to open the User Collection (2 of 3) screen .
-
Under Fields Mapping, select a field from the Dictionary Field dropdown menu (or if none exists, select Create a new Field next to Fields Mapping).
-
Select a field from the Mapped Field dropdown menu.
-
Select Next.
The Identity Collector: Users Collection (3 of 3) displays.
-
If relevant, under Users Tree, check the Should the users tree be grouped box. This will affect how the users will look in the Users Tree under the Advanced Forensics Control.
-
If you checked that box, select a field grouping from the Field dropdown menu.
-
If relevant, under Unique User Accounts Mapping, check the Use a field to map between accounts of the same user box.
-
If you checked that box, select the field from the Field dropdown menu.
-
Select Next.
The Identity Collector: Groups Collection (1 of 2) window displays.
Under Main Data Source, the Data Source displays automatically.
-
Under Mandatory Fields, select a Group Name from the dropdown menu.
-
Under Optional Fixed Fields, check the check box next to each relevant optional fixed field, and select the field from the corresponding dropdown menu.
-
Select Next.
The Identity Collector: Groups Collection (2 of 2) displays.
-
Under Fields Mapping, select a field from the Dictionary Field dropdown menu. If none exist, select Create a new Field next to Fields Mapping.
-
Select a field from the Mapped Field dropdown menu.
-
Select Next.
The Groups Hierarchy Support window displays.
-
If relevant, select This Identity Collector uses Groups Hierarchy.
-
Under Main Data Source, the Data Source displays automatically.
-
Under Mandatory Fields, select a Child Group Name and a Parent Group Name from their respective dropdown menus.
-
Under Mandatory Fields, select a Parent Group Name from the dropdown menu.
-
Under Optional Fixed Fields, check the check box next to each relevant optional fixed field, and select the field from the corresponding dropdown menu.
-
Select Next.
The Identity Collector: Users Membership in Groups (1 of 1) window displays.
-
Under Main Data Source, the Data Source displays automatically.
-
Under Mandatory Fields, select a Group Domain Name, Group Name, and Username from the respective dropdown menus.
-
Under Mandatory Fields, select a Parent Group Name from the dropdown menu.
-
Under Optional Fixed Fields, check the User Domain Name check box if relevant, and select the field from the corresponding dropdown menu.
-
Select Next.
The Business Resources Collection (General) window displays.
-
Select This application uses Business Resources if applicable. If you do not select this check box, File Access Manager creates a Business Resource (in the background) and associates it with all permissions.
-
Type the name in the Name field.
-
Select Next to open the Business Resources collection.
Permission Collection Resources Tab
Permission Collection Resources Tab Directions
The Business Resources Collection (1 of 2) window displays. Select the data source that contains Business Resource Data type information from the Data Source dropdown list or select Create a new Data Source to create a new data source.
- If you select Create a new Data Source, the Data Source Wizard displays.
- Select a resource unique identifier from the Resource Unique Identifier dropdown list under Mandatory Fields.
- This field must identify the Business Resource uniquely (for example C:\Docs\Finance), and should match Business Resource Unique Identifier selected in the User/Group-Permission Type-Business Resource relationships defined in the following steps.
- Check the Resource Name check box under Optional Fixed Fields, if applicable, and select the column that represents the source name.
-
Select Next.
The Business Resources Collection (2 of 2) window displays.
-
This section allows dynamic field mapping for the Business Resource data type. The relevant fields will be available later for query and display in the Permission Forensics page. You can use it in Access Certification Campaigns and Access Requests to display meaningful information for permission reviewers.
- Select a dictionary field from the Dictionary Field dropdown men.
- Select a mapped field from the Mapped Field dropdown menu.
-
Select Next.
The Business Resources Hierarchy Support window displays.
-
Check the This Business Resources Collector uses Resources Hierarchy check box to support parent-child hierarchy.
- Type in a unique identifier for the hierarchical string in the String to be used as a delimiter to break the string into resources field.
-
An example of a group hierarchy follows:
If the nested groups are:

The Data Source table of parent-child group associations would be:
Parent Group Child Group Group A Group C Group A Group D Group A Group E Group C Group B Group E Group F Group E Group G -
Select Next to open the Permission Types Collection tab.
Permission Types Collection Tab
The Permission Types Collection window displays.

The Permission Type collector is associated with the Application type, so all homegrown applications of the same type will share the same permission type collector, and the same permission types
Permissions Types Collection Tab Directions
-
Check the Edit the selected Permission Type Collector check box to edit the permission type collector.
The Permissions Types Collection (1 of 2) window displays.
-
Select the data source with information on the Permission Type data type from the Data Source dropdown menu, or select Create a new Data Source.
-
Select a Mandatory Field from the Permission Type Name dropdown menu.
-
This field must identify the Permission Type uniquely (for example, Read), and should match the Permission Type Name selected in the User/Group-Permission Type-Business Resource relationships defined in the following steps.
-
Check optional fixed fields, if applicable, from the Optional Fixed Fields check boxes.
-
Select Next.
The Permission Types Collection (2 of 2) window displays.
This section allows dynamic field mapping for the Permission Type data type. The relevant fields will be available later for query and display in the Permissions Forensics screen, and you can use them in Access Certification Campaigns and Access Requests to display meaningful information for permission reviewers.
-
Select Create a new Field under Fields Mapping if applicable.
The Manage Permission Types Data Dictionary window displays.
-
Type a name in the Name field.
-
Select a WH Question from the WH Question dropdown menu.
-
A WH Question will determine under which question this field display in the Advanced Forensics Control under the Permissions > Identity and Permissions Forensics window, when you create a new query.
-
Select Save to save the new field or select Cancel to return to the previous window.
-
The Permission Types Collection (2 of 2) window displays again.
-
Select a dictionary field from the Dictionary Field dropdown men.
-
Select a mapped field from the Mapped Field dropdown menu.
-
Select Next to open the Users’ Direct Permissions Collection tab.
Users’ Direct Permissions Collection Tab
In this portion of the Permissions Collector Configuration Wizard, you determine how to import permissions given directly to users. This is done by mapping the relations between users, permission types, and business resources.
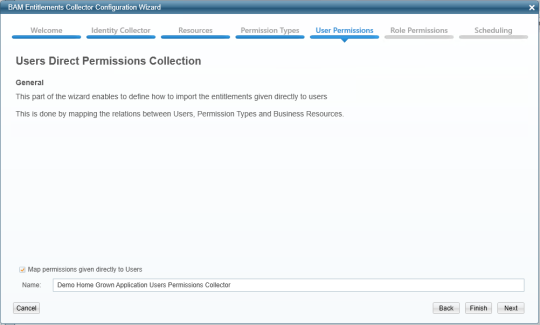
Users’ Direct Permissions Collection Directions
Note: The Name field contains the name you provided.
-
Select the **Map permissions given directly to Users**check box to map those permissions.
-
Select Finish if you do not need to map the permissions, or select Next to continue with the Users’ Direct Permissions Collection portion of the wizard.
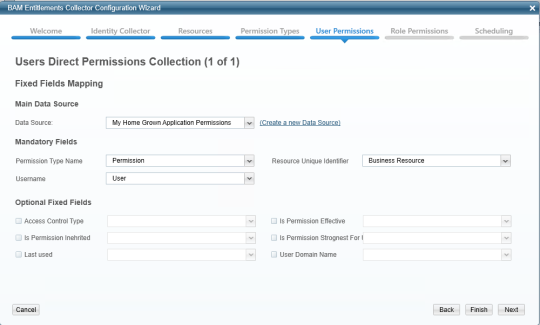
If you select Next, the Users Direct Permissions Collection (1 of 1) window displays.
-
Select the Main Data Source from the Data Source dropdown menu that contains the information on the User-Permission Type-Business Resource relationships or select Create a new Data Source.
-
Select the mandatory fields from the following dropdown menus:
-
Permission Type Name - this field value must match the permission type name selected in the Permission Type collector.
-
Username - this field value must match the user name selected in the Users Collector defined in the identity collector.
-
Resource Unique Identifier - this field value must match the business resource unique identifier selected in the Business Resources collector.
-
-
Check optional fixed fields, if applicable, from the Optional Fixed Fields check boxes.
-
Select Next to open the Groups’ Direct Permissions Collection tab.
Groups Direct Permissions’ Collection Tab
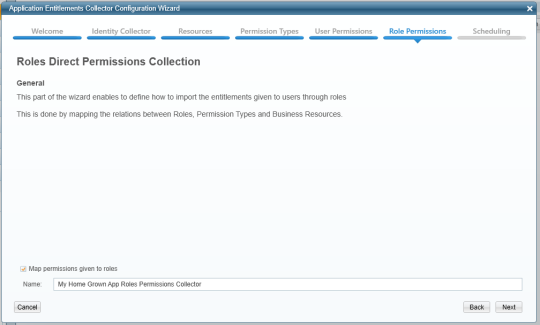
In this portion of the Permissions Collector Configuration Wizard, you determine how to import permissions given to users through rules by mapping the relations between Groups, Permission Types, and Business Resources.
Groups Direct Permissions’ Collection Directions
-
Check the Map permissions given to groups check box if applicable.
Note: The Name field contains the name you provided.
-
Select Finish if you do not need to map the permissions, or select Next to continue with the Groups Direct Permissions Collection portion of the wizard.
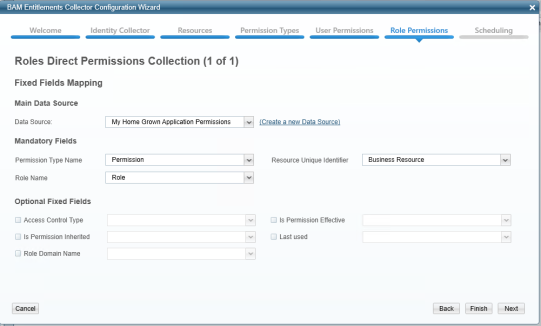
If you select Next, the Groups Direct Permissions Collection (1 of 1) window displays.
-
Select the Main Data Source from the Data Source dropdown menu that contains on the Group-Permission Type-Business Resource relationships or select Create a new Data Source.
-
Select the mandatory fields from the following dropdown menus:
-
Permission Type Name - this field value must match the permission type name selected in the Permission Type collector.
-
Group Name - this field value must match the group name selected in the Groups Collector defined in the identity collector.
-
Resource Unique Identifier - this field value must match the business resource unique identifier selected in the Business Resources collector.
-
-
Check Optional Fixed Fields, if applicable, from the Optional Fixed Fields check boxes.
-
Select Next to open the Permission Collector scheduling tab.
Permissions Collector Scheduling Tab
Permissions Collector Scheduling Directions
-
Select Finish if you do not want to create a schedule.
-
Check the Create a Schedule checkbox to create a schedule for identities, groups, and permissions collection.
-
Select Next to open the summary tab.
Permissions Collection Summary Tab
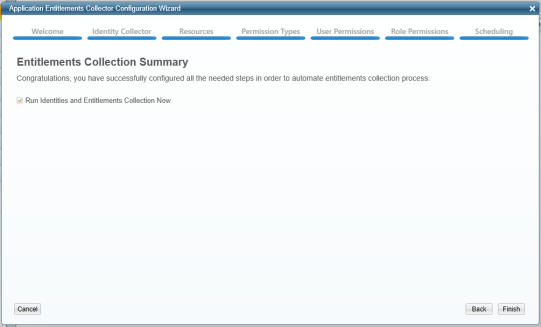
Permissions Collection Summary Directions
-
Select the Run Identities and Permissions Collection Now checkbox to run the collection.
-
Select Finish.
The Permissions Collector Summary window displays.
-
Check Run Identities and Permissions Collection Now and select Finish.
An Information window displays to indicate that the system created a Task successfully.
-
To view the task progress, go to Settings > Task Management > Tasks.
-
Select OK to end the wizard.
Note: It is possible to reuse the Identity collectors for user, group, and the user-group relationships and the Permission Types collector. However, it is only possible to use the Business Resources collectors and the two Business Resource Relationships collectors once, since they are associated with specific applications. One or more Data Sources collect all the above data types, but there must be a separate mapping from the Data Source to each of the data types.
Viewing Permissions Collection Results
The permission results can be seen in the Permission Forensics screen. See Permission Forensics.
You can view the results of the permissions collection that you defined from the Permission tab.