NetSuite
SaaS Management integrates directly with NetSuite's API to uncover your organization's software subscriptions. After you complete the integration, you can use this data to make informed decisions on upcoming renewals and redundant applications to help you reduce your SaaS spend.
Note
SaaS Management only has read access to your software expenses and bill reporting. We do not access your company's financials. For more information, refer to Our Data Policy.
Integrating with NetSuite
You’ll need to connect your NetSuite and SaaS Management accounts to begin gathering data on your SaaS spend. We recommend you have NetSuite and SaaS Management open in separate tabs in your browser to complete the integration.
Important
You must have admin access in NetSuite to integrate the application with SaaS Management.
Adding your NetSuite Account ID to SaaS Management
-
From the NetSuite navigation menu, select Setup > Integrations > SOAP Web Services Preferences.

-
Copy your Account ID from the Primary Information section.

-
Go to SaaS Management and select Integrations from the navigation menu.
- Select the NetSuite tile.
- Select Add Integration.
- In the Authenticate with NetSuite window, enter your NetSuite Account ID in the Account ID field.
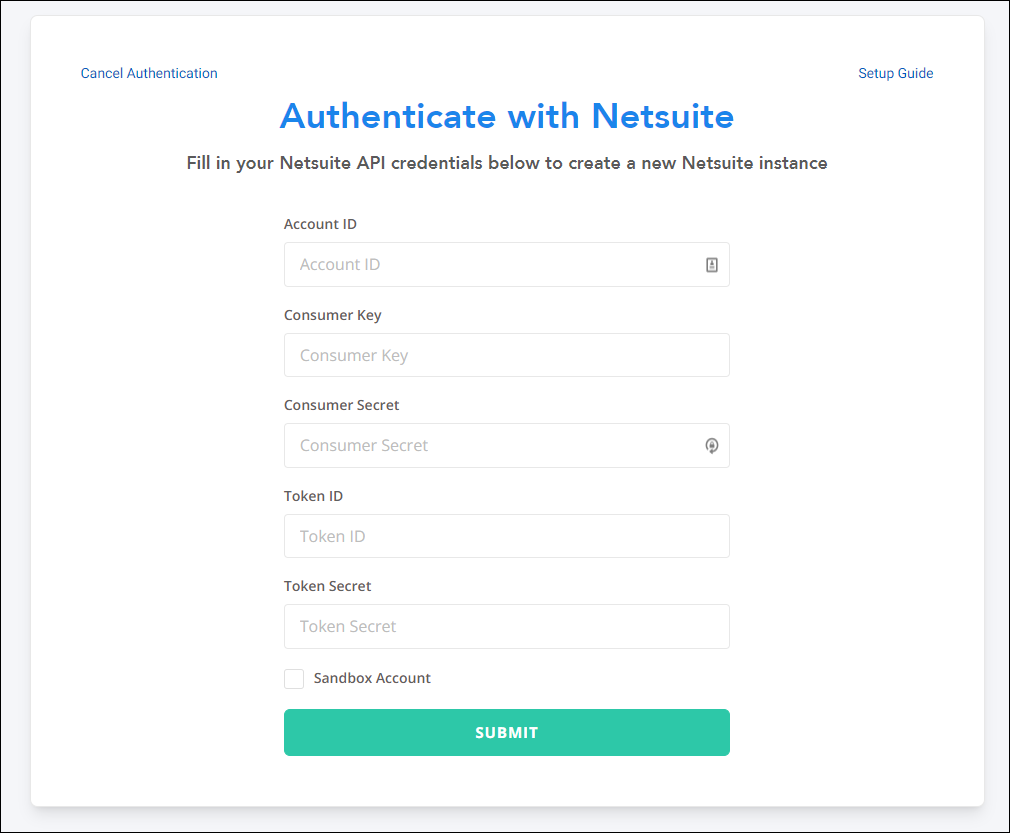
After you've entered your Account ID, leave this tab open in your browser. You'll need to add your consumer key and consumer secret in a later step.
Next you’ll enable token-based authentication in NetSuite, so the application can authenticate requests sent from SaaS Management.
Enabling token-based authentication in NetSuite
-
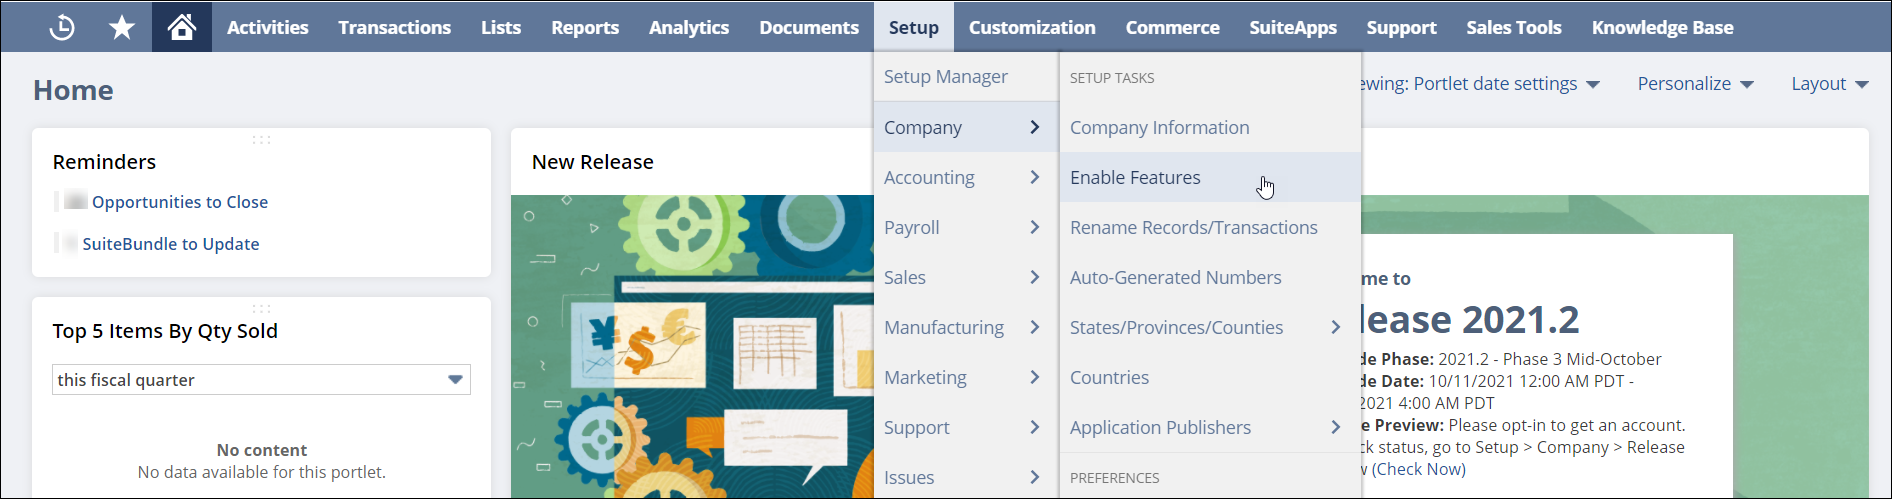
From the NetSuite navigation menu, select Setup > Company > Enable Features.
-
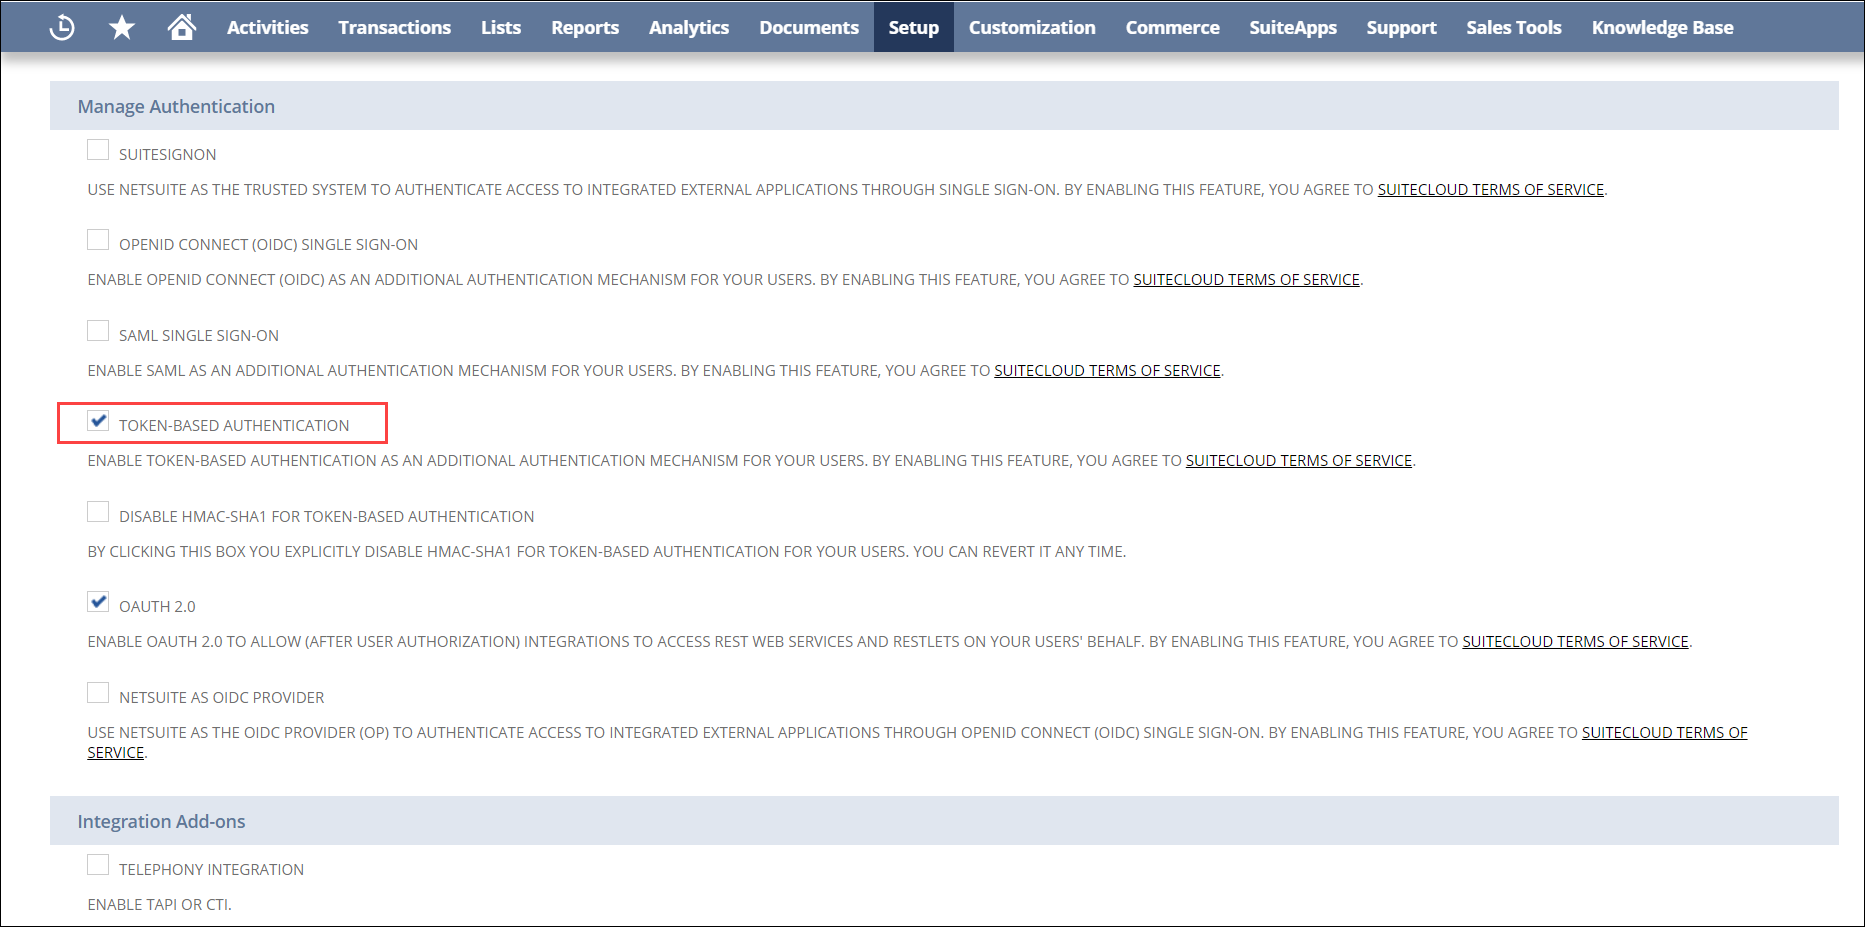
Select the Suite Cloud tab.

-
Go to the Manage Authentication section and select the Token-based Authentication checkbox.
-
Select Save to enable token-based authentication in NetSuite.
After you’ve enabled token-based authentication, you’ll create a new role for SaaS Management in NetSuite and assign it the permissions needed to report on your SaaS spend.
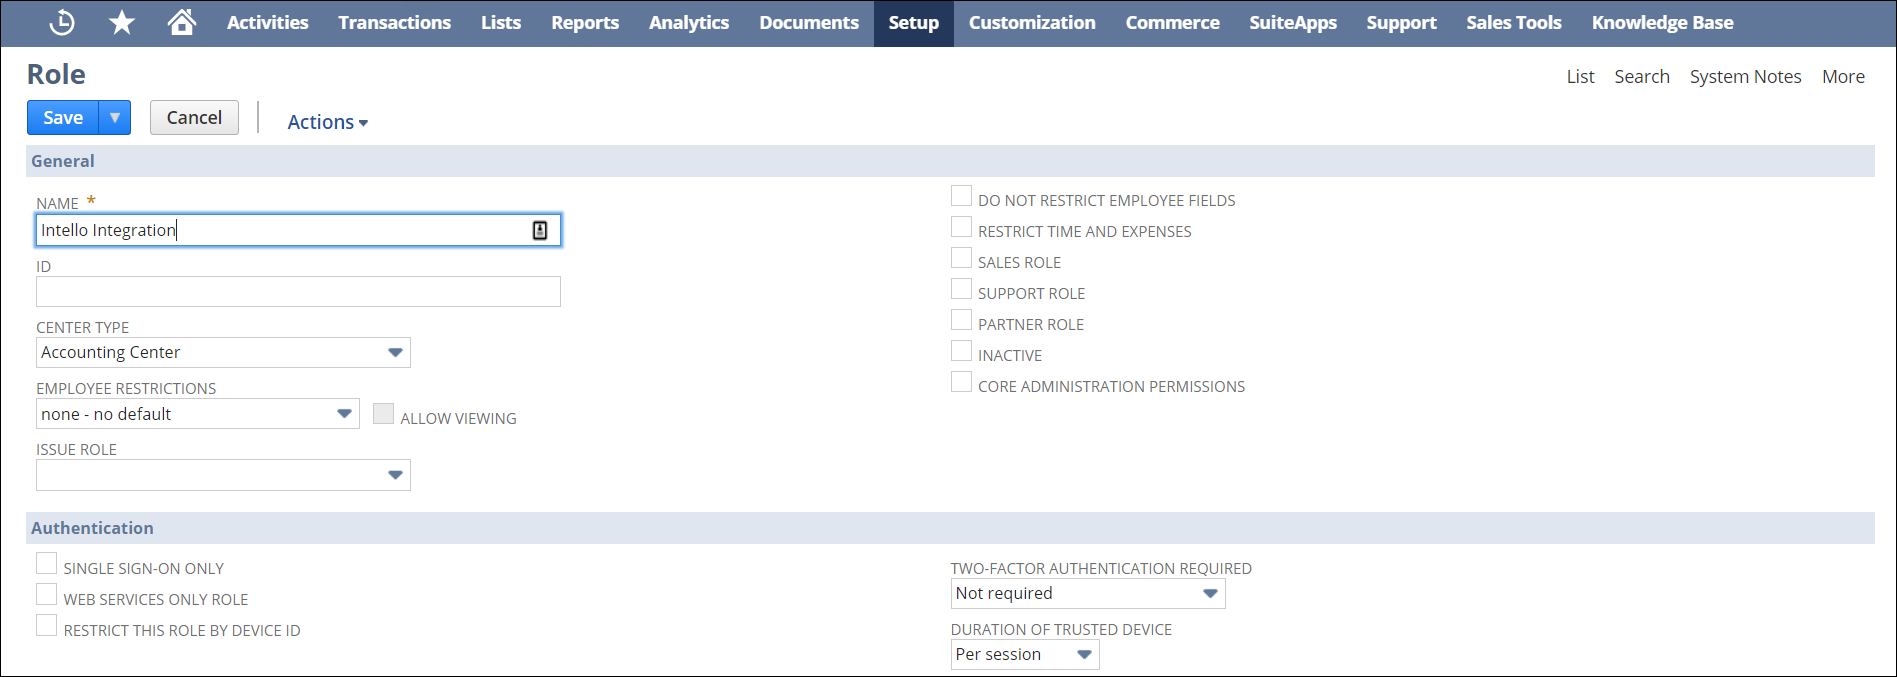
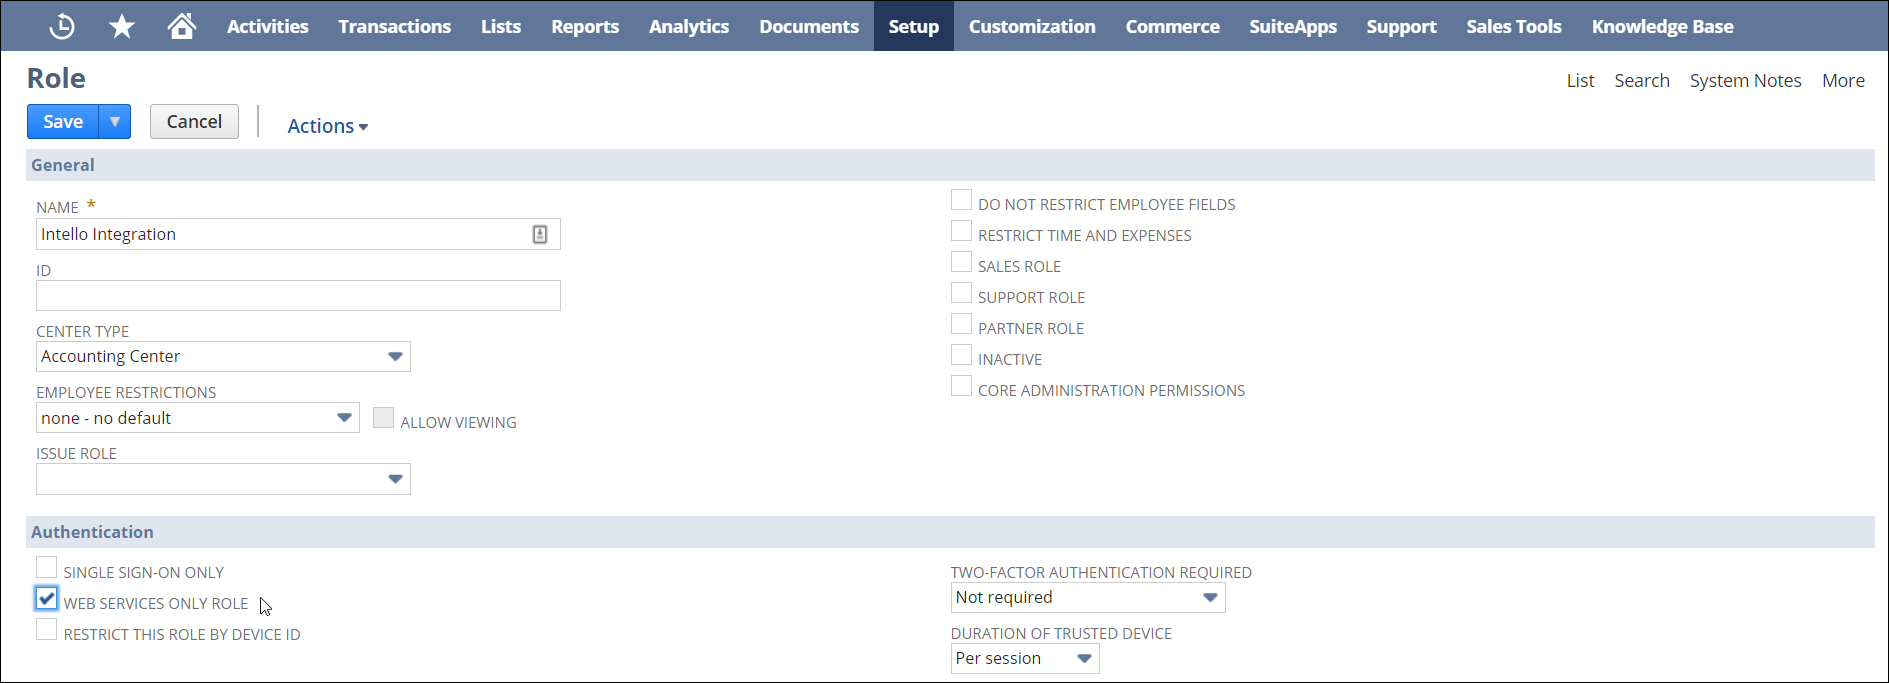
Creating a new role for SaaS Management
-
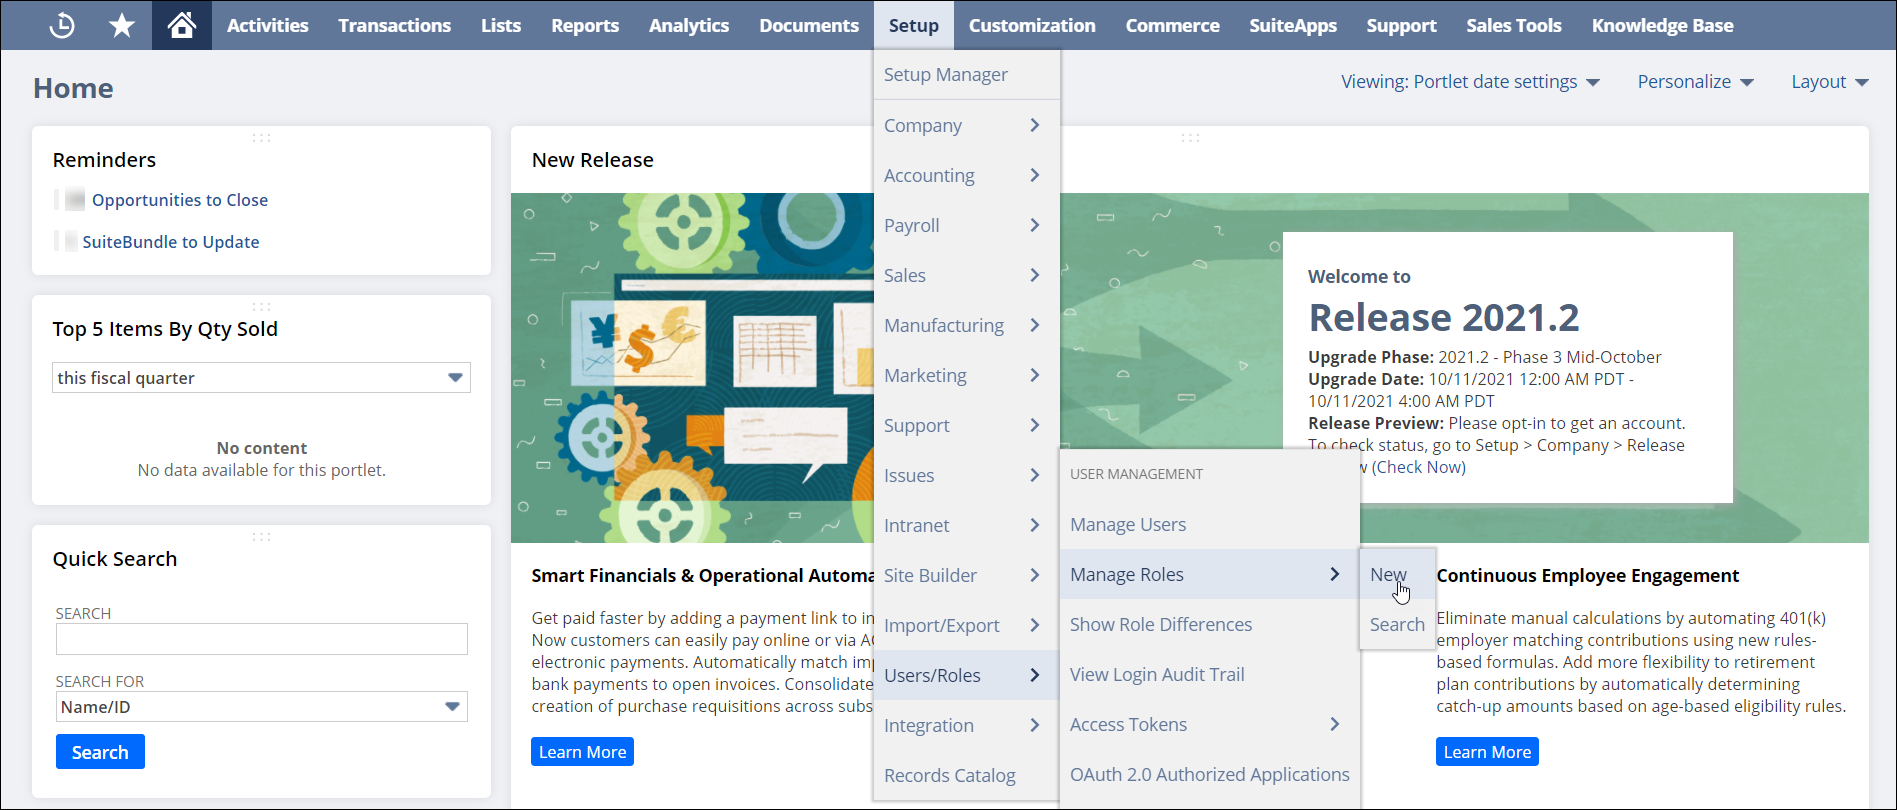
From the NetSuite navigation menu, select Setup > Users/Roles > Manage Roles > New.
-
For the name of the new role, enter Intello Integration.
-
Select the Web Services Only checkbox under the Authentication section.
Note
To sync a subsidiary or multiple subsidiaries to a role, select a subsidiary from the Subsidiary dropdown menu. Select and hold Ctrl to select more than one subsidiary.
-
In the Permissions tab, add the following permissions:
-
Transactions
- Bills
- Expense Report (only if you don't have an expense integration)
- Find Transaction
- Enter Vendor Credit
-
Reports
- Expenses (only if you don't have an expense integration)
-
Lists
- Departments (so we can pull in all your teams from NetSuite)
-
Setup
- Web Services
- User Access Token
-
-
Select Save to create the role.
You can now assign the new role to a user in your NetSuite instance. This user will be tied to the integration record you create for SaaS Management.
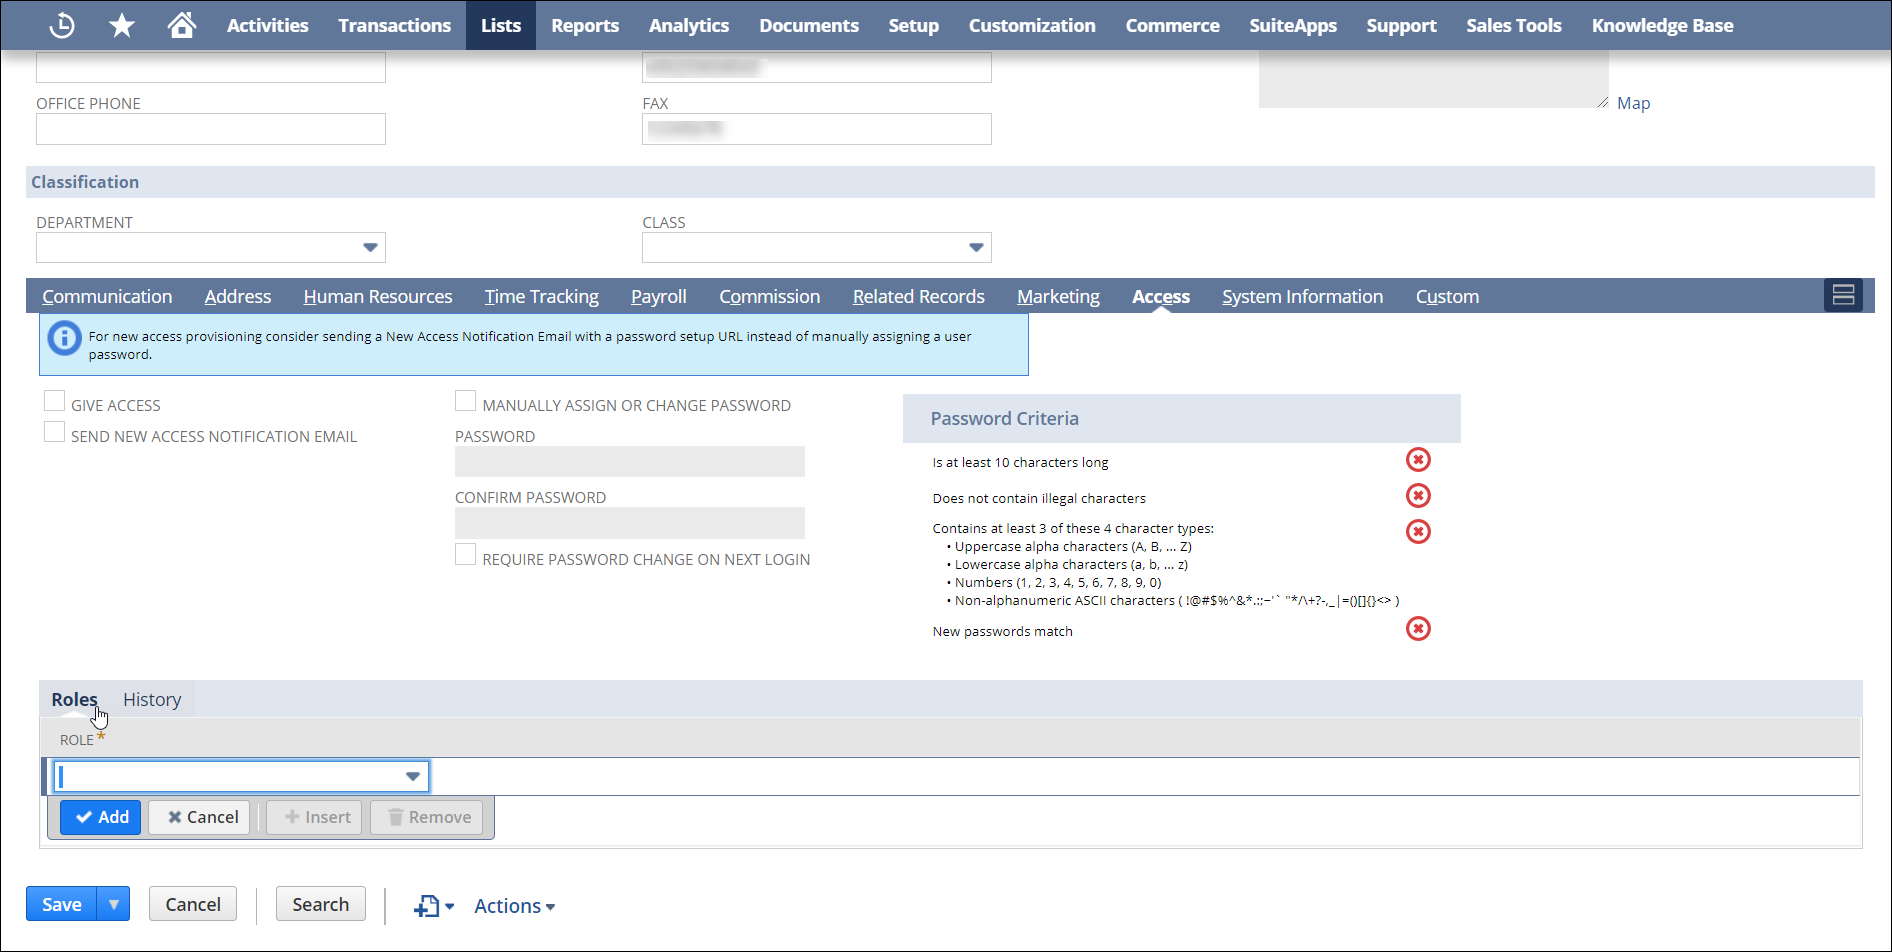
Assigning the SaaS Management role to a user
We recommend you set up a new user to link to the SaaS Management role. You can assign the role to an existing user, but if that user leaves, the integration will no longer function.
-
From the NetSuite navigation menu, select Lists > Employees > Employees > Search.

-
Search for the user you want to assign the new role to.
-
Select Edit to open the user’s Employee page.
-
In the Access tab, go to the Roles section.
-
Select Intello Integration from the dropdown menu and then select Add.
- Select Save to assign the role to the specified user.
Now you’ll create an integration record for SaaS Management in NetSuite that will provide you with the consumer key and consumer secret you need to add to SaaS Management.
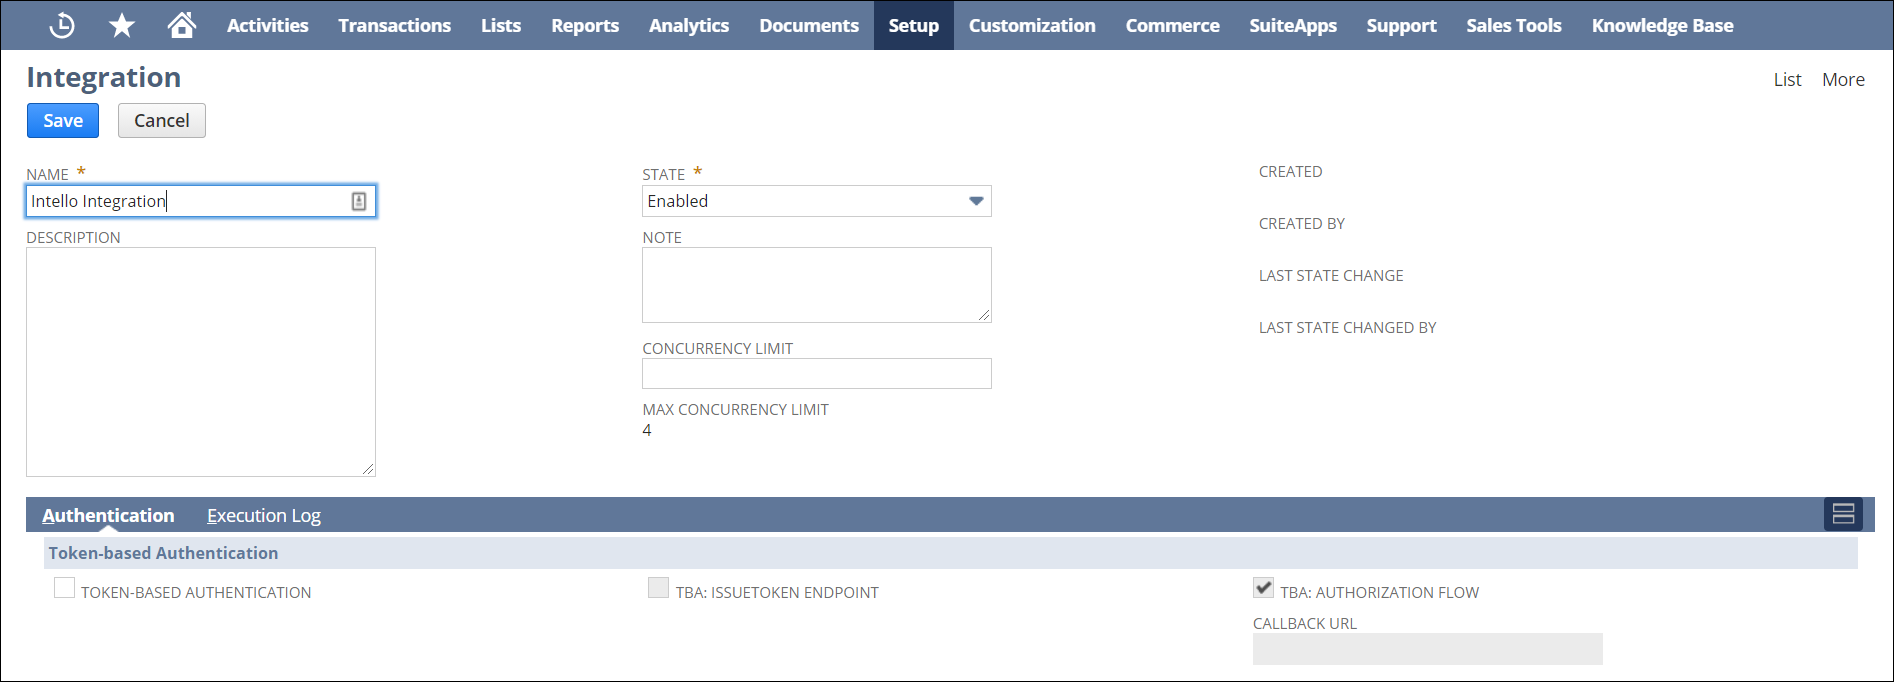
Creating a new integration record for SaaS Management
-
From the NetSuite navigation menu, select Setup > Integration > Manage Integrations > New.

-
Name the new integration Intello Integration.
-
Set the integration's state to Enabled.
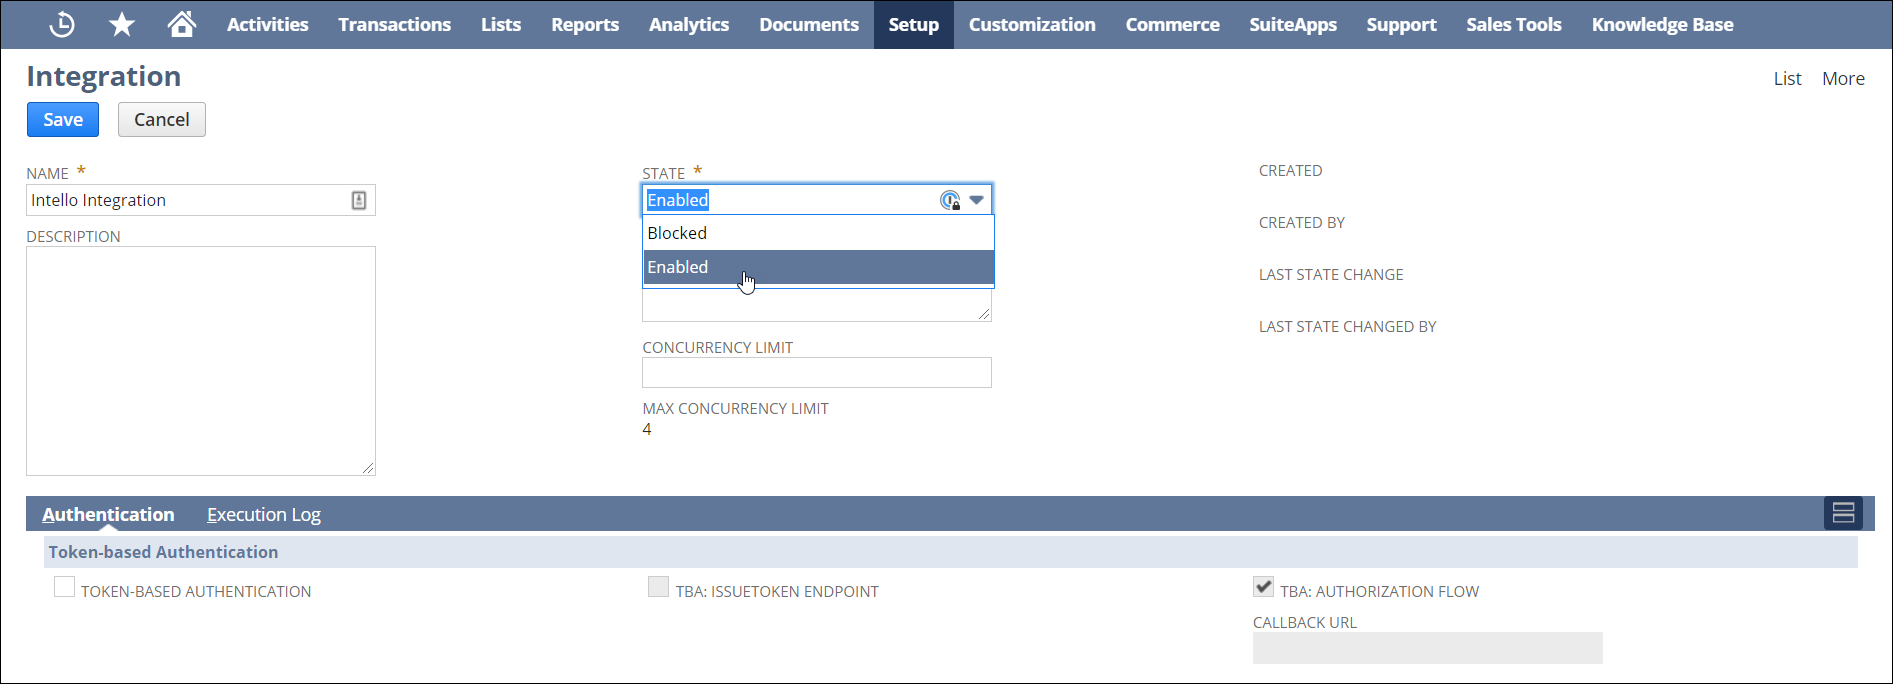
-
In the Authentication tab, select the Token-Based Authentication checkbox.

-
Select Save to create a consumer key and consumer secret.
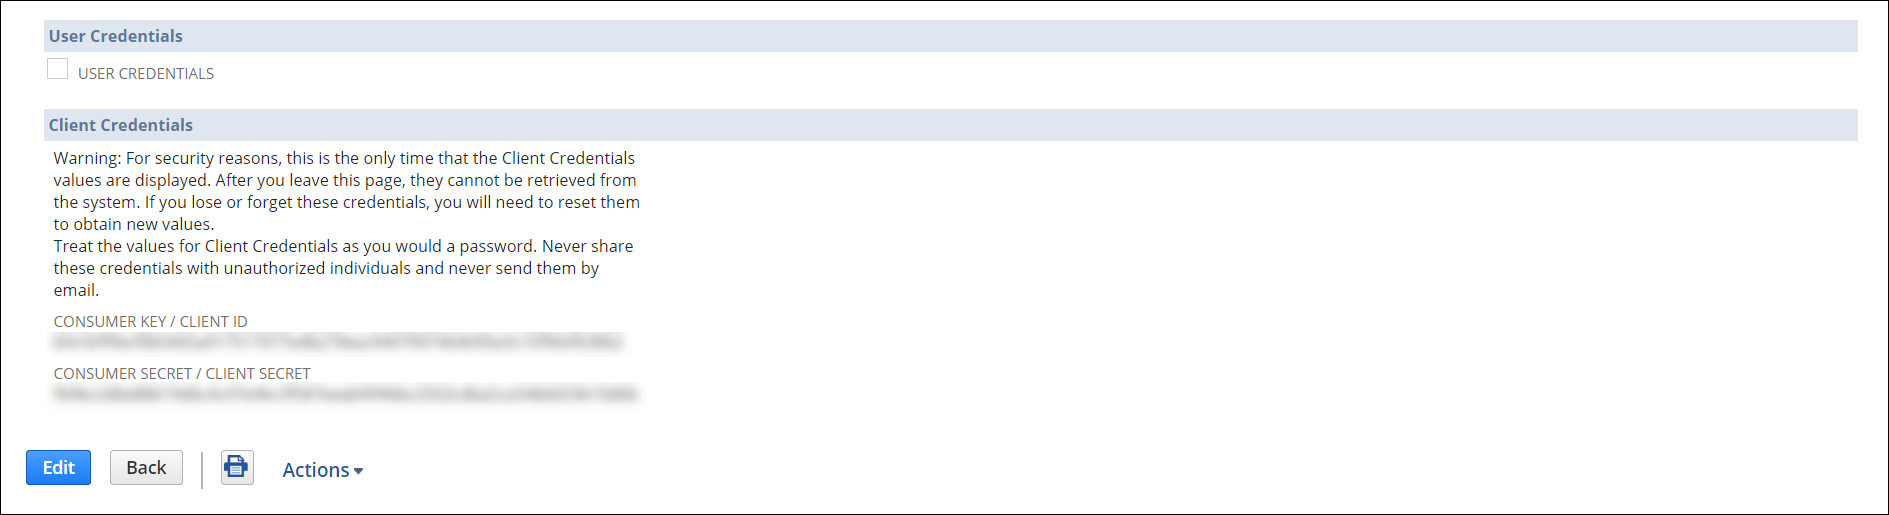
-
Copy the Consumer Key and Consumer Secret.
Warning
Do not close this window without copying both your consumer key and consumer secret. You'll only be shown this information once. If you lose or forget these credentials, you will need to reset them to obtain new values.
-
Return to the Authenticate with NetSuite window in SaaS Management.
- Enter your Consumer Key and Consumer Secret in the appropriate fields.
Now you can create an access token in NetSuite that you’ll add to SaaS Management to complete the integration.
Creating a new access token
-
From the NetSuite navigation menu, select Setup > Users/Roles > Access Tokens > New.
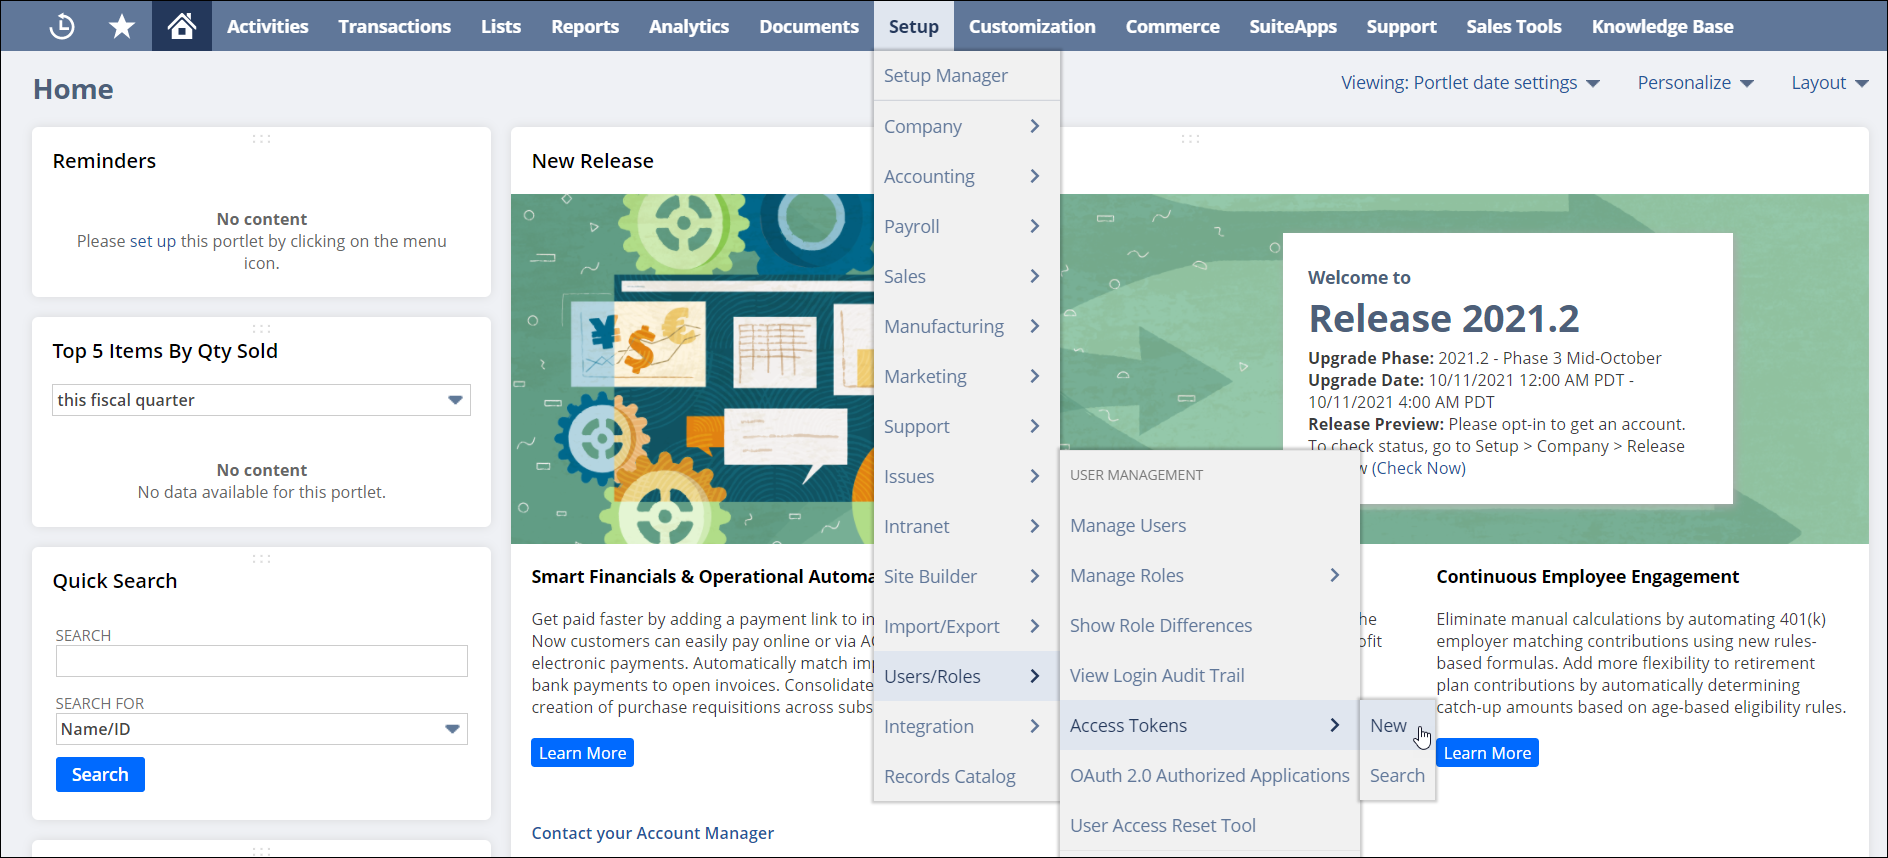
-
Select Intello Integration from the Application Name dropdown menu.
- In the User field, enter the name of the user.
- For Role, select Intello Integration or the integration role you created above.
- Enter a name for the token in the Token Name field.
- Select Save to create the new access token.
-
In the confirmation window, copy your Token ID and Token Secret.
Caution
Do not close this window without copying both your token ID and token secret. You'll only be shown this information once. If you lose or forget these credentials, you will need to reset them to obtain new values.
-
Return to the Authenticate with NetSuite window in SaaS Management.
- Enter your Token ID and Token Secret in the appropriate fields.
- (Optional) Select the Sandbox Account checkbox if you're setting up a sandbox account.
- After you've entered your NetSuite information in SaaS Management, select Submit to complete the integration.
It can take up to 24 hours for your SaaS spend to sync.
User Metadata
SaaS Management does not pull app-specific metadata for this application.
Documentation Feedback
Feedback is provided as an informational resource only and does not form part of SailPoint’s official product documentation. SailPoint does not warrant or make any guarantees about the feedback (including without limitation as to its accuracy, relevance, or reliability). All feedback is subject to the terms set forth at https://developer.sailpoint.com/discuss/tos.