Approving Access Requests
Use the Approve Access Requests interface to make decisions on access request approvals that are assigned to you. If you are a member of any workgroups, the listings include approvals for those workgroups.
Click the Approve Access Requests Quicklink card or select Approve Access Requests in the Quicklink menu to access the Approvals page, which shows the access request approvals that are assigned to you. Use this page to view and manage your approval requests. Approval items include the following types of Lifecycle Manager access requests:
-
Role Requests
-
Entitlement Requests
-
Account Requests
Approval items are shown in an expanded view by default, showing full details for all items in the request. Click Collapse All to switch to a more compact display showing only the approval-level details, without item details. Click Expand All to expand the listing to the detailed view.
To sort the list, click the arrow next to Sort By and select a sort type, Newest, Oldest, or Priority.
Use the Filter icon to filter the items that are displayed on the page. You can filter by Owner, Requester, or Assignee. When you have selected your filtering criteria, click Apply. When filtering is applied, the Filter icon turns green to alert you that you are seeing a filtered subset of your items. To clear filtering criteria and return to viewing all items, click Filter again, and click Clear to remove your filter criteria.
Use Collapse All or Expand All to control how the items are displayed.
Use the Search field to search for approval items by Work Item ID or Requestee Name.
Click Access Recommendations to display the Decision Recommendation popup. The access recommendations icon is only displayed If SailPoint AI-Driven Identity Security was purchased and activated for your installation of IdentityIQ. See About SailPoint AI-Driven Identity Security for more information.
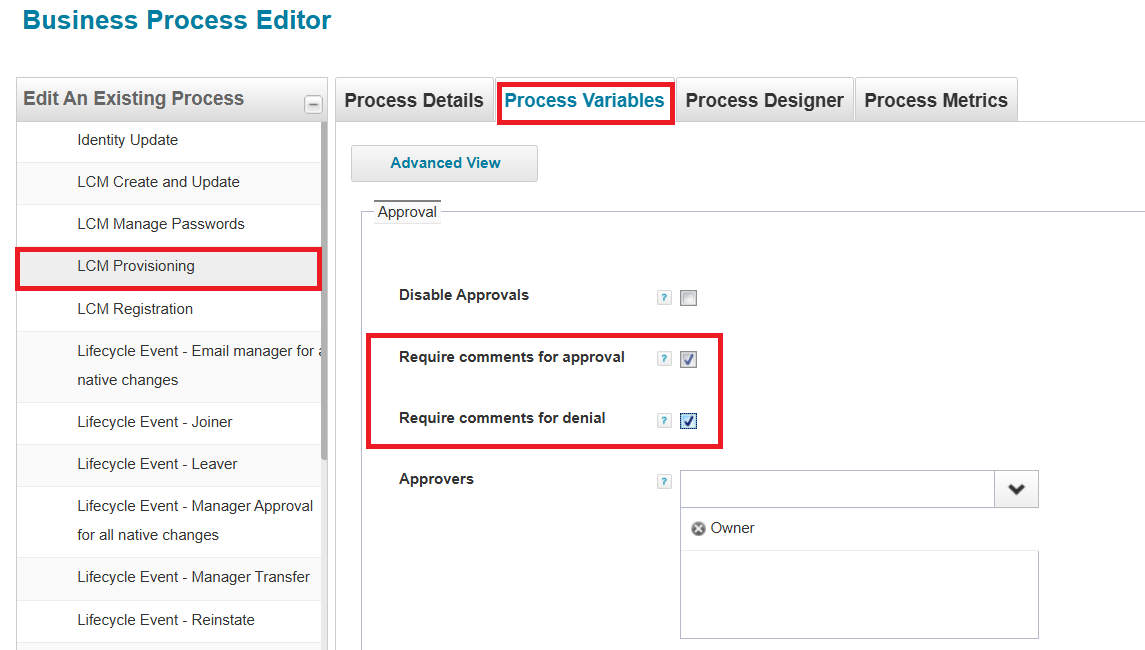
Requiring Comments for Access Approvals or Denials
Complete the following to require comments for access approvals or denials:
-
Navigate to Setup > Business Processes.
-
Select the LCM Provisioning business process, or your organization's custom business process for provisioning if you use one.
-
Select the Process Variables tab.
-
Use the checkbox options Require comments for approval and Require comments for denial to set your comment preferences.
-
Save your changes.
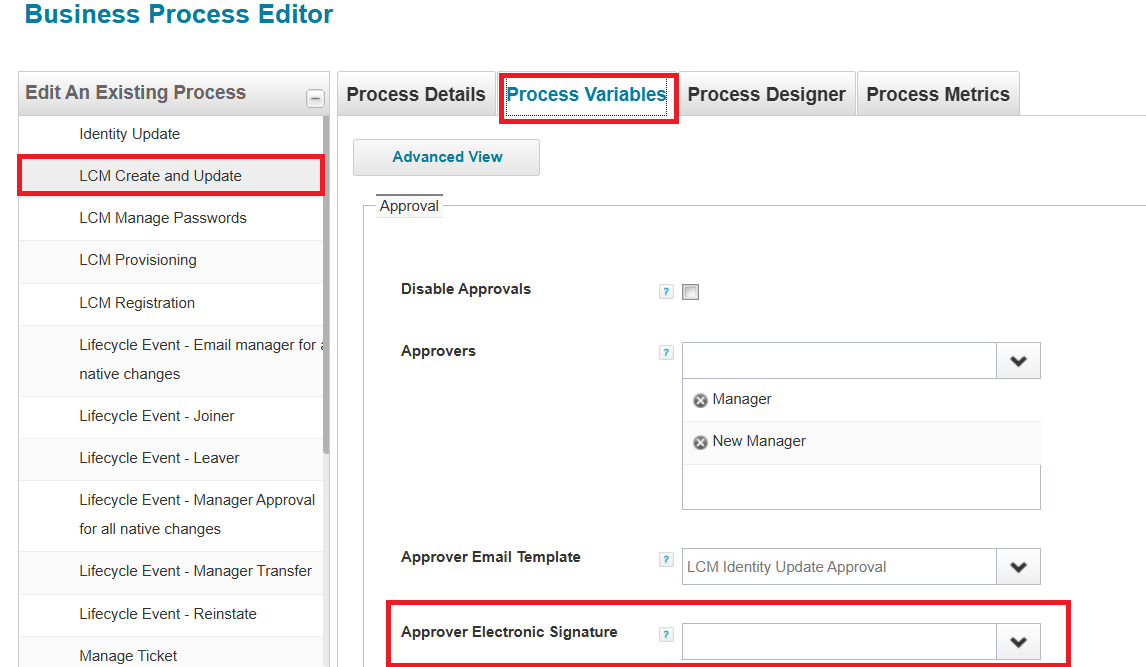
Requiring Electronic Signatures for Access Approvals or Denials
Complete the following to require electronic signatures for access approvals or denials:
-
Navigate to Setup > Business Processes.
-
Select the business process you want to configure for electronic signatures.
-
Select the Process Variables tab.
-
In the Approver Electronic Signature dropdown, choose the electronic signature to use with this process. Note that electronic signatures must be defined in advance. For more information on defining electronic signatures, see Electronic Signatures.
-
Save your changes.
Approval Tasks
You can perform the following tasks:
-
Complete an Approval
-
Forward an Approval
-
View Details
-
Viewing Attachments when Approving Requests
-
View and Post Comments
Complete an Approval
Note
A Policy Violation alert is displayed at the top of any approval that causes a violation if the request is approved.
You can take approval actions both at the overall approval request level, or at the individual request item level.
If SailPoint AI-Driven Identity Security was purchased and activated for your installation of IdentityIQ, recommendation icons are displayed with each item for which an access recommendation is available. Click the icon to see the access recommendation details. See About SailPoint AI-Driven Identity Security for more information.
For each approval request you can:
-
Approve All items, Deny All items, or Forward the approval.
-
Make a decision on each individual approval item to Approve or Deny the request.
-
Use an electronic signature to sign an approval if your installation is configured to use this feature.
Note
If the approval request was set up to use electronic signature, the Electronic Signature dialog displays automatically. Use the same credentials you use to sign in to the product.
The Complete Approval dialog displays when you click Approve All or Deny All for an approval, or after you click the Approve or Deny button for the last individual item in an approval. To complete the approval, click Complete. To change your approval decisions, click Cancel.
Forward an Approval
You can forward an approval to another identity or workgroup, to pass the responsibility for approval decisions to them. Forwarded approvals can not be recalled, and once you forward an approval, you can no longer view information about it. To forward an approval:
-
Click the Forward icon in the Actions (three-line) menu for an approval.
-
Enter the name or a few letters of the name of the new owner of the approval. Alternatively, you can click the down icon and select a name from the list.
-
Add any forwarding comments and click Forward.
View Details
You can view detailed information about an approval, its forwarding history, and information about any approval line item.
Note
For small form factors such a mobile phones, the Details button is displayed in the Actions menu.
You can view the following types of details:
View Approval Details
Click the Info button for the overall approval to open the Details dialog. It shows the following items.
-
Work Item Details tab – displays the work item and Access Request ID number, who made the request, who owns the approval, when the approval was created and the priority.
-
Identity Details tab – displays the attributes that the Administrator configures for the Identity Mappings and can include attributes such as user name, first and last name for the identity, the email for the identity and the owner of the location and region for the identity.
-
Forwarding History tab – displays the name of the person who forwarded the approval, the date the approval was forwarded and any comments. Approvals that are forwarded to or from a workgroup display the name of the workgroup. If there are multiple forwards, all ownership changes are displayed.
View Approval Line Item Details
Click the Info button for an individual approval item to see these Details.
For Roles:
Note
If the requestor includes an Assignment Note when an approval request for a role and an account selection is required, the Assignment Note is displayed at the bottom of the Details tab.
-
Details – displays the requested action and the name of the role. For Entitlement and account requests, information about the account and application is displayed.
-
Account Details – displays the specific role name, the account name and the application for roles requests.
-
Entitlements – displays the associated applications, attributes, entitlement name, and how it was assigned.
For Entitlements:
A single panel listing the Action, Attribute, Value, Account Name, Application, and Entitlement Owner.
Viewing Attachments when Approving Requests
When an Access Request item includes file attachments, the reviewer sees a green attachment icon indicating the presence and number of attachments. The reviewer can select the icon to download and view the attachment. IdentityIQ does not have any built-in viewers; in order to open and view an attachment, the user must have the appropriate application installed (for example, Adobe Acrobat or similar, to open and view a PDF attachment).
View and Post Comments
You can view or post comments for an approval or for an individual approval item, using the Comments button. The number next to Comments indicates the number of comments that exist for the approval or approval item. If no number is displayed, there are no current comments.
Note
For small form factors such as mobile phones, the Comments button is displayed in the Actions menu.
You can perform the following tasks:
View Approval or Approval Line Item Comments
Click Comments for the overall approval or an approval item to view the comments. The Comments dialog lists the comments from the oldest to the newest with the oldest comments at the top. For each comment, the following information is displayed:
Note
All approvers can view all comments made by other users.
-
Posted comment
-
Name of the user who posted the comment
-
Date and time the comment was posted
Post Approval or Approval Line Item Comments
To post a new comment:
-
Click Comments for the approval or approval item
-
Type your comment in the text box at the bottom on the Comments dialog.
-
Click Post.
Required Comments for Approvals and Denials
IdentityIQ can be configured to require comments for any approval and, separately, for any denial of access. This setting is defined in the provisioning business process that manages approvals. The default business process for this is the LCM Provisioning business process.
To require comments on approvals and denials, click Setup > Business Processes, and choose the LCM Provisioning business process (or your custom provisioning business process if you have implemented one). On the Process Variables tab, use the checkboxes to determine when comments are required: Require comments for approval and Require comments for denial.
In the approvals UI, if comments are required for the item, the comment icon is flagged with a red asterisk. Comments can be made at the overall approval level and at the individual approval item level; when comments are required, a comment at the overall request level satisfies the requirement for comments at the individual approval item level. If bulk decisions are enabled in your system, a pop-up dialog will open for the required comments when approvals or denials are made in bulk.