Importing or Updating Mitigating Controls
Add or update mitigating control data and mappings to risks and users using the UI or by importing a spreadsheet. All changes are tracked in Mitigating Controls Change Logs
Add or Update Mitigating Controls in the UI
Manage mitigating controls in the UI for faster administration of small numbers of changes with ease and consistency, since validations are enforced automatically through a guided process. Notes can be added to mappings and rules to provide additional context for auditors.
When you add or update mitigating controls in the UI, the Change Log entries include who made the changes and when. Metadata for controls and mappings shows Created By with the date and Last Modified By and the date.
The Risks > Mitigating Controls UI includes three tabs for managing mitigating controls and mapping them to risks: Mitigating Controls, Risk Mapping, and Mapping Rules.
Mitigating Controls Tab
From the Mitigating Controls tab, you can create new controls and edit existing controls, including all of the relevant text metadata and when the control should take effect or expire.
To create a new control:
- Go to Risks > Mitigating Controls and select the Mitigating Controls tab.
- Select the Create Control + button.
- Define details about the control:
- Control Code - Unique identifier for the control.
- Name - Name of the control.
- Description - Description of the control.
- Valid From (optional) - Starting date when the control is valid.
- Valid To - End date, when the control is no longer valid.
- Last Tested (optional) - Date when the control was last tested.
- External Link (optional) - Link to your internal audit application where you have documentation specific to this control.
- Control Objective (optional) - Business objective that the control serves.
- Test Plan (optional) - Plan for testing the control.
- Control Type - Type of control, whether manual or automatic, preventative or detective.
- Frequency - How often the control should be executed, such as weekly, monthly, or ad hoc.
- Primary and Secondary Owners - Name of the person or persons who are designated owners of this control. There must be at least one owner assigned to each control.
- Select + Add Primary Owners or + Secondary Owners.
- In the modal, select + to add individuals or + Add All to add all as owners. At the bottom of the window, you can add a comma-separated or line-separated list of usernames and select + Add to add multiple owners at once.
- Select X to close the modal.
- Select Close (without saving), Save, or Save and Add Risk Mapping.
To edit or view an existing control:
- Locate the control you want to edit by scrolling, searching, or filtering.
-
Select an option from the Actions dropdown.
-
Enable / Disable Mitigation - Enable or disable this mitigating control, including any associated user mappings.
Note
When a mitigating control is disabled, its row is shaded red indicating that no associated risks or users will be identified as mitigated for either What If Simulations or Risk Reports.
-
View Risk Mappings - View risks that this control is currently mapped to.
- View Mapping Rules - View the mapping rules for this control.
- Add Risk Mapping - Map a risk to be mitigated.
- Edit Control - Update fields such as description, objective, and owners.
- Disable Risk Mappings - Stop allowing this control to be mapped to new risks or users, but without impacting existing risk and user mappings.
-
To delete an existing control:
- Locate the control you want to delete by scrolling, searching, or filtering.
- In the Actions column, select the Delete icon
 .
.
Risk Mapping Tab
From the Risk Mapping tab, you can manage how mitigating controls are mapped to the specific rulebook risks that they mitigate.
To start a new mapping of a mitigating control to risks that are associated with a selected rulebook:
- Go to Risks > Mitigating Controls and select the Risk Mapping tab.
- Select Create Risk Mapping +.
- From the Mitigating Control dropdown list, select a control code.
-
Select a Rulebook.
Note
You can only add risks from one rulebook at a time.
-
Select + Add Risks.
- In the Risks Selection modal, scroll, search, or filter to locate the risks you want to map to the selected control.
- Select + to add individual risks or + Add All to add all risks in this rulebook. At the bottom of the window, you can add a comma-separated or line-separated list of risks and select + Add to add multiple risks at once.
- Select X to close the modal.
- Select Save to save the control to risk mapping, Save and Add Mapping to proceed to add user mappings, or Cancel.
To edit or view an existing risk-to-control mapping:
- Locate the risk mapping you want to edit by scrolling, searching, or filtering.
- Select an option from the Actions dropdown.
- View Mapping Rules - View the rules applied to this mapping.
- View Mitigating Control - View the mitigating control applied to this mapping.
- Add Mapping Rule - Add a mapping rule to control how this mapping applies to users.
- Edit Risk Mapping - Modify the notes for a mapping, then select Save to save a draft, Save and Add Mapping, or Cancel.
To delete an existing risk-to-control mapping:
- Scroll, search, or filter to locate the risk mapping you want to delete.
- In the Actions column, select the Delete icon .
Mapping Rules Tab
On Mapping Rules tab, you can provide logic for how a control-to-risk mapping applies to users. You can create a logic rule that either mitigates all users for one or more systems, or specific users for one system at a time.
To create a mapping rule:
- Go to Risks > Mitigating Controls and select the Risk Mapping tab.
- Select Create Mapping Rule +.
- Use the Control–Risk Mitigation dropdown to select a control–risk mapping to apply.
- Select a Mitigation Logic Rule Type:
- All Users - Applies to all users. Use this option when a risk is not applicable to a given system or globally across all systems.
- Specific Users - Applies only to selected users. Use this option when a risk should only be mitigated for certain specific users.
-
Select the system(s) that this rule applies to.
Note
If your rule is for specific users, you can only select one system.
-
If your rule is for Specific Users, select + Add Users and add those users to the User Selection list.
- Enter notes (optional) to add context and clarity for future audits.
-
Select a Valid To date (optional) to have the mapping logic rule expire after a given date.
Note
This differs from the Valid To Date at the Control level which expires all mapping rules.
To edit or view a mapping rule:
- Locate the mapping rule you want to edit by scrolling, searching, or filtering.
- Select an option from the Actions dropdown.
- View Mitigating Control - View the mitigating control applied to this mapping.
- View Risk Mappings - View risks that this control is currently mapped to.
- Edit Mapping Rule - Modify the notes and valid to date for this mapping rule, then select Save or Close.
Import or Update Mitigating Controls via Spreadsheet
Manage mitigating controls by importing a spreadsheet when you need to make a large amount of updates at once.
- Go to Risks > Mitigating Controls.
- If you need to add mitigating controls for the first time, download the Excel template. Select Import, then Download Template.
- If you need to update or add to the mitigating controls that are already in your system, download them in a spreadsheet by selecting Export.
-
Update the spreadsheet and save your changes.
Caution
Importing mitigating controls performs a full overwrite of all existing mitigating controls, control owners, and mappings. Make sure that all entries are present in your spreadsheet or they will be deleted.
-
In the provided Excel template, each column has an explanation of what information belongs there. Select a cell to view the explanation.
-
Any field that requires an enumerated value has data validation. Dropdowns will only allow you to select a permissible value.
-
For each control, you can specify a Valid From and a Valid To date; this allows you to manage when a control should take effect and when it should expire. Valid To dates are required, but Valid From dates are optional. When there is no Valid From date, the control takes effect the day it is added.
Note
No users will be mitigated for controls with a Valid From date in the future until that date is reached. No users will be mitigated for controls with a Valid To date in the past.
-
You can create a control that is not activated by setting the Is Enabled value to FALSE. No users will be mitigated until Is Enabled is set to TRUE.
-
Control to risk mapping and risk to user mapping is combined on the Mappings sheet. You need to repeat the Control Code, Rulebook Name, and the Risk Code for each mapping rule that you create.
- Once you add a single mapping rule for a given control and risk, then the system will automatically create the relationship between the control and the risk when it’s imported.
- On the Mappings tab, you can only select a control that has already been entered on the first tab.
- The Rulebook Name must be entered exactly as it appears in the Access Risk Management UI.
- The Risk Code must exist in the specified rulebook.
- The Type column determines whether the mapping rule will be applied to all users or specific users.
- The System Name must be entered exactly as it appears in the Access Risk Management UI.
- For mapping rules of Type ‘All Users,’ you may either specify a single system in the System Name column to restrict the mapping to only that system, or, if you leave the System Name column blank, the mapping will apply to all of your systems governed by Access Risk Management.
- For mapping rules of Type ‘All Users,’ you must leave the Attribute and Value columns blank.
- For mapping rules of Type ‘Specific Users,’ you must specify the Attribute value as ‘ERP_SYSTEM_USER_ID’ at this time. Additional Attribute values may be supported in future releases.
- The Value column should only be populated for mapping rules of Type ‘Specific Users’ and must exactly match the username of the user to be mitigated from the specified ERP system.
- Control Owners is a separate tab in the spreadsheet. You may set more than one user to be the Primary owner, but you must set at least one. Any user specified here must exist in the Access Risk Management application.
- Specifying a Valid To value on the Mappings tab causes the mapping rule to expire after the specified date.
-
-
Select Risks > Mitigating Controls to return to the Mitigating Controls - Maintenance page and select Import.
- Use Select Files to add your saved .xlsx file.
- Select Upload.
Note
There may be a gap of up to 30 minutes between the time you upload the spreadsheet and the Mitigations Report being updated with the new data.
You can also apply a mitigation when performing a What If Analysis. Refer to Applying Mitigations.
After uploading a spreadsheet, you are taken to Activity History > Data Imports.
Mitigating Controls Data Validation
For tenants where Access Risk Management Validation Service is enabled, your uploaded mitigating controls file is validated against predefined validation rules.
On the Activity History > Data Imports page, locate the mitigating controls file that you uploaded. Initially, it will have the status Uploaded. Validation may take up to several minutes to complete. As you refresh the screen, the status will move from Uploaded to Validating to either Validation Passed or Validation Failed.
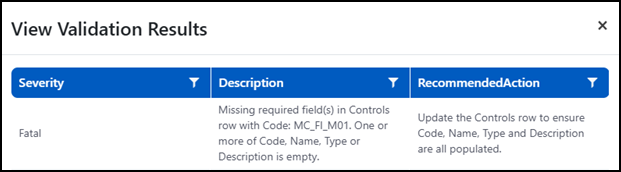
Once the validation has passed or failed, the Result column includes the data validation outcome. When there are errors, you can select View Result in the Action column to view the data issues that caused the failure. Results include the recommended action for resolving the failure.
Documentation Feedback
Feedback is provided as an informational resource only and does not form part of SailPoint’s official product documentation. SailPoint does not warrant or make any guarantees about the feedback (including without limitation as to its accuracy, relevance, or reliability). All feedback is subject to the terms set forth at https://developer.sailpoint.com/discuss/tos.