Prerequisites for AWS
This section describes the minimal set of permissions required to configure a File Access Manager AWS connector.
It is a step-by-step guide, including AWS Console Screens.
Make sure your system fits the descriptions below before starting the installation.
There are two methods to configure the AWS File Access Manager connector, and the require configuration is different for each.
-
EC2 instance to run File Access Manager (This is the recommended method).
-
Dedicated IAM user.
Software Requirements
File Access Manager requires the latest ASP.NET Core 8.0.x Hosting Bundle. This bundle consists of .NET Runtime and ASP .NET Core Runtime. You can download the latest 8.0.x Hosting Bundle version from here.
Configuring an EC2 for File Access Manager Connector
This is the recommended connection method for the File Access Manager connector.
Create a role and policies to enable running the File Access Manager activities on all accounts in the organization.
-
Sign into your AWS account.
-
Create a new policy “FileAccessManager_AssumeRolePolicy”.
This policy will allow the File Access Manager application, created in the next step, to perform an Assume Role on the roles that will be created in each account.
  {
      "Version": "2012-10-17",
      "Statement": [
          {
              "Sid": "VisualEditor0",
              "Effect": "Allow",
              "Action": "sts:AssumeRole",
              "Resource": "arn:aws:iam::*:role/IdentityIQ_FileAccessManagerRole"
          }
      ]
  }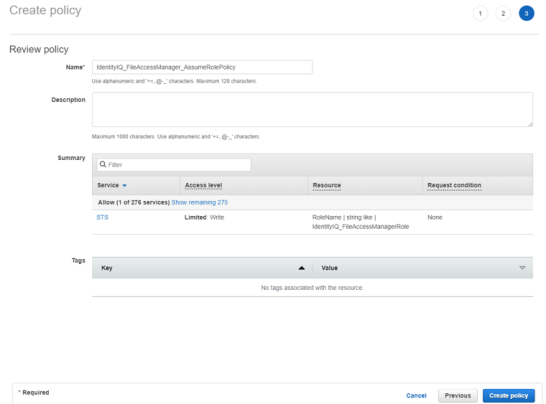
-
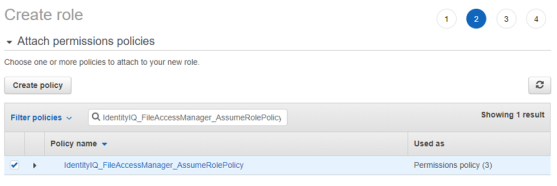
Create a new role.
-
Select AWS Service as the trusted entity type.
-
Select EC2 as the service.

-
-
Attach the role to the FileAccessManager_AssumeRolePolicy policy created above.
-
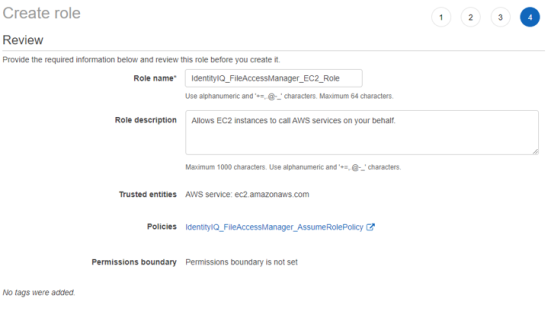
Give the role a name (e.g. FileAccessManager_EC2_Role) and create it.
-
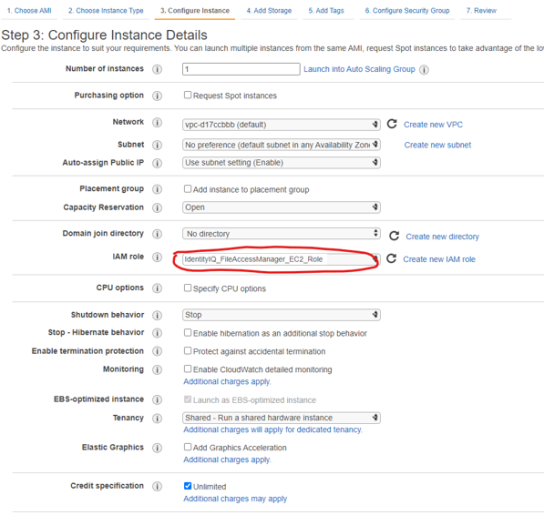
If you are creating a new EC2 instance select the above role as the IAM role for the instance.
-
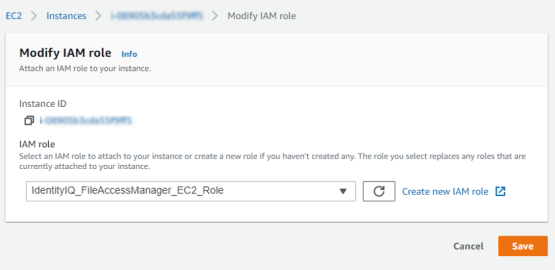
If you are using an existing EC2 instance, modify the IAM role to the role above in the option EC2 > Instances > Actions > Security > Modify IAM role.
-
Create a new policy for each organization account the connector is supposed to analyze.
Create a new policy called “FileAccessManager_S3IAMReadOnlyAccessPolicy” with all the required permissions for the connector.
  {
      "Version": "2012-10-17",
      "Statement": [
          {
              "Effect": "Allow",
              "Action": [
                  "s3:ListAllMyBuckets",
                  "s3:ListBucket",
                  "s3:GetBucketAcl",
                  "s3:GetBucketLocation",
                  "s3:GetBucketPolicy",
                  "s3:GetBucketPolicyStatus",
                  "s3:GetBucketPublicAccessBlock",
                  "s3:GetAccountPublicAccessBlock",
                  "s3:GetObject",
                  "s3:GetObjectAcl",
                  "iam:ListAttachedGroupPolicies",
                  "iam:ListAttachedRolePolicies",
                  "iam:ListAttachedUserPolicies",
                  "iam:ListGroupPolicies",
                  "iam:ListGroups",
                  "iam:ListPolicies",
                  "iam:ListPolicyVersions",
                  "iam:ListRolePolicies",
                  "iam:ListRoles",
                  "iam:ListUserPolicies",
                  "iam:ListUsers",
                  "iam:GetGroup",
                  "iam:GetGroupPolicy",
                  "iam:GetPolicy",
                  "iam:GetPolicyVersion",
                  "iam:GetRolePolicy",
                  "iam:GetUserPolicy",
                  "organizations:ListAccountsForParent",
                  "organizations:ListRoots",
                  "organizations:ListAccounts",
                  "organizations:ListOrganizationalUnitsForParent"
              ],
              "Resource": "*"
          }
      ]
  }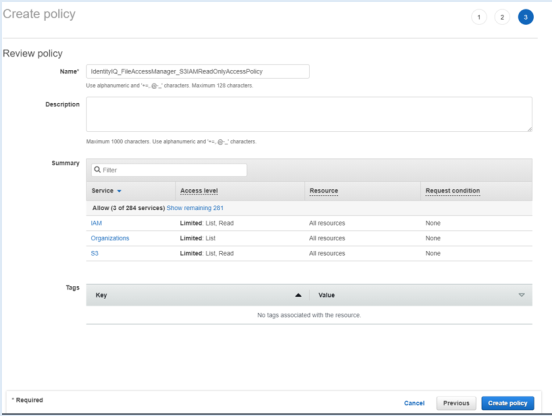
-
Create a new role for the File Access Manager user to assume.
On each organization account the connector should analyze, create a new role called “FileAccessManagerRole” which the FAM user will assume. Select Another AWS Account and enter the account Id of the organization’s management account.
Important
The role name should be kept as FileAccessManagerRole.

-
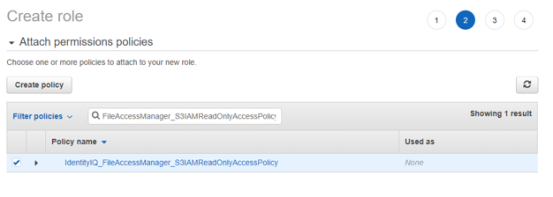
Attach the FileAccessManager_S3IAMReadOnlyAccessPolicy policy created above.
-
Enter the role name - FileAccessManagerRole.
-
Edit the trust relationship of the new role.

-
Edit the json file. Replace “root” in the Principal section with
assumed-role/{**EC2 role name**}/{**EC2 instance ID**}Where:
- “EC2 role name” is the name of the role created above (“FileAccessManager_EC2_Role“ in this manual).
- “EC2 instance ID” is the ID of the instance on which the FAM application is installed.
   {
     "Version": "2012-10-17",
     "Statement": [
       {
         "Effect": "Allow",
         "Principal": {
           "AWS": [
           "AWS": "arn:aws:iam::{The EC2 instance account Id}:assumed-role/{EC2 instance role name}/{EC2 instance Id}"
           ]
         },
         "Action": "sts:AssumeRole"
       }
     ]
   }
Creating a Dedicated IAM User
Note
The recommended method to install the File Access Manager connector is using the EC2 Login method. See Configuring an EC2 for File Access Manager Connector. If you wish to use a dedicated IAM user login instead, follow this section:
To configure the connector, create dedicated users with the appropriate users and policies:
-
Sign into your organization’s management account.
-
Create a new policy “IdentityIQ_FileAccessManager_AssumeRolePolicy”.
This policy will allow the File Access Manager user created in the next step to perform an Assume Role on the roles that will be created in each account.
  {
      "Version": "2012-10-17",
      "Statement": [
          {
              "Sid": "VisualEditor0",
              "Effect": "Allow",
              "Action": "sts:AssumeRole",
              "Resource": "arn:aws:iam::*:role/IdentityIQ_FileAccessManagerRole"
          }
      ]
  }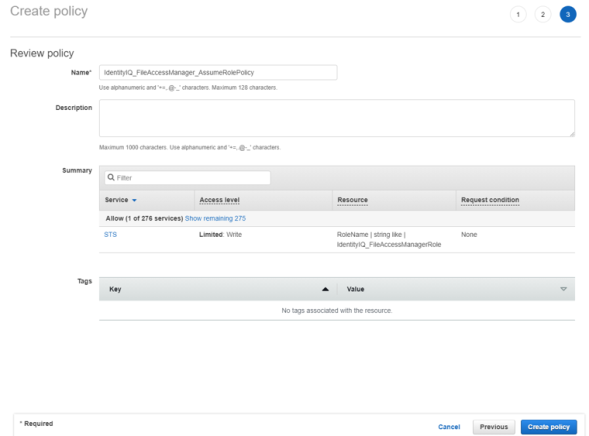
-
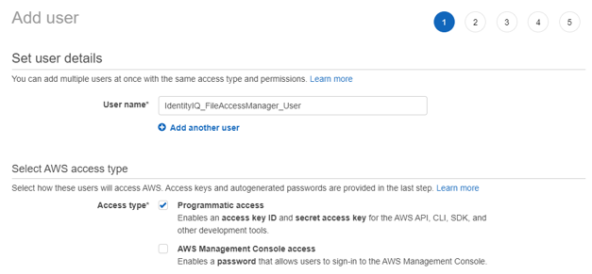
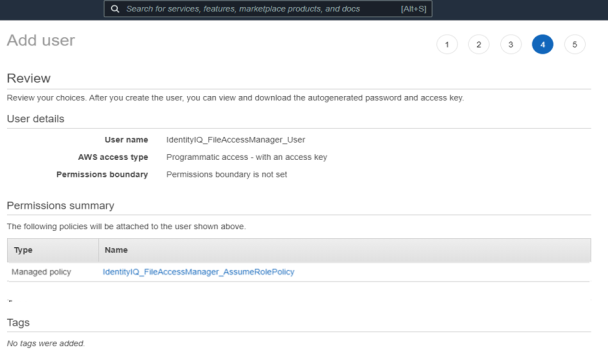
Create an IAM User for File Access Manager and select Programmatic access. This access requires an access key and secret key.
-
Attach the policy IdentityIQ_FileAccessManager_AssumeRolePolicy policy created above to the new user.
-
Save the generated Access Key and Secret Key in a secure place.

-
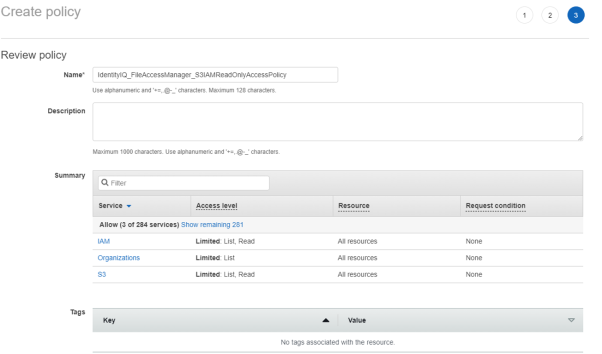
On each organization account the connector should analyze - Create new policy “IdentityIQ_FileAccessManager_S3IAMReadOnlyAccessPolicy” with all the required permissions for the connector.
  {
      "Version": "2012-10-17",
      "Statement": [
          {
              "Effect": "Allow",
              "Action": [
                  "s3:ListAllMyBuckets",
                  "s3:ListBucket",
                  "s3:GetBucketAcl",
                  "s3:GetBucketLocation",
                  "s3:GetBucketPolicy",
                  "s3:GetBucketPolicyStatus",
                  "s3:GetBucketPublicAccessBlock",
                  "s3:GetAccountPublicAccessBlock",
                  "s3:GetObject",
                  "s3:GetObjectAcl",
                  "iam:ListAttachedGroupPolicies",
                  "iam:ListAttachedRolePolicies",
                  "iam:ListAttachedUserPolicies",
                  "iam:ListGroupPolicies",
                  "iam:ListGroups",
                  "iam:ListPolicies",
                  "iam:ListPolicyVersions",
                  "iam:ListRolePolicies",
                  "iam:ListRoles",
                  "iam:ListUserPolicies",
                  "iam:ListUsers",
                  "iam:GetGroup",
                  "iam:GetGroupPolicy",
                  "iam:GetPolicy",
                  "iam:GetPolicyVersion",
                  "iam:GetRolePolicy",
                  "iam:GetUserPolicy",
                  "organizations:ListAccountsForParent",
                  "organizations:ListRoots",
                  "organizations:ListAccounts",
                  "organizations:ListOrganizationalUnitsForParent"
              ],
              "Resource": "*"
          }
      ]
  }
 .
.
-
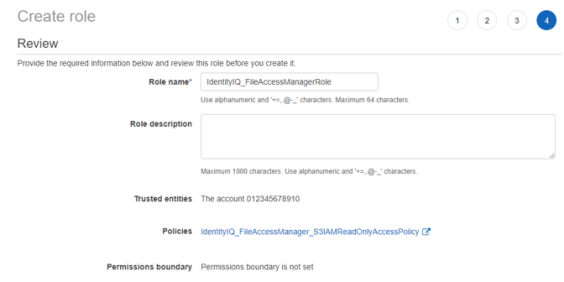
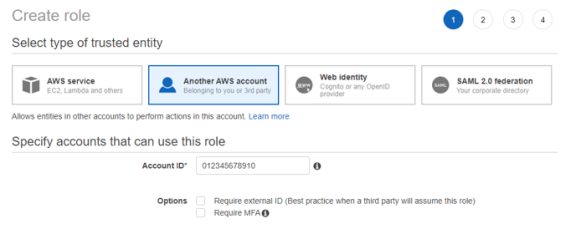
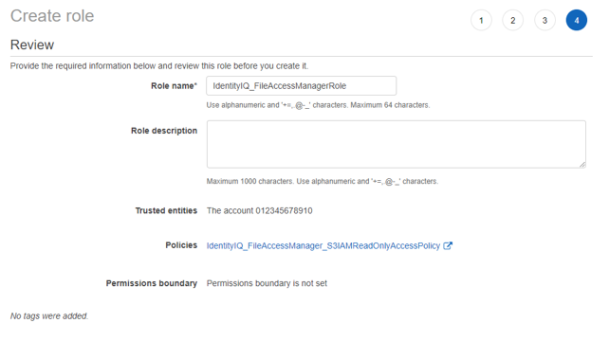
Create a new role “IdentityIQ_FileAccessManagerRole” which the File Access Manager user will assume on each organization account the connector should analyze. Select Another AWS Account and enter the user account ID.
-
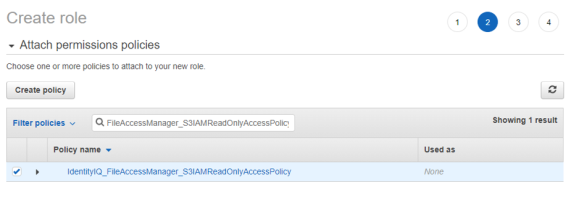
Attach the policy IdentityIQ_FileAccessManager_S3IAMReadOnlyAccessPolicy created above.
-
Enter the role name - IdentityIQ_FileAccessManagerRole.
Important
This name cannot be changed.
-
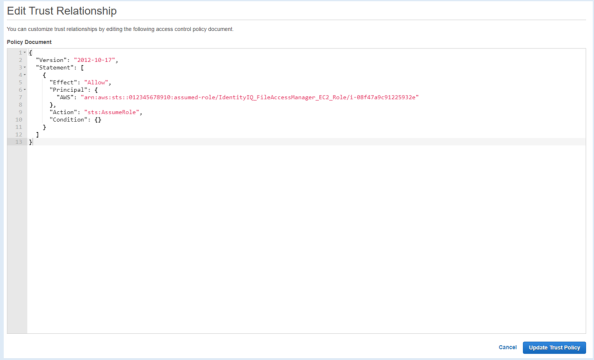
Edit the trust relationship of the new role.

-
Edit the json file. Replace “root” in the Principal section with
user/{FAM IAM User username}Where:
- “FAM IAM User username” is the user created above.
   {
     "Version": "2012-10-17",
     "Statement": [
       {
         "Effect": "Allow",
         "Principal": {
           "AWS": [
             "arn:aws:iam::{The user account ID}:user/{FAM IAM User username}"
           ]
         },
         "Action": "sts:AssumeRole"
       }
     ]
   }

- “FAM IAM User username” is the user created above.