Application and Policy Scope
Application Scope
Use this screen to view and set the scope of applications and resources on which to apply Data Classification policies.
Navigate to Compliance > Data Classification > Application Scope.
The scope list includes only applications with installed Data Classification.
The Optical Character Recognition (OCR) column indicates whether the application has OCR activated on part or all part of its resources.
The scope definition directly affects the time required for Data Classification indexing.
Activating Optical Character Recognition on resources is a resource intensive process, and should be configured carefully.
For example, to reduce Data Classification indexing, an Administrator can:
- Exclude an application from Data Classification indexing (if “non-critical” data is saved by default on that application).
- Include a specific resource (one with very important data) for Data Classification indexing.
You can specify which resources to use (and which to exclude) from a selected application by clicking the Edit button to the right of the application.
The Scope definition only takes effect after the next run of the Data Classification task.
Only the business resources of an application selected for editing display on the list.
Editing the Application Scope
- Select Edit to modify the scope (such as folders).
- Find the desired application from the Application Scope screen.
-
Select Edit.
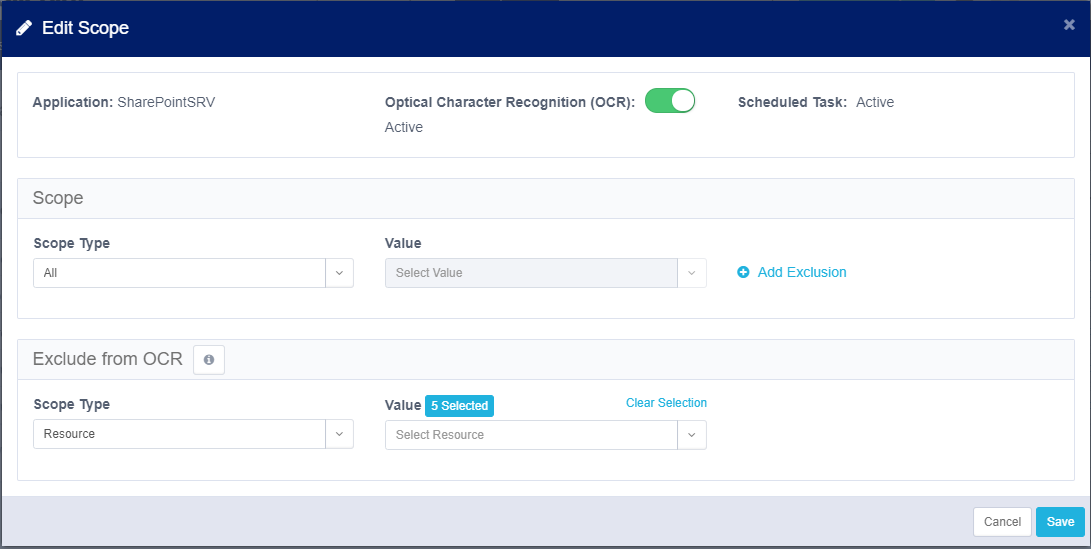
To change the scope, complete the following:
- Select the scope type.
- All – Run Data Classification on all the resources in the application
- Resource – select from a list of resource to include
To exclude resources from the Data Classification process:
- Toggle the Exclude from Classification option on to select the desired resource.
- Select resources to exclude from the dropdown list.
To enable OCR:
- Toggle the Optical Character Recognition (OCR) option on to enable OCR analysis for the application.
- Select the resources to exclude from the OCR analysis from the dropdown resource tree.
Note
Changes to the scope or activating the OCR on an application will trigger a re-indexing in the next run of the Data Classification task.
Deactivating OCR on an application will not trigger re-indexing.
Policy Scope
Use this page to view and define the Data Classification scope of your existing policies and adjust each one by specific applications or application types.
By default, every policy will include all applications and application types in the scope.
- Navigate to Compliance > Data Classification > Policy Scope.
-
Select the Edit icon on the desired policy.
The Policy Scope overlay displays. From here, the Scope Type and the Application Type or specific Application can be edited.
If Application Type is selected, supported applications within Data Access Security will display.
If Application is selected, a list of the added applications will display.
-
Select Save.
After saving the policy scope, a task is created.
-
Rescan all applications associated with the updated policy.
Documentation Feedback
Feedback is provided as an informational resource only and does not form part of SailPoint’s official product documentation. SailPoint does not warrant or make any guarantees about the feedback (including without limitation as to its accuracy, relevance, or reliability). All feedback is subject to the terms set forth at https://developer.sailpoint.com/discuss/tos.
