Crawling
Crawling is the process that discovers the business resource (BR) of a specific application type. It is the first task involving an application, since BRs are required for many other activities involving applications, such as Permissions Collection and Access Certification.
For example, a crawler may discover folders (BR) on a connected application.
Before beginning the crawling process, you must create a Resource Collection virtual appliance cluster.
The crawling process involves the following:
- Discovery of business resources and the population of a business resource tree
- Business resource size calculation
| File Name | File Type | Size |
|---|---|---|
| Finance Balance Sheet.xls | Excel (*.xls) | 2 MB |
| Finance Salaries.docx | Word (*.docx) | 1 MB |
| Finance Departments.txt | Text (*.txt) | 3 MB |
| Finance Organization.ppt | PowerPoint (*.ppt) | 5 MB |
| Finance Other Files | (An uncommon file type) | 4 MB |
- Summary of business resource size by file type
| Category Name | Size |
|---|---|
| Office Files | (2MB + 1MB + 5MB = 8MB) |
| Text Files | 3 MB |
| Finance Other Files | 4MB |
The Business Resource Trees display the results of crawling in various locations in Data Access Security.
Interaction of Crawling with Permission Analysis
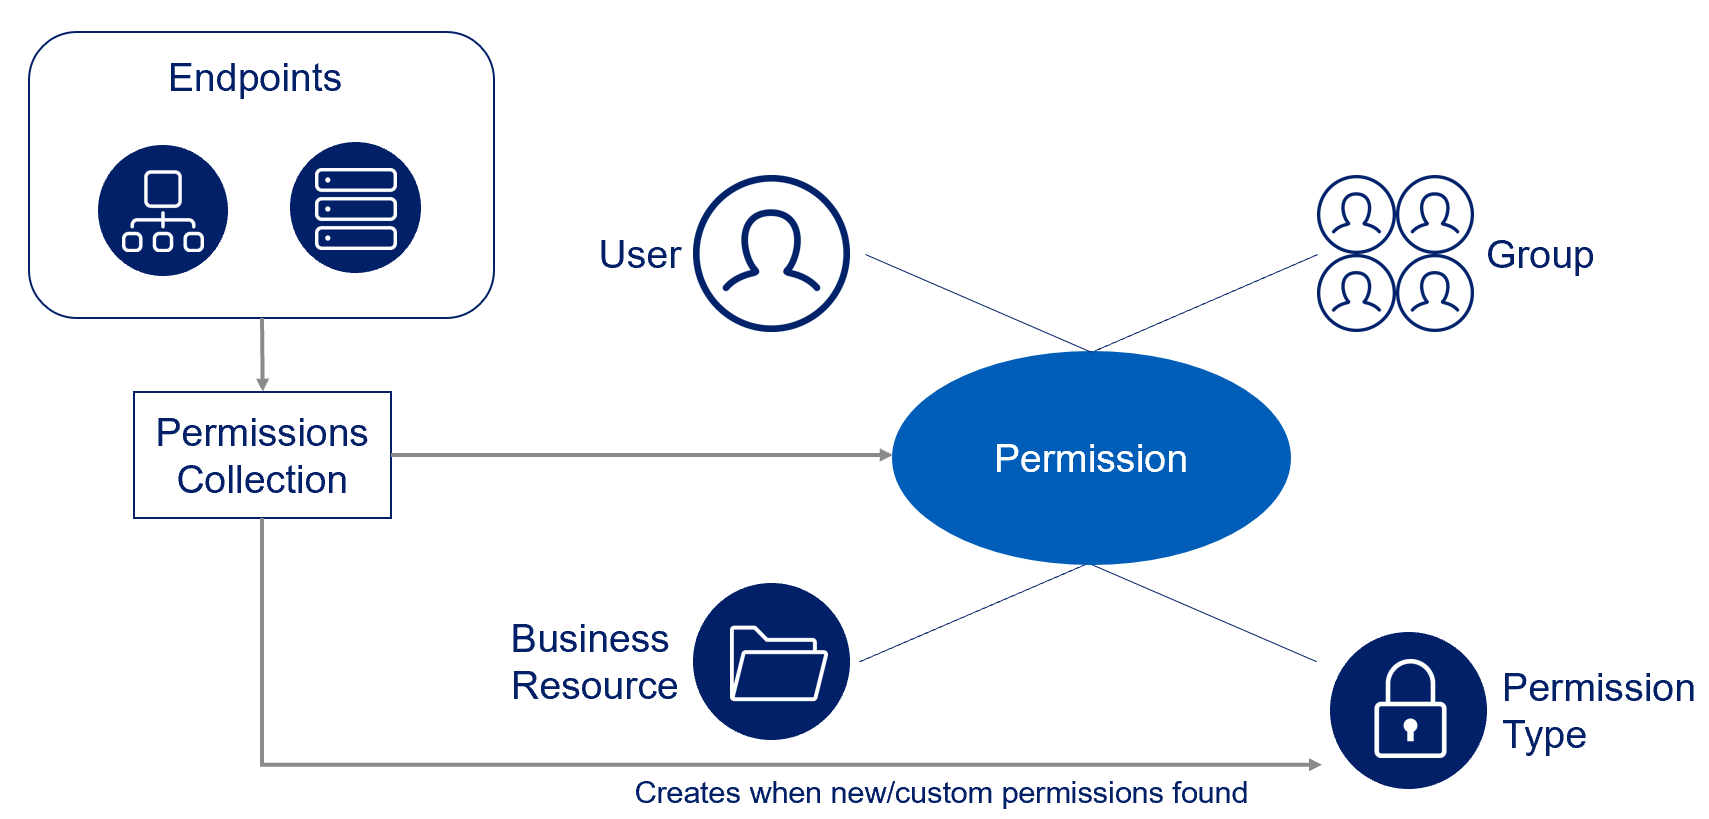
The permissions analysis process collects the following:
- The crawling process collects application business resources.
- In parallel, the Identities Collector collects users and groups (which may occur before the crawler collects the business resources, since these collections are unrelated).
- The Permissions Collector collects the business resources, users, and groups, and associates them with permission types to create permissions.
Configuring and Scheduling the Crawler
To set or edit the Crawler configuration and scheduling, complete the following:
- Navigate to Admin > Applications.
- Scroll through the list or use the filter to find the application.
- Click the edit icon on the line of the application.
- Select Next until you reach the Crawler & Permissions Collection settings page.
Note
The actual entry fields vary according to the application type.
See Scheduling a Task to set a schedule.
Setting the Crawl Scope
There are several options on how to set the crawl scope:
- Setting an explicit list of resources to include and / or exclude from the scan.
- Creating a regex to define resources to exclude.
Including and Excluding Paths by List
To set the paths to include or exclude in the crawl process for an application, complete the following:
- Navigate to Admin > Applications.
- Scroll through the list or use the filter to find the application.
- Click the edit icon on the line of the application.
-
Select Next until you reach the Crawler & Permissions Collection settings page.
Note
The actual entry fields vary according to the application type.
-
Scroll down to the Crawl configuration settings.
- Select Advanced Crawl Scope Configuration to open the scope configuration panel.
- Select Include / Exclude Resources to open the input fields.
- To add a resource to a list, type in the full path to include / exclude in the top field and select + to add it to the list.
- To remove a resource from a list, find the resource from the list and click the x icon on the resource row.
Note
When creating exclusion lists, excludes take precedence over includes.
Excluding Paths by Regex
To set filters of paths to exclude in the crawl process for an application using regex, complete the following:
- Navigate to Admin > Applications.
- Scroll through the list or use the filter to find the application.
- Click the edit icon on the line of the application.
-
Select Next until you reach the Crawler & Permissions Collection settings page.
Note
The actual entry fields vary according to the application type.
-
Select Exclude Paths by Regex to open the configuration panel.
- Type in the paths to exclude by Regex; see regex examples in the section below. Since the system does not collect business resources that match this Regex, it also does not analyze them for permissions.
Note
To write a backslash or a Dollar sign, add a backslash before it as an escape character.
Note
To add a condition in a single command, use a pipe character “|”.
Excluding Top Level Resources
Use the top level exclusion screen to select top level roots to exclude from the crawl. This setting is done per application.
Note
If utilizing Exclude Top Level Resources, what is available to exclude is based on the type of connector. See the various connector guides for more details.
To exclude top level resources from the crawl process, complete the following:
- Open the application screen by navigating to Admin > Applications.
-
Find the application to configure and click the dropdown menu on the application line. Select Exclude Top Level Resources to open the configuration panel.
The Top Level Resource Exclusion overlay displays.
If the Run Task button is selected, a task will run a short detection scan to detect the current top level resources.
This is the first time the task will run, a note at the top of the overlay will read "Run task to detect the top level resources.
If the top level resource list has changed in the application while on this screen, select the Run Task button to retrieve the updated structure.
Once triggered, you can see the task status in Settings > Task Management > Tasks.
Note
This will only work if the user has access to the task page.
When the task has completed, select Refresh to update the page with the list of top level resources.
-
Select the top level resource dropdown list and select top level resources to exclude.
- Select Save to save the change.
- To refresh the list of top level resources, run the task again. Running the task will not clear the list of top level resources to exclude.
Business Resource Structure
The table below lists additional information on the Business Resource Structure.
| Application Type | Business Resource Type | Business Resource Full Path Structure | Example |
|---|---|---|---|
| Active Directory | Every LDAP Object | Distinguished Name | CN=Howard,CN=Users,DC=Example,DC=com |
| OneDrive for Business | Folder | Personal/<user email>/<Folder-Path> | Perosnal/watson@company. Example.com/Diagnostics/Recent |
| SharePoint Online | Site Collection/List/Folder | https://<Company-Name>.sharepoint.com/<Site-Collection>/<Site>/Lists/<List>/<Folder> | https://sailpoint.sharepoint.com/Wayback Site/Lists/Songs/New York/New York |
Documentation Feedback
Feedback is provided as an informational resource only and does not form part of SailPoint’s official product documentation. SailPoint does not warrant or make any guarantees about the feedback (including without limitation as to its accuracy, relevance, or reliability). All feedback is subject to the terms set forth at https://developer.sailpoint.com/discuss/tos.