Configuring Data Access Security
This section describes the Settings tab in Data Access Security. The Settings tab includes the following sub tabs (displayed from left to right):
Task Management
- Tasks
- Scheduled Tasks
- Task Auto Retry
Account Exclusions
- Sensitive Account Exclusions
General
- Overexposed Resources
- Import User Scope
Task Management View
Data Access Security is a task-oriented system with both interactive tasks (such as querying events) and background tasks (such as producing reports).
Scheduling tasks with parameters allows them to comply with various requirements.
Data Access Security has long-running processes, including crawling, permissions collection, and reports. The system executes and tracks these processes using tasks and runs them in batches.
Reports throughout the system have a button or menu item to create a scheduled task or to run it now. Select Run Now to create ad-hoc tasks in the administrative client to run the report. You can track the tasks in the Data Access Security web application, under Settings > Task Management > Tasks.
Each Data Access Security service uses a message queue topic to subscribe to a specific type of task for which it is responsible. For example, the Reporting Service listens and handles Report Tasks. User-created tasks and scheduled tasks display in the Tasks screen.
Note
The permission “Show Tasks from All Users” is required to view all system tasks. This permission is granted by default to the administrator role. Without this permission, the system only displays user-created tasks.
Navigate to Settings > Task Management.
Navigation and Menus
The Task Management table has the following options:
- The checkbox on the left of a task selects a task
- The checkbox on top of the table selects all of the tasks on the page
- The filter icon at the top right corner opens the filter window
- Move through pages by using the arrows at the bottom right corner or insert a page number to go to that page.
- Select all x items on the top menu – select all tasks on all pages according to the filter.
- Unselect all items – unselect all items on other pages except for the current one.
Tasks
This screen shows a table with the tasks selected according to the user’s permissions and the filter. The data is updated in real time. On this screen you can cancel, rerun, or delete task instances. The filter allows selecting tasks by various parameters, including status, type, and date.
Selecting a task opens the Task Details panel which provides a detailed description of the task details and status of submitted tasks.
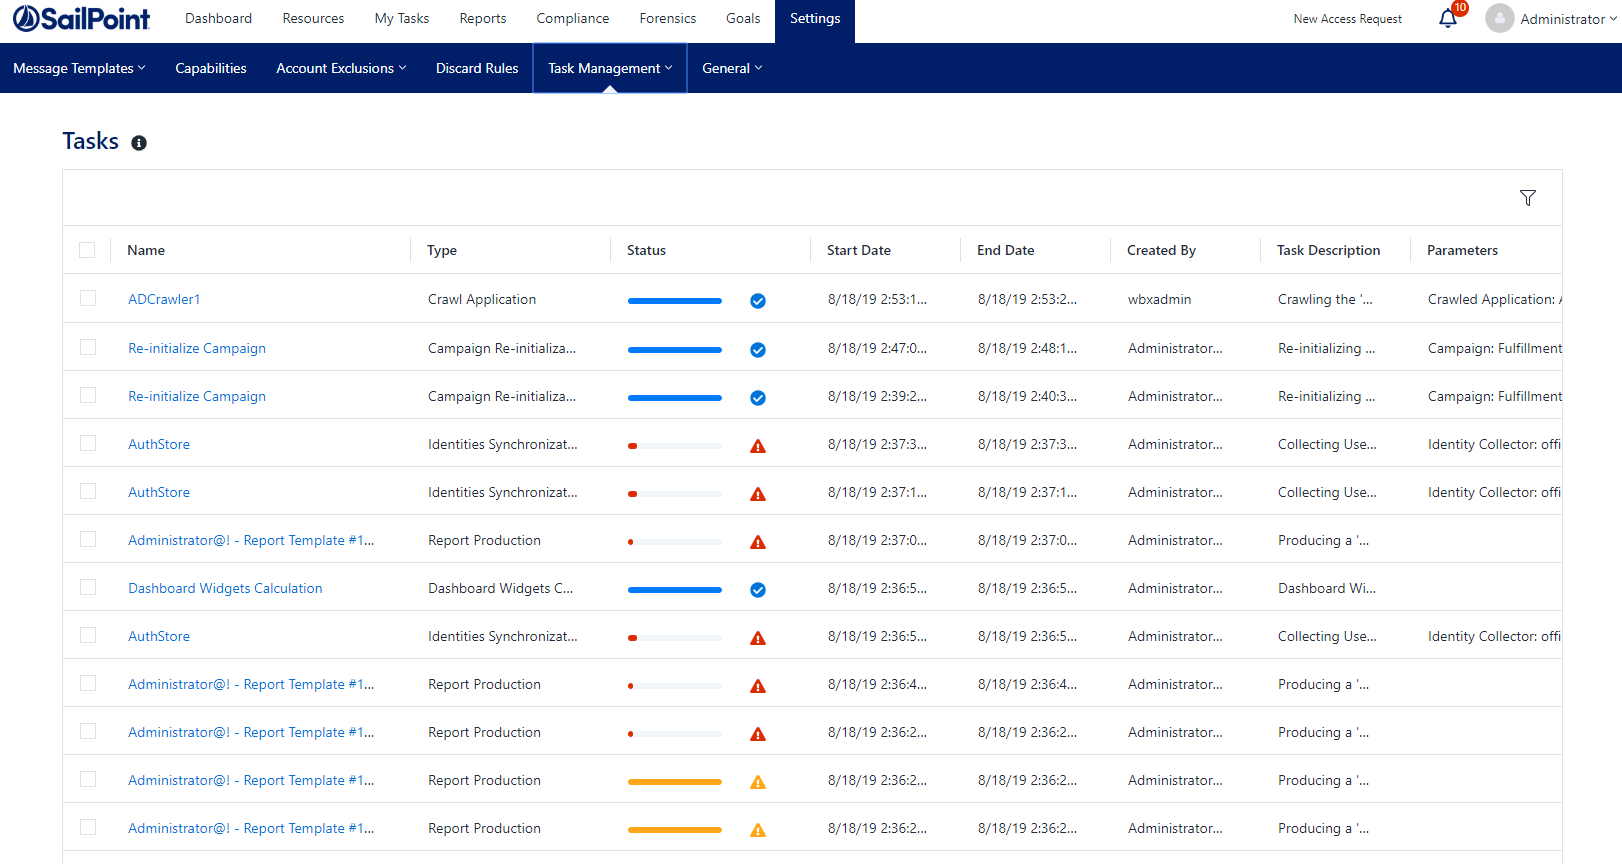
Task Fields
- Name, Type - The task name and/or type
- Status - This field shows the current status of the task, including a progress bar
- Start Date, End Data - The start day and time of the task and the end date and time of the task
- Created By - Provides the name of who created the task
- Task Description - A brief reason for the task
| Status | Icon |
|---|---|
| Completed |  |
| Completed with warnings |  |
| Failed |  |
| Canceled |  |
| In Progress |  |
| Pending |  |
Additional columns include Start and End Data, Created By, and Parameters.
Task Filter
The Task screen includes a filter to narrow down the selection of tasks. Select the filter button on the top right corner of the Task screen to open the filter.
Note
The filter icon and feature is not visible if there are tasks selected.
Filter fields include Name, Type, Service, Status, Task that Ended Before (date field), Created by me only.
The service filter dropdown lists services that have tasks.
- Click Apply to set the filter.
Task Actions
Select one or more tasks using the checkbox to the left of each task. Selecting a task will open the top option menu:
- Rerun - Rerun the task(s) selected. Selected tasks that cannot be run will not run. Selected tasks that depend on other tasks to complete before running will run after the prerequisite task runs.
- Cancel - Cancel the running tasks.
- Delete - Delete the task(s).
Task Details Screen
Clicking on a task opens the Task Details screen, with a description of the task stages.
To close the detail screen, click outside the details screen, or click the X in the upper corner.
Scheduled Tasks
A Scheduled Task tells Data Access Security when, and how often, to execute a specific task repeatedly. For example, a weekly scheduled task can run a weekly Activities Report.
The wizards in Data Access Security help create Scheduled Tasks. Every wizard with a scheduling screen has a checkbox for creating a scheduled task in the background. While deselecting a checkbox deletes a scheduled task, an attempt to delete a Scheduled Task via the Scheduled Tasks screen results in the display of a warning popup, indicating that another object or process is dependent on this Scheduled Task.
The Schedule Task Handler service creates and processes Scheduled Tasks for the relevant services to handle.
Except for a few types of scheduled tasks, it is only possible to edit task scheduling (not parameters) from within the Scheduled Tasks screen.
Scheduled Tasks Filter
The Scheduled tasks screen includes a filter to narrow down the selection of scheduled tasks. Select the filter button on the top right corner of the Task screen to open the filter.
Note
The filter icon is not visible if there are tasks selected.
The filter fields include Name, Type, and Status (either all, active, or inactive).
Click Apply to set the filter.
Scheduled Tasks Fields
- Name
- Task Name
- Type
- The type of a Scheduled Task indicates the task actions
The table below lists and describes the task types:
| Type | Description and Task Source |
|---|---|
| Application Deletion | One-time task created when deleting an Application. You cannot schedule this task type. |
| Built-in Application Permissions Only Collection | Created from the Permissions Collector or the Edit Application wizard. |
| Built-in Business Resource Permissions Only Collection | Created by right clicking a business resource in the Permissions/Permissions and Identities Forensics screen and starting a specific business resource permissions’ collection. You cannot schedule this task type. |
| Business Resource Deletion | One-time task created when deleting a Business Resource. You cannot schedule this task type. |
| Crawler | Controlled through the Edit Application Wizard. |
| Data Classification | Different Data Classification tasks. |
| Report | Created during report creation or in the Edit report wizard. |
| Revert Review Process | A one-time task, created when a review process is reverted in Access Certification or Access Request. You cannot schedule this task type. |
Status - This field shows the current status of the task, including a progress bar. A scheduled task can be either active or inactive.
Schedule Type - The schedule type describes the frequency of running the tasks.
The following are the schedule intervals:
- Run After - Create dependency of tasks. The task starts running only upon successful completion of the first task.
- Daily - Set the start date and time.
- Weekly - Set the day(s) of the week on which to run.
- Monthly - The start date defines the day of the month on which to run a task.
- Quarterly - A monthly schedule with an interval of 3 months.
- Semi-Annually - A monthly schedule with an interval of 6 months.
- Yearly - A monthly schedule with an interval of 12 months.
Last Run - The last time the task ran and whether or not it was successful.
Next Run - For scheduled tasks that have future runs scheduled.
Parameters - The run parameters of the scheduled task.
Note
If a user set a schedule to run yearly, the interval cannot be higher than 1.
If a user is setting an hourly, weekly or monthly schedule, an interval higher than 1 will start to work at 00.00. For example, if a schedule is set with a 2 hour interval, it will run every second hour and not every 2 hours from its creation.
Edit Schedule
To edit the schedule of one or more scheduled tasks, select the scheduled task from the Scheduled Task screen, and select Edit.
This will open the Edit Schedule panel. Scroll down the panel to see all the input fields.
Frequency Type - See schedule intervals above.
Run After - If selecting Run After, select the task after which this task should run.
Note
When editing more than one task at the same time, you cannot select Run After.
Start Date - All tasks, except for Once and Run After, have a Start Date. That date defines the baseline date for all calculations.
For example, daily tasks with two-day intervals run first on the start date. The next run will be two days after the start date (not two days after the scheduling date).
End Date (Ends) - There are two options, either Never or On. Never means tasks never end if there is no end date. On means the task will end on the selected date.
If set, the system does not schedule new tasks beyond the End Date.
Related Tasks
Clicking a task will open the Related Tasks panel which lists the instances of the scheduled task that were run, the run dates, task status, and running user. Click outside the panel or click the X on the top right corner of the panel to return to the previous screen.
Running Tasks
To run a task, perform the following steps:
- In the web client, navigate to Task Management > Scheduled Tasks.
- Select a task or tasks from the list of tasks. This can be done by:
- Using the filter to narrow down the list of tasks.
- Marking the boxes at the left of each task to select it.
- Using the select all checkbox at the top of the list which selects all the tasks on the page.
- This will open the task menu bar at the top of the Task table.
- Edit
- Run Now
- After running a task or tasks, a popup message opens, with a link to the Tasks screen to view the task progress.
- Activate – Turn on the Activate flag for all schedule tasks selected. This will enable the scheduling to run, as it is configured.
- Deactivate – Turn off the activation flag for all scheduled tasks selected.
If you deactivate a scheduled task, the next run field for these tasks will remain empty.
Note
The options displayed after right clicking are Run Now, Edit, and Delete.
Task Auto Retry
Data Access Security lets you set auto-retry, so that failed tasks can automatically rerun a preconfigured number of times. The tasks that can be retried are configured by task type.
By default, most task types are set to auto retry twice.
Navigate to Settings > Task Management > Task Auto Retry to view a list of all task types that are available for retry.
To enable auto retry for tasks, perform the following:
- Navigate to Settings > Task Management > Task Auto Retry.
- Toggle Enable Auto Retries for Failed Tasks on.
- From the dropdown, select the number of retry attempts. This is the number of additional tries the system will run.
To set the task type that will be retried, perform the following:
- Select the task type from the dropdown menu.
- Select Add to add the task type to the list.
Note
The dropdown list includes all available task types that are not already selected for auto retry. If all the task types are enabled, the Add Task Type field is disabled.
To delete a task type from the list of task types, perform the following:
- Locate the task type you wish to delete from the list.
- Select the trash icon on the same row of the task.
- Select Save to save the changes or Discard to undo them.
Account Exclusions
Administrators use the Account Exclusions setting to exclude specific accounts from appearing in various reports or activities. This might include bots that access resources often, but should not be considered for data ownership, or sensitive accounts, that we might not want appearing on activity reports.
To open the exclusion screen, navigate to Settings > Account Exclusions.
Add a Single Account
- Select +Add Account.
- Search for a user from the combo box.
- Select Add.
Remove Accounts
Filter the list of accounts using the filter field.
For a single account:
Select Delete from the Actions menu on the row of the account to delete.
For a multiple accounts:
Select the required accounts by clicking the checkbox on the account row.
Select the Delete icon.
Critical Account Exclusions
The permissions and activities of the excluded accounts will be visible to Administrators only. Select User / Group accounts, or use a prefix. All the direct members of an excluded group will be excluded.
Once an account is on the exclusion list, data owners will not be able to see those accounts in the following screens:
- Resources > Permissions > Simple View
- Resources > Permissions > Excess View
- Resources > Permissions > Tree
- Resources > Owners
- Forensics
General Menu
General settings affect the entire system.
To get to the general menu, navigate to Settings > General.
Overexposed Resources
Overexposed resources are resources accessed by groups with “too many” members. The system determines large groups based on basic parameters, and administrators can change those parameters. Everyone and Authenticated Users groups are included by default, but it is possible to further filter (define) overexposed resources by group.
To define overexposed resources, perform the following steps:
- Navigate to Settings > General > Overexposed Resources.
- Check the Groups containing at least ___% of user accounts checkbox to define groups by the percentage of user accounts. (This checkbox is checked by default.)
- Check the Groups containing at least ___ user accounts checkbox to define groups by the number of user accounts. (This checkbox is checked by default.)
- Check the Include Share permissions (on CIFS-based applications) checkbox to include those share permissions. (This checkbox is checked by default.)
- To exclude group accounts from the overexposed group, type the account name, or the first few characters of the account name, in the Exclude Group Account search box.
- Select Save to save the selection, or Discard to discard it.
- To remove a group from the list, select the x next to the group name.
Scope
The scope determines what applications and resources a Data Access Security user can access and run reports on within the application.
Assigning Scope to Users
User scope can be assigned to users. Data scope can be defined in terms of folders within an application that the user can access.
Assigning User Scope to Users
There are several ways of assigning scope to users in Data Access Security.
- Administrators are assigned the Full Scope resource allocation (see below) automatically when they are assigned the Administrator capability.
- Bulk assignment of user scope, using Import User Scope (see below).
Full Scope Resource Allocation
The Full Scope resource allocation is an administrator-level allocation which allows a broad view and general system-wide statistics of the business resources.
Full Scope is added automatically to Administrator users. It can also be added through the user scope import by navigating to Settings > General > Import User Scope.
You cannot remove the Full Scope capability from users who are Administrators, even by using Import User Scope. To create an administrator that has less access than Full Scope, clone the Administrator capability and upload the required coverage using User Scope Import.
The Full Scope Resource allows access to all resources in the dashboard and reports.
It does not allow the following:
- Users with Full Scope who are assigned with the Data Owner capability are not data owners of the entire scope, but only of any user scope that is allocated to them specifically. This includes approving data owner requests, approving access requests, etc. See Business Resource Owners.
- Drilling down from statistics in the Data Owner Dashboard allows you to view only the resources to which this user has direct allocation. This means that in some cases, drilling down from a chart on the dashboard will display detailed charts of the partial scope that do not add up to the totals that were on the dashboard charts showing the full scope. If an admin user has no directly allocated resources, the user receives an error message and an empty chart.
Import User Scope
Users can be assigned resources in bulk, using a one time or scheduled import process.
Note
The Import User Scope functionality supports changes and adjustments to existing scopes. There is an Action field that displays one of four possible values:
-
Add – adds the resource to the User's Scope. This action can either have a full scope or a resource. If a resource is specified, the full scope is ignored. If a resource is empty, the full scope field must be true. The user should specify both the application and full path to add a scope for a specific resource.
-
Remove – removes the resource from the User’s Scope. This action can either have a full scope or a resource. If a resource is already specified, the full scope is ignored. If a resource is empty, the full scope field must be true. The user should specify both the application and full path to remove a scope for a specific resource.
-
Clear – removes all resources from the user’s scope. This command does not need any data specified in the Application or Resource Full Path columns. This operation removes all resources from the users scope. This action can only have Full Scope set to True.
-
Data Owner – functions in the same way as Add, but also adds the Data Owner capability to the user if they do not have it already. If the user already has the Data Owner capability, the Data Owner action simply functions as Add. This action cannot have a full scope. It must have a resource. Full scope is ignored and if the resource is empty, the line will be ignored as well.
Importing a User Scope
When setting the Full Scope parameter to True, the record cannot contain other parts of resources, such as Application Name and Full Path, since it already contains all paths and applications.
The input source should contain the following information:
| Input Field | Description |
|---|---|
| Application Name | Name of the application as it appears in Data Access Security |
| Full Path | Full path of the resource |
| Full Scope | True/False toggle for granting the user full scope access to all resources |
| User Name | User name of the user receiving access |
| Action | Actions related to resources, including Add, Remove, Clear, and Data Owner |
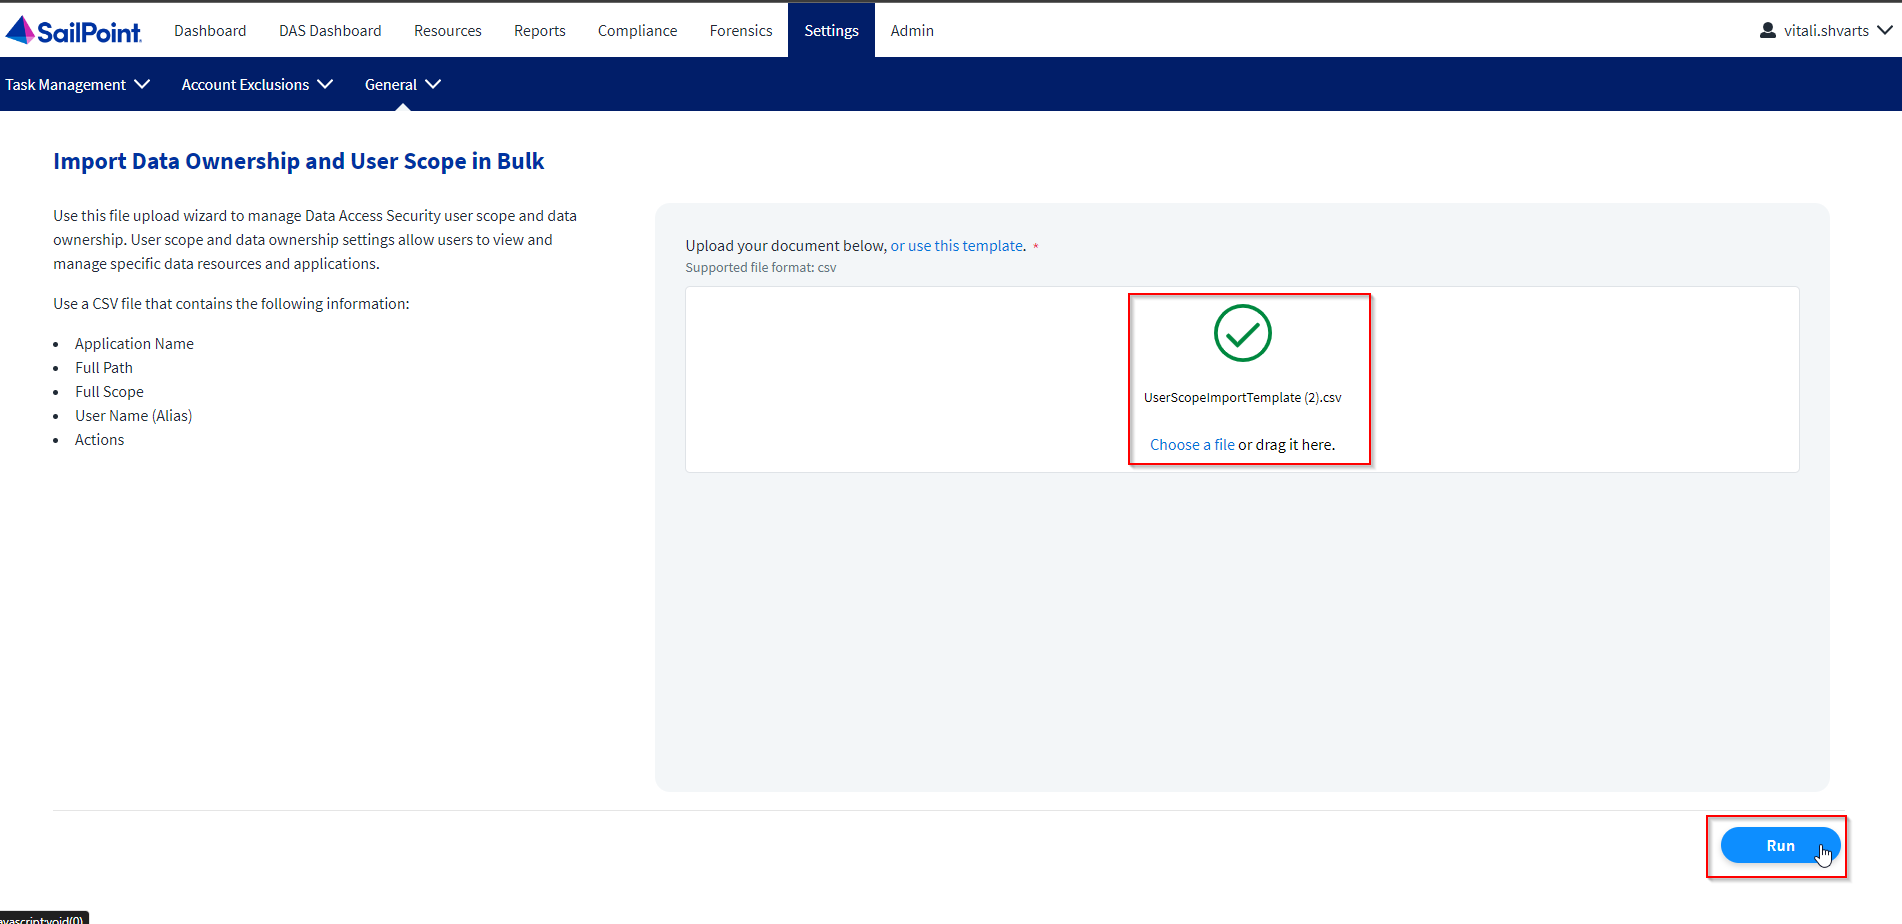
Setting up the Import Process
-
Navigate to Settings > General > Import User Scope to open the Import User Scope page.
Note
There is a CSV file within the website that is there to serve as a basis for the data source. There are explanations about the different actions within the template file. Select the provided link within the Import User Scope display for this preferred method.
-
Upload the CSV file by dragging the file to the upload box or by selecting Choose a file.
-
Once uploaded, select Run.
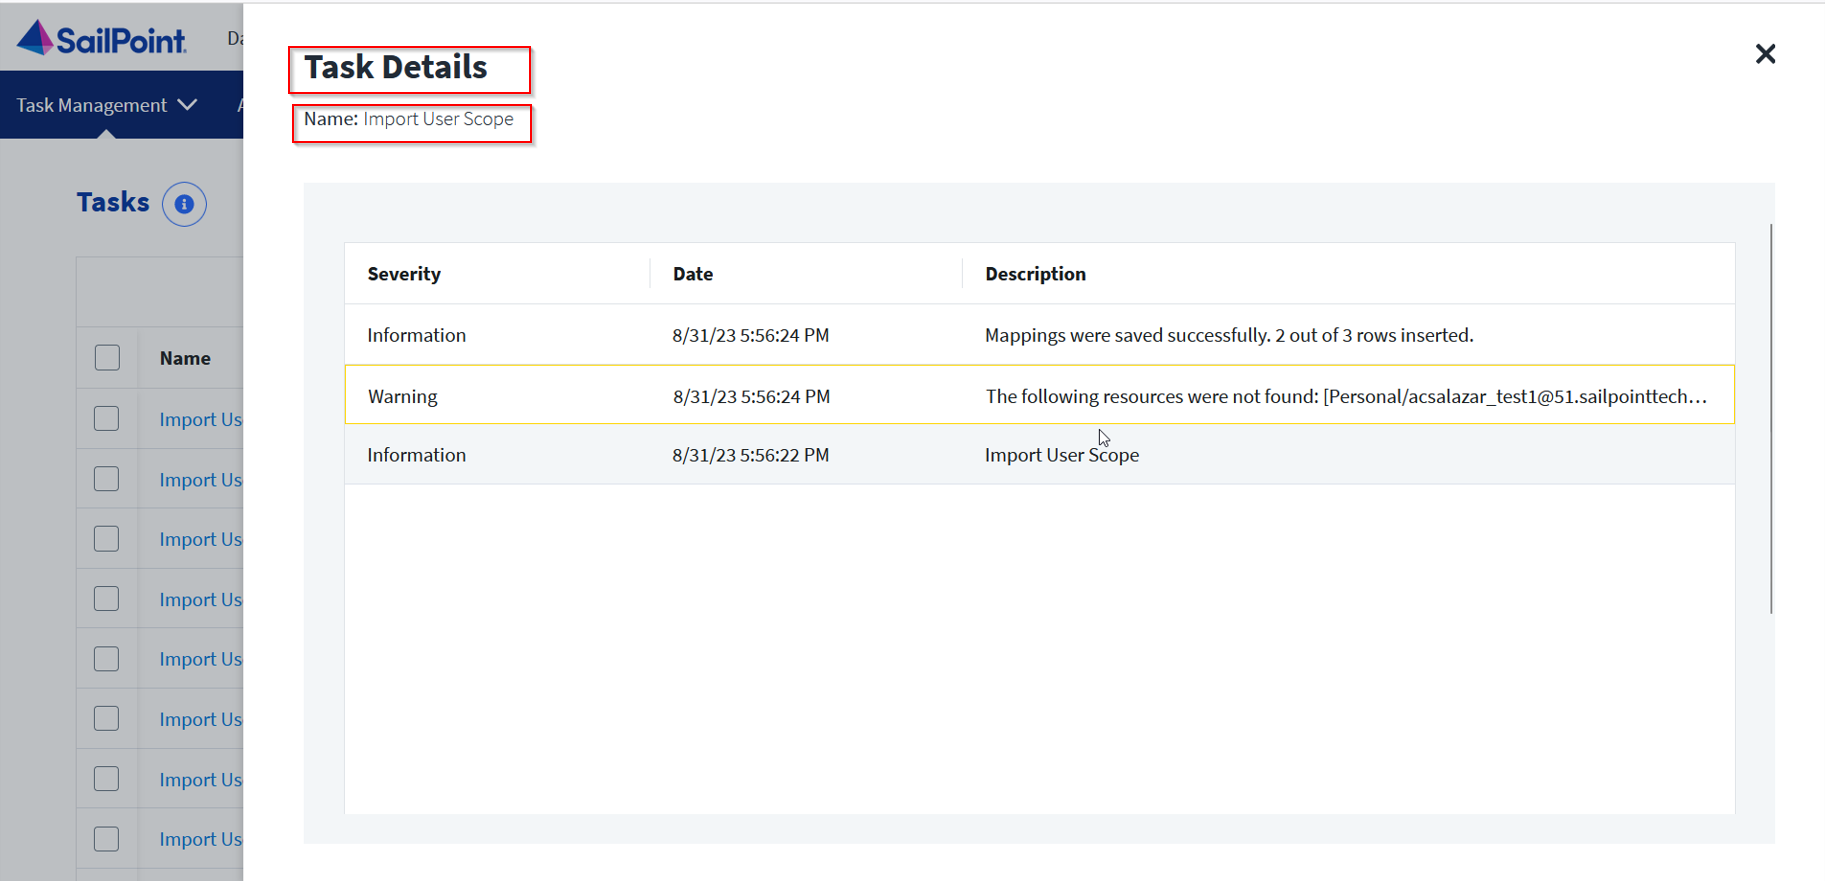
-
Navigate to Settings > Task Management > Tasks. Here, you can view the newly created Import User Scope task and track its progress.
- Click the name of the task to view the details.
Documentation Feedback
Feedback is provided as an informational resource only and does not form part of SailPoint’s official product documentation. SailPoint does not warrant or make any guarantees about the feedback (including without limitation as to its accuracy, relevance, or reliability). All feedback is subject to the terms set forth at https://developer.sailpoint.com/discuss/tos.