Creating an Azure Application for OneDrive
A new Azure Active Directory application must be created and configured to support the Data Access Security OneDrive functionality.
This configuration can be performed either by running the automated PowerShell script supplied with the SailPoint distribution pack, or by creating and configuring the application through the Azure portal.
Creating and Configuring the Application Automatically
The script below will perform all the Azure application creation and configuration steps required for OneDrive.
Windows Systems
To run this script, the Azure AD PowerShell module must be installed.
- Open PowerShell as an Administrator.
- Install the Microsoft Graph PowerShell module:
Install-Module -Name Microsoft.Graph -
For Windows systems, open the
CreateOneDriveApp.ps1file in a text editor to review the default parameters. The parameters can be edited in the file or passed as parameters when running the script.CreateOneDriveApp.ps1
<# .SYNOPSIS Configures an Azure Application for use by Data Access Security One Drive Applications: .DESCRIPTION Configures an Azure Application for use by Data Access Security One Drive Applications Creates an Azure App with the following API Permissions Microsoft.Graph Files.ReadWrite.All Sites.Read.All User.Read.All Domain.Read.All Office 365 Management APIs ActivityFeed.Read Sharepoint Online APIs Sites.FullControl.All Creates and uploads a certificate as app client credential. Prompts for App admin consent. .EXAMPLE AddDasPermissionsForOneDrive "Azure App Name" 'CertificateDnsName.com' 1 30 $SecureStringVariableWithPassword .NOTES Version: 1.0.1 #> #Requires -Modules Microsoft.Graph param( [string]$AppName = 'DAS OneDrive App', # DnsName will be included in Cert subject name [string]$CertDnsName = 'organization.com', [int]$CertYearsValid = 10, [int]$SleepBeforeConsentSeconds = 30, [Parameter(Mandatory = $True)] [Security.SecureString]$CertPassword ) # Stop the script on error $ErrorActionPreference = "Stop" function Get-RequireResource{ param($appId, $permissionValues) $appObj = (Get-MgServicePrincipal -Filter ("AppId eq '{0}'" -f $appId)) $appPermissions = $appObj.AppRoles | Where-Object {$_.Value -in $permissionValues} $appHT = @() foreach($ap in $appPermissions){ $appHT += @{ Id = $ap.Id; Type = "Role"; } } $appResource = @{ ResourceAppId = $appId ResourceAccess = $appHt } return $appResource; } Write-Output 'Connecting' Connect-MgGraph -Scopes 'Application.Read.All', 'Application.ReadWrite.All', 'AppRoleAssignment.ReadWrite.All' Write-Output 'Getting required API details...' $graphPermissionValues = 'Files.ReadWrite.All', 'Sites.Read.All', 'User.Read.All', 'Domain.Read.All' $o365PermissionValues = 'ActivityFeed.Read' $spoPermissionsValues = 'Sites.FullControl.All' $AppsAndPermissions = @{ '00000003-0000-0000-c000-000000000000' = $graphPermissionValues 'c5393580-f805-4401-95e8-94b7a6ef2fc2' = $o365PermissionValues '00000003-0000-0ff1-ce00-000000000000' = $spoPermissionsValues } $apiPermission = @() foreach($aAndP in $AppsAndPermissions.GetEnumerator()) { $apiPermission += Get-RequireResource $aAndP.Name $aAndP.Value } '' 'Registering Azure App...' # Register the new Azure App with API Permissions $myApp = New-MgApplication -DisplayName $AppName -RequiredResourceAccess $apiPermission # Display the new App properties '' "App Display Name: $($myApp.DisplayName)" "App ID: $($myApp.AppID)" '' 'Creating certificate...' # Create certificate $myCert = New-SelfSignedCertificate ` -DnsName $CertDnsName ` -CertStoreLocation "cert:\LocalMachine\My" ` -NotAfter (Get-Date).AddYears($CertYearsValid) ` -KeySpec KeyExchange '' 'Exporting certificate files to disk...' # Export certificate to .pfx file $pfxFilePath = ".\$($AppName).pfx" $output = $myCert | Export-PfxCertificate -FilePath $pfxFilePath -Password $CertPassword # Display certificate pfx file path '' "Certificate pfx file path: $($output.FullName)" # Export certificate to .cer file $certFilePath = ".\$($AppName).cer" $output = $myCert | Export-Certificate -FilePath $certFilePath # Display certificate cer file path '' "Certificate cer file path: $($output.FullName)" '' 'Uploading certificate to Azure App...' # Upload and assign the certificate to Azure App $keyCredentials = @{ customKeyIdentifier = $myCert.GetCertHash() key = $myCert.GetRawCertData() type = "AsymmetricX509Cert" usage = "Verify" startDateTime = $myCert.NotBefore endDateTime = $myCert.NotAfter } "Waiting $SleepBeforeConsentSeconds seconds to allow the Azure App to be fully created before uploading cert..." Start-Sleep $SleepBeforeConsentSeconds '' Update-MgApplication -ApplicationId $myApp.Id -KeyCredentials $keyCredentials '' 'Getting tenant details for consent...' # Get the tenant ID $tenantID = (Get-MgOrganization).Id # Build the consent URL $consentURL = "https://login.microsoftonline.com/$tenantID/adminconsent?client_id=$($myApp.AppId)" # Display the consent URL '' "Consent URL: $consentURL" '' 'Launching browser for consent...' # Browse to the consent URL using the default browser Start-Process $consentURL -
Run the script:
- To run the script with the default parameters from the directory where the script is located,
run
.\CreateOneDriveApp.ps1 - To run the script while overriding some of the default parameters, like DNS Name, years of certificate validity, or application name:
.\CreateOneDriveApp.ps1 -AppName "OneDrive DAS App" -CertDnsName "contoso.com" -CertYearsValid 15
- To run the script with the default parameters from the directory where the script is located,
run
- When prompted, log in with administrator credentials to create and configure Azure applications.
Linux / MacOS Systems
-
Ensure you have the Azure CLI installed.
-
For Linux / MacOS systems, open the
CreateOneDriveApp.shfile in a text editor to review the default parameters.CreateOneDriveApp.sh
   g!/bin/bash

# Usage: ./AddDasPermissionsForOneDrive.sh "Azure App Name" "CertificateDnsName.com" 10 30 "CertPassword"

APP_NAME="${1:-DAS OneDrive App}"
CERT_DNS_NAME="${2:-organization.com}"
CERT_YEARS_VALID="${3:-10}"
SLEEP_BEFORE_CONSENT="${4:-30}"
CERT_PASSWORD="${5}"

if [ -z "$CERT_PASSWORD" ]; then
echo "Certificate password is required as the 5th argument."
exit 1
fi

set -e

echo "Logging in to Azure..."
az login --only-show-errors --allow-no-subscriptions

echo "Registering Azure App..."
APP_ID=$(az ad app create --display-name "$APP_NAME" --query appId -o tsv)

echo "App Display Name: $APP_NAME"
echo "App ID: $APP_ID"

echo "Adding required API permissions..."
# Microsoft Graph
az ad app permission add --id "$APP_ID" --api 00000003-0000-0000-c000-000000000000 --api-permissions 75359482-378d-4052-8f01-80520e7db3cd=Role df021288-bdef-4463-88db-98f22de89214=Role 332a536c-c7ef-4017-ab91-336970924f0d=Role dbb9058a-0e50-45d7-ae91-66909b5d4664=Role
# Office 365 Management APIs
az ad app permission add --id "$APP_ID" --api c5393580-f805-4401-95e8-94b7a6ef2fc2 --api-permissions 594c1fb6-4f81-4475-ae41-0c394909246c=Role
# SharePoint Online APIs
az ad app permission add --id "$APP_ID" --api 00000003-0000-0ff1-ce00-000000000000 --api-permissions 678536fe-1083-478a-9c59-b99265e6b0d3=Role

echo "Creating certificate..."
CERT_SUBJECT="/CN=$CERT_DNS_NAME"
CERT_DAYS=$((365 * CERT_YEARS_VALID))
openssl req -x509 -nodes -days "$CERT_DAYS" -newkey rsa:2048 -keyout "$APP_NAME.key" -out "$APP_NAME.crt" -subj "$CERT_SUBJECT" -passout pass:"$CERT_PASSWORD"
openssl pkcs12 -export -out "$APP_NAME.pfx" -inkey "$APP_NAME.key" -in "$APP_NAME.crt" -password pass:"$CERT_PASSWORD"

echo "Certificate pfx file path: $(pwd)/$APP_NAME.pfx"
echo "Certificate cer file path: $(pwd)/$APP_NAME.crt"

echo "Uploading certificate to Azure App..."
az ad app credential reset --id "$APP_ID" --cert "@$APP_NAME.crt" --append

echo "Waiting $SLEEP_BEFORE_CONSENT seconds before admin consent..."
sleep "$SLEEP_BEFORE_CONSENT"

echo "Getting tenant details for consent..."
TENANT_ID=$(az account show --query tenantId -o tsv)
CONSENT_URL="https://login.microsoftonline.com/$TENANT_ID/adminconsent?client_id=$APP_ID"
echo "Consent URL: $CONSENT_URL"

echo "Launching browser for consent..."
if command -v xdg-open &> /dev/null; then
xdg-open "$CONSENT_URL"
elif command -v open &> /dev/null; then
open "$CONSENT_URL"
else
echo "Please open the following URL in your browser:"
echo "$CONSENT_URL"
fi
The last step of the script will launch a URL to grant admin consent for the application. When you grant consent, you will be redirected to a missing localhost URL. The operation is successful if the URL for that page contains admin_consent=True.
Note
If you experience an access denied or other error in the web browser when granting admin consent, this might be a timing issue. This can be resolved by manually granting admin consent through the Azure portal. Alternatively you can copy and paste the consent URL into your browser. This is found in the script at: Consent URL:.
The following output should be gathered or noted when running the script. This information will be used to configure the OneDrive application in Data Access Security:
- The App ID value in the console output.
- The created certificate file <AppName>.pfx located in your working directory.
- The certificate password that was entered when prompted.
Note
Confirm the API Permissions have been configured properly.
Creating and Configuring the Application Manually
The following steps will create and configure an Azure application for OneDrive authentication through the Azure portal.
These steps are adapted from the Microsoft SharePoint Online documentation.
Registering the Application in Azure AD
- Go to the the Azure AD portal.
- Under Manage Azure Active Directory, select View.
- On the Overview page, select App registrations under Manage.
- On the App registrations page, select New registration.
- On the Register an application page, configure the following settings:
- Name - Enter something descriptive, like "OneDrive DAS App"
- Supported account types - Verify that Accounts in this organizational directory only (
<YourOrganizationName>only - Single tenant) is selected. - Redirect URI (optional) - Leave empty
- Select Register.
You will now assign API permissions to the application from this screen.
Assigning API Permissions to the Application
Note
To optimize performance for these connectors, SailPoint recommends having separate application registrations in Azure for each OneDrive and SharePoint Online connector.
- On the app page under Manage, select Manifest.
- On the Manifest page, find the
requiredResourceAccessentry. -
Replace the entire
requiredResourceAccessentry with the following:"requiredResourceAccess": [ { "resourceAppId": "00000003-0000-0000-c000-000000000000", "resourceAccess": [ { "id": "dbb9058a-0e50-45d7-ae91-66909b5d4664", "type": "Role" }, { "id": "75359482-378d-4052-8f01-80520e7db3cd", "type": "Role" }, { "id": "332a536c-c7ef-4017-ab91-336970924f0d", "type": "Role" }, { "id": "df021288-bdef-4463-88db-98f22de89214", "type": "Role" } ] }, { "resourceAppId": "00000003-0000-0ff1-ce00-000000000000", "resourceAccess": [ { "id": "678536fe-1083-478a-9c59-b99265e6b0d3", "type": "Role" } ] }, { "resourceAppId": "c5393580-f805-4401-95e8-94b7a6ef2fc2", "resourceAccess": [ { "id": "594c1fb6-4f81-4475-ae41-0c394909246c", "type": "Role" } ] } ], -
Select Save.
- On the Manifest page, under Manage, select API permissions.
-
On the API permissions page, verify the following permissions:
- Microsoft Graph
- Files.ReadWrite.All
- Sites.Read.All
- User.Read.All
- Domain.Read.All
- Office 365 Management APIs
- ActivityFeed.Read
- SharePoint
- Sites.Fullcontrol.All
- Microsoft Graph
-
Select Grant admin consent for <Organization>. Read the confirmation dialog.
-
Select Yes in the confirmation dialog. The Status value should now be Granted for <Organization> on both entries.
Note
Confirm the API Permissions have been configured properly.
-
Close the API Permissions page (not the browser tab) to return to the App registrations page to generate a self-signed certificate.
Generating a Self-Signed Certificate
Create a self-signed x.509 certificate using the following PowerShell commands.
Edit parameters such as DnsName, Certificate expiration, and password as appropriate:
Create certificate
$mycert = New-SelfSignedCertificate -DnsName **"contoso.org"** -CertStoreLocation "cert:\LocalMachine\My" -NotAfter (Get-Date).AddYears(**15**) -KeySpec KeyExchange
Export certificate to .pfx file
This .pfx file will be used in the application configuration.
$mycert | Export-PfxCertificate -FilePath mycert.pfx -Password $(ConvertTo-SecureString -String "**P@ssw0Rd1234**" -AsPlainText -Force)
Export certificate to .cer file
The .cer file will be used in step 6 of Assigning the Certificate to the Azure Active Directory Application.
$mycert | Export-Certificate -FilePath mycert.cer
Assigning the Certificate to the Azure Active Directory Application
After you register the certificate with your application, you can use the private key (.pfx file) for authentication.
- Go to the the Azure AD portal.
- Under Manage Azure Active Directory, select View.
- On the Overview page, under Manage, select App registrations.
- On the Apps registration page, select the application you registered.
- On the application page, under Manage, select Certificates & secrets.
- Select Upload Certificate.
- Browse to the self-signed certificate .cer file that you created when generating a self-signed certificate.
- Select Add.
The certificate is now shown in the Certificates section.
API Permissions Configuration
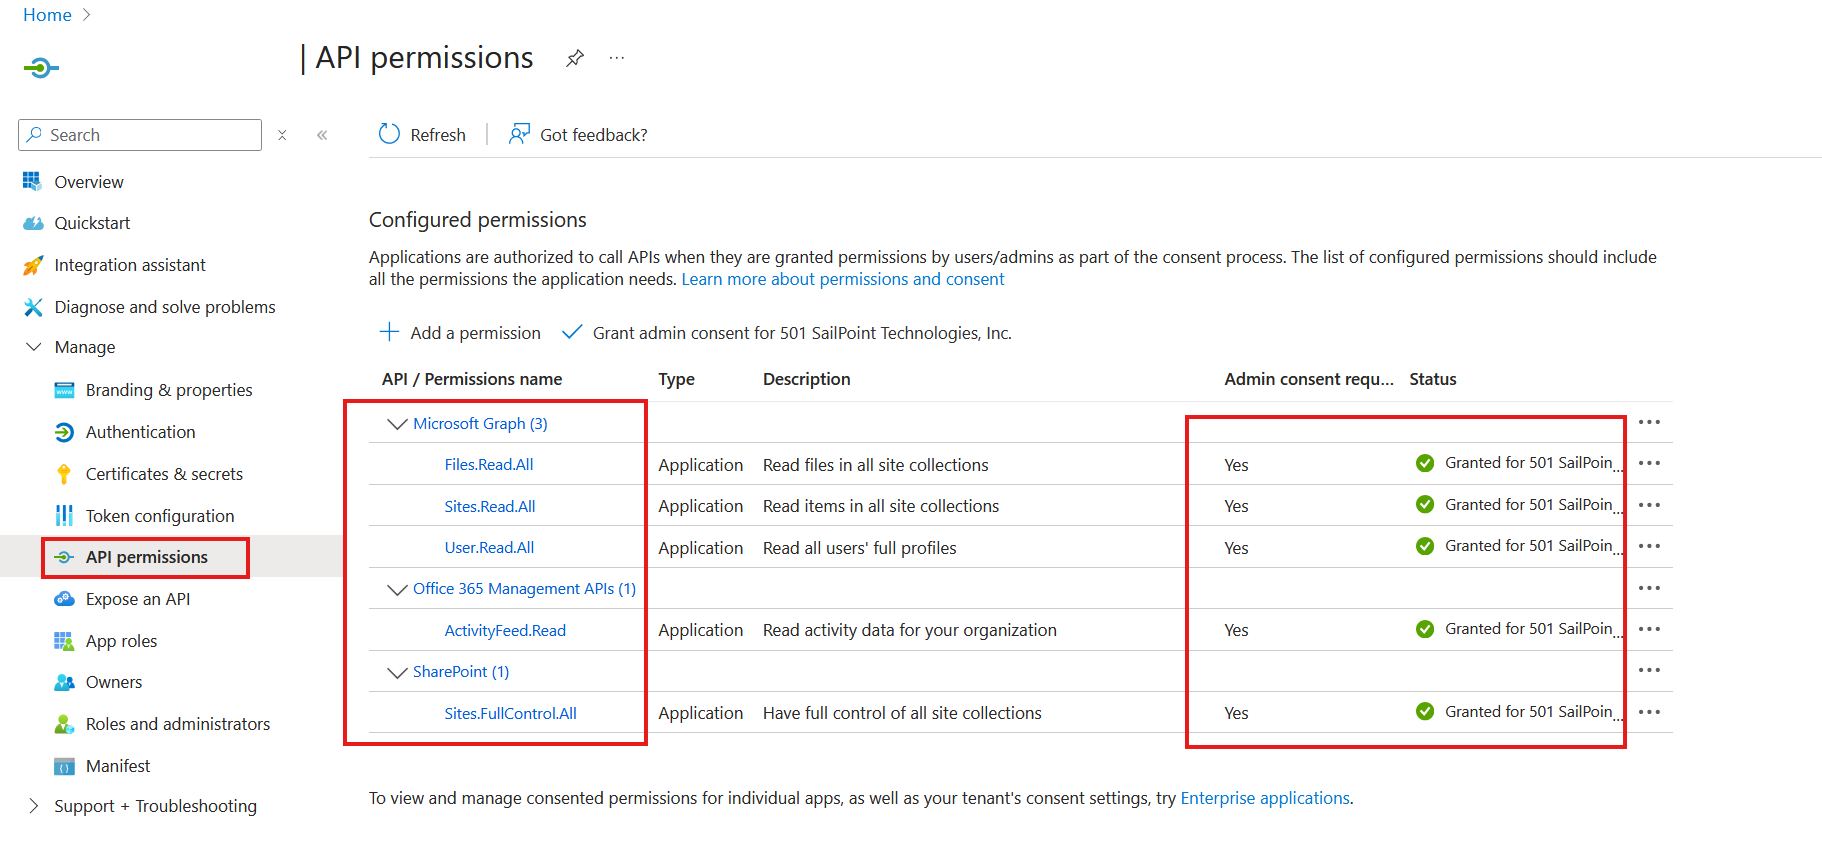
Note
The image above is a reference image to highlight configuration requirements.
Documentation Feedback
Feedback is provided as an informational resource only and does not form part of SailPoint’s official product documentation. SailPoint does not warrant or make any guarantees about the feedback (including without limitation as to its accuracy, relevance, or reliability). All feedback is subject to the terms set forth at https://developer.sailpoint.com/discuss/tos.