Creating and Editing Profiles
A profile is any individual, organization, or other object managed within Non-Employee Risk Management, as well as the data about that object. This includes non-employees, the organizations they come from, or the assignments they work on, and additional data related to non-employees in your organization.
When your tenant is set up for the first time, your tenant has 4 core profile types that already have attributes. If you create custom profile types, you must create custom attributes to use in each of those profile types.
Attributes are added to forms, where they can be added to workflow pages and profile pages so that they can be used to create profiles.
There are several ways to create profiles within your environment:
- End users can create new profiles based on the Create Workflow configured for the profile types they work with.
- Administrators can create an individual profile from the list of profiles.
- Administrators can also upload a CSV file containing a list of new profiles.
There are also multiple ways to update a profile based on your permissions.
- End users can update profiles using the Update Workflow configured for a profile type they work with.
- Administrators can update a profile directly within the list of profiles.
Creating Profiles
Administrators can create profiles individually and in bulk.
For more information on creating a workflow so that end users can create new profiles, refer to Creating and Managing Workflows in Lifecycle
Creating an Individual Profile
To create a profile:
-
Go to Admin > Lifecycle > Profiles.
-
Select the profile type you want to create a profile in.
-
Select the + <Profile Type> button. The button's name is based on the name of the profile type.
The new profile page is displayed. The fields that appear vary based on the profile page created for profiles in this profile type. Refer to Profile Pages for more information.
-
In the Status field, select the status of the new profile.
-
Select the Edit icon
 beside each field to enter a value for that field.
 -
Select Create.
Uploading Profiles in Bulk
You can upload a CSV file of profiles to your tenant to create profiles in bulk.
Prerequisite:
-
You have a CSV file containing a list of profiles to add to your tenant.
-
Go to Admin > Lifecycle > Profiles.
-
Select the profile type you want to add profiles to.
-
Select
 .
. -
Select the CSV file containing your profiles and select Open.
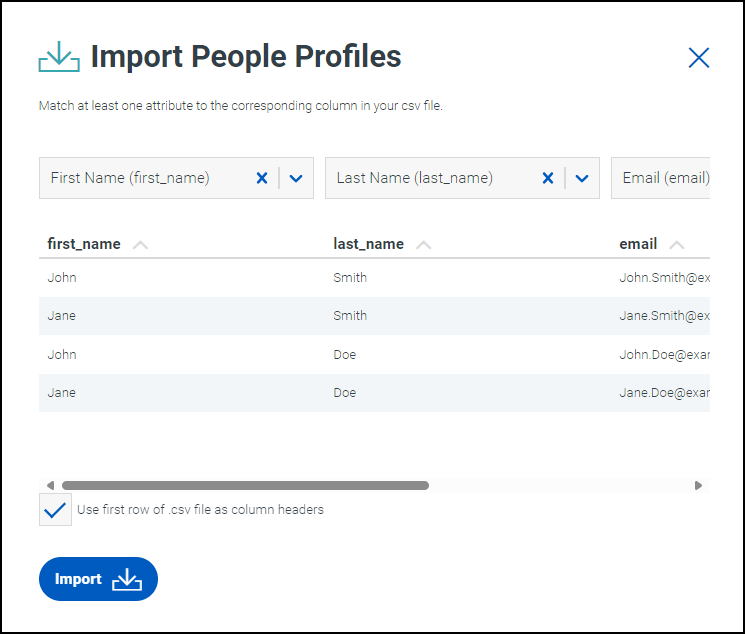
The Import Profiles dialog box is displayed. The dialog box displays the columns from the CSV file, each representing an attribute that can be included on the profile. There is a dropdown list over each column.
-
If the first row of your CSV file contains profile data, instead of column headers, clear the Use first row of .csv file as column headers checkbox.
-
Use the dropdown list over each column to select the profile attribute that corresponds to the values within the column from the CSV file.
In order to import profiles, you must assign an attribute to at least one column from the CSV file. You must assign all required attributes to a column for the import to be completed successfully.
If you do not select an attribute over a column, that column's values will not be added to the newly-created profiles.
Notes
- Importing a CSV file of profiles in the admin interface can only create profiles and can't update existing profiles. To update multiple profiles at once, use the bulk upload feature available to end users.
- Remove unwanted rows from your CSV file before uploading it. It is not possible to omit specific rows within the CSV file as it is imported.
-
Select
.
Profiles are created for each row in the CSV file. The attributes in the profile are populated by the values in the columns.
Managing Profiles
You can view and edit the profiles in your system.
Viewing Profiles
To view existing profiles and filter them based on specific attributes:
-
Go to Admin > Lifecycle > Profiles.
-
In the Profile Type dropdown, begin typing the name of a profile type. Select the profile type that contains the profiles you want to view.
The following tabs are displayed:
- All - Displays all profiles regardless of status.
- Active - Displays Active and On-Leave profiles.
- Inactive - Displays Inactive and Terminated profiles.
- Archived - Displays archived profiles.
You can use the search bar to find profiles by their configured profile name.
In addition to plain text queries, the search bar supports PCRE2 regular expressions.
For example:
John D[a-z]* Smithreturns all profiles where the name contains John, any word beginning with D, and then Smith.Contractor.+2025returns all profiles where the name contains contractor, one or more of any other characters, and then 2025.\(Administrator)\returns all profiles containing the string, "(Administrator)". Note that the parentheses are escaped by backslashes.(2023|2024) .* Washingtonreturns all profiles where the name contains 2023 or 2024, any number of additional characters, then Washington.
You can also filter the profiles that are displayed.
Filtering Profiles
You can filter which profiles are displayed in your list of profiles. You can also save those filters and share them with users that have specific roles in your organization.
To filter the list of profiles:
-
Go to the list of profiles and select the type of profile you want to review.
-
Select the ellipsis icon
 beside the Filter header.
 -
Choose whether you want to create a new filter or apply one that has been created already.
Creating a Profile Filter
-
From the filter screen, in the FILTER BY tab, choose the type of filter you want to create by selecting the Type dropdown list.
Complete the additional fields that are added based on your selection.
-
To add additional filter criteria, select Add Criteria.
Choose an operator between each set of criteria. The options are AND or OR.
-
Select Apply. Your filter is applied to the list of profiles.
-
To save your filter, select Save as New Filter.
Note
You must apply your filter before you can save it.
-
Enter a label for your new filter.
-
If you want to be able to apply your new filter to multiple profile types, type the name of the additional profile types you want to add in the Profile Type field and select them from the dropdown list.
-
Select Save.
Your profile filter is added to the list of profile filters.
You can also create a new filter by editing an existing filter and selecting Save as New Filter.
Applying a Profile Filter
-
From the filter screen, select the SAVED FILTERS tab.
A list of filters that you own or that have been shared with you is displayed.
-
Select the name of the filter you want to use.
The list of profiles is updated to reflect your selected filter.
You can also edit a saved filter.
Editing a Saved Profile Filter
You can make changes to a saved profile filter.
-
From the filter screen, select the SAVED FILTERS tab.
A list of filters that you own or that have been shared with you is displayed.
-
Select the filter you want to edit.
-
In the Criteria panel, make the necessary changes to your profile filter. You can edit the existing criteria, delete them, or add new criteria.
-
Select Apply.
-
To create a new filter with the criteria you applied, select Save as New Filter.
To overwrite the existing filter you edited, select Update Saved Filter.
Sharing Profile Filters
You can share a filter you own with other users by their roles.
-
From the filter screen, select the SAVED FILTERS tab.
A list of filters that you own or that have been shared with you is displayed.
-
Select the Actions icon
 and select Share.
 -
In the User Role field, begin typing the name of a user role. Select the name of the role you want to add.
Repeat for each user role that needs access to this filter.
-
Select Share.
Users with any of the roles you selected in the Share Filter screen will be able to use the filter you shared with them. They will not be able to edit the filter or share it with others.
Viewing Risk on Profiles
Profiles can be assigned risk using attributes to identify risks and help assess the threat they pose. Non-Employee Risk Management calculates the risk and displays a risk score and level on the profile table and profile detail page. Refer to Configuring and Managing Risk for additional information.
Editing Profiles
End users can update profiles using the Update Workflow configured for a profile type they work with.
Administrators can update profiles in bulk from the list of profiles, or select an individual profile to edit.
Updating Profiles in Bulk
You can make some updates to profiles in bulk.
-
Go to Admin > Lifecycle > Profiles and select a profile type.
-
Select the checkboxes next to the profiles you want to edit.
-
Select the ellipsis icon
 beside the Actions button.
 -
Select the action you want to take on the selected profiles.
- Archive - Deactivates the selected profiles and moves them to the Archived tab.
- Unarchive - Immediately activates the selected profiles and moves them from the Archived tab to the Active tab.
- Delete - Permanently delete the selected profiles. If these profiles are needed again, they must be recreated. If they are linked to other profiles in your system, those links will be broken.
Updating an Individual Profile
-
Go to Admin > Lifecycle > Profiles and select a profile type.
-
Select the name of the profile you want to edit.
The INFO tab is displayed. It contains a list of attributes for this profile.
-
On the INFO tab, select the status dropdown to update the status of this profile.
-
Select the Edit icon
to edit the value of a specific attribute.The attributes on this page are based on how the profile page is configured. End users might see these attributes depending on their role.
-
On the CONTRIBUTORS tab, add and remove contributors for this profile. Refer to Assigning Contributors Directly to a Profile for more information.
The HISTORY tab contains a record of recent changes to the profile. The ALL ATTRIBUTES tab is only accessible to administrators, and it displays all attributes associated with the profile regardless of whether they are included on the profile page. The data on these tabs can't be edited.
Documentation Feedback
Feedback is provided as an informational resource only and does not form part of SailPoint’s official product documentation. SailPoint does not warrant or make any guarantees about the feedback (including without limitation as to its accuracy, relevance, or reliability). All feedback is subject to the terms set forth at https://developer.sailpoint.com/discuss/tos.