Creating and Editing Value Builders
Value builders allow you to generate patterns for profile attributes, so that the selected attributes are populated with either random or systematic values. Value builders can be used as part of a Set Attribute Values step within a workflow.
Creating Value Builders
To create a value builder:
-
Go to Admin > Templates > Value Builders.
-
Select + Value Builder.
-
Complete the following fields:
- Name - Add a unique name for this value builder.
- Uid - Add a unique identifier.
-
Select Create.
The FORMULA tab is displayed. The formula is the pieces of your value builder In existing value builders, the current formula is displayed here.
-
In the FORMULA section, in Add Attributes, search for and select attributes to include in the value builder's formula.
When this attribute has been added to your formula, you will see the Selector dropdown list within the Formula section. Choose from the following options:
- All - Use the entire contents of the selected attribute value in the value builder.
- First - Use the first characters in an existing attribute value in the value builder. Select the number of characters in the Count dropdown list that appears.
- Last - Use the last characters in an existing attribute value in the value builder. Select the number of characters in the Count dropdown list that appears.
-
In Add Helper, select an option to assign additional values to the attribute.
- Random Numbers - Add up to 10 random numbers to the attribute's value.
- Static Value - Add a static string to attributes that use this value builder.
- Incremented Number - Add an integer to the value builder that increases by 1 when the value builder is used.
- Random String - Add up to 10 random Latin characters to the attribute's value.
-
In the OTHER SETTINGS section, choose an option under Case Conversion.
- none - Make no changes to the capitalization of the strings in the value builder.
- lower - All letters in the attributes used in the value will be lowercase.
- upper - All letters in the attribute value will be uppercase.
- capital - The first letter of each string attribute used in the value will be uppercase. For example, the attribute "john smith" would be converted to "John smith" in the resulting value.
- title - The first letter of each word in a string attribute used in the value will be uppercase. For example, the attribute "john smith" would be converted to "John Smith" in the resulting value.
Static strings and random strings are not affected by Case Conversion settings.
For example, the value builder formula in the screenshot below combines the first letter of a first name attribute, 3 random numbers, a period, the last name attribute, and the string
@sample.com. These attributes and helpers are combined to form an email address.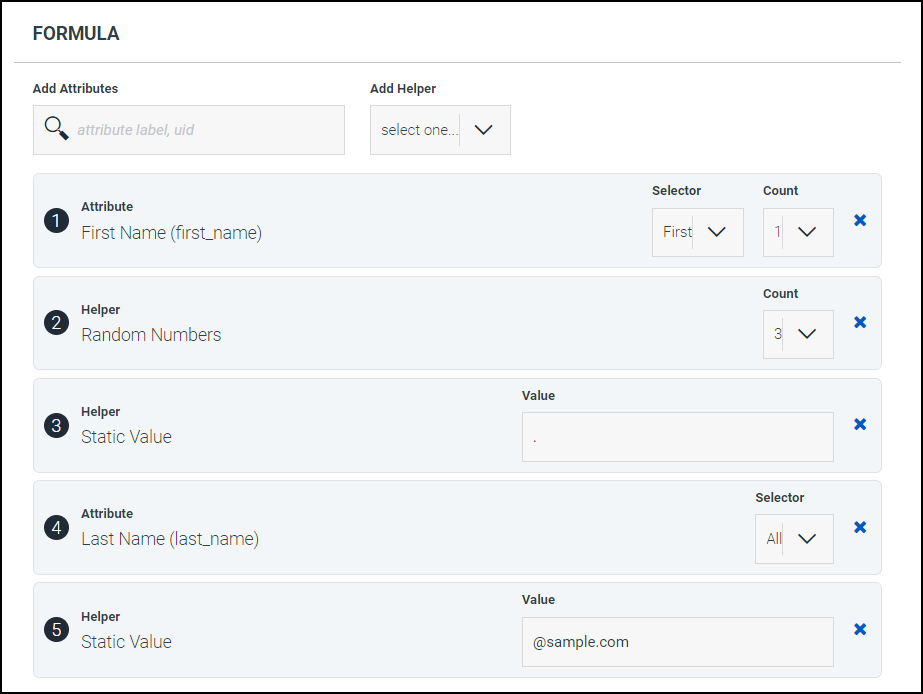
Applied to the profile John Smith, this value builder might generate
j423.smith@sample.com. -
Select Save.
-
(Optional) Test your value builder by choosing a profile in the TESTING section within the Profile field. A value will be generated based on your selections in the FORMULA section and displayed underneath the Profile field.
Editing Value Builders
You can view and edit existing value builders.
-
Go to Admin > Templates > Value Builders.
-
To export a JSON file containing the metadata about the selected value builders and any related configuration:
-
Select the checkbox beside the value builders you want to export. To select all value builders, select the checkbox beside the VALUE BUILDERS header.
-
Select the ellipsis icon
 next to Actions and select Export. When the file has been generated, select Download to save the metadata to a local file.
 -
To edit an individual value builder, select the name of the value builder.
-
In the FORMULA section, make any necessary changes to the formula used in this value builder.
Note
If you make changes to an Incremented Number helper, the counter for that helper will be reset.
-
In the INFO section, make any necessary changes to the name and UID for this value builder.
-
Select Save.
When your value builders are complete, you can add them to workflows using the Set Attribute Values action.
Documentation Feedback
Feedback is provided as an informational resource only and does not form part of SailPoint’s official product documentation. SailPoint does not warrant or make any guarantees about the feedback (including without limitation as to its accuracy, relevance, or reliability). All feedback is subject to the terms set forth at https://developer.sailpoint.com/discuss/tos.