Creating and Editing Pages
Pages are a collection of forms, text, and other elements that define how information is presented to an end user.
There are two types of pages within Non-Employee Risk Management: workflow pages and profile pages.
Workflow pages are presented to a user during the execution of a workflow, such as when they're creating or updating a profile.
Profile pages are displayed on an individual profile. The information displayed to a user is based on their attribute permissions.
Workflow pages and profile pages both support Liquid Template Language in text fields.
Workflow Pages
A workflow page is any page used within a workflow. They can collect or display data during the workflow's execution.
Users fill out workflow pages as part of a workflow's execution, such as when a profile is created or updated. These pages are displayed to users regardless of the permissions they have to the attributes for this profile type, so that a user can complete the tasks assigned to them and the workflow can proceed.
By default, all core profile types have forms and pages associated with them already. You can edit those pages by rearranging the forms on them, or by adding and removing custom forms, but you can't delete the core forms from them.
If you selected the Create supporting content? checkbox when creating a custom profile type, an empty workflow page and profile page have been created using the name of the profile type. If this is the case, you do not need to create a new form, and you can search for and edit the workflow page or profile page that was created.
Creating Workflow Pages
Workflows are used to create and update profiles, so workflow pages are used to gather the information for the attributes on a profile within a specific profile type. Because workflow pages are primarily used to gather information, they are created and managed separately from profile pages.
-
Go to Admin > Templates > Pages.
The WORKFLOWS tab is displayed.
-
Select + Workflow Page.
-
Complete the following fields:
- Name - Add a unique name for the workflow page.
- Uid - The unique identifier for this workflow page. This can't be changed once the page has been created.
- Description - Add a description for this page.
-
Select CSreate.
The LAYOUT tab of the new workflow page is displayed.
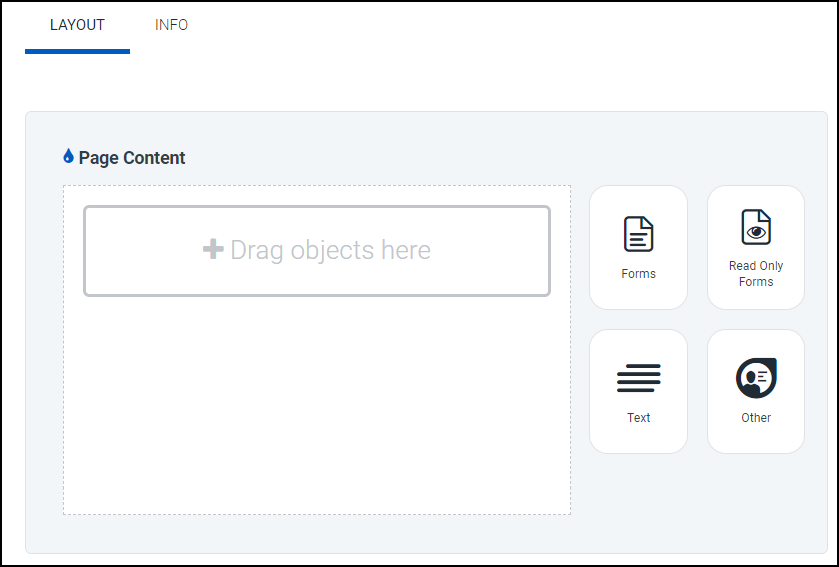
To add objects to your workflow page, select one of the options in the panel on the right of the Page Content canvas.
Review the available options below:
Forms
When a form is part of a workflow page, a user will be required to complete the fields within the forms on this page.
-
Select the Forms option in the right panel.
A list of forms is displayed.
-
Select and drag a form into the Page Content canvas.
Read Only Forms
You can use read-only forms to display additional context to a user on a page, such as attributes from a form that a different user filled out earlier in the workflow.
For example, you can use a read-only form to display organization information when creating a new assignment profile applicable to that organization.
-
Select the Read Only Forms option in the right panel.
A list of forms is displayed. These are the same forms visible in the Forms section, but when displayed to the user, they won't be editable.
-
Select and drag a form into the Page Content canvas.
Text
You can add headers, text, and HTML to your pages, so that you can provide users with instructions and section dividers on a page.
-
Select the Text option in the right panel.
-
Select and drag a type of text field into the Page Content canvas.
Choose from the following options:
- Form Header - Adds a text header and a dividing line between two sections of a page.
- Large Header - Adds the largest header to the page.
- Medium Header - Adds a mid-sized header to the page.
- Small Header - Adds the smallest header size to the page.
- Paragraph - Adds body text to the page.
- Html - Adds an HTML field to the page. This can be edited to support tables, hosted images and logos, and other supporting content.
Other
Add additional options in the Other section.
-
Select the Other option in the right panel.
-
Select and drag an option into the Page Content canvas.
The options include:
- Owner - Display the profile owner on this page.
- Progress Bar - Add a progress bar to this page so that users can track the progress of the workflow as a whole.
-
-
Drag and drop the tiles within the Page Content canvas to reorder them. Select the Delete
 icon to remove the object from the page.
 -
Select Save.
-
(Optional) To preview the page as it will be displayed to users, select Preview.
Editing Workflow Pages
You can view and edit existing workflow pages.
- Learn more about updating workflow pages in bulk.
- Learn more about updating an individual workflow page.
To begin editing workflow pages:
-
Go to Admin > Templates > Pages.
The WORKFLOWS tab is displayed.
-
Make any necessary changes to the pages on the list.
Review the changes you can make below.
Update Workflow Pages in Bulk
You can make some changes to your workflow pages in bulk.
-
Select the checkbox beside the pages you want to edit.
To select all pages, select the checkbox next to the WORKFLOW PAGES header.
-
Select the
 ellipsis icon next to the Actions button to display the available actions.
- Archive - Immediately deactivates the selected pages and moves them to the Archived tab.
- Unarchive - Immediately activates the selected pages and moves them to the Active tab.
- Export - Generates a JSON file containing the metadata about the selected pages and any related configuration. When the file has been generated, select Download to save the metadata to a local file.
- Clone - Makes an identical copy of the selected pages and adds it to the list with a number appended to their names.
Note
If a workflow page is in use by one or more workflows, it can't be archived. An error message displays containing the names of the pages that couldn't be archived and the workflows that use them.
Update an Individual Workflow Page
You can make changes to the details and layout of an individual workflow page.
-
From the list of workflow pages, select the name of the page you want to edit.
-
In the LAYOUT tab, make changes to the forms, text, and other objects within this workflow page. Refer to the available options in the Creating Workflow Pages section.
-
In the INFO tab, make changes to the name and description of the page. The Uid can't be edited once the page has been created.
Profile Pages
Profile pages are displayed to users viewing an individual profile after it's been created. In many cases, these pages are read-only, which is why they are configured separately from workflow pages. However, if a user has a role that allows them to edit a specific attribute on a profile, or if they're an owner or contributor to a profile, they'll be able to edit the attribute values on a profile page.
By default, all core profile types have forms and pages associated with them already. You can edit those pages by rearranging the forms on them, or by adding and removing custom forms, but you can't delete the core forms from them.
Custom profile pages are created automatically when a profile type is created. If Create supporting content was selected when the profile type was created, the profile page associated with this type will contain the empty form created as supporting content. Otherwise, the profile page for the profile type will be empty.
Editing Profile Pages
You can view and edit existing profile pages.
- Learn more about updating profile pages in bulk.
- Learn more about updating an individual workflow page.
Note
Profile pages can't be created independently. They are created when a profile type is created, and can be edited.
To begin editing workflow pages:
-
Go to Admin > Templates > Pages.
The WORKFLOWS tab is displayed.
-
Select PROFILES.
-
Make any necessary changes to the pages on the list.
Review the changes you can make below.
Update Profile Pages in Bulk
You can make some updates to your profile pages in bulk.
-
Select the checkbox beside the pages you want to edit.
To select all pages, select the checkbox next to the PROFILE PAGES header.
-
Select the
ellipsis icon next to the Actions button to display the available actions.- Export - Generates a JSON file containing the metadata about the selected pages and any related configuration. When the file has been generated, select Download to save the metadata to a local file.
Note
Profile pages are archived when the profile type associated with them is archived. They cannot be archived manually.
Update an Individual Profile Page
You can make changes to the details and layout of an individual profile page.
-
From the list of profile pages, select the name of the page you want to edit.
The profile page's Edit page is displayed.
-
Add and remove objects from your profile page as necessary.
Review the available options below:
Permission Forms
Permission forms are forms used to display and edit attributes. The actions a user can take on these forms are based on the permissions of the user's roles.
-
Select the Permission Forms option in the right panel.
A list of forms is displayed.
-
Select and drag a form into the Page Content canvas.
Text
You can add headers, text, and HTML to your pages, so that you can provide users with information and section dividers on a page.
-
Select the Text option in the right panel.
-
Select and drag a type of text field into the Page Content canvas.
Choose from the following options:
- Form Header - Adds a text header and a dividing line between two sections of a page.
- Large Header - Adds the largest header to the page.
- Medium Header - Adds a mid-sized header to the page.
- Small Header - Adds the smallest header size to the page.
- Paragraph - Adds body text to the page.
- Html - Adds an HTML field to the page. This can be edited to support tables, hosted images and logos, and other supporting content.
Other
Add additional options in the Other section.
-
Select the Other option in the right panel.
-
Select and drag an option into the Page Content canvas.
The options include:
- Owner - Display the profile owner on this page.
-
-
Select Save.
-
Select Preview to preview the page.
Documentation Feedback
Feedback is provided as an informational resource only and does not form part of SailPoint’s official product documentation. SailPoint does not warrant or make any guarantees about the feedback (including without limitation as to its accuracy, relevance, or reliability). All feedback is subject to the terms set forth at https://developer.sailpoint.com/discuss/tos.