Importing Tenant Configuration
The Configuration Import page allows you to import some configurations from your lower environment to production. For example, you might have a test, development, or sandbox tenant. You can import its configurations into your production environment.
Caution
- Migrating a tenant's configuration incorrectly can result in serious configuration and database errors. Contact SailPoint Support for questions regarding the configuration import process or SailPoint Expert Services for hands-on assistance with migrating a tenant's configuration.
- If you intend to use the configuration import tool as described in this document, always make your environment configurations within your lower tenant. Do not create these objects or configurations in both your lower and production tenants.
- Importing configuration objects doesn't remove components of those objects. For example, if you import a form from your lower environment that has had one or more attributes removed, those attributes will not be removed from the corresponding form in your production environment.
Preparing for a Tenant Migration
Before you can export your tenant's configuration, you'll need to:
- Determine which objects you will migrate. Review a list of the types of objects that can be migrated.
- Verify the UID and GUID of each object to migrate.
- Generate a new API token.
An API token is required for tenant migrations.
The following types of objects can be migrated:
-
Within the Lifecycle section:
- Profile Types
- User Roles
- Workflows
-
Within the Collaboration section:
- Portals
- User Roles
- Workflows
-
Within the Templates section:
- Attributes
- Forms
- Notifications
- Pages
- Value Builders
Important
- Profiles can't be migrated between environments. If a specific profile is required for another object, such as a workflow action or condition, it must be created in the new environment before importing any workflow configurations. Before uploading your workflow's JSON, replace the GUID of any profiles referenced within the JSON of the workflow with the GUID of the applicable profiles from your production tenant.
- When an object such as a workflow is exported, objects connected to the workflow or any of its steps are also exported, with the exception of profiles. This includes user roles that can access the workflow, the profile type the workflow runs on, any forms and pages the workflow uses, and other configurations. If an exported workflow contains a Run Workflow step, that workflow and the objects connected to it are also exported.
Some specific configurations can be made directly to objects within your production environment. Review Manually Updating Objects for details.
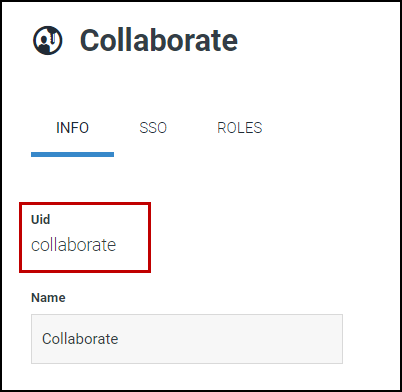
Verifying Object IDs
As you create objects within your environment, they are assigned an ID on the configuration page. This is the UID.
A GUID is automatically generated for each object in your environment. This is not visible while the object is being created, but it can be accessed later.
If you migrate an existing object from your lower environment to your production environment, both the UID and the GUID must be identical for each object between both environments. If either ID for the object isn't the same between the two environments, a new object will be created in the new environment when it's uploaded.
To verify the UID and GUID of an object:
-
Navigate to the configuration page for that object.
For example, a portal's configuration page can be located by going to Admin > Collaboration > Portals and selecting the name of the portal you want to view.
-
Locate the Uid field on the page. This value should be identical between the object in your lower environment and production.
-
Within the URL, locate the string of letters and numbers after the name of the object type. This is the GUID. The GUID should also be identical for this object between your lower and production environments.
For example, in the sample portal URL
https://tenant-name.com/neaccess_admin/portals/f52a14bc-6a73-4h95-ba3c-dfedabd643ae/info, the GUID can be found betweenportalsandinfo.
Exporting Objects
SailPoint recommends that you export configurations one at a time to enable you to troubleshoot issues as they arise.
To export objects from your lower environment:
-
Navigate to the object within your lower environment.
-
Select the objects you want to export.
-
Select the menu icon
 beside Actions and select Export.
A JSON file is generated that contains the selected object. JSON files for exported workflows also contain the JSON for many dependent objects such as attributes, forms, and pages.
-
Select the Download button.
Repeat these steps for each object you're exporting from your lower environment.
Importing Objects
When you have verified the UID and GUID for each object you are migrating, you can begin importing many of your configurations.
Prerequisites for Importing Objects
Before importing certain types of objects to your production environment, you must make some additional changes to them.
- Within your production environment, create any profiles that are referenced by your workflows' actions or conditions. Add the GUIDs of those production profiles to the JSON for he workflow that uses them.
- Edit the endpoints and API tokens of API actions within your workflows to point to your production environment.
Best Practice
To ensure that workflows and notifications work correctly, update any URLs within notifications to point to your production environment.
Importing Configuration Objects
SailPoint recommends you import and validate your configuration objects one at a time. To simplify the migration process, import foundational objects such as user roles and profile types, before importing workflows.
To import an object:
-
Go to Admin > System > Configuration Import.
-
Select Get Started.
-
Under Import File, select the plus icon
 and choose an object in JSON format to upload.
 -
Select Next.
-
Under CREATE REVIEW, review each object that will be created as a result of this import.
If you see unexpected items in this list, or copies of existing items, review the UID and GUID of each object you're importing to ensure they match the existing objects in your tenant.
Select Next.
-
Under UPDATE REVIEW, review each object that will be updated. Select Next.
When your configurations have been imported successfully, a success message is displayed.
Validating Configuration Imports
Some objects require manual verification or additional configuration once they have been imported to your production environment. Review the list of object types below and complete your tenant's configuration.
Attributes
- Verify that the permissions and validations associated with imported attributes match the intended configuration.
- Verify that any options such as checkboxes or radio buttons that you need to remove from the attribute have been removed.
Forms
- Review forms for duplicate fields.
- Verify that all conditional forms, configured with Add form to options, appear correctly.
- Remove any attributes and options that no longer apply from forms.
Pages
- Verify that all forms within both workflow pages and profile pages appear correctly.
- Remove any forms that no longer apply from pages.
Profile Pages
- Verify that profile pages are displaying information as expected based on the profile type configurations.
Profile Types
- Review the profile naming schema. If you see duplicate attributes within the schema, remove all attributes from the profile naming field and reimport the profile type.
Tables
- Go to Admin > Templates > Tables and update the attributes displayed.
User Roles
- Navigate to the configuration for each role and update the permissions for your lifecycle and collaboration roles as necessary.
Workflow Pages
- Verify that workflow pages are displaying information as expected based on the profile type configurations for that workflow.
Workflows
- In Duplicate Prevention steps, review and update the attributes used for the Duplicate Search Settings Criteria.
- In Collaboration Account steps in Collaboration Registration workflows, update the Roles to assign the user field.
- Review actions that contain conditional logic. If a condition uses static profiles or static text values, update those values to use the correct profile or text.
Manually Updating Objects
There are some configurations that can be made directly within the production environment.
If you make these changes to one environment, apply them to all other environments as well to ensure your tenants remain in sync.
| Object Type | Allowed Changes |
|---|---|
| Attributes | |
| Branding | |
| Legal | |
| Notifications | |
| Roles | |
| SMTP | |
| SSO | |
| Tables | |
| Users |
Documentation Feedback
Feedback is provided as an informational resource only and does not form part of SailPoint’s official product documentation. SailPoint does not warrant or make any guarantees about the feedback (including without limitation as to its accuracy, relevance, or reliability). All feedback is subject to the terms set forth at https://developer.sailpoint.com/discuss/tos.