Managing Users
Most users are granted accounts within Non-Employee Risk Management through your SSO provider or through an imported CSV file. These are known as lifecycle users.
If you use the Collaboration service, you can also grant non-employees accounts they can access through portals you create. These are known as portal users.
You can manage both types of users within your Non-Employee tenant.
Managing Lifecycle Users
On the Users page, you can review a list of lifecycle users in your environment, update existing users, or import new users.
Importing New Users
Users are granted accounts within Non-Employee automatically when they authenticate using your identity provider. However, you can also add new lifecycle users to your environment by importing a CSV file containing their information. This allows you to use them in workflows before they sign in to your environment.
This CSV file must contain:
- The new user's name.
- Their email address.
- A username.
- If you grant roles to users based on their groups in your identity provider, and you want to grant these users a role, include a column in your CSV file that contains a group string corresponding to an existing user role.
Note
- The value used for username must be unique among all users in your environment. If an imported file contains duplicate usernames or usernames that already exist in your system, those imported users will fail.
- Users must have a role in order to sign in to Non-Employee. If you don't include a groups string in your CSV file, the user's role can be granted when they authenticate into Non-Employee with your identity provider, or you can assign them a role within Identity Security Cloud.
To upload a user file, from the Admin console:
-
Select System > Users in the left navigation.
-
Select
 .
. -
Select the CSV file containing your users. Select Open.
An Import Users dialog box is displayed, including the columns from the CSV file.
-
Use the dropdown lists over the columns to select which columns contain the names, emails, and usernames for the imported users.
If your CSV file does not contain column headers, clear the Use first row of .csv file as column headers checkbox to ensure all users are imported correctly. Use the horizontal scroll bar to find all of the columns you uploaded with the CSV file.
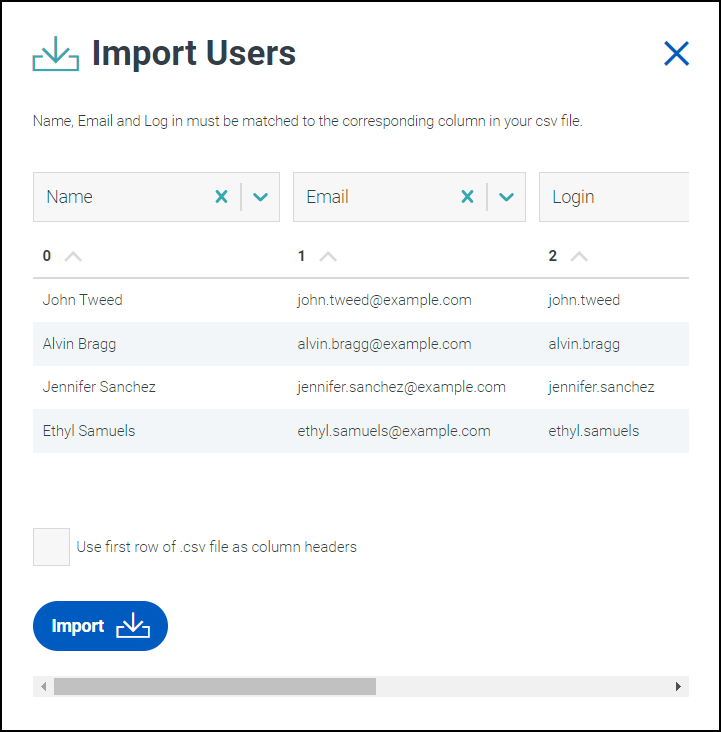
Select Import.
The users you upload appear in the list of users. They can be edited and used in workflows as needed.
Editing Lifecycle Users
You can make changes to a user's status or other details about their Non-Employee account.
To update a lifecycle user:
-
Go to Admin > System > Users.
Active, or enabled, users are displayed in the Active tab. Disabled users are displayed in the Disabled tab.
You can find details such as the user's name, email address, status, and lifecycle roles by selecting their name from the list. These attributes cannot be edited directly and must be edited within your identity provider.
-
Make any necessary changes to the users on the list.
Review the possible changes you can make below.
To enable or disable users:
-
Select the checkboxes beside the users you want to edit, or select the checkbox beside the USER ACCOUNTS header to select all accounts.
-
Select the ellipsis icon
 next to the USER ACCOUNTS header.
- Select Enable to enable the users and move them to the Active tab.
- Select Disable to disable the users and move them to the Disabled tab. These users will not be able to access Non-Employee.
You can also enable or disable a user by clicking their name and selecting the enable user or disable user button at the top of the screen.
To edit a user's avatar:
-
Select the name of the user you want to edit.
The INFO tab is displayed.
-
Hover over the user's avatar and select the edit icon
 .
. -
Select Choose File to upload a new file, then select Update.
To add a manager for a user:
-
Select the name of the user you want to edit.
-
Select the MANAGERS tab.
-
In the Add manager field, begin typing the name of the user's manager. Select the name of the manager to add them to the table.
To add direct reports for a user:
-
Select the name of the user you want to edit.
-
Select the MANAGED USERS tab.
-
In the Add managed user field, begin typing the name of a user reports to the user you selected. Select the name of the user to add them to the table.
To review the access this user has on your identity provider:
-
Select the name of the user you want to review.
-
Select the GROUPS tab.
The user's groups, or entitlements, on the identity provider are displayed.
To add this user as a contributor to a profile:
-
Select the name of the user you want to edit.
-
Select the name of the profile type that contains the relevant profile.
-
In the add field containing the name of the profile type, begin typing the name of a profile. Select a profile to add this user as a contributor on that profile.
Managing Portal Users
You can invite non-employees to join your Non-Employee tenant and collaborate on managing profiles. These non-employees are known as portal users.
Creating Portal Users
Before you can invite portal users, you must create a portal and its associated registration and login workflows.
These non-employees must be invited to join your tenant using the Registration Invitation action within a registration workflow. When they have registered and authenticated into your tenant, they are automatically added to your list of portal users.
To assign and manage portal users' roles, refer to Managing Collaboration User Roles.
To update a portal user:
-
Go to Admin > Collaboration > Portal Users.
Active, or enabled, users are displayed in the Active tab. Disabled users are displayed in the Disabled tab.
You can find details such as the user's name, email address, status, and roles by selecting their name from the list.
-
Make any necessary changes to the users on the list.
Review the possible changes you can make below.
To enable or disable portal users:
-
Select the checkboxes beside the users you want to edit, or select the checkbox beside the USER ACCOUNTS header to select all accounts.
-
Select the ellipsis icon
next to the PORTAL USERS header.- Select Enable to enable the users and move them to the Active tab.
- Select Disable to disable the users and move them to the Disabled tab. These users will not be able to access Non-Employee.
You can also enable or disable a user by clicking their name and selecting the enable user or disable user button at the top of the screen.
To edit a user's avatar:
-
Select the name of the user you want to edit.
The INFO tab is displayed.
-
Hover over the user's avatar and select the edit icon
. -
Select Choose File to upload a new file, then select Update.
To review a portal user's access:
-
Select the name of the user you want to review.
The INFO tab is displayed.
-
Select the GROUPS tab.
If this portal user has any groups or entitlements, that access is displayed here.
To add this user as a contributor to a profile:
-
Select the name of the user you want to edit.
-
Select the name of the profile type that contains the relevant profile.
-
In the add field containing the name of the profile type, begin typing the name of a profile. Select a profile to add this user as a contributor on that profile.
Documentation Feedback
Feedback is provided as an informational resource only and does not form part of SailPoint’s official product documentation. SailPoint does not warrant or make any guarantees about the feedback (including without limitation as to its accuracy, relevance, or reliability). All feedback is subject to the terms set forth at https://developer.sailpoint.com/discuss/tos.