Creating and Editing Profile Types
Profile types are used to group similar profiles. They represent a type of object that Non-employee Risk Management governs, such as vendors, projects, or non-employees. All profiles must be part of a profile type.
By default, new tenants are created with 4 default profile types, also known as core profile types, that come with default attributes designed to simplify the onboarding process. You can also create as many custom profile types as necessary to meet your business needs.
A profile's type determines the workflows, forms, and pages used to create that profile. You can assign contributors to a profile type so they can manage profiles of that type.
Before you can create profiles within a profile type, you must have the following:
- The attributes that will be used within profiles.
- Forms to gather the data needed to populate those attributes when a profile is being created.
- Pages from those forms so that they can be included in workflows to create and update profiles for this profile type.
- Create Workflows using the pages and forms set up for this profile type. When the workflow associated with this profile type is executed, those forms and pages are used to fill out the attributes associated with new profiles of this profile type.
Managing Default Profile Types
By default, new tenants come with 4 configured profile types, called the core or default profile types. These profile types are:
- Organizations - An entity used to manage the teams or groups of non-employees within your company. For example, this can be a staffing agency, a vendor, or an internal team or department.
- Jobs - A specific time-bound initiative that an organization and its non-employees have been assigned to complete.
- Non-Employees - The individuals contracted to perform work for an organization on a job for a specific period of time.
- Assignments - A non-employee’s time-bound association with a job within an organization.
Each of these profile types comes pre-configured with a set of attributes to organize the profiles within them and the relationships between them.
These profile types and the core attributes they contain can't be deleted. You can create, edit, and delete custom attributes for these core profile types and update the permissions associated with them.
Editing Default Profile Types
-
Go to Admin > Lifecycle > Profile Types.
-
Select one of the core profile types.
-
In the BASIC SETTINGS section, review the list of attributes. You can also edit the following fields:
- Role filtering - Choose whether to filter the users that can be selected as contributors for this profile type based on their role.
- If you select ALLOW and add roles within the Add role field, only users with one or more of the roles in this list can be added as contributors to profiles in this profile type.
- If you select ALLOW and don't add any roles, users can't be added as contributors to profiles in this profile type.
- If you select BLOCK and add roles within the Add role field, users with those roles can't be added as contributors to profiles in this profile type.
- If you select BLOCK and don't add any roles, filtering will not be applied and users can be selected as contributors regardless of their role.
- Role filtering - Choose whether to filter the users that can be selected as contributors for this profile type based on their role.
-
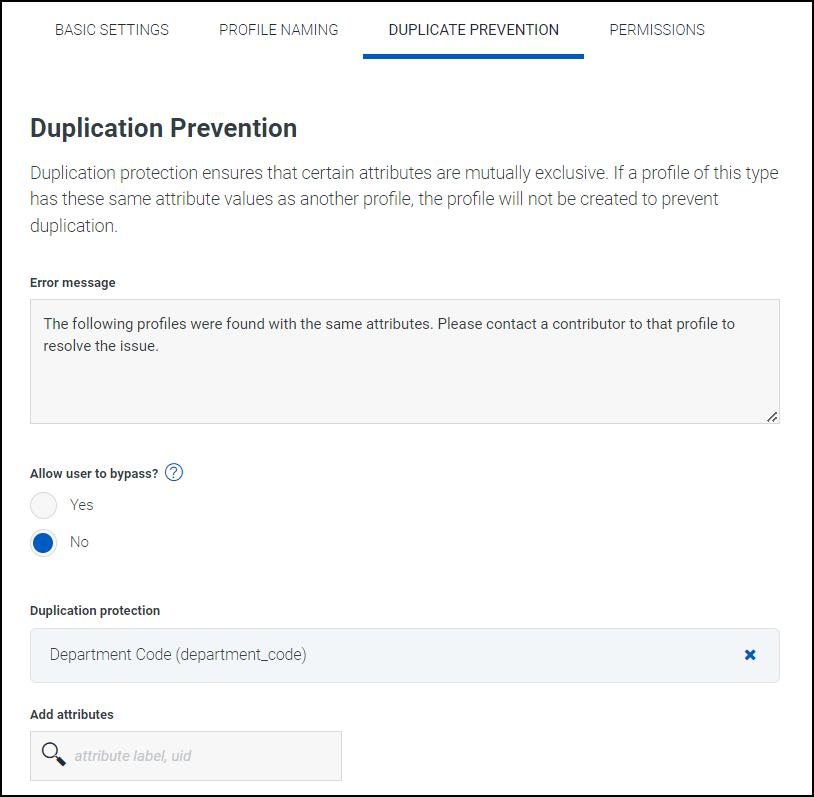
In the DUPLICATION PREVENTION section, make selections to determine how duplicate profiles should be identified and resolved.
- In the Error message field, enter an error message to display when users attempt to create a duplicate profile in this profile type.
- In Allow user to bypass?, select whether the user creating the profile can create it even if Non-Employee Risk Management detects that the new profile might be a duplicate.
- In the Add attributes field, choose one or more attributes that Non-Employee Risk Management should use to check for duplicate profiles. When you add an attribute in this field, it appears in the Duplication protection field.
-
In the PERMISSIONS section, choose whether or not the users from any additional roles, separate from the default roles, should be granted access to this profile type, based on the permissions granted to users with that role in the Profile Access section of its Permissions.
Notes
- In the Contributors section, you can see that the Profile Owner and the Profile Contributor have access to profiles in this profile type regardless of their other roles.
- The permissions in the PERMISSIONS section can be applied to both lifecycle and collaboration roles.
- If you select ALLOW and add one or more roles within the Add role field, users with the roles you select can access this profile type regardless of whether they are also contributors.
- If you select ALLOW and don't add any roles, users who aren't contributors to this profile type won't be able to access it.
- If you select BLOCK and add one or more roles within the Add role field, users with the roles you select will not be able to access this profile type unless they are also contributors. However, users with any other roles can access this profile type regardless of whether they are also contributors.
- If you select BLOCK and don't add any roles, users with any role can access this profile type regardless of whether they are also contributors.
-
Select Save.
-
Optionally, in the ISC SOURCE SETTINGS section, choose whether this profile type should be connected to Identity Security Cloud so it can be managed as a source. Refer to Creating a Source in Identity Security Cloud for details.
You can also add additional attributes to this profile type by adding custom attributes to forms and pages associated with this profile type.
Managing Custom Profile Types
If you need to manage additional data beyond what is covered by the core profile types, or if your tenant was created before core profile types were added, you can manage your data using custom profile types.
Creating a Custom Profile Type
To create a profile type:
-
Go to Admin > Lifecycle > Profile Types.
-
Select CUSTOM.
-
Select + New Profile Type.
-
In the BASIC SETTINGS section, complete the following fields:
- Name - Add a unique name for the profile type.
- UID - Add a unique identifier for the profile type. This can't be changed once the profile type has been created.
-
Category - Choose the category of profile for this profile type. The available options are:
- Employee - An employee that works directly for your company.
- Job - A specific time-bound initiative that an organization and its non-employees have been assigned to complete.
- Non-Employee - Non-employees such as contractors or vendors that work with your company.
- Organization - An external company that provides contractors to your company or is otherwise affiliated with your organization.
- Assignment - A specific engagement or project.
- Other - Profiles that don't fit other categories, such as departments or locations.
-
Create supporting content? - Select this checkbox to create some additional content when you save your profile type. This content includes:
- An empty form using the name of the new profile type.
- A Workflow Page with the name "Create <profile type>".
- A Profile Page containing the empty form created with this profile type.
- A disabled Create Workflow containing two steps. These are the "Request Form" action, containing the "Create <profile type>" Workflow Page; and the "Create" action.
You can rename and edit supporting content.
-
Role filtering - Choose whether to filter the users that can be selected as contributors for this profile based on their role.
- If you select ALLOW and add roles within the Add role field, only users with one or more of the roles in this list can be added as contributors to profiles in this profile type.
- If you select ALLOW and don't add any roles, users can't be added as contributors to this profile type.
- If you select BLOCK and add roles within the Add role field, users with those roles can't be added as contributors to profiles in this profile type.
- If you select BLOCK and don't add any roles, filtering will not be applied and users can be selected as contributors regardless of their role.
Note
The ACCESS PERMISSIONS section is read-only and states that profile owners and profile contributors will have access to this profile type.
-
In the PERMISSIONS section, choose whether or not the users from any additional roles, separate from the default roles, should be granted access to this profile type, based on the permissions granted to users with that role in the Profile Access section of its Permissions.
Notes
- In the Contributors section, you can see that the Profile Owner and the Profile Contributor have access to profiles in this profile type regardless of their other roles.
- The permissions in the PERMISSIONS section can be applied to both lifecycle and collaboration roles.
- If you select ALLOW and add one or more roles within the Add role field, users with the roles you select can access this profile type regardless of whether they are also contributors.
- If you select ALLOW and don't add any roles, users who aren't contributors to this profile type won't be able to access it.
- If you select BLOCK and add one or more roles within the Add role field, users with the roles you select will not be able to access this profile type unless they are also contributors. However, users with all other roles can access this profile type regardless of whether they are also contributors.
- If you select BLOCK and don't add any roles, users with any role can access this profile type regardless of whether they are also contributors.
-
Select Create.
Your custom profile type is saved. The PROFILE NAMING tab is displayed.
-
In the Name Attributes section, in the Add attributes field, enter the names of one or more attributes. The attributes you select here will be used to construct the unique name of each profile in this type.
For example, if you choose the attributes
firstName,lastName, andemployeeNumberin that order, a profile representing a user named John Smith with an employee number of 001 would be calledJohnSmith001.By default, the
idattribute is used as the name attribute. -
Select Save.
Your profile type has been created. Before you can add profiles to this profile type, you must complete the following tasks:
- Create the attributes that will be used within profiles.
- Create forms to gather the data needed to populate those attributes when a profile is being created.
- Create pages from those forms so that they can be included in workflows to create and update profiles for this profile type.
- Add those pages to Create Workflows. When the workflow associated with this profile type is executed, those forms and pages are used to fill out the attributes associated with new profiles of this profile type.
Note
If you selected Create supporting content? while initially creating the profile type, a workflow, page, and form were created already, using the name of the profile type you created. These objects are empty and must be edited before they can be used.
You can make additional changes to your profile type after it's been created, such as configuring duplicate prevention.
Editing Custom Profile Types
You can view and edit custom profile types in bulk or individually.
Updating Custom Profile Types in Bulk
You can make some changes to the custom profile types in your tenant in bulk.
-
Go to Admin > Lifecycle > Profile Types.
-
Select the checkbox beside the profile types you want to edit.
To select all profile types, select the checkbox next to the PROFILE TYPES header.
-
Select the ellipsis icon
 next to the Actions header to display the available actions.
-
Archive - Deactivates the selected profile types and moves them to the Archived tab.
Profile types that are in use can't be archived. You must delete or archive any items connected to this profile type before it can be deleted. A list of the items that use each profile type that can't be deleted is displayed.
-
Unarchive - Immediately activates the selected profile types and moves them to the Active tab.
- Export - Generates a .json file containing the metadata about the selected profile types. When the file has been generated, select Download to save the metadata to a local file.
-
Updating an Individual Custom Profile Type
You can make updates to most information about a custom profile type.
-
Go to Admin > Lifecycle > Profile Types.
-
Select the name of the profile type you want to edit.
-
On the BASIC SETTINGS tab, make any necessary changes to the basic information for your profile type.
This includes the Name, Category, and Role Filtering fields that you configured when first creating this profile type.
You can also configure several additional fields:
- Id label - The label that should be used for the unique technical ID for each profile in this profile type.
- Show profile id in header - Whether to display the value of the ID on each profile in this profile type.
If you have previously created a profile type without a category, you must assign it a category before you can save changes to your profile type.
-
In the PROFILE NAMING tab, edit how the name attribute is configured as described in Creating a Custom Profile Type.
-
In the DUPLICATE PREVENTION tab, enter an error message in the Error message field to display when users attempt to create a duplicate profile in this profile type.
-
In Allow user to bypass?, select whether the user creating the profile can create it even if Non-Employee Risk Management detects that the new profile might be a duplicate.
-
In the Add attributes field, choose one or more attributes that Non-Employee Risk Management should use to check for duplicate profiles. When you add an attribute in this field, it appears in the Duplication protection field.
-
In the PERMISSIONS tab, edit the permissions for this profile type as described in Creating a Custom Profile Type.
-
Select Save.
Documentation Feedback
Feedback is provided as an informational resource only and does not form part of SailPoint’s official product documentation. SailPoint does not warrant or make any guarantees about the feedback (including without limitation as to its accuracy, relevance, or reliability). All feedback is subject to the terms set forth at https://developer.sailpoint.com/discuss/tos.