Configuring Connection Parameters
SailPoint and ServiceNow need to be configured for the connection to enable the exchange of seamless data. SailPoint uses the industry standard OAuth 2.0 framework’s following grant types: Service Account (previously referred as Client Credentials) and User Account (previously referred as Authorization Code).
One or more of the methods must be chosen for the connection based on your organization's preference. This page lists the possible grant types, and the following pages give step by step instructions for the admins.
-
Service Account (Previously referred as Client Credentials) - The Service Account connects ServiceNow to SailPoint with one specific service account. All ServiceNow users use this preconfigured account when signing in as a SailPoint user. All access requests are made from the ServiceNow Service Catalog app, and are generated on behalf of one specific service account user in SailPoint.
This service account user must have the ORG_ADMIN role with SCOPE:All that allows to call the REST API endpoints without any consideration for limitation of authorization. The features related to limitation of authorization are programmatically controlled in the app.
SailPoint considers the source of all interactions with ServiceNow as the service account. For example, the
requester namein SailPoint will show asService Accountand not the user who initiated the request in ServiceNow. Traceability of the request to the user requires additional steps. ServiceNow users have seamless authorization using the SailPoint app on ServiceNow, while connected to SailPoint. -
User Account (Previously referred as Authorization Code) - The User Account connects ServiceNow to SailPoint after authentication of the logged in ServiceNow user via the OAuth server. In this case, SailPoint is logged in via the actual user and not the service account. SailPoint requests are raised using real SailPoint users.
ServiceNow users will see an authorization prompt when using this option in ServiceNow. You can configure the frequency of the prompt to be shown only once or multiple times. Requests via ServiceNow are based on settings in SailPoint, therefore, the ability to request for others depends on privileges of that specific user in SailPoint. Here, the
requester namein SailPoint will show asrequester account. Approval actions still follow theService Account.Note
- There are some minor feature differences between the two connection methods especially related to transfer of variables across the systems.
- The
ApproveandRejectrequests made under the IDN Workflow approval type are handled by client credentials rather than the real user, therefore the display of the IDN values will be as per client credentials.
-
User Account for Certifications - The Certifications module uses only the Authorization Code connection mechanism. This is independent of the request access connection and is required to setup only if Certification in ServiceNow is used.
Important
ServiceNow connects to SailPoint via APIs. This list must be kept current with installations and upgrades. For more information about APIs applicable to the appropriate version, refer to Identity Security Cloud Links.
Service Account Configuration
(Previously referred as Client Credentials for Access request)
To configure the access request connection using client credentials, perform the following:
-
Generate a personal access token on SailPoint.
- Sign in to SailPoint as an administrator.
- Follow the instructions to Generate a Personal Access Token. For additional information, refer to Best Practice: Using Personal Access Tokens.
- A client ID and client secret are generated for you.
- Save these offline so they are accessible.
Note
No additional configuration is required on the ServiceNow side to support client_credentials.
-
Go to SailPoint Identity Security Cloud for Service Catalog > Setup.
- Enter the fully- qualified domain name of your SailPoint tenant in Identity Security Cloud URL (Mandatory). For example,
https://<company>.api.identitynow.com -
Enter the values of the Client ID and Client Secret that you generated in the above step in Identity Security Cloud Personal Access Token Client ID (To be Deprecated from future release, Use Application Registries) and Identity Security Cloud Personal Access Token Client Secret (To be Deprecated from future release, Use Application Registries).
Note
This is the legacy method to establish the Service Account and will be soon deprecated. Keep this blank if you are using the new method as described in point 5.
-
Enter the the value of the Auth name from the application registries in Application Registries OAuth Provider Name for Service Account (Provides enhanced performance, Mandatory from future release).
To configure the parameter perform the following steps. (It is required for app version 5.3 and future releases.)
- In ServiceNow, go to System OAuth > Application Registry.
- Select New. Choose Connect to a third-party OAuth provider.
- Enter the Client ID and Client Secret you created in step 1.
- Set Grant Type to Client Credentials, add the Token URL, and select Save.
Note
This is suggested new method to be mandated from upcoming release. Keep it blank if still using legacy method as described in point 4.
-
Select client_credentials if Service Account is the method for connection for every user or Select authorization_code if individual user account will be used for connection.
Screenshot

User Account Configuration
(Previously referred as “Auth Code for Access Request)
To configure the access request connection using authorization code, perform the following:
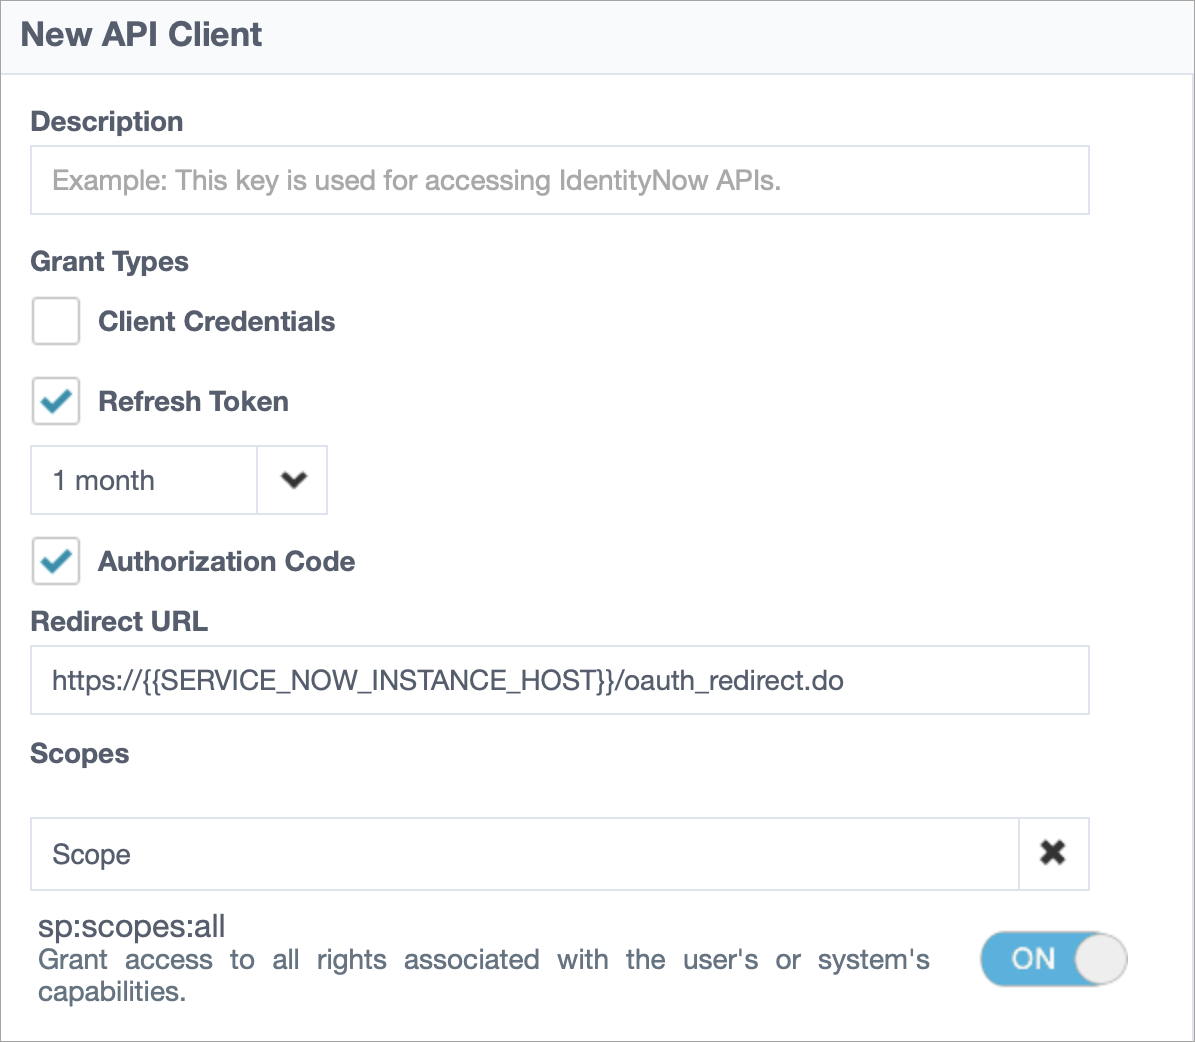
- Sign in to SailPoint and create a new OAuth client. Go to Admin > Global > Security Settings > API Management > New.
- Type a name in the Description and select the options for Refresh token and Authorization Code.
- Enter the Redirect URL, and type the word
Scopeinto the Scopes field. Enable the option forsp:scopes:allto turn it ON. -
Select Create, and save the Client ID and Client Secret for configuration on the ServiceNow side.
Screenshot
-
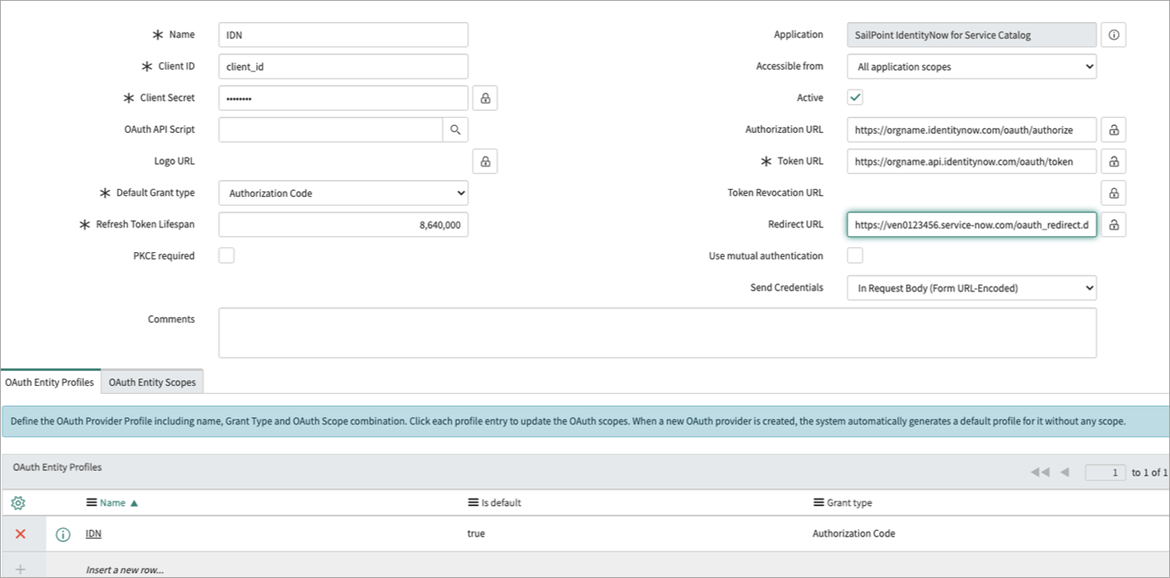
In ServiceNow, go to System OAuth > Application Registry, and then select New.
-
On the interceptor page, select Connect to a third-party OAuth provider, and then fill in the form fields.
- Name: The name you want to give the OAuth client. For example, IDN.
- Client ID: The client ID of the application registered in SailPoint; created in step 4.
- Client Secret: The client secret of the application registered in SailPoint; created in step 4.
- Default Grant type: Authorization code.
- Refresh Token Lifespan: Auto populates the seconds. You may customize the value as needed.
- Active: Checked.
-
Authorization URL:
https://{{ORG_NAME}}.identitynow.com/oauth/authorize-
{{ORG_NAME}}: The name of the SailPoint tenant.- You can check the relevant configuration of your SailPoint tenant at the following link. Replace {{ORG_NAME}} with the name of your organization:
https://{{ORG_NAME}}.api.identitynow.com/oauth/info
- You can check the relevant configuration of your SailPoint tenant at the following link. Replace {{ORG_NAME}} with the name of your organization:
-
-
Token URL:
https://{{ORG_NAME}}.api.identitynow.com/oauth/token{{ORG_NAME}}: The name of the SailPoint tenant.
-
Redirect URL:
https://{{SERVICE_NOW_INSTANCE_HOST}}/oauth_redirect.do{{SERVICE_NOW_INSTANCE_HOST}}: The hostname of the ServiceNow instance.
Screenshot
-
Generate a Personal Access Token on SailPoint.
- Sign in to SailPoint as an administrator.
- Follow the instructions to Generate a Personal Access Token. For additional information, refer to Best Practice: Using Personal Access Tokens.
- A Client ID and Client Secret are generated for you. Save these offline, so they are accessible.
-
Go to SailPoint Identity Security Cloud for Service Catalog > Setup.
- Enter the fully-qualified domain name of your SailPoint tenant in Identity Security Cloud URL (Mandatory). For example,
https://<company>.api.identitynow.com - Enter the values of the Client ID and Client Secret that you generated in the above step #7 in Identity Security Cloud Personal Access Token Client ID (To be Deprecated from future release, Use Application Registries) and Identity Security Cloud Personal Access Token Client Secret (To be Deprecated from future release, Use Application Registries).
- Select
client_credentialsif Service Account is the method for connection for every user or selectauthorization_codeif individual user account will be used for connection. -
In Application Registries OAuth Provider Name for "Logged In User Account" (Mandatory if User Authorization is "Logged In User Account", i.e authorization_code) enter the name you gave the OAuth client in step 6.
Screenshot

-
Assign the appropriate role on ServiceNow to a user to access the portal. For more information on the appropriate role, refer to Assigning Roles Required to Access the Portal Integration to ServiceNow Users.
-
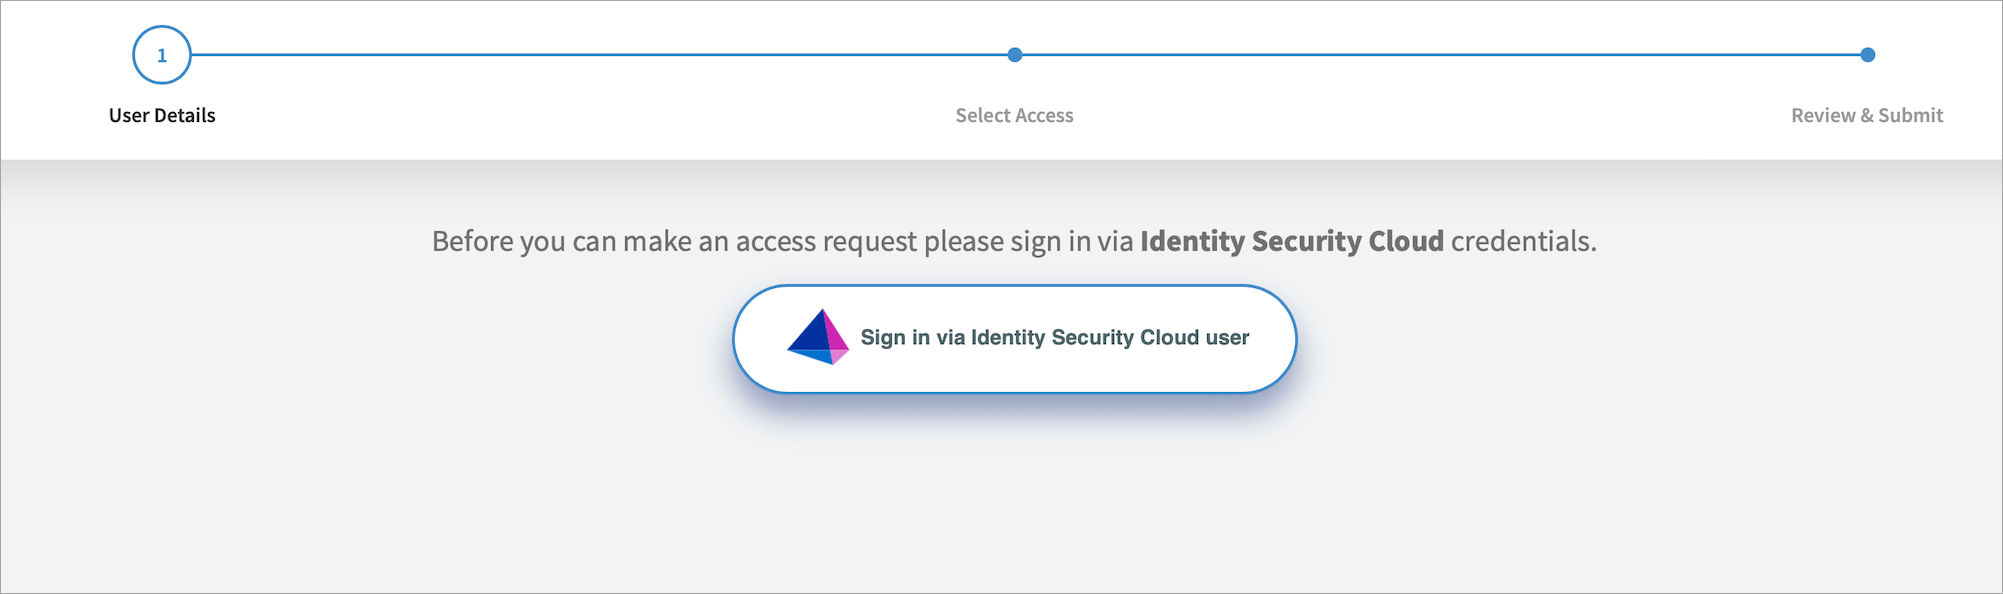
Sign in with the SailPoint user that has the required privileges for intended operations.
Screenshot
User Account for Certification
(Previously referred as Auth Code for Certification)
To configure the connection using authorization code for the Certification interface, you can use the OAuth2 connection defined in User Account Configuration or create a new one. This can be ignored if the Certification functionality is not being configured for the ServiceNow instance.
Note
When the same OAuth client is used for both the User Authorization validation method and the Application Registries OAuth Provider Name for Certification, the user's authentication session is shared across both the SailPoint Access Request and the Certification Page.
To configure the Certification connection using authorization code, perform the following:
- Go to SailPoint Identity Security Cloud for Service Catalog > Setup.
- If not filled already, enter the fully-qualified domain name of your SailPoint tenant in Identity Security Cloud URL. For example,
https://<company>.api.identitynow.com - Enter the values of the Client ID and Client Secret that you generated in the above step in Identity Security Cloud Personal Access Token Client ID (To be Deprecated from future release, Use Application Registries) and Identity Security Cloud Personal Access Token Client Secret (To be Deprecated from future release, Use Application Registries) or Enter the the value of the Auth name from the application registries in Application Registries OAuth Provider Name for Service Account (Provides enhanced performance, Mandatory from future release).
-
In Application Registries OAuth Provider Name for Certification (Mandatory if using Certification widgets), enter the name of the OAuth Client. The scope can be limited to
iai:decisions:manage.Screenshot

-
Assign the appropriate role on ServiceNow to a user to access the portal. For more information on the appropriate role, refer to Assigning Roles to the Portal Integration.
- Sign in with the SailPoint user that has the required privileges for intended operations.
Configuring ISC Event Triggers
Starting in version 5.4, the Service Catalog application uses SailPoint event triggers instead of timer-based polling. The triggers push approval and access request updates to ServiceNow in real time.
Important
This configuration is required starting in version 5.4. Approval synchronization and access request status updates do not work without it.
Before you begin:
- In ServiceNow, create an integration user with the
rest_service,x_sap_intidn.user, anditilroles. - Set the user's identity type to Machine and select Web services access only.
- Use this user's credentials when you configure the SailPoint subscriptions.
Integration URL
Replace {instance_name} with your ServiceNow instance name:
https://{instance_name}.service-now.com/api/x_sap_intidn/isc_event_processor
Required Subscriptions
Create an HTTP subscription in SailPoint for each of the following triggers. Use the integration URL and the ServiceNow integration user credentials for every subscription.
| # | Trigger | Subscription type | Filter |
|---|---|---|---|
| 1 | ServiceNow Approval Request Created for Service Catalog | HTTP | $.attributes.clientMetadata[?(@.origin == 'ServiceNow Service Catalog Integration')] |
| 2 | ServiceNow Approval Request Updated for Service Catalog | HTTP | $.attributes.clientMetadata[?(@.origin == 'ServiceNow Service Catalog Integration')] |
| 3 | ServiceNow Access Request Completed for Service Catalog | HTTP | $.accessRequestItems[?(@.clientMetadata.origin == 'ServiceNow Service Catalog Integration')] |
| 4 | ServiceNow Access Request Cancelled for Service Catalog | HTTP | $.accessRequestItems[?(@.clientMetadata.origin == 'ServiceNow Service Catalog Integration')] |
| 5 | Access Request Decision | HTTP | $.requestedItemsStatus[?(@.clientMetadata.origin == "ServiceNow Service Catalog Integration")] |
To validate the triggers:
- In the SailPoint admin interface, go to Subscriptions.
- For a subscription, select the ellipsis icon, then select Test Subscription.
- In ServiceNow, go to SailPoint Identity Security Cloud > ISC Events > ISC Event Processings and confirm that the test event appears.
- Repeat these steps for all five subscriptions.
Documentation Feedback
Feedback is provided as an informational resource only and does not form part of SailPoint’s official product documentation. SailPoint does not warrant or make any guarantees about the feedback (including without limitation as to its accuracy, relevance, or reliability). All feedback is subject to the terms set forth at https://developer.sailpoint.com/discuss/tos.