Configuring the SailPoint Access Page
Versions 3.2 and prior feature a single landing page named Manage_Access. Access to this page is defined and restricted to roles authorized by the ServiceNow administrator.
An example to provide a link to this page is explained in Manage Access. SailPoint recommends admins evaluate the best option on the ServicePortal or Employee Center to provide the link to access the Manage_Access page according to the organization's portals.
Note
Manage_Access will have limited changes post v3.2. Admins are advised to migrate to widgets via pages/record producers introduced from v4.0 to use the latest architecture and functionality benefits.
Version v4.0 has transformed the application architecture by introducing widgets for enhanced flexibility. These widgets collaborate seamlessly throughout a page to deliver the SailPoint Access Request solution. This update offers a plethora of opportunities to tailor the request page to align with specific business requirements. Moreover, it grants ServiceNow developers the flexibility to personalize the request process, mirroring ServiceNow's widget concept.
Moving forward post version 4.0, users will have access to multiple widgets catering to similar functions. ServiceNow developers can select the most suitable widgets to integrate into customized request pages. By default, widgets are set to Read-Only, prompting users to duplicate them for customization purposes.
SailPoint furnishes sample pages and record producers, detailed in the subsequent section, that can be tailored by ServiceNow implementers to meet organizational needs. These pages are accessible through ServicePortal or the Employee Center, dependent on the specific implementation requirements.
ServiceNow administrators must adjust the properties according to the choice of utilizing Manage Access, ISC Request, Record Producer, or ISC Certification.
SailPoint Demo Pages
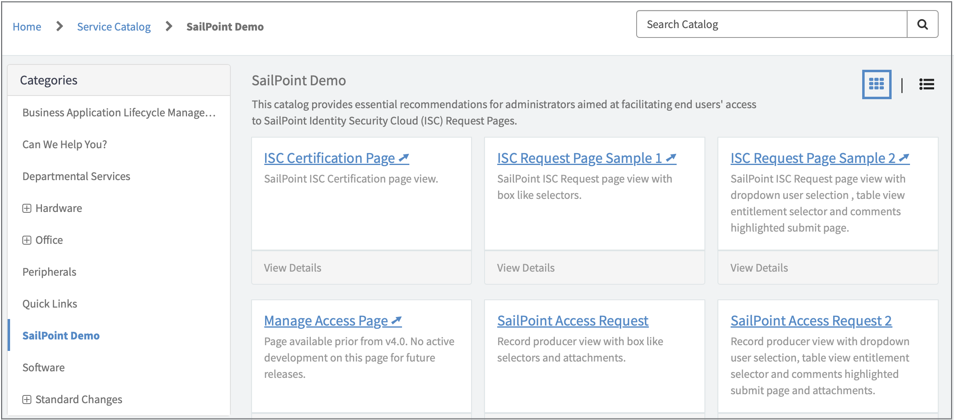
The SailPoint Demo category has been included to the Service Catalog, featuring links to all custom pages and record producers provided Out Of The Box (OOTB). Users with the x_sap_intidn.sapadmin role can view this category and customize it according to their needs.
Screenshot
Manage Access
As an Administrator, you must add a Manage Access link to the Service Portal menu that users select to request access, as this is not done automatically via the app installation. Change the application scope to Global, then follow the process described to add a manage access link for users to request access.
To update the Service Portal Menu:
-
Use the search filter to search for Service Portal, then select Portals in the menu.
Screenshot

-
Select the Service Portal link listed to view its details.
-
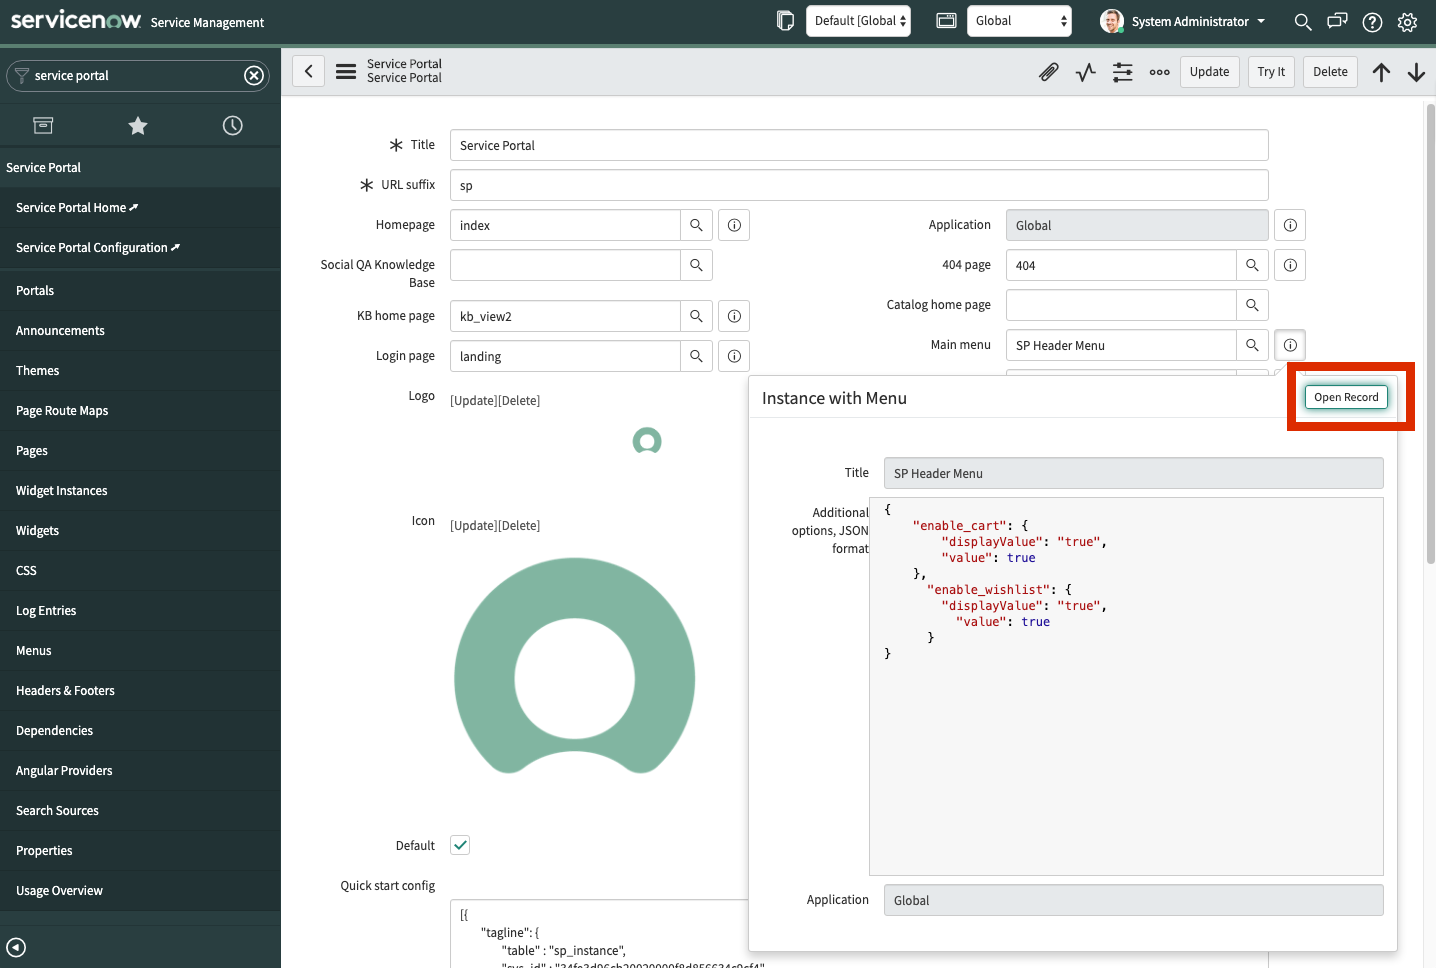
Select the Info icon on the Main menu and select Open Record in the Instance with Menu dialog.
Screenshot
-
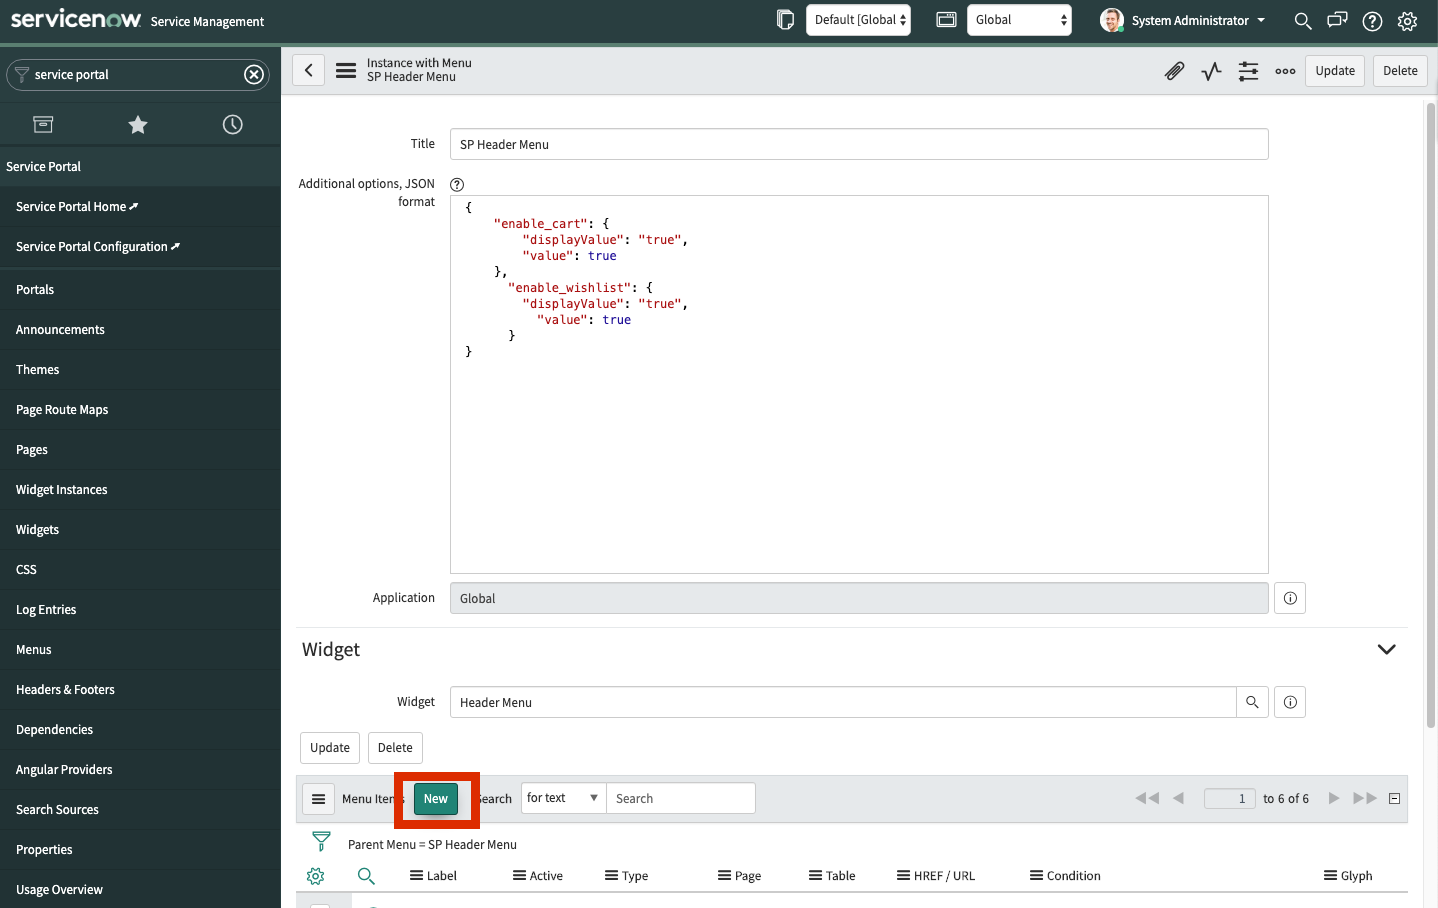
Locate the New button in the Widget section and select it to add a Manage Access (or similar) menu item for users to request the access they need.
Screenshot
-
Add the new menu item as follows:
Label: Enter Manage Access or a similar label for the menu item to give users the ability to request access.
Type: Select URL from the list.
HREF / URL: Enter the value required for the integration to work correctly:
?id=manage_accessCondition: Enter the value required for the integration to work correctly in this field:
GlideSPScriptable.canSeePage("manage_access")Screenshot

-
Select Submit to save changes and create the Manage Access menu item.
Screenshot

ISC Request
As an Administrator, you’ll need to add one of the SailPoint request page links to the Service Portal or Employee Center menu that users select to request access, as this is not done automatically via the app installation.
- Page 1: Title: ISC Request, Application: SailPoint IdentityNow for Service Catalog
- Page 2: Title: ISC Request 2, Application: SailPoint IdentityNow for Service Catalog
The pages can be used as is, however, SailPoint suggests you change them as per your theme, branding, and combination of suitable widgets.
Note
Widgets on the page can be moved around using Studio and by modifying the CSS along with the appropriate widget options. Changes to the widgets can be made by making a copy of these Read-Only widgets and applying them back to your pages.
ISC Certification
As an Administrator, you’ll need to add the SailPoint Certification page link to the Service Portal or Employee Center menu that users select to request access, as this is not done automatically via the app installation.
- Page: Title: ISC Certification, Application: SailPoint IdentityNow for Service Catalog
The page can be used as is, however, SailPoint suggests you change it as per your theme, branding, and combination of suitable widgets.
Note
Widgets on the page can be moved around using Studio and by modifying the CSS along with the appropriate widget options. Changes to the widgets can be made by making a copy of these Read-Only widgets and applying them back to your page.
Redirect SailPoint Certification Due Notifications
Redirect the SailPoint Certification Due Notifications to ServiceNow https://<servicenowinstance>/sp?id=isc_certification by modification of the notification template https://{tenant}.identitynow.com/ui/a/admin/global/email-templates/default/certification_due
SailPoint Record Producer
As an Administrator, you can let users request SailPoint entitlements via Record Producer view. The following Record Producers are added as part of the application. In the Accessibility tab, an end users Catalogs field is set as Service Catalog, and the Category is Can We Help You?. This may change based on your setup.
Screenshot

- Page 1: Name: Title: SailPoint Access Request, Application: SailPoint IdentityNow for Service Catalog
- Page 1: Name: Title: SailPoint Access Request 2, Application: SailPoint IdentityNow for Service Catalog
The Record Producers can be used as is, however, SailPoint suggests you change them as per your theme, branding, and combination of suitable widgets.
Note
Changes to the widgets can be made by making a copy of these Read-Only widgets and applying them back to your pages.
Applying Widget Options in Record Producers
- Go to Record Producer, and select Widget from the variables related list.
- In the Default Value tab, add or modify the JSON values.
- Save the changes.
Note
Record producer has the ability to attach attachments along with SailPoint record producers. The Default Attachment option needs to be selected. Every attachment in the record producer's record will be duplicated to the corresponding RITM records.
Documentation Feedback
Feedback is provided as an informational resource only and does not form part of SailPoint’s official product documentation. SailPoint does not warrant or make any guarantees about the feedback (including without limitation as to its accuracy, relevance, or reliability). All feedback is subject to the terms set forth at https://developer.sailpoint.com/discuss/tos.