Configuring SailPoint for ServiceNow Service Desk
In SailPoint, configure the following items for your ServiceNow Service Desk Integration:
On the Summary panel you can review the general settings and parameters for the connectivity and authentication.
Note
All activity on the Service Desk connector appears as events in Search and on the Activity tab of an identity.
Ticket Creation
A ticket contains the relevant data required for further processing. You can create a ticket for your integration for a centralized approach spanning many users and resources to strengthen IT controls and provide proof of compliance to auditors and executive management.
Note
Currently, ServiceNow Service Desk UI Integration only supports Service Request and Incident ticket types.
Service Request
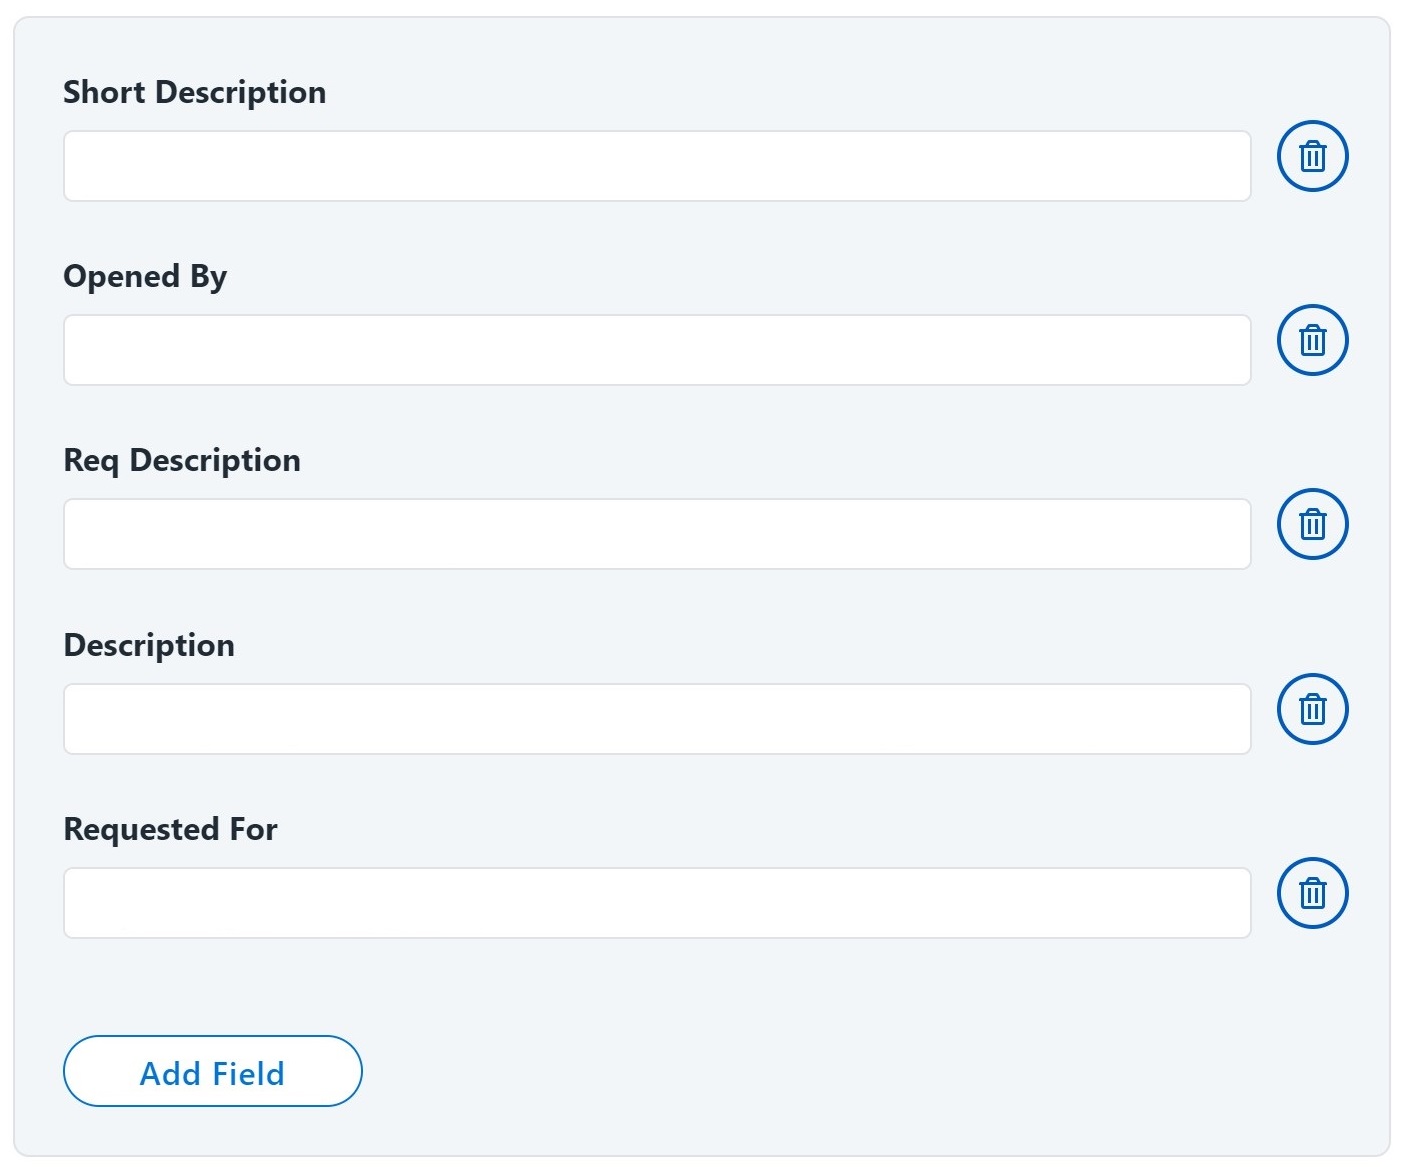
The contents of a service request define the components of the SailPoint provisioning task that are added to the ServiceNow ticket. SailPoint recommends that you include the Apache Velocity variables, as needed, to meet your specific use cases.
For each ticket created by the integration, a request is created that includes the approval flow along with an RITM (request item) as a child of the request to be completed in a ServiceNow managed system.
Screenshot
Note
The default setting tracks REQ tickets. To track RITM, go to Add Field settings to add a new field to track RITM.
- Enter the Short Description for the ticket that you are creating. For example,
SailPoint Access Request $!plan.arguments.identityRequestId. -
Enter the Opened By with the
sys_idfor the ServiceNow user from the Requester Source on SailPoint. The default value is$!{plan.arguments.opened_by|'Default_ServiceNow_Account_Sys_ID'}.In the default value provided above, replace
Default_ServiceNow_Account_Sys_IDwith the actual service account'ssys_id. -
Enter the Req Description of the requirement that generated the ticket. For example,
Service Request created by Service Desk Integration Module (SIM). -
Enter additional details in the Description field. For example:
#if($request.operation == 'Create') Create Account on application $request.resource #else For $request.id in application $request.resource #end #if ($request.items) $newline #foreach ($item in $request.items) #if ($item.name == '*disabled*' && $item.value == 'true') Disable Account. $newline #elseif ($item.name == '*disabled*' && $item.value == 'false') Enable Account. $newline #elseif ($item.name == '*locked*' && $item.value == 'false') Unlock Account. $newline #else $!item.Operation $item.name: $item.value $newline #end #end #else $newline $!request.Operation Account #end -
Enter the Requested For with the
sys_idof a ServiceNow account for creating a ticket. Alternatively, you can use the existing variable. An admin can create a ticket for an employee or request a ticket for themselves. For example,$!plan.arguments.requested_for.
Add Field
To add a field in ticket creation, select Add Field and enter the relevant details for the new field. The field types are:
- Single Value
- Multi Valued Field
- Grouped Key-Value Pair
For example, if you want to add a Single Value custom attribute such as custom_attr in the request to the ServiceNow managed system, add the custom_attr field using the Single Value type. The corresponding value can be either static or dynamic. For the dynamic value, use a Velocity Template Expression. On the ServiceNow managed system, ensure that the Catalog Item has the custom_attr variable.
Track RITM
Select Single Value. Add the following details:
- Name =
track_ritm - Value =
true
Note
The ticket number generated on the Service Desk system for the corresponding provisioning action can be seen under Search > Account Activity details of the identity. For more information, refer to Account Activity Using Search.
Incident
Screenshot
-
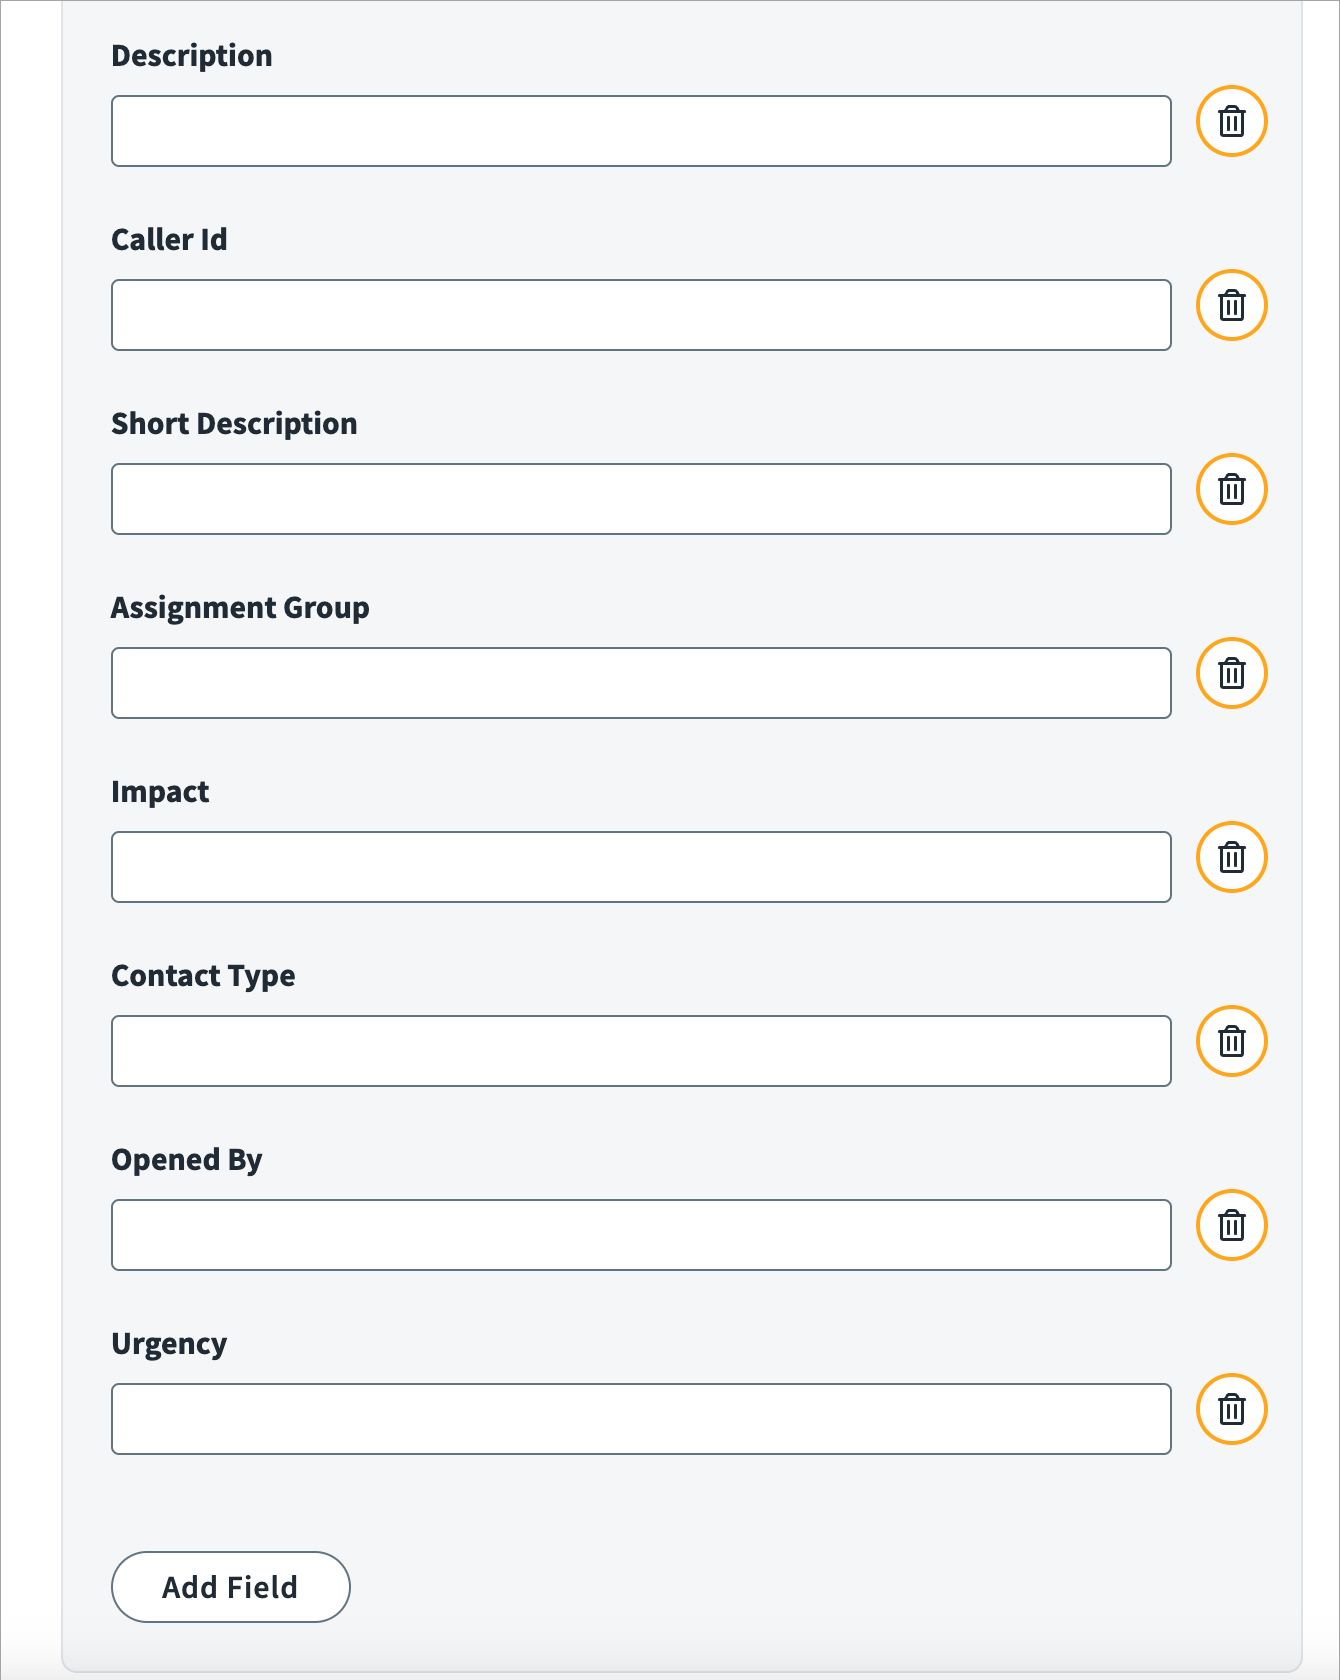
Enter the Description for the Incident that you are creating. For example:
#foreach($req in $plan.requests) #if($req.operation == 'Create') Create Account on application $req.resource #elseif($req.operation == 'Delete') Delete Account on application $req.resource For $req.id #if($req.arguments.comments) Comments: $req.arguments.comments #end #else For $req.id in application $req.resource #if($req.arguments.comments) Comments: $req.arguments.comments #end #end #if($req.items) $newline #foreach($item in $req.items) #if($item.name == '*disabled*' && $item.value == 'true') Requested action from SailPoint: Disable Account #elseif($item.name == '*disabled*' && $item.value == 'false') Requested action from SailPoint: Enable Account #elseif($item.name == '*locked*' && $item.value == 'false') Requested action from SailPoint: Unlock Account #else $!item.Operation $item.name: $item.value #if($item.arguments.comments) Comment from SailPoint: $item.arguments.comments #end #end $newline #end #end #end -
Enter the Caller ID with the
sys_idfor the ServiceNow user from the Requester Source on SailPoint. The default value is$!plan.arguments.requested_for. - Enter the Short Description of the raised Incident ticket. For example,
SailPoint Access Request $!plan.arguments.identityRequestId. - Enter the Assignment Group (the group of users that are responsible for the Incident record). The default value is
Service Desk. - Enter the Impact level of the ticket. The default value is
3. - Enter the Contact Type (the type of contact that created the ticket). The default value is
email. -
Enter the Opened By with the
sys_idfor the ServiceNow user from the Requester Source on SailPoint. For example,$!{plan.arguments.opened_by|'Default_ServiceNow_Account_Sys_ID'}.In the provided default value, replace
Default_ServiceNow_Account_Sys_IDwith the actual service account'ssys_id. -
Enter the Urgency for the Incident. The default value is
3.
Add Field
To add a field in ticket creation, select Add Field and enter the relevant details for the new field. The field type is:
- Single Value
- Multi Valued Field
- Grouped Key-Value Pair
For example, if you want to add a Single Value custom attribute such as u_custom_attr in the request to the ServiceNow managed system, add the u_custom_attr field using the Single Value type. The corresponding value can be either static or dynamic. For the dynamic value, use a Velocity Template Expression. On the ServiceNow managed system, ensure that the x_sap_sdim_incident transform table has the u_custom_attr variable.
Note
The ticket number generated on the Service Desk system for the corresponding provisioning action can be seen under Search > Account Activity details of the identity. For more information, refer to Account Activity Using Search.
Create Ticket Advanced Properties
Service Request
Select View Advanced Properties to add other details of the ticket.
Screenshot
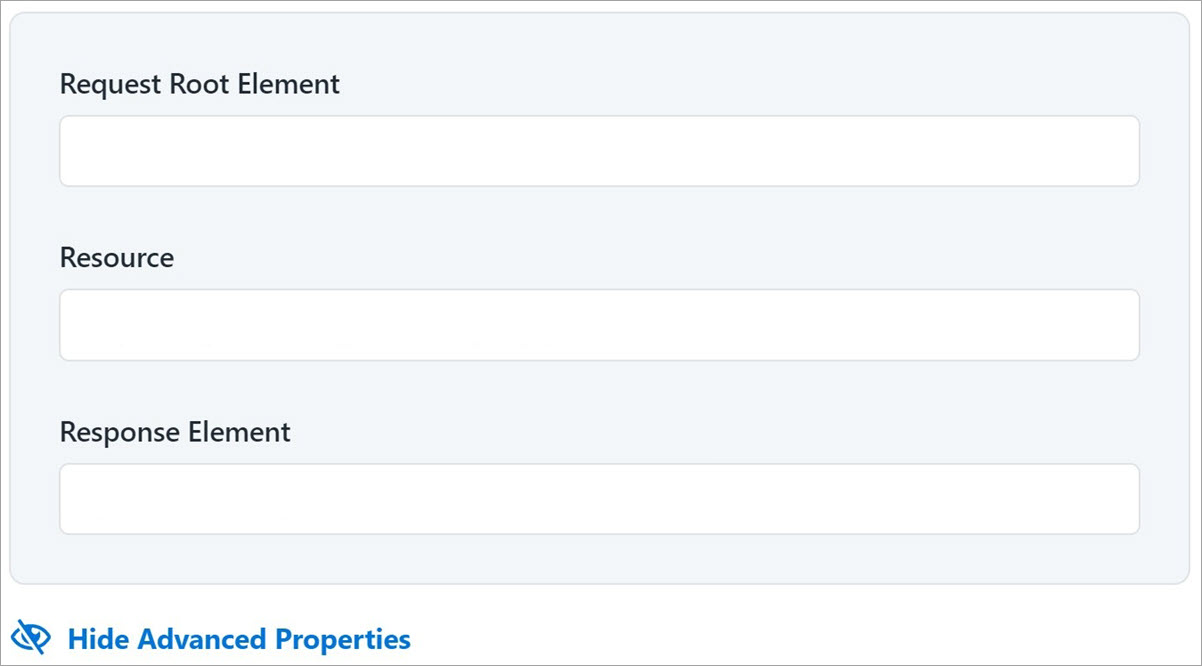
- Enter the basic element of the request ticket in the Request Root Element field. The value represents the JSON root element in a request.
- Enter the resource used for the request ticket in the Resource field. This is the ticket creation REST endpoint. Do not provide the base URL for the instance in the value. The base URL is appended to this endpoint value. Enter only the remaining endpoint URL. For example,
/api/x_sap_sdim/sailpoint_cart_js_api/create_ticket. - Enter the response code for the request ticket in the Response Element field. This value is a JSON path expression that provides information about where to find a ticket number. For example:
- For REQ:
$.result.request_number - For RITM:
$.result.items
- For REQ:
Incident
Select View Advanced Properties to add other details of the ticket.
Screenshot
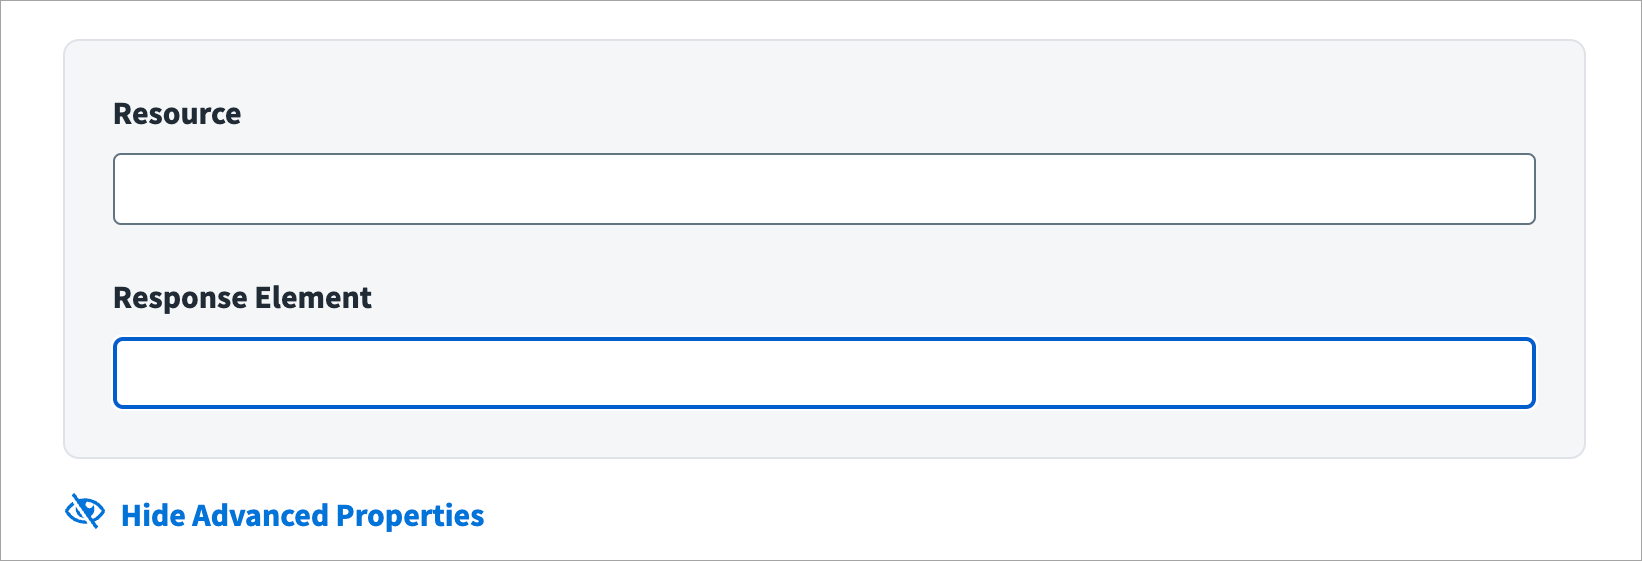
- Enter the resource used for the incident in the Resource field. This is the ticket creation REST endpoint. Do not provide the base URL for the instance in the value. The base URL is appended to this endpoint value. Enter only the remaining endpoint URL. For example,
/api/now/import/x_sap_sdim_incident. - Enter the response code for the incident in the Response Element field. This value is a JSON path expression that provides information about where to find a ticket number. For example,
result[0].display_value.
Catalog Mapping for Service Requests
A catalog item defines how a provisioning action item on a source produces a ticket for a specific ServiceNow catalog item. It defines the mapping between the sources in the source parameter and the related item at the ServiceNow managed system. A provisioning action item and catalog item have unique codes.
Screenshot
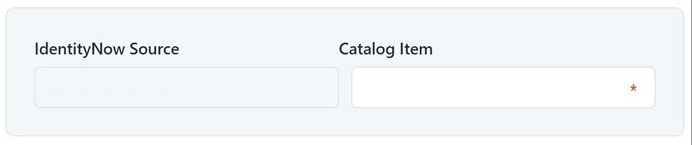
- The SailPoint Source value is auto-populated from Settings > General Settings > Sources directly.
- Enter the system ID (
sys_id) of the ServiceNow catalog item in the Catalog Item field. For example,8053818edbffb300e90690b3db9619c4.
Status Mapping
Service Request Tickets
You can map the status of the service request to the corresponding status of activity on the ServiceNow Service Desk managed system.
Screenshot
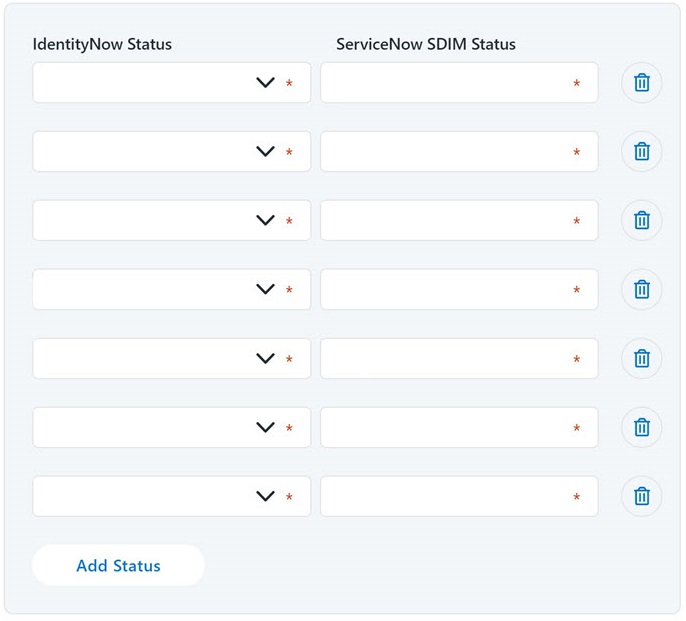
Select Add Status to add another row for status mapping.
For SailPoint, the types of status are:
- Committed
- Queued
- Failed
For the ServiceNow Service Desk managed system, the statuses for tracking REQ are:
- requested
- in_process
- closed_complete
- closed_incomplete
- closed_canceled
- closed_rejected
- closed_skipped
For the ServiceNow Service Desk managed system, the statuses for tracking RITM are -5, 1, 2, 3, 4, and 7.
Incident Tickets
You can map the Incident status to the corresponding activity status on the ServiceNow Service Desk managed system.
Note
In an Incident ticket, the status map closure code has a higher precedence than the status.
Screenshot
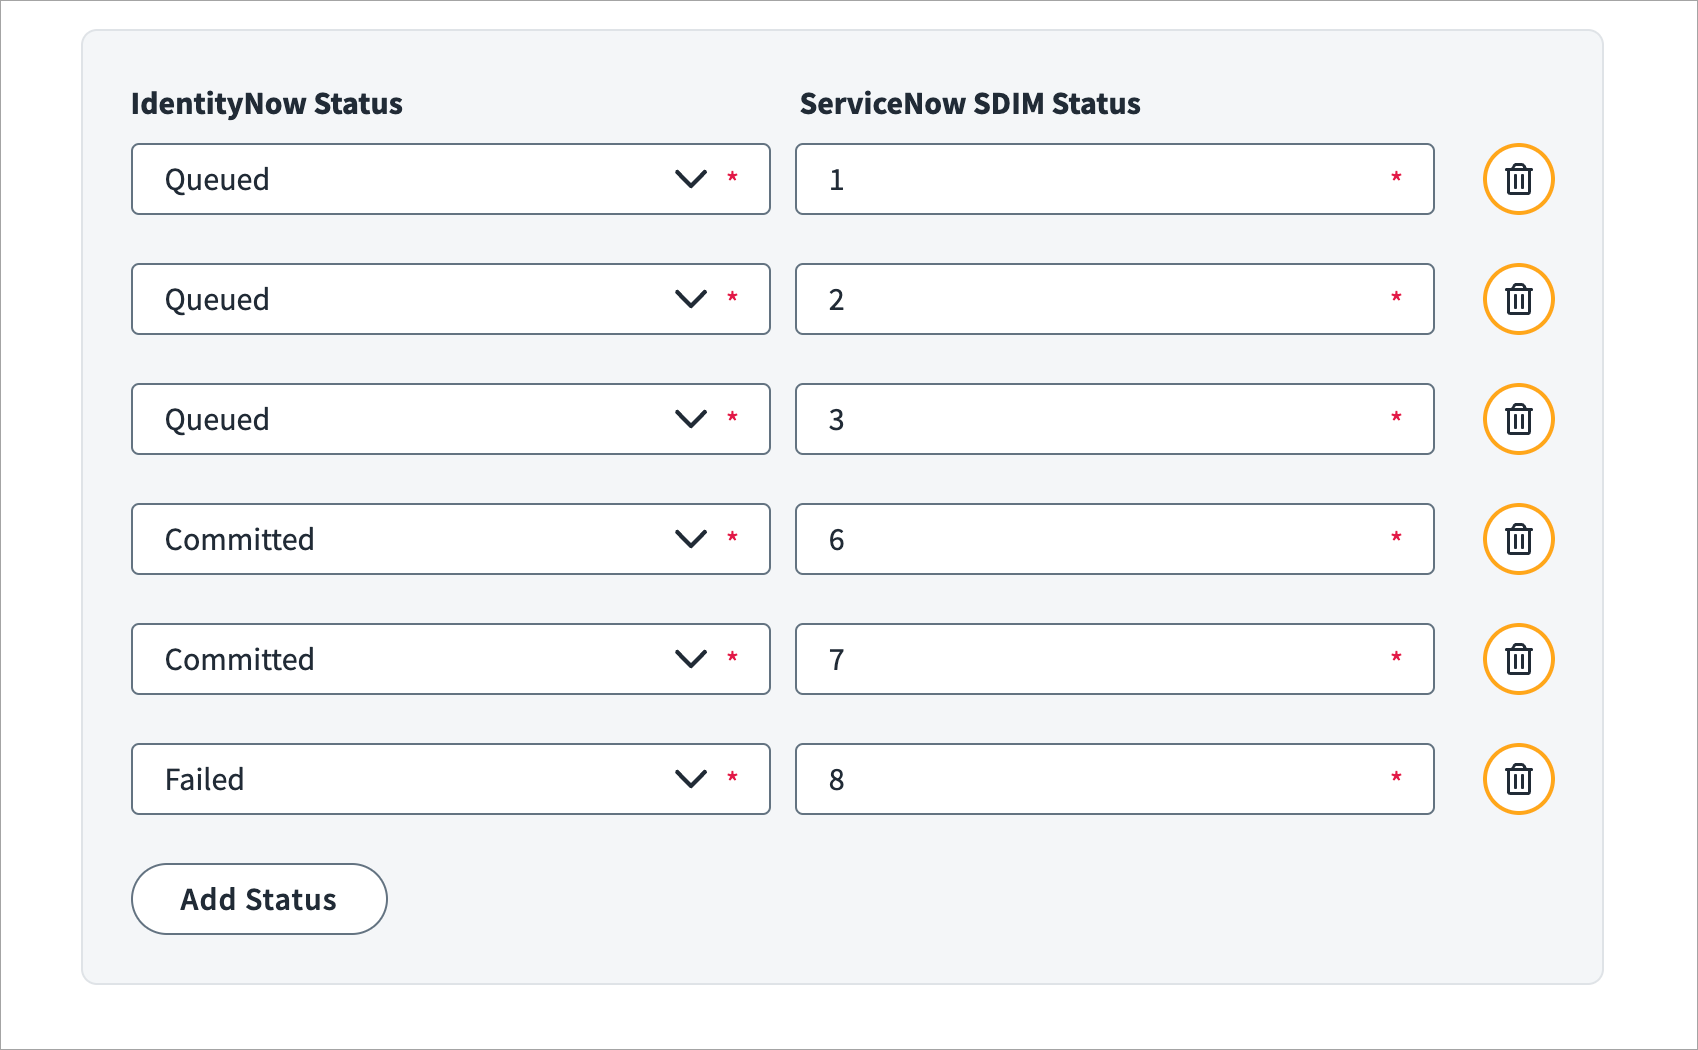
Select Add Status to add another row for status mapping.
For SailPoint, the types of status are:
- Committed
- Queued
- Failed
For the ServiceNow Service Desk managed system, the statuses for Incidents are 1, 2, 3, 6, 7, and 8.
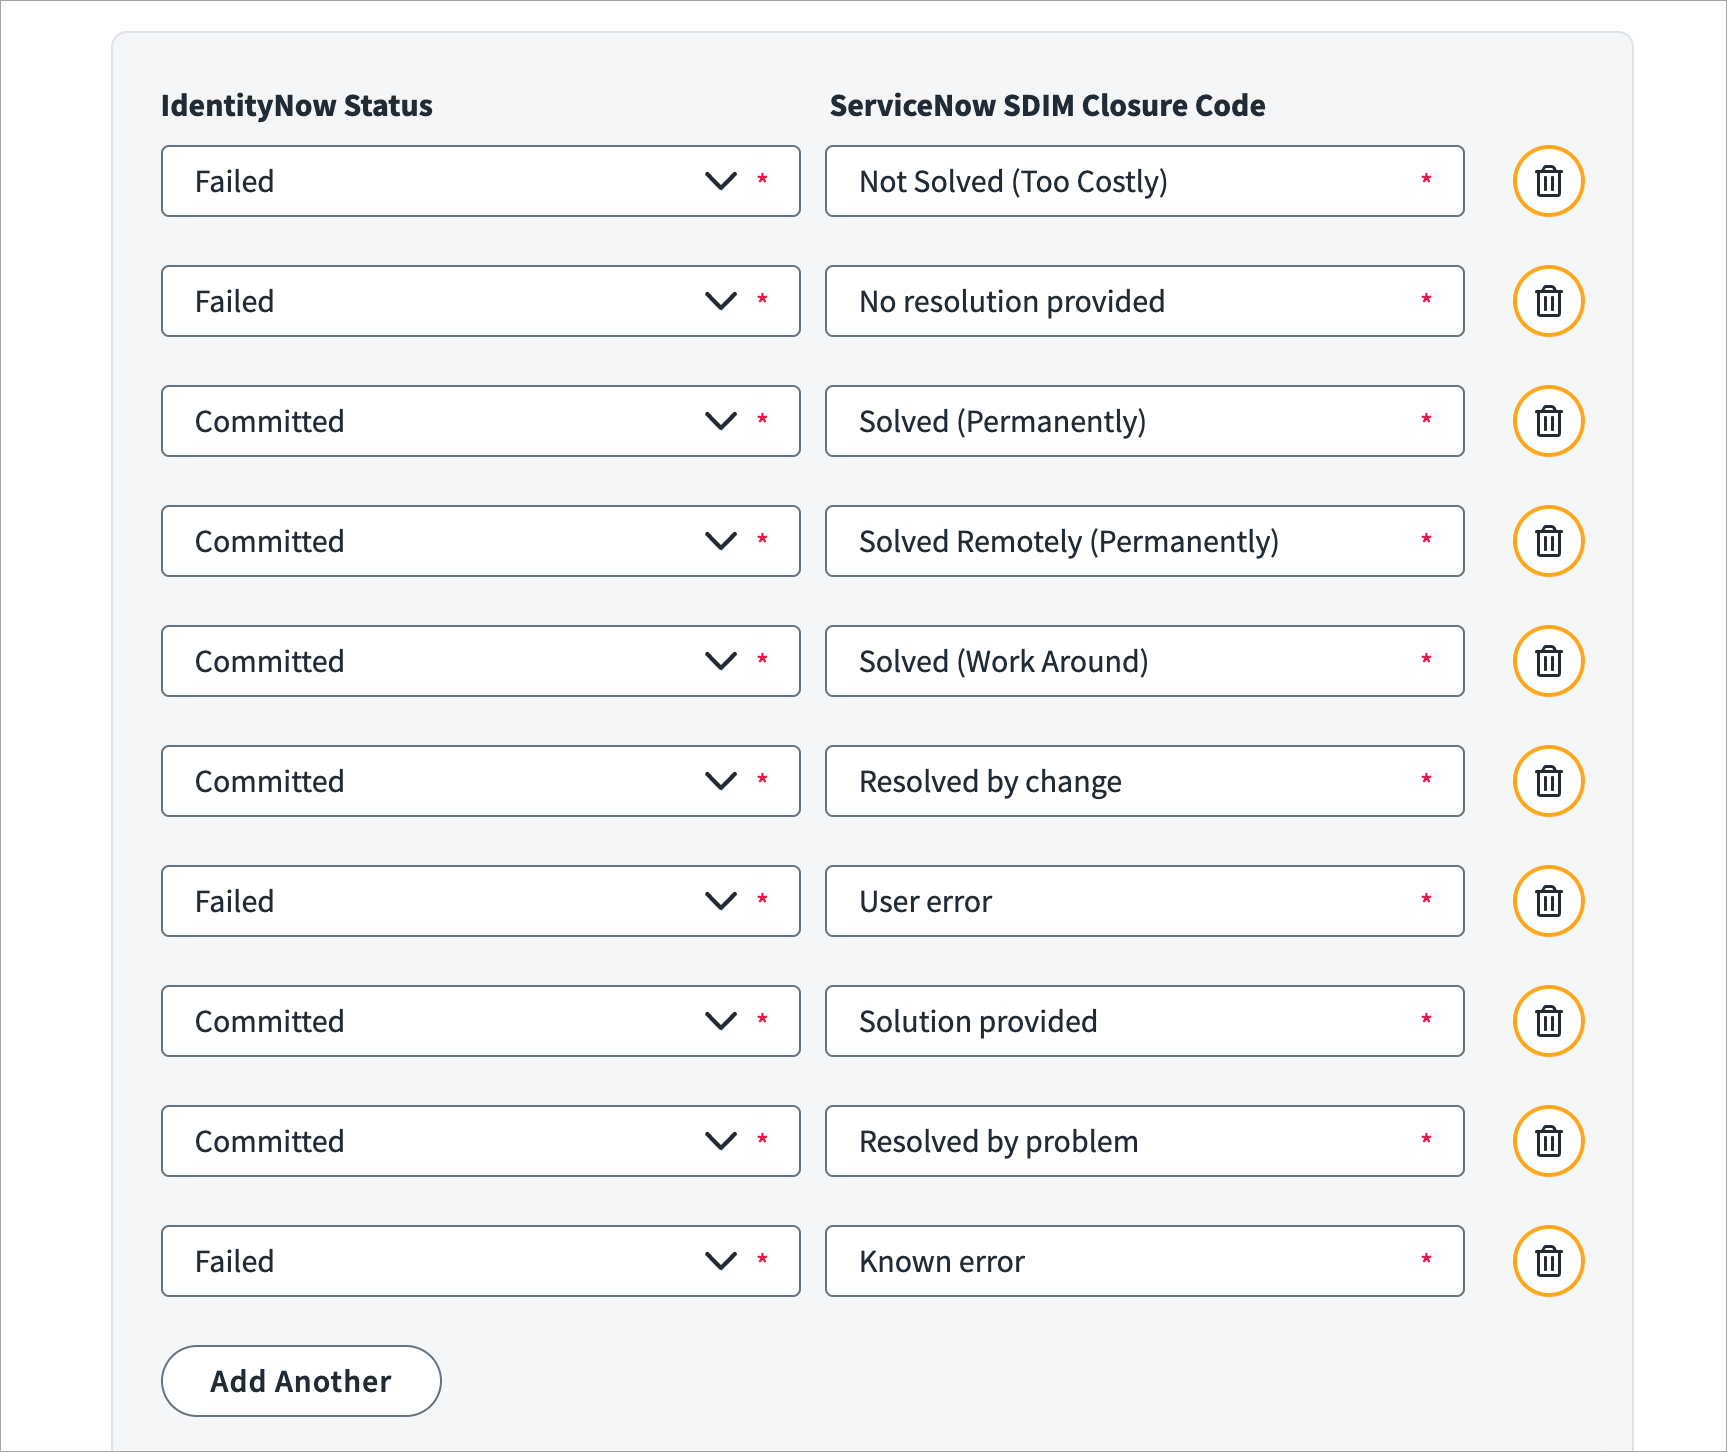
For SailPoint, the types of statuses for closure codes are:
- Committed
- Failed
For the ServiceNow Service Desk managed system, the types of ServiceNow SDIM Closure Codes for Incidents are:
- Solved (Work Around)
- Solved (Permanently)
- Solved Remotely (Work Around)
- Solved Remotely (Permanently)
- Closed/Resolved by Caller
- Not Solved (Not Reproducible)
- Not Solved (Too Costly)
- Duplicate
- Known error
- No resolution provided
- Resolved by caller
- Resolved by change
- Resolved by problem
- Resolved by request
- Solution provided
- Workaround provided
- User error
Adding or Removing Statuses
You can add or delete statuses in the Status Mapping section as needed for your organization. The ServiceNow SDIM UI Integration checks the status on tickets at regular intervals. The status must have at least one committed value. For more information on status check configuration, refer to the SailPoint Developer Portal:
- Getting the time check configuration of queued SDIM tickets
- Updating the time check configuration of queued SDIM tickets
Status Mapping Advanced Properties
Service Request Tickets
Select View Advanced Properties to add other details of the status mapping.
Screenshot
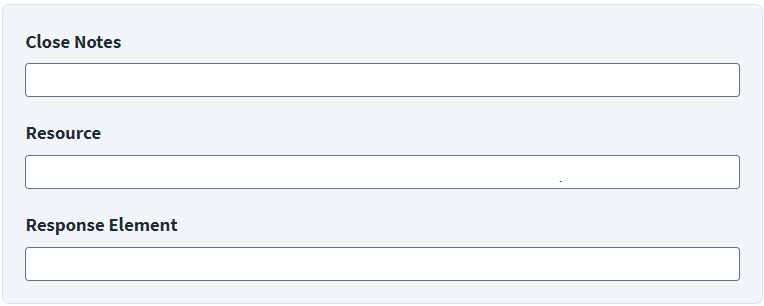
- Enter the ServiceNow ticket field for fetching the resolution comments as closing notes in Close Notes. For example,
$.result[0].close_notes. - Enter the resource used for the status mapping in Resource. For example:
- For REQ:
/api/now/table/sc_request?number=$ticketId&sysparm_fields=request_state,close_notes - For RITM:
/api/now/table/sc_req_item?number=$ticketId&sysparm_fields=state
- For REQ:
- Enter the response code for the status mapping in Response Element. This value is a JSON path expression that has information on the service request status. For example:
- For REQ:
$.result[0].request_state - For RITM:
$.result[0].state
- For REQ:
Incident Tickets
Select View Advanced Properties to add other details of the status mapping.
Screenshot
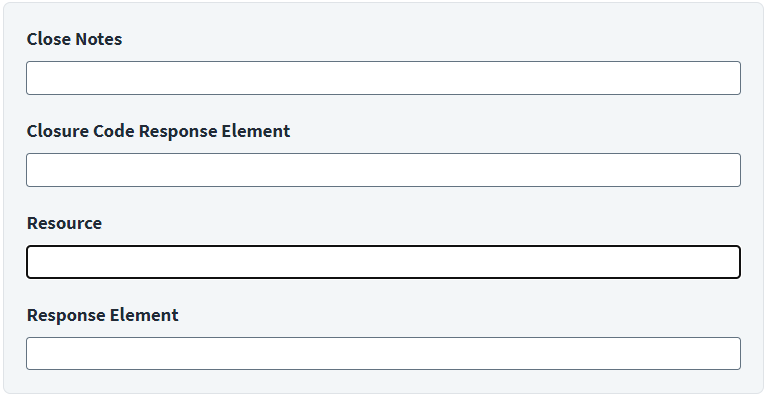
- Enter the ServiceNow ticket field for fetching the resolution comments as closing notes in Close Notes. For example,
$.result[0].close_notes. - Enter the response code for the status mapping in Closure Code Response Element. This value is a JSON path expression that has information on the incident status. For example,
result[0].display_value. - Enter the resource used for the Incident in Resource. This is the check status REST endpoint. Do not provide the base URL value. The base URL is appended to this endpoint value. Provide only the remaining endpoint URL. For example,
/api/now/table/incident?number=$ticketId&sysparm_fields=incident_state,close_code,close_notes. - Enter the response code for the status mapping in Response Element. This value is a JSON path expression that has information on the incident status. For example,
$.result[0].incident_state.
Customize Ticket Fields
You can customize the ticket fields based on your requirements. You can set up a Before Provisioning rule to generate ticket fields.
Moving from Plan Initializer Script Rule to Before Provisioning Rule:
- Create a rule with a distinct name that is different from the default rule name (Sample Before Provisioning Rule for SDIM). You can set this new rule for the integration using API. For more information, refer to Service Desk Integration Update - PATCH API. If you are using the out-of-the-box PlanInitializerScript in your ServiceNow Service Desk integration, use the Service Desk Integration Update - PATCH API to update the integration to use the out-of-the-box Before Provisioning rule.
- If you have customized the out-of-the-box PlanInitializerScript in your ServiceNow Service Desk integration, contact SailPoint Services for setting up a Before Provisioning rule for your integration. Then use the Service Desk Integration Update - PATCH API to update the integration to use the new Before Provisioning rule.
- After completing the previous two steps, raise a support request at support@sailpoint.com to enable the feature flag
GOV_DISABLE_PLAN_INITIALIZERin your SailPoint instance.
Requester Source
In the Requester Source field, enter the source name through which the ServiceNow Service Desk system's users are aggregated.
Screenshot

Linking with SailPoint Service Catalog
If you have both the SailPoint for Service Catalog and SailPoint for Service Desk store applications installed on the same ServiceNow instance, you can link the tickets created by both applications. The default setup links both tickets using the parent field on tickets created by SailPoint for Service Desk, so you can use out-of-the-box related lists to show the linked records on requested items created by SailPoint for Service Catalog.
-
Sign in to your ServiceNow instance as an administrator, type
sys_properties.FILTERin the application navigator, and press Enter to go to System Properties.Screenshot

-
Search for the
x_sap_sdim.relationship_field_nameproperty name.Screenshot

-
The default value is set to
correlation_id. Update the value to a different field from the request (sc_request) table if you're usingcorrelation_idfor another integration. If you're using the incident as a ticket type, this field should be from the incident (incident) table.Note
The value in this field is overwritten by the integration, so you must ensure the value is not used by any out-of-the-box or custom code.
-
Select Save. Now you must update field mapping in the Service Desk application on SailPoint.
Field Mapping for Service Request Tickets:
-
Sign in to your SailPoint instance as an administrator, and go to Connections > Service Desk.
Screenshot

-
To edit the Service Desk application that you're using to create service requests, select Configure.
Screenshot
-
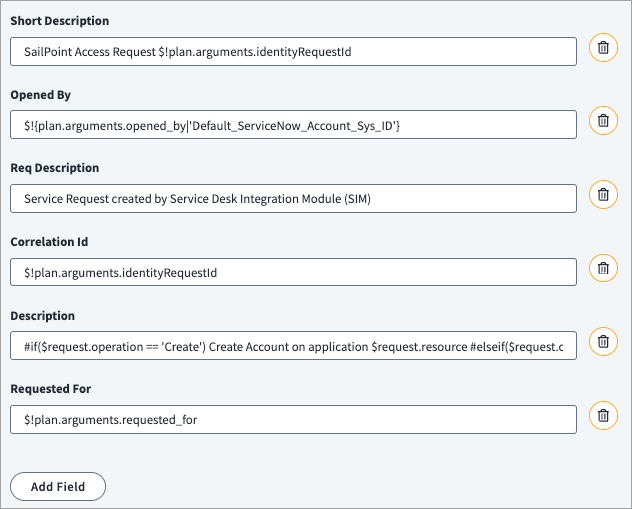
Under Ticket Creation, select Add Field.
Screenshot

-
Select the Field Type as
Single Value. Copy the same field Name that you entered in the property forx_sap_sdim.relationship_field_name, and specify the Value as$!plan.arguments.identityRequestId.Screenshot

-
Select Save. The list of fields displays.
Screenshot
Field Mapping for Incident Tickets:
-
Sign in to your SailPoint instance as an administrator, and go to Connections > Service Desk.
Screenshot
-
To edit the Service Desk application that you're using to create incidents, select Configure.
Screenshot
-
Under Ticket Creation, select Add Field.
Screenshot

-
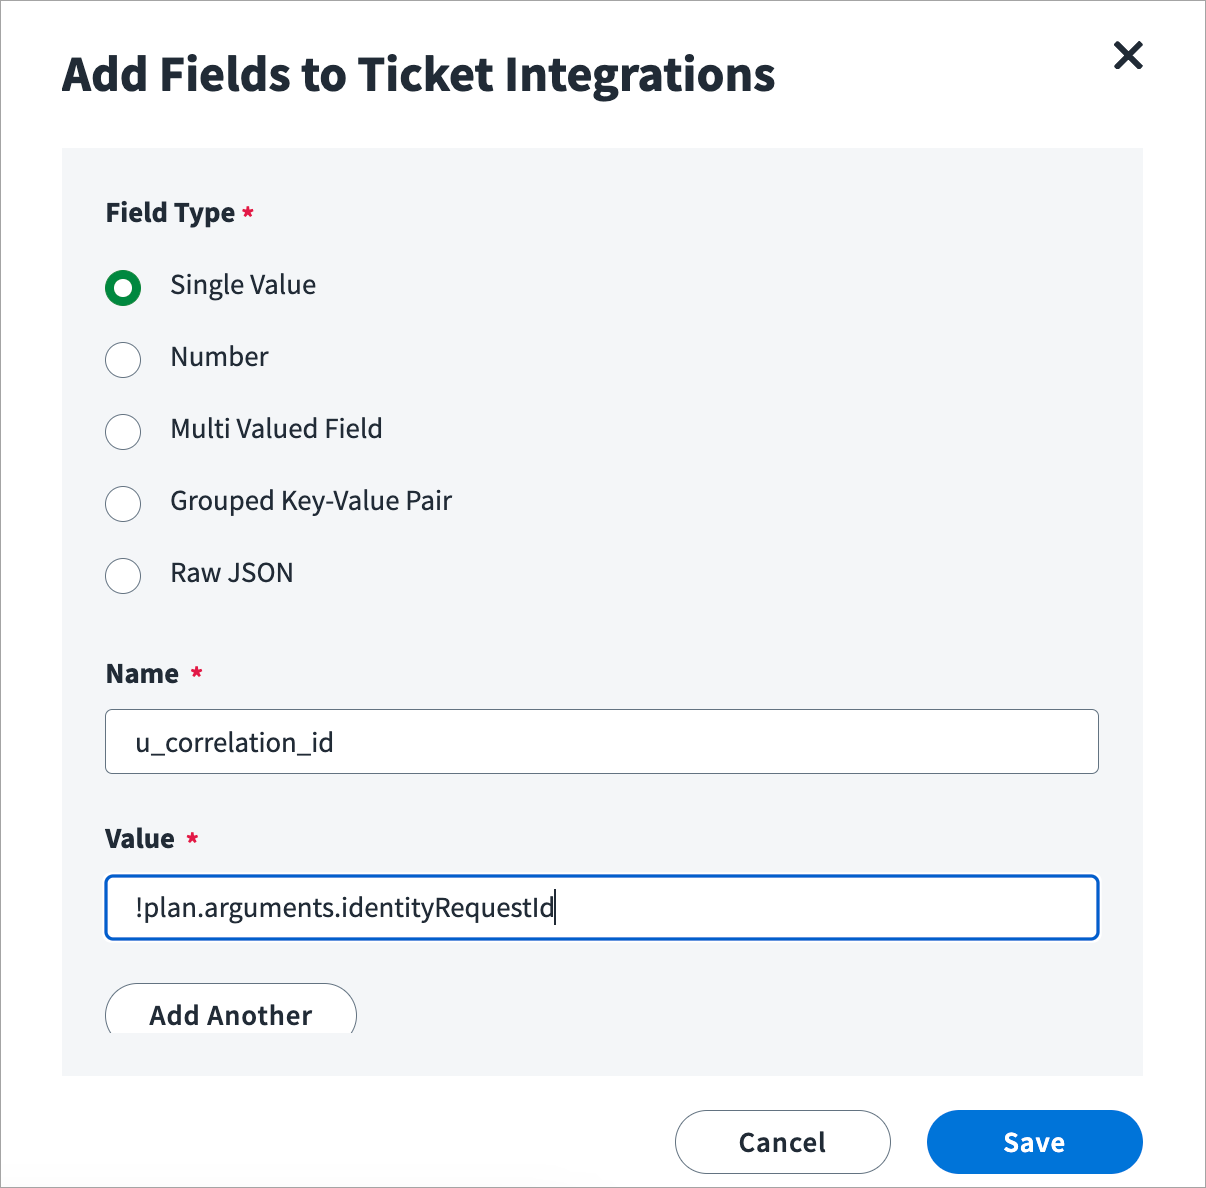
Select the Field Type as
Single Value. Copy the same field Name that you entered in the property forx_sap_sdim.relationship_field_name, prepended withu_. For example, if the property name iscorrelation_id, addu_correlation_idas the name. Specify the Value as$!plan.arguments.identityRequestId.Screenshot
-
Select Save. The list of fields displays.
Screenshot

Documentation Feedback
Feedback is provided as an informational resource only and does not form part of SailPoint’s official product documentation. SailPoint does not warrant or make any guarantees about the feedback (including without limitation as to its accuracy, relevance, or reliability). All feedback is subject to the terms set forth at https://developer.sailpoint.com/discuss/tos.