Connecting SailPoint and SAP GRC
To connect SailPoint with SAP GRC, perform the following tasks:
Adding the Source in SailPoint
To connect to SailPoint, perform the following steps. Once the connection is made, you can configure it to meet your company's needs.
Important
By default, the provisioning feature is disabled, and the connector only supports read-only operations. To support provisioning operations, you must manually enable the feature in the source configuration.
To configure a new source:
- Sign in to SailPoint.
- Go to Admin > Connections > Sources.
- Select Create New.
- Search for the connector by entering the name in the search box, and then select Configure.
- In the Source Name field, enter a unique and descriptive name for your source. Source names cannot exceed 128 characters.
- In the Description field, provide additional details about the source to help distinguish it from similar sources. This field allows a maximum of 2,000 characters.
- In the Source Owner field, begin typing the name of an owner. Matches appear after you type two or more letters. For more information, refer to Assigning a Source Owner.
-
Under Connection Type, select Direct Connection or Flat File.
- Direct Connection - A direct connection fetches data from the Virtual Appliance Cluster you choose as the application connector for the source. A direct connection configuration allows for real-time updates. For more information about configuring and deploying virtual appliances, refer to the Virtual Appliance Reference Guide.
- Flat File - Select the flat file if no connector is available, or if another system restricts the connection. This option allows only reading and aggregating data as a generic/delimited application. Provisioning activity is unsupported, and additional configuration pages like connection settings and aggregation settings are unavailable.
-
If you selected Direct Connection, in Virtual Appliance Cluster, select the virtual appliance cluster that will be used as the application connector for the source.
- (Optional) Select a governance group to grant its members source or role sub-admin level oversight of the source and its access. For more information, refer to Creating and Managing Governance Groups.
- If this source represents a primary system containing your organization's personnel records, select the Authoritative Source checkbox. For more information, refer to Creating Identity Profiles.
- Select Continue. The source is created, and you are navigated to the Source Setup > Base Configuration page. Continue to configure your connected source there.
Base Configuration
Provide the base configuration parameters. Information you entered in the Create New Source dialog is automatically entered into the fields in the Base Configuration page. You can edit this information if necessary.
- Enter a unique name and description for the source.
-
In the Source Owner dropdown list, select the identity that owns this source.
- To find a source owner, begin entering their name.
-
In the Virtual Appliance Cluster dropdown list, select the virtual appliance to use when communicating with your organization's systems. For more information, refer to SailPoint Virtual Appliances.
-
(Optional) If enabled for your organization, select the Use a Credential Provider checkbox to manage the source's authentication using a credential provider.
Note
To add a credential provider, go to Admin > Connections > Credential Providers. For more information about credential providers, refer to Credential Providers.
-
Configure the authentication to allow SailPoint to connect to the source. Refer to Connection Settings for more information.
-
(Optional) In the Governance Group for Source Management dropdown list, select a governance group to associate with this source. For more information about governance groups, refer to Associating Governance Groups with a Source.
-
(Optional) Choose whether to enable or disable provisioning for the source. Provisioning is disabled by default.
-
Enable Provisioning - Set the toggle to Enabled to allow the source to create, update, and deactivate accounts in the connected source system.
-
Disable Provisioning - Set the toggle to Disabled to disable provisioning for the source. Disabling provisioning will prevent the creation, updating, or deactivating of accounts on this source.
-
-
Drag and drop the required files into the Upload Files box, or upload them from your computer.
Warning
Ensure that the file you upload is not vulnerable or malicious.
Upload the
sapjco3.jarandlibsapjco3.sofiles. Download the JCO libraries (JCO Release 3.1.x) from the SAP customer service marketplace. -
Select Save.
Connection Settings
This section contains the information that SailPoint uses to authenticate with the managed system. After you select Connection Settings the following page is displayed.
Screenshot
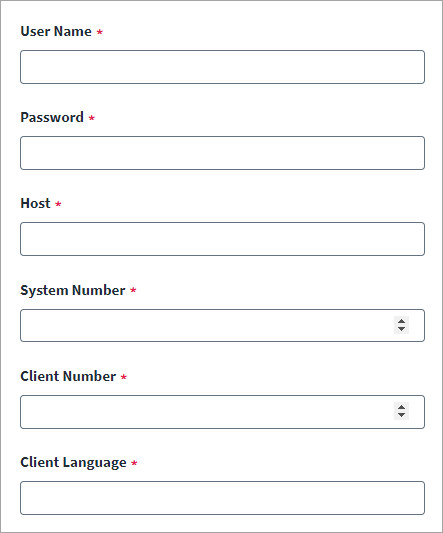
- Enter the User Name with the appropriate permissions.
- Enter the Password of the user.
-
Enter the Host on which the SAP service is running.
Note
The server must have Java Connector (JCo) enabled.
-
Enter the two digit System Number that was generated during the SAP system installation.
- Enter the three digit client ID or Client Number to use while connecting to SAP.
- Enter the two character code for the Client Language used by the application.
-
Select the option to Enable IAG Bridge configurations (optional).
Screenshot

-
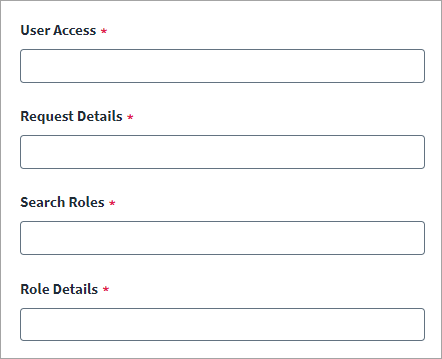
Complete the Webservice URL Configuration by inserting the URL for each required web service:
Screenshot
-
User Access
For example,
-
Request Details
For example,
-
Search Roles
For example,
-
Role Details
For example,
For more information, refer to Obtain the SAP GRC URLs.
-
-
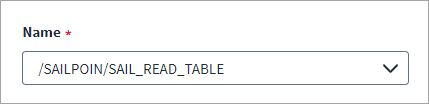
Select the Name of the Function Module Configuration as per your SAP Basis Version.
Screenshot
-
Select Save.
Configuring Secure Network Communication (SNC)
This section contains the information for the Secure Network Communication (SNC) configuration. SNC protects the logical link between the end points of a communication.
Note
For prerequisites, refer to SAP Secure Network Communication (SNC) For SAP Source in the Compass community.
Screenshot
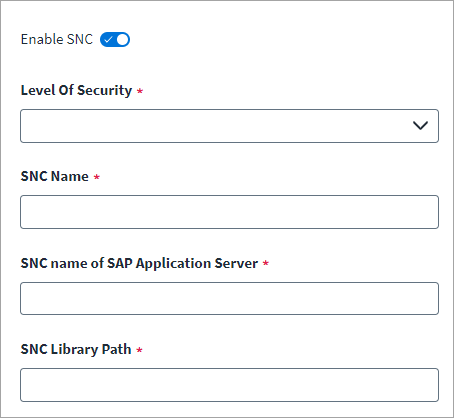
- Select the option to Enable SNC.
- Select a Level of Security. Each level sets the Quality of Protection (QOP) level. In SAP, it relates to
jco.client.snc_qop. - Enter the name that internally identifies in SNC Name. In SAP, it relates to
jco.client.snc_myname. -
Enter the SNC partner's name in SNC Name of SAP Application Server. If SNC is configured in SAP, it relates to
jco.client.snc_partnername.For example, provide input as
p:CN=R3, O=XYZ-INC, C=ENin SAP. -
Enter the path to the library that provides the SNC service in SNC Library Path. In SAP it relates to
jco.client.snc_lib. - Select Save.
Configuring Aggregation Settings
Configure the aggregation filters to determine which accounts are aggregated.
Note
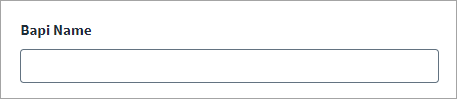
These attributes will be aggregated from a custom Business Application Programming Interface (BAPI). Creating a Custom Business Application Programming Interface (BAPI) is required to aggregate on these values.
Screenshot
Note
For more information about obtaining these values, refer to Finding Aggregation Values for Child Roles.
-
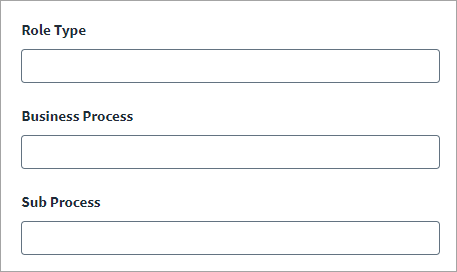
Provide the list of Role Types(s), Business Process(es), and Sub Process(es) to aggregate by entering them using commas to separate the values.
- Business Process(es) aggregate roles for only the specified business processes.
- Sub Process(es) only aggregates roles for the specified sub processes.
-
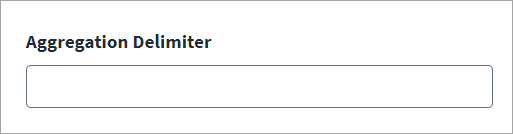
Specify the Aggregation Delimiter. The Aggregation Delimiter configuration is applicable only in the case of the '/SAILPOIN/SAIL_READ_TABLE' and the '/SAILPOIN/SAIL_READ_TABLE_LEG' Function Module.
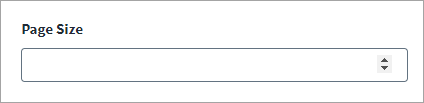
- Specify the Page Size for your Function Module Configuration. The Page Size is applicable for /SAILPOIN/SAIL_READ_TABLE.
-
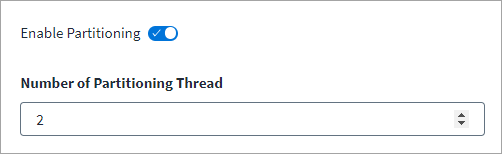
Select the Enable Partitioning option. Specify a number in Number of Partitioning Threads. Account Partitioning Aggregation allows processing of data in parallel, across multiple threads, to help increase the performance of aggregation tasks.
Note
- If the VA has configuration for multiple CPU cores a higher number of partition threads can be configured in order to improve performance.
- Account Partitioning configuration is supported only for SAP Basis version 751 or later.
-
(Optional) Specify the name of the BAPI configuration in BAPI Name. This allows you to aggregate based on additional account attributes such as Functional Area, User Group Assignments, and SNC-Name. For more information, refer to Creating a Custom Business Application Programming Interface (BAPI).
- Select Save.
Creating a Custom Business Application Programming Interface (BAPI)
You can aggregate the following attributes by manually adding them in the Schema Attributes section:
Screenshot
- Function: Use Function as the field name in the provisioning policy.
- SNC Name: Use SNC Name as the field name in the provisioning policy.
- Functional Area: Use function_area as the field name in the provisioning policy.
- User Group Assignments
- Logon Language
- Function
- Phone
- Department
SailPoint provides support for aggregation and provisioning of the additional attributes mentioned below. You must add these to the account schema and create a custom BAPI.
- Alias
- Personnel Number
- Company
- Parameters (Multi valued)
Important
After creating the BAPI, you must add the name of the BAPI under RFC_NAME in authorization object S_RFC in SAP GRC.
To create a custom BAPI:
In the GRC system, provide the input and output parameters.
Input
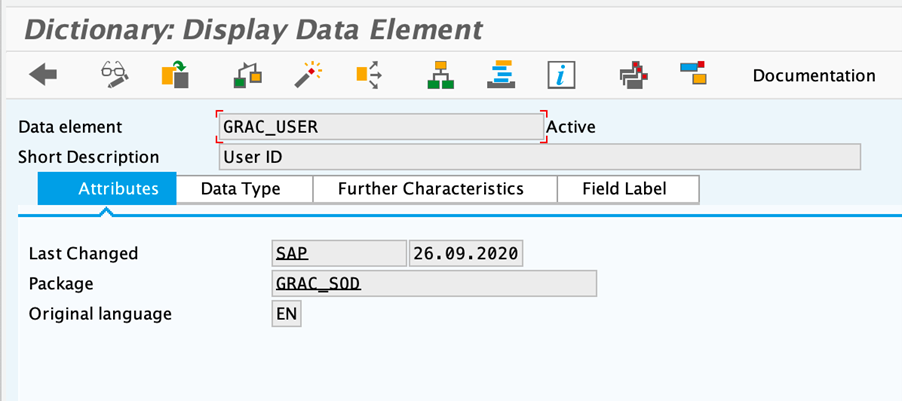
The input for the custom BAPI must be User_ID as described below:
Screenshot
Output
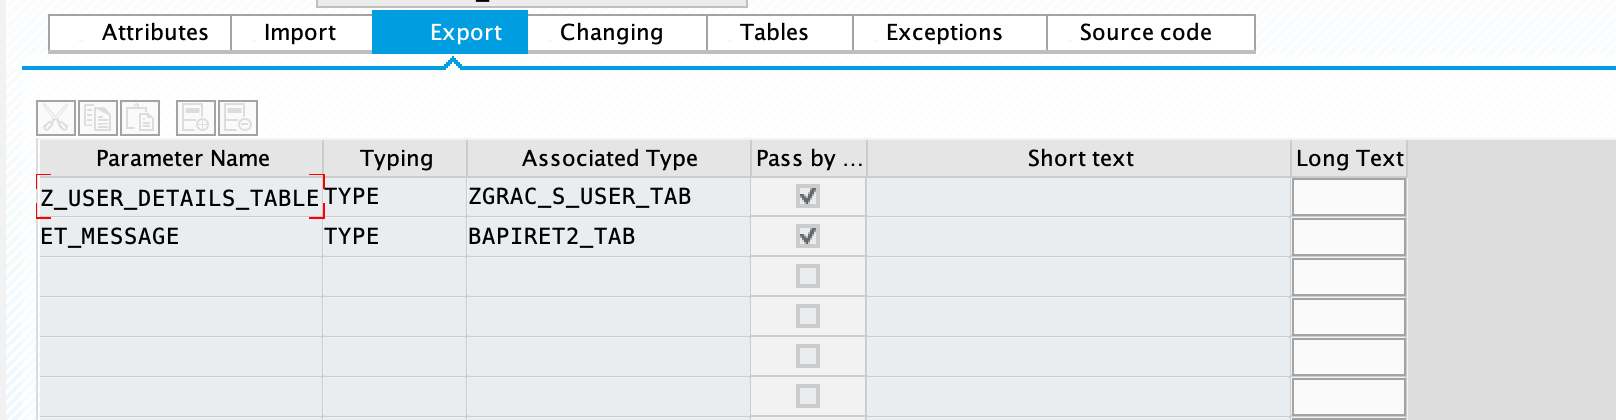
The output of this value must be in the form of:
-
Z_USER_DETAILS_TABLE - Internal table: where each row is of Line Type:ZUSER_SYSTEM_DETAILS.Screenshot
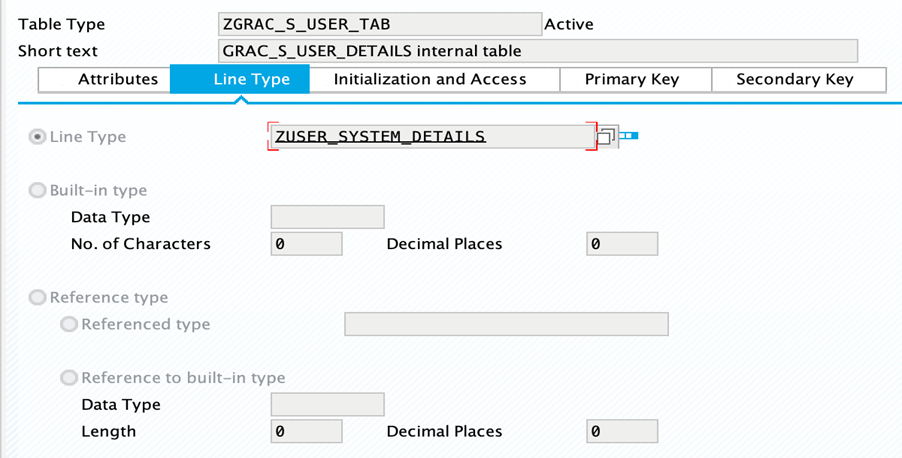
ZUSER_SYSTEM_DETAILSis a custom structure which contains two fields:SYSTEM: The system to which the user is connected. Associated type isCHAR.Z_GRAC_S_USER_DETAIL: The complete user details. The associated type isGRAC_S_USER_DETAIL.
Note
This is GRC's built-in structure which represents a complete user entity connected to a system.
-
ET_MESSAGE: contains error message details and the associated type isBAPIRET2_TAB.Screenshot
Example Source Code
FUNCTION ZCUSTOM_BAPI_FOR_ADDITIONAL_ATTRIBUTES.
*"----------------------------------------------------------------------
*"*"Local Interface:
*"  IMPORTING
*"     VALUE(USER_ID) TYPE  GRAC_USER
*"  EXPORTING
*"     VALUE(Z_USER_DETAILS_TABLE) TYPE  ZGRAC_S_USER_TAB
*"     VALUE(ET_MESSAGE) TYPE  BAPIRET2_TAB
*"----------------------------------------------------------------------


DATA:
ld_IV_USER TYPE GRAC_USER ,
ld_ES_USER_DETAILS TYPE GRAC_S_USER_DETAIL ,
it_data TYPE STANDARD TABLE OF GRACUSERCONN INITIAL SIZE 0 ,
wa_data TYPE GRACUSERCONN ,
id_system_id  TYPE string ,
it_user_details TYPE STANDARD TABLE OF ZUSER_SYSTEM_DETAILS INITIAL SIZE 0 ,
ld_custom_user_struct TYPE ZUSER_SYSTEM_DETAILS,
exception_ref TYPE REF TO cx_grfn_exception.


ld_IV_USER = USER_ID.

*Getting systems associated with a user
SELECT * FROM GRACUSERCONN WHERE USER_ID = @ld_IV_user INTO TABLE @it_data.


TRY.
*Loop over each connector to get the user details
LOOP AT it_data INTO wa_data.

id_system_id = wa_data-CONNECTOR.
clear : ld_ES_USER_DETAILS.

CALL METHOD CL_GRAC_AD_ACCESS_MGMT=>GET_USER_DETAIL(
EXPORTING
IV_USER = ld_IV_USER
iv_system_id    = id_system_id
IMPORTING
ES_USER_DETAILS = ld_ES_USER_DETAILS
ET_MESSAGE = ET_MESSAGE

).

ld_custom_user_struct-SYSTEM = id_system_id.
 ld_custom_user_struct-Z_GRAC_S_USER_DETAIL = ld_ES_USER_DETAILS.

APPEND ld_custom_user_struct TO it_user_details.

ENDLOOP.

CATCH cx_grfn_exception INTO exception_ref.
RETURN.

ENDTRY.

Z_USER_DETAILS_TABLE =  it_user_details.


ENDFUNCTION.
SailPoint Add-On to replace the use of RFC_READ_TABLE
SailPoint's ABAP Integration is designed to replace the functionality of SAP's RFC_READ_TABLE to securely access the information in the SAP system required for deeper governance.
Important
SailPoint strongly recommends installing the SAP-certified add-on in the SAP environment and then using /SAILPOIN/SAIL_READ_TABLE instead of RFC_READ_TABLE.
This integration needs to be deployed on the GRC system for querying the GRC tables. For the deployment process follow these instructions in order:
- Installation of SAILPOIN Add-On
- Configuration of SailPoint's Function Module
- Configuration Table for SAP GRC
Prerequisites
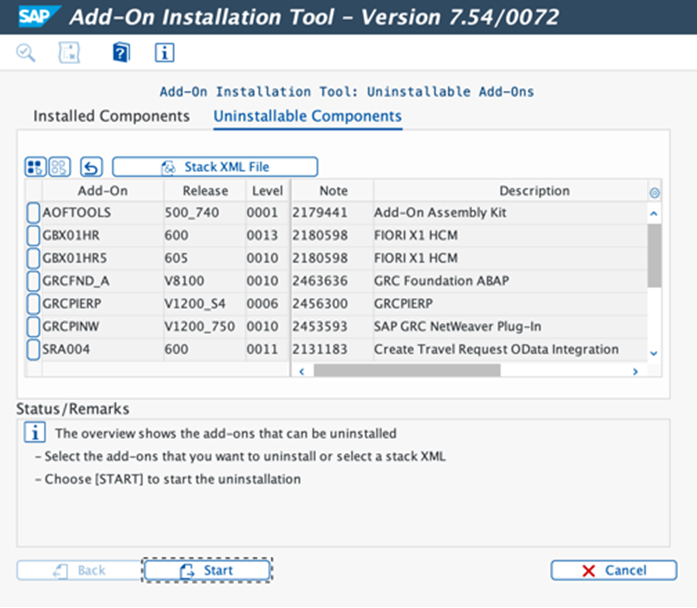
To install the Add-On and support packages using the SAINT transaction code (t-code), follow these steps:
- Log into client 000.
- Ensure that you have installed at least SPAM/SAINT version 0053 to be able to uninstall Add-Ons using the SAINT t-code.
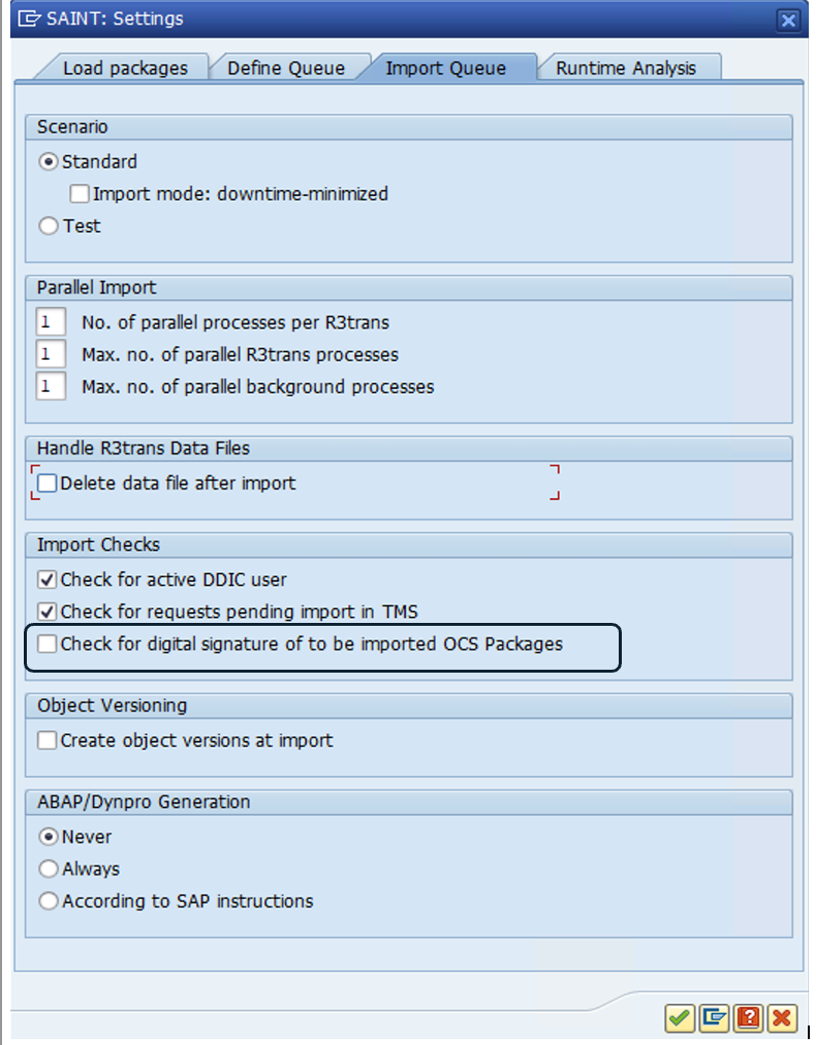
- Deselect the digital signature setting in SAINT t-code:
- Go to SAINT t-code.
- Select Extras.
- Choose Setting.
- Deselect the Check for digital signature of to be imported OCS Packages.
- Proceed with installing the Add-On and support packages using the SAINT t-code.
Screenshot
Installation of SAILPOIN Add-On
Note
If Add-on is already installed, reference Importing Support Packages for Add-On SAILPOIN.
-
Download the PAT file(s) for the Add-On and all the required support packages from the New Package Download Matrix.
Note
The PAT file is a special file used to package the SAP Add-on. If you install the add-on using SPAM/SAINT, the contents of the PAT file will be extracted (disassembled) to your transport directory.
-
Copy the .PAT file on your server location for the Add-On and all the required support packages:
Server Location: (Windows :
<DRIVE>:\usr\sap\trans\EPS\in; Linux/Unix :/usr/sap/trans/EPS/in). -
Login to SAP GUI, and then execute the Tcode SAINT.
Screenshot
-
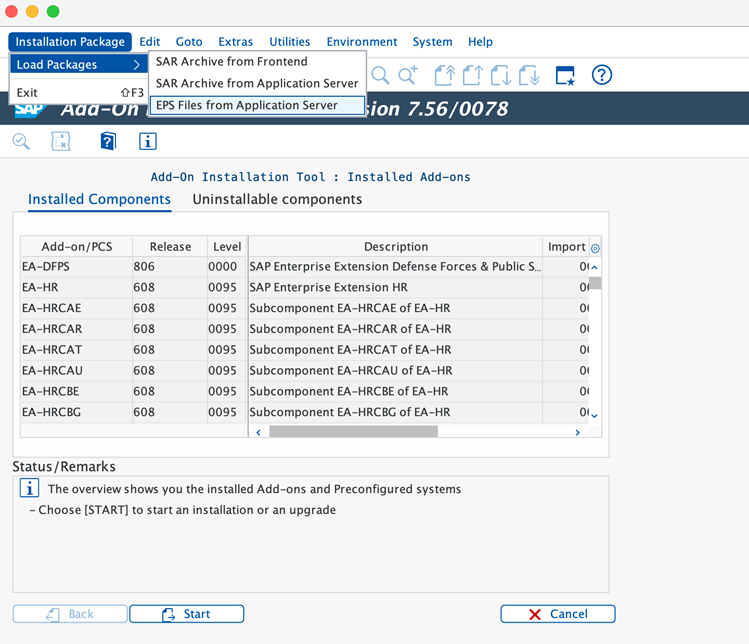
Go to Installation Package > Load Packages > EPS Files From Application Server.
Screenshot
-
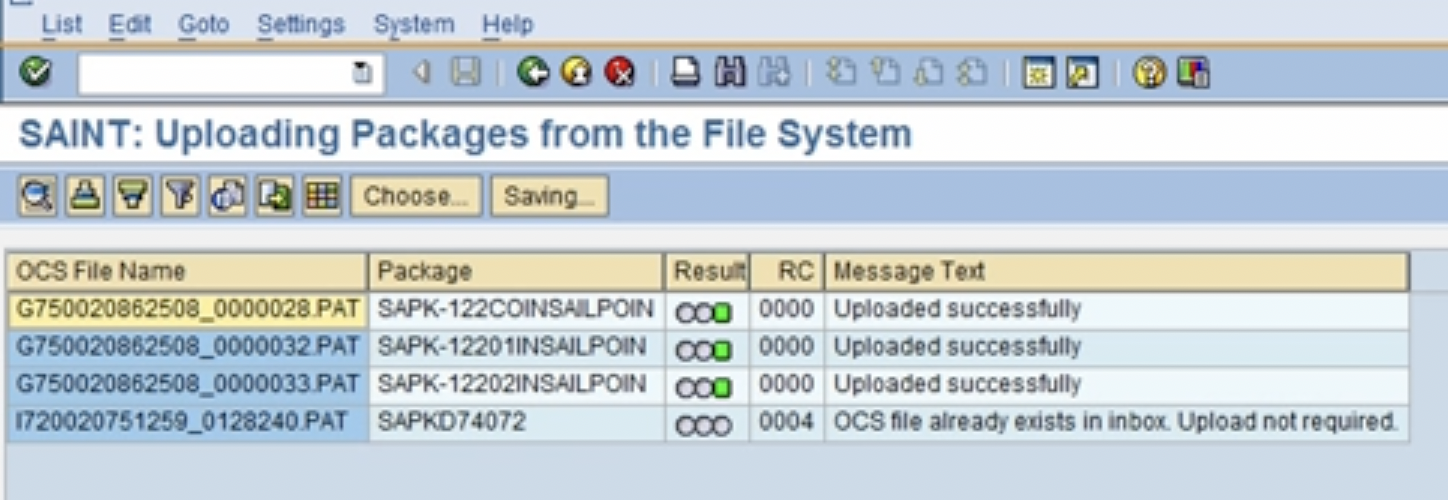
Ensure the following PAT file(s) uploaded successfully:
Screenshot
-
Select Start.
-
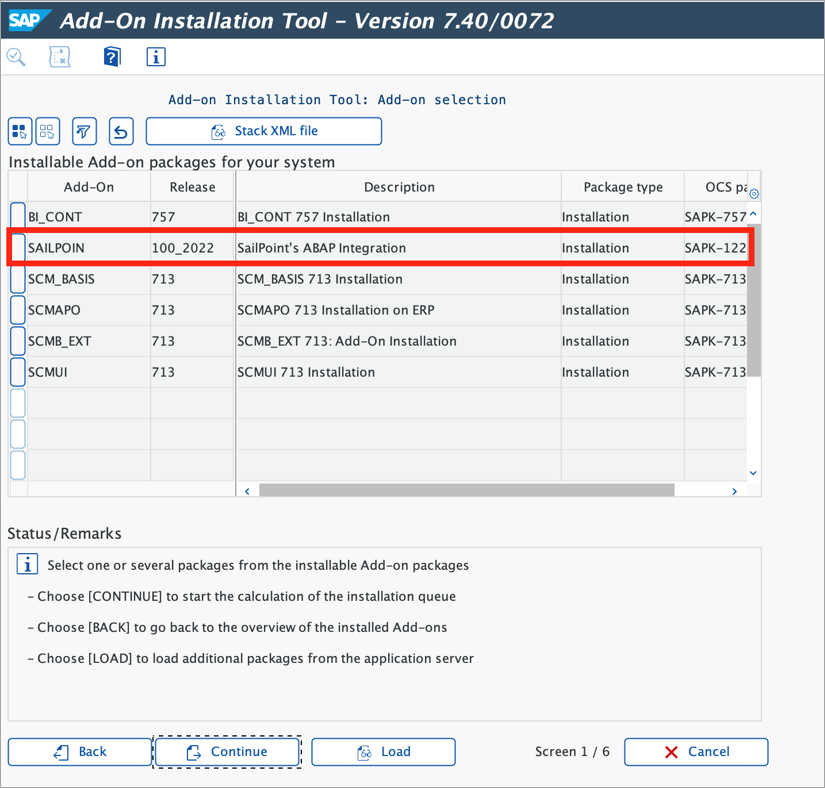
Select SAILPOIN from the Installable Add-on Package packages for your system grid.
Screenshot
-
Select Continue.
-
To install the Add-On and support package(s), perform the following:
-
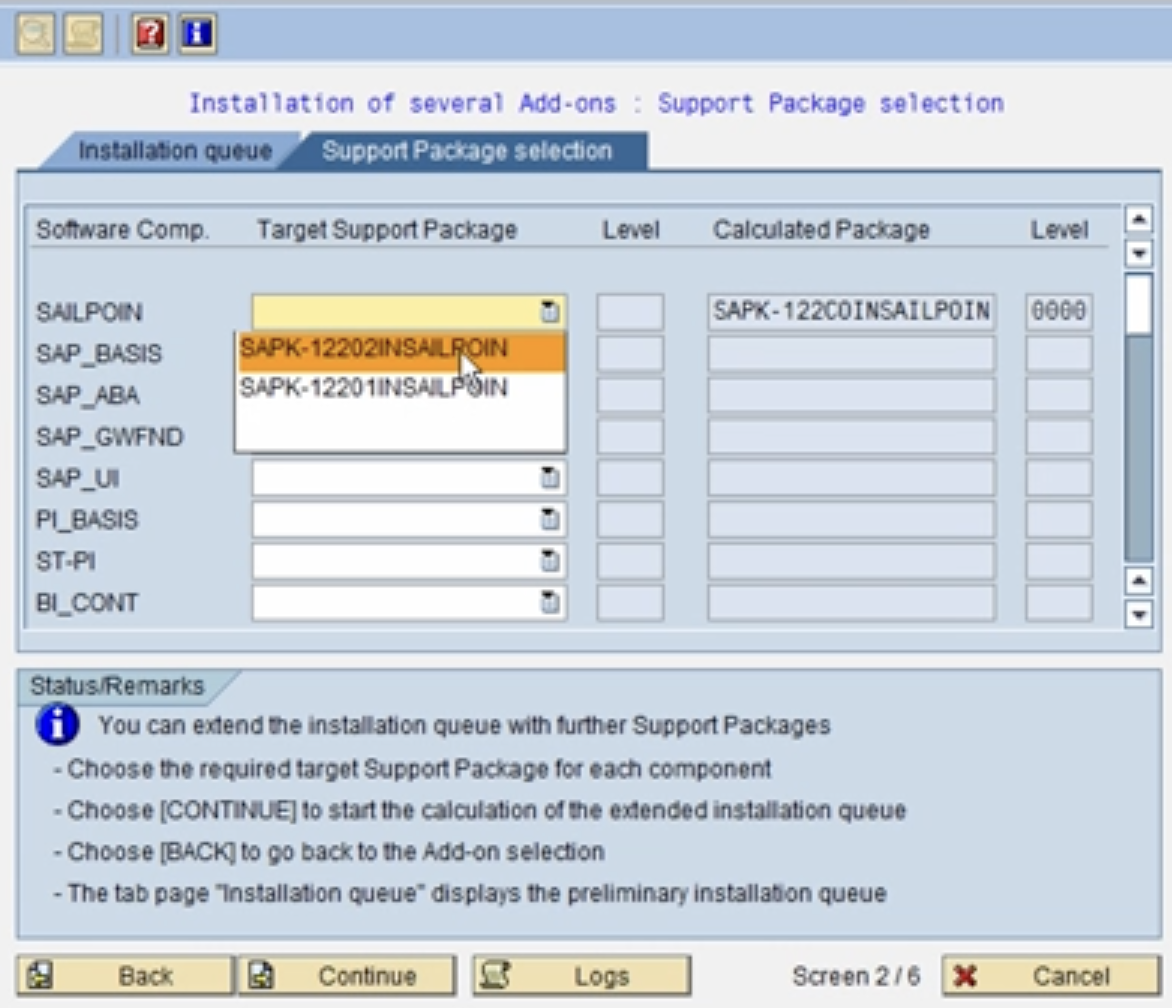
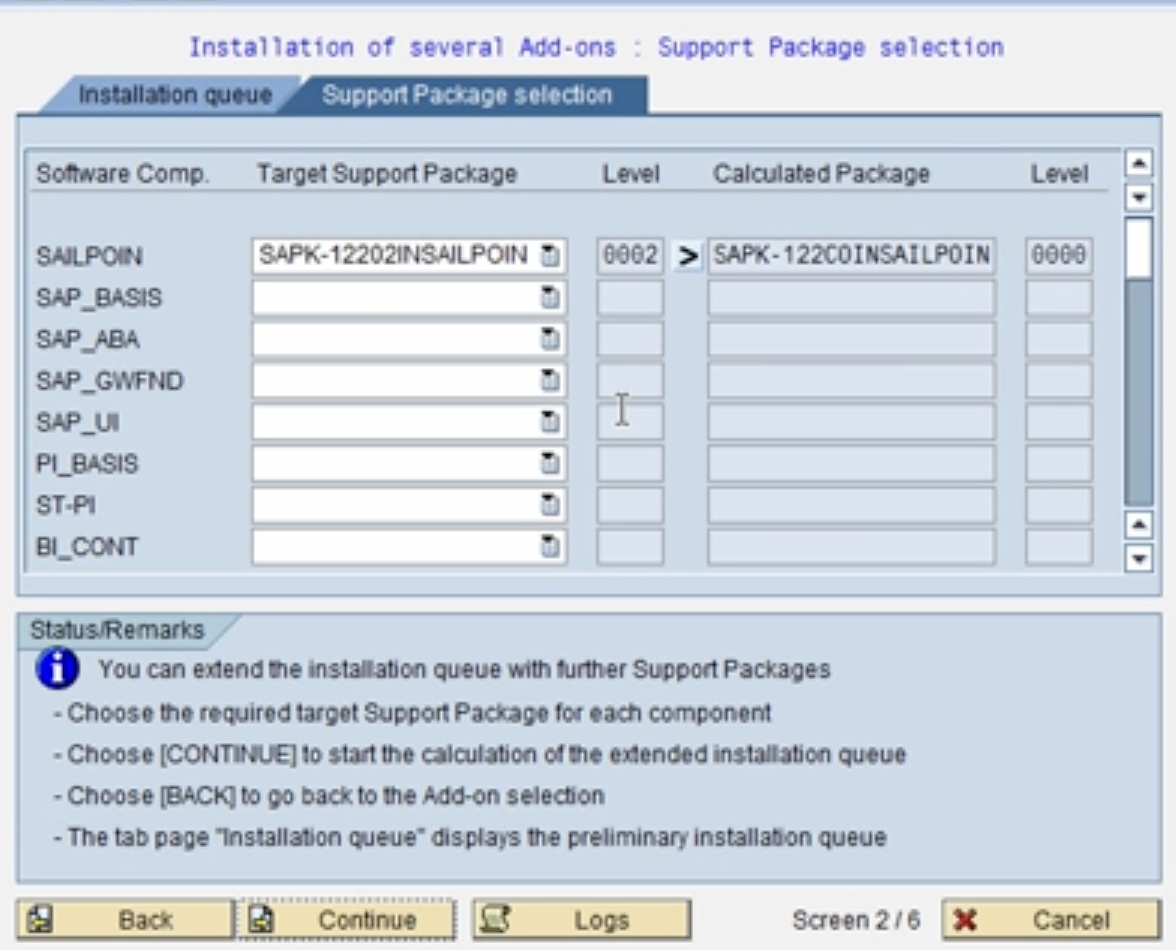
Select the highest version from the available support package(s) under the Target Support Package drop down of the component SAILPOIN.
Screenshot
-
The column Level should indicate the chosen target support package.
Screenshot
-
-
Select Continue.
-
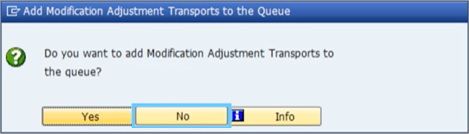
On the Add Modification Adjustment Transports to the Queue dialog, select No.
Screenshot
-
If prompted on the Start Options dialog box, select Continue.
Screenshot
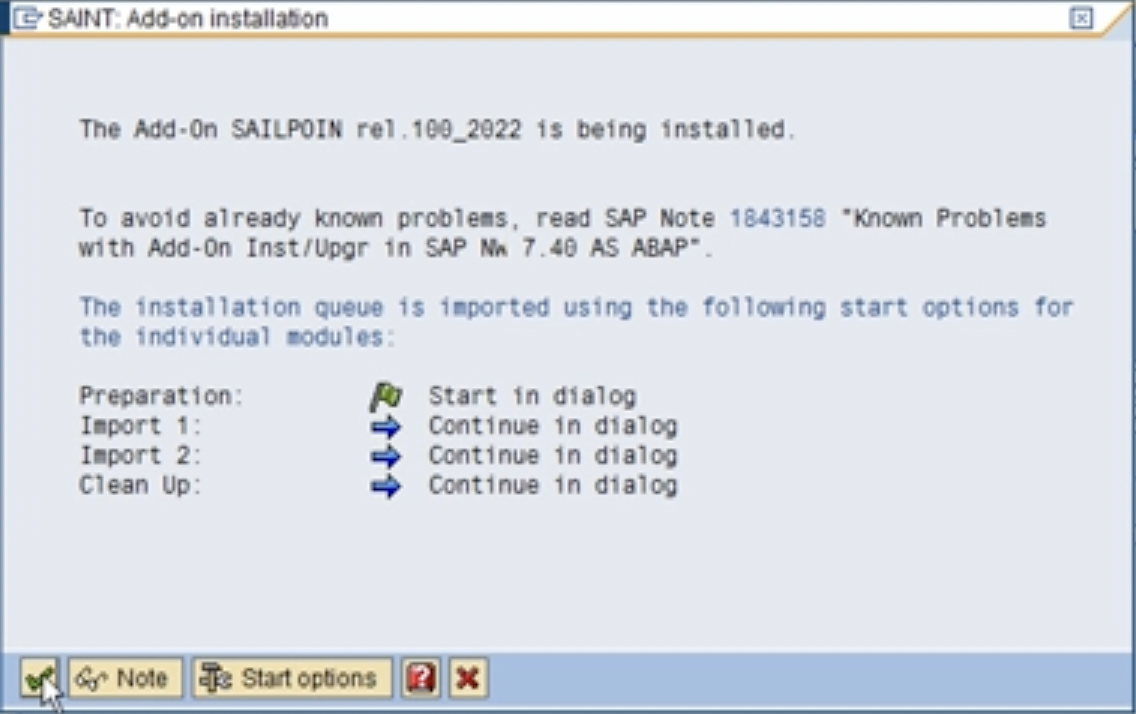
Note
The Add-on and the support package(s) will begin installing, and the progress can be seen at the bottom of the window.
-
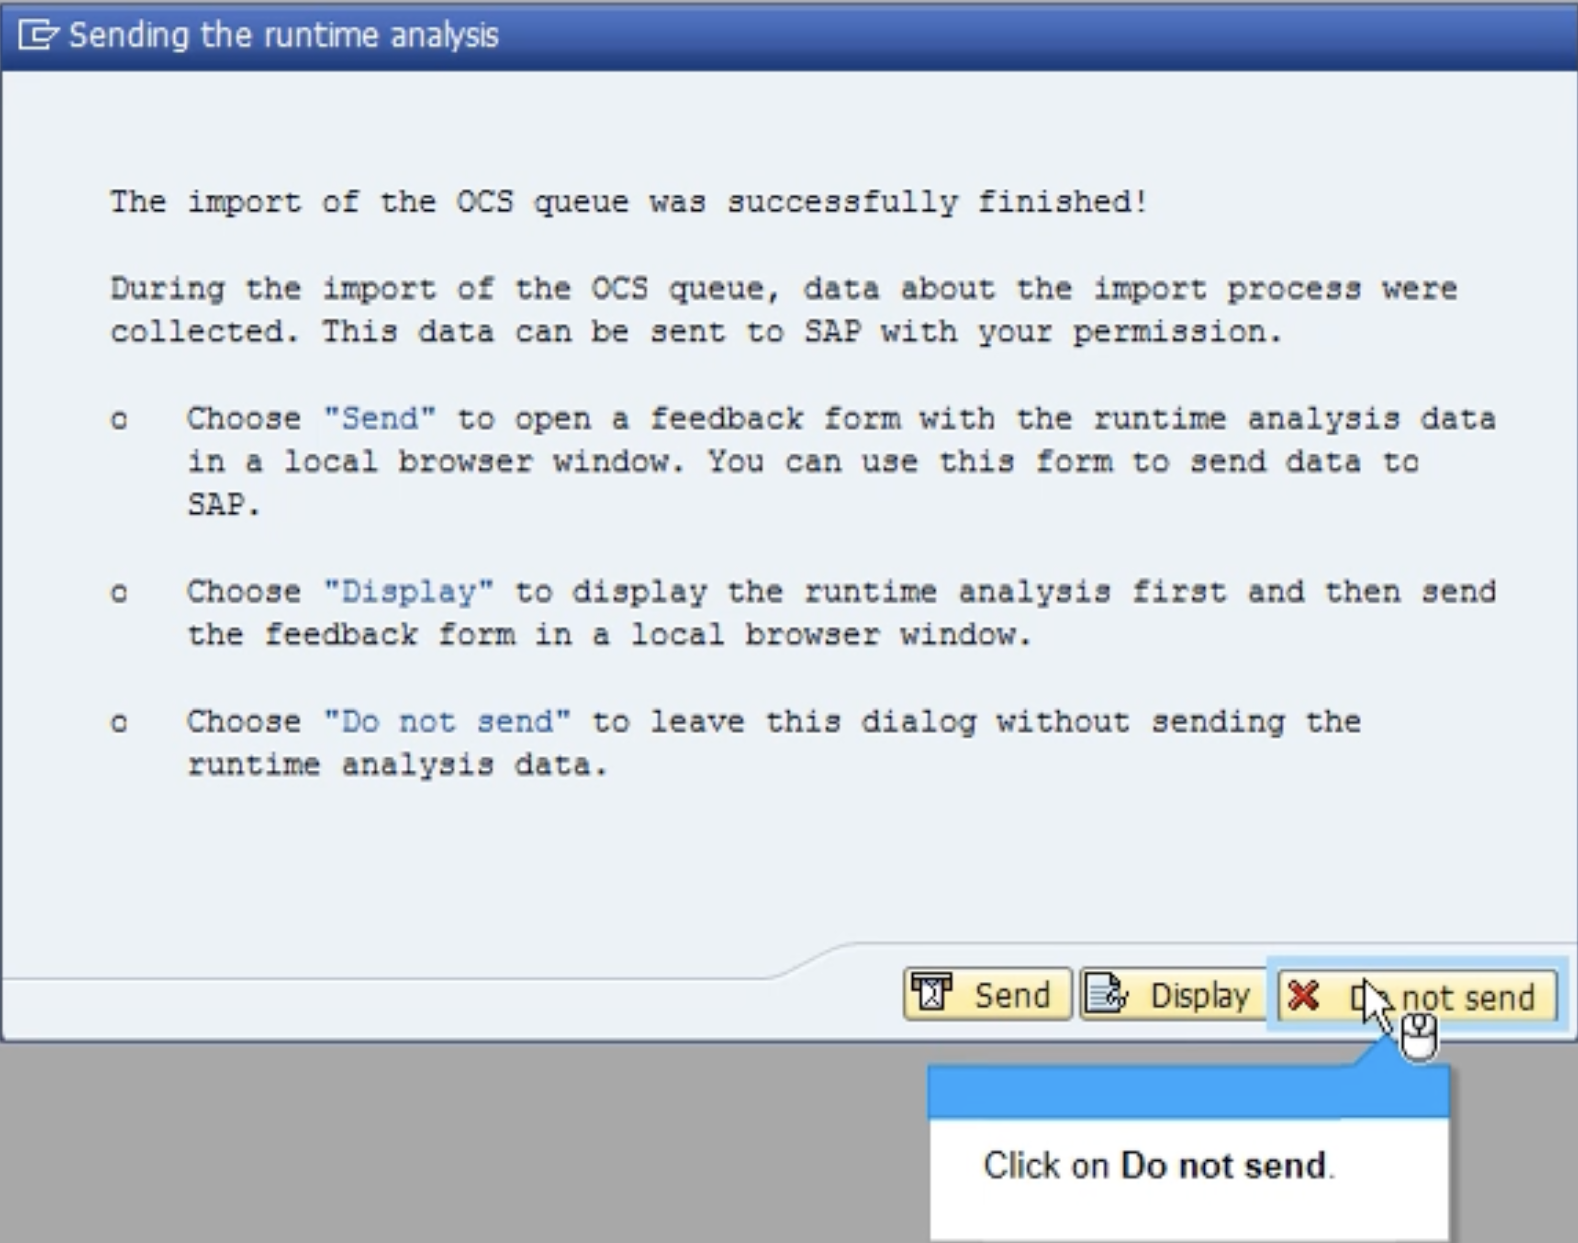
Select Finish. If prompted to send Runtime Analysis, select Do not send.
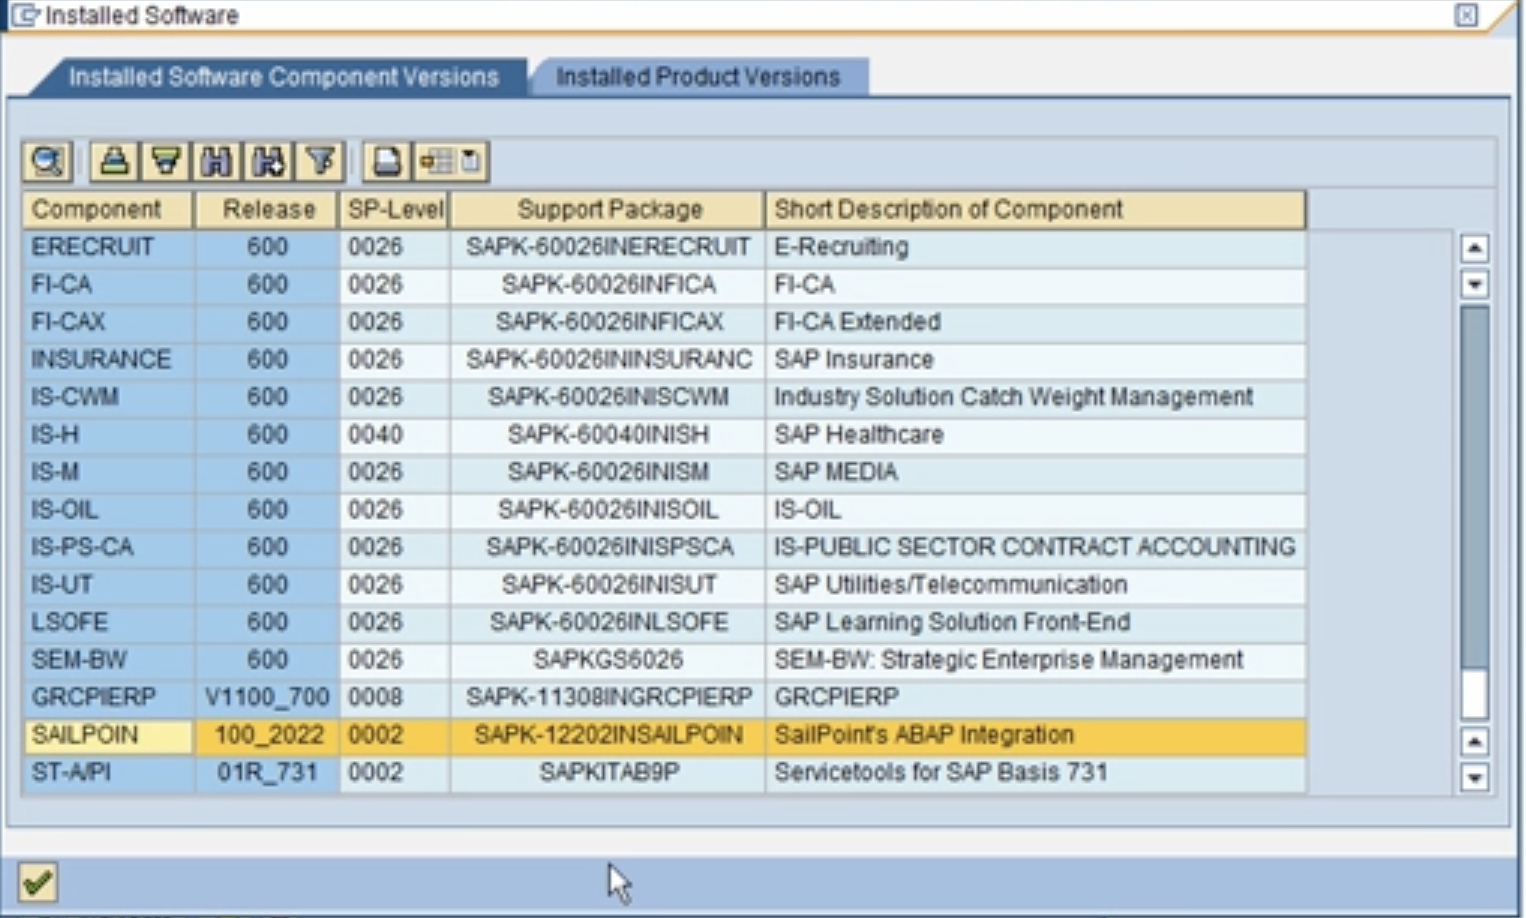
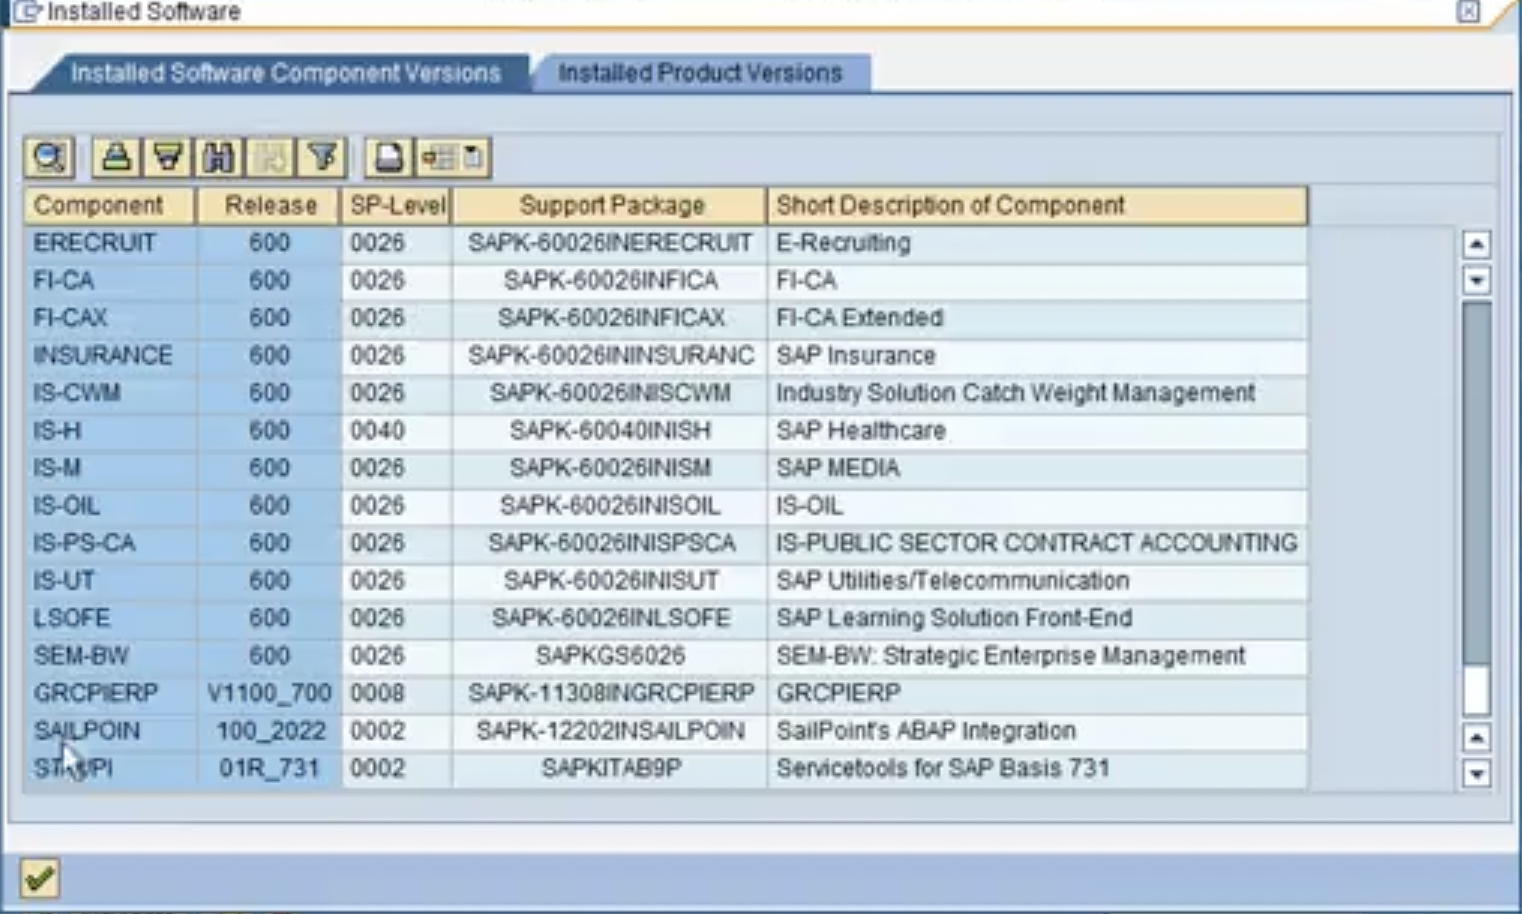
- Go to System > Status > Details > Installed Software Component Versions to confirm the following:
-
The Add-On and the support packages have been added in the system component.
Screenshot
-
Configuring SailPoint's Function Module
Note
Configure any one function module based on your SAP_BASIS version.
Use the /SAILPOIN/SAIL_READ_TABLE function module to support systems whose SAP BASIS version is 751 and later.
This is a SAP-certified function module provided by SailPoint to replace the use of SAP's RFC_READ_TABLE function module, according to SAP recommendations, for reading data from SAP tables required for governance.
The /SAILPOIN/SAIL_READ_TABLE provides enhanced security, support for pagination, and performance improvements over the RFC_READ_TABLE. For more information on the deployment process, refer to Installation of SAILPOIN Add-On.
Important
- SailPoint recommends having SAP BASIS version 751 and above for seamless functionality of the ABAP add-on. However, for lower BASIS versions, /SAILPOIN/SAIL_READ_TABLE_LEG can be tried with limited support from SailPoint.
- RFC_READ_TABLE-based connections are deprecated, and it is recommended to use the SAP-certified add-on instead.
Configuration Table for SAP GRC
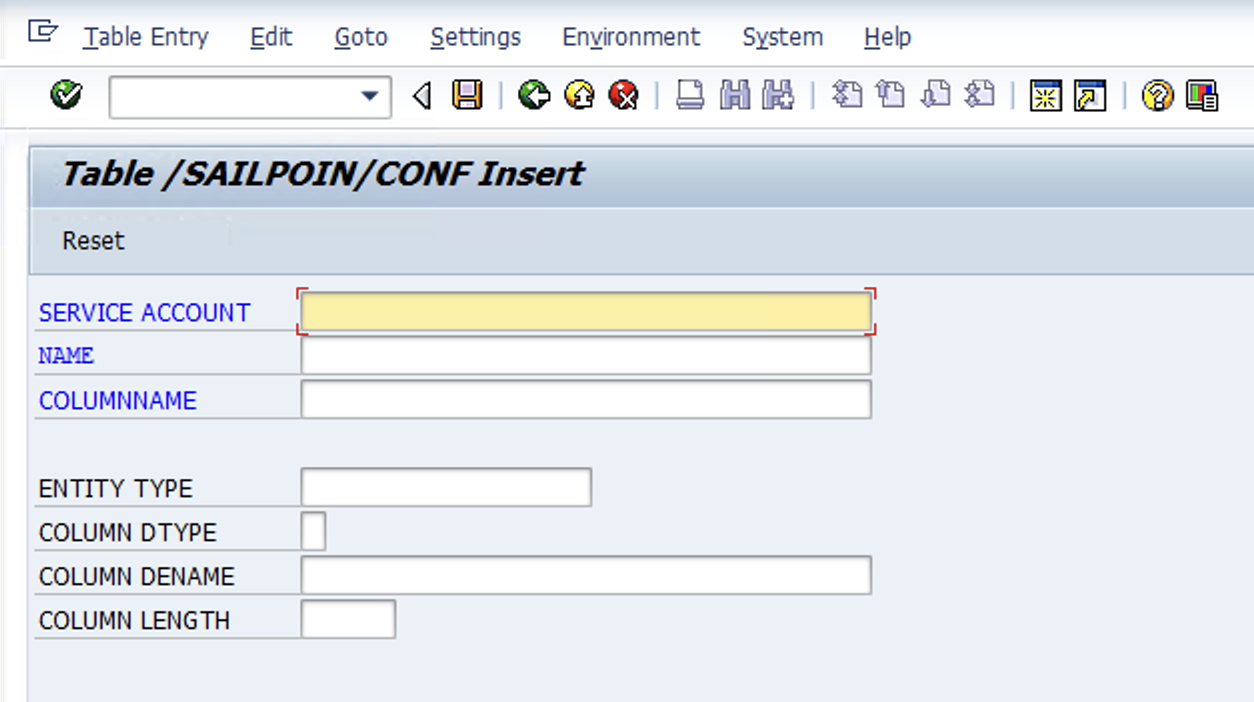
Insert the following data into the /SAILPOIN/CONF table. The table uses the following fields:
- SERVICE_ACCOUNT - The allowed service account used for accessing the function module.
- NAME - The name of the entity from which data is fetched. Consider this a table name.
- COLUMN_NAME - The column allowed for fetching data.
- ENTITY_TYPE - The type of entity, such as table or join. This field is reserved for future use.
- COLUMN_DTYPE - The data type of the column that is allowed.
- COLUMN_DENAME - The data element type of the column. You can find the data element type using the t-code
SE11when viewing the table details, under Fields. - COLUMN_LENGTH - The length of the column that is allowed. You can find the length using the t-code
SE11when viewing the table's details, under Fields.
Note
Validate that the values for COLUMN_DENAME and COLUMN_LENGTH are correct for your system. You can validate these values using the t-code SE11 while viewing the table details, under Fields.
Insert the data into the /SAILPOIN/CONF table using one of the following methods.
Choose how to insert the table data
Inserting Data Using the SE16 T-Code
-
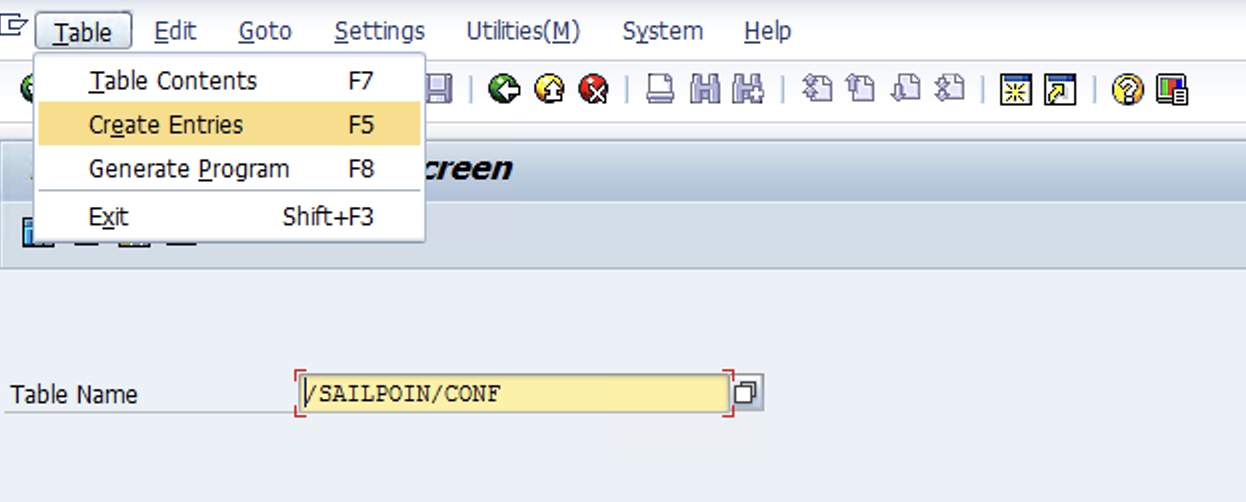
Enter SE16 > Table Name: /SAILPOIN/CONF > Create Entries.
Screenshot
-
Enter the data into the table.
Screenshot
Inserting Data Using a Script
Setup
- Enter the t-code SE38, and then create the program
Z_CONFIGURE_SERVICEACCOUNTin the local object package with the type set to executable program. - Copy and paste the script provided here, and activate the program.
-
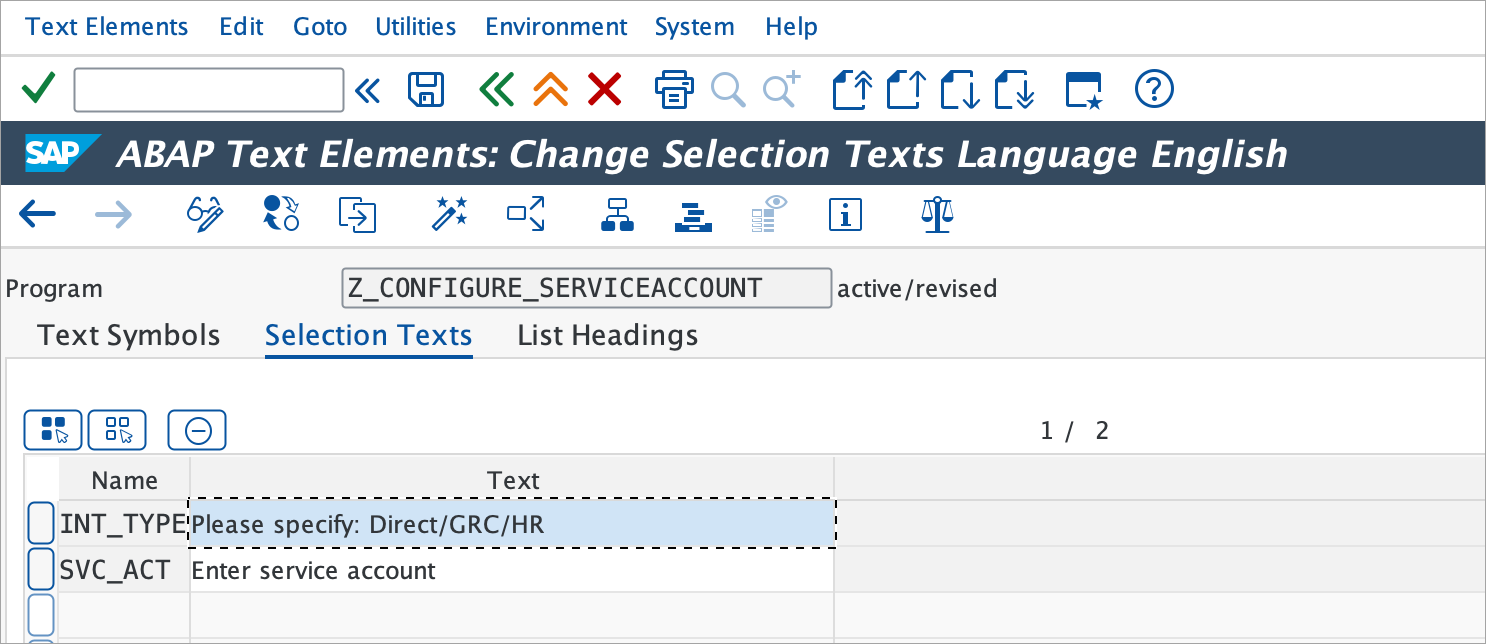
Edit the selection text from Go to > Text Element > Selection Text and update it as shown in the following image, for better readability of the input parameters.
Screenshot
-
Select Save, and then select Activate.
How It Works
- Enter the t-code SE38, and then search for the program
Z_CONFIGURE_SERVICEACCOUNT. Select Execute. -
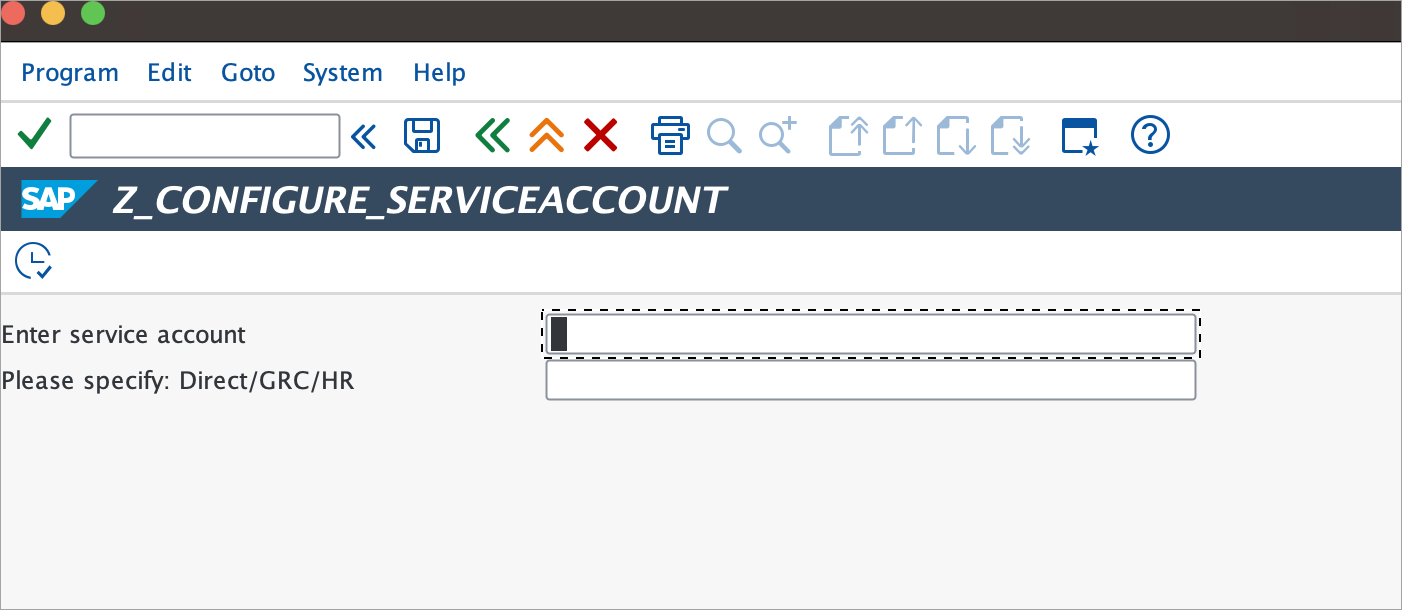
Enter the service account and integration module to populate.
Screenshot
-
Select Execute. A success message appears once you have entered the details correctly.
Screenshot
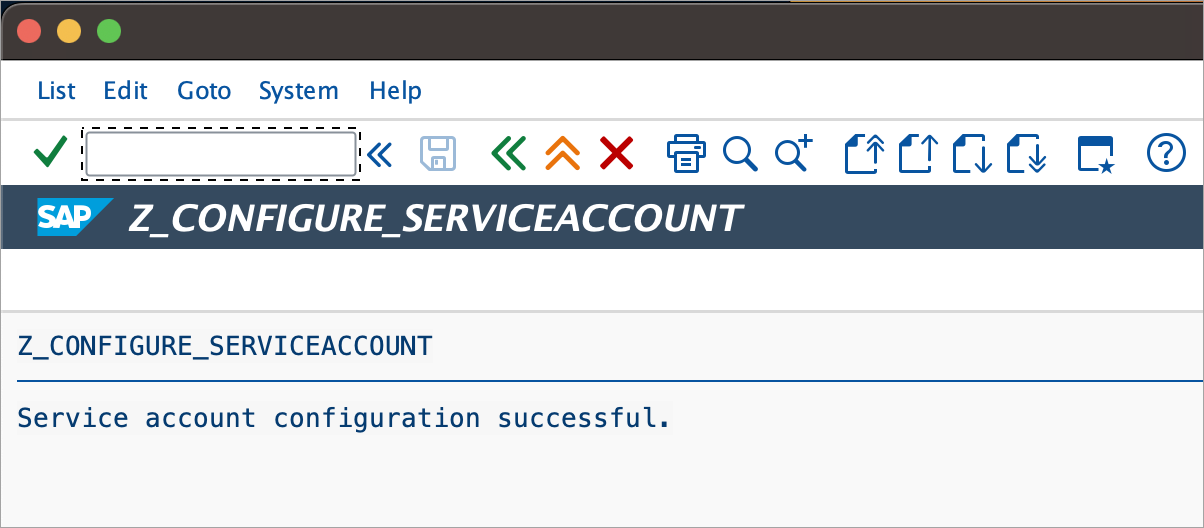
Table Permissions
| SERVICE_ACCOUNT | NAME | COLUMNNAME | ENTITY_TYPE | COLUMN_DTYPE | COLUMN_DENAME | COLUMN_LENGTH |
|---|---|---|---|---|---|---|
| <your-service-account-name> | GRACPROFILE | AC_REF_ROLE_ID | TABLE | C | GRFN_GUID | 32 |
| <your-service-account-name> | GRACPROFILE | CONNECTOR | TABLE | C | GRFN_CONNECTORID | 32 |
| <your-service-account-name> | GRACPROFILE | PROFILE | TABLE | C | GRAC_PROFILE | 20 |
| <your-service-account-name> | GRACRLCOMPRL | CHILD_ROLEID | TABLE | C | GRFN_GUID | 32 |
| <your-service-account-name> | GRACRLCOMPRL | COMP_ROLEID | TABLE | C | GRFN_GUID | 32 |
| <your-service-account-name> | GRACRLCONN | AC_REF_ROLE_ID | TABLE | C | GRFN_GUID | 32 |
| <your-service-account-name> | GRACRLCONN | CONNECTOR | TABLE | C | RFCDEST | 32 |
| <your-service-account-name> | GRACRLCONN | ROLE_ID | TABLE | C | GRFN_GUID | 32 |
| <your-service-account-name> | GRACRLCONN | ROLE_NAME | TABLE | C | GRAC_ROLE_NAME | 300 |
| <your-service-account-name> | GRACRLCUARELAT | ROLEID1 | TABLE | C | GRAC_ROLEID | 32 |
| <your-service-account-name> | GRACRLCUARELAT | ROLEID2 | TABLE | C | GRAC_ROLEID | 32 |
| <your-service-account-name> | GRACROLE | BPROC | TABLE | C | GRAC_BPROC | 10 |
| <your-service-account-name> | GRACROLE | BSUBPROC | TABLE | C | GRAC_BSUBPROC | 10 |
| <your-service-account-name> | GRACROLE | CONNECTOR_GRP | TABLE | C | GRFN_CONNECTORGRP | 10 |
| <your-service-account-name> | GRACROLE | ROLEID | TABLE | C | GRAC_ROLEID | 32 |
| <your-service-account-name> | GRACROLE | ROLE_NAME | TABLE | C | GRAC_ROLE_NAME | 300 |
| <your-service-account-name> | GRACROLE | ROLE_STATUS | TABLE | C | GRAC_ROLE_STATUS | 3 |
| <your-service-account-name> | GRACROLE | ROLE_TYPE | TABLE | C | GRAC_ROLE_TYPE | 3 |
| <your-service-account-name> | GRACROLERELAT | RELAT_TYPE | TABLE | C | GRAC_RL_RELAT_TYPE | 4 |
| <your-service-account-name> | GRACROLERELAT | ROLEID1 | TABLE | C | GRAC_ROLEID | 32 |
| <your-service-account-name> | GRACROLERELAT | ROLEID2 | TABLE | C | GRAC_ROLEID | 32 |
| <your-service-account-name> | GRACUSER | CONNECTOR | TABLE | C | GRFN_CONNECTORID | 32 |
| <your-service-account-name> | GRACUSER | DEPARTMENT | TABLE | C | GRAC_DEPARTMENT | 100 |
| <your-service-account-name> | GRACUSER | TABLE | C | AD_SMTPADR | 241 | |
| <your-service-account-name> | GRACUSER | FIRST_NAME | TABLE | C | GRAC_USER_NAME | 50 |
| <your-service-account-name> | GRACUSER | LAST_NAME | TABLE | C | GRAC_USER_NAME | 50 |
| <your-service-account-name> | GRACUSER | MANAGER_ID | TABLE | C | GRAC_USER | 50 |
| <your-service-account-name> | GRACUSER | PHONE | TABLE | C | GRAC_PHONE_NUMBER | 20 |
| <your-service-account-name> | GRACUSER | USER_ID | TABLE | C | GRAC_USER | 50 |
| <your-service-account-name> | GRACUSERCONN | CONNECTOR | TABLE | C | RFCDEST | 32 |
| <your-service-account-name> | GRACUSERCONN | INACTIVE | TABLE | C | BOOLEAN | 1 |
| <your-service-account-name> | GRACUSERCONN | USER_GROUP | TABLE | C | GRAC_USER_GRP | 50 |
| <your-service-account-name> | GRACUSERCONN | USER_ID | TABLE | C | GRAC_USER | 50 |
| <your-service-account-name> | GRACUSERCONN | USER_TYPE | TABLE | C | XUUSTYP | 1 |
| <your-service-account-name> | GRACUSERCONN | VALID_FROM | TABLE | C | GRAC_VALID_FROM | 8 |
| <your-service-account-name> | GRACUSERCONN | VALID_TO | TABLE | D | GRAC_VALID_TO | 8 |
| <your-service-account-name> | GRACUSERPROFILE | CONNECTOR | TABLE | C | GRFN_CONNECTORID | 32 |
| <your-service-account-name> | GRACUSERPROFILE | PROFILE | TABLE | C | GRAC_PROFILE | 20 |
| <your-service-account-name> | GRACUSERPROFILE | USER_ID | TABLE | C | GRAC_USER | 50 |
| <your-service-account-name> | GRACUSERROLE | BUS_ROLEID | TABLE | C | GRFN_GUID | 32 |
| <your-service-account-name> | GRACUSERROLE | CONNECTOR | TABLE | C | GRFN_CONNECTORID | 32 |
| <your-service-account-name> | GRACUSERROLE | ROLE_ID | TABLE | C | GRFN_GUID | 32 |
| <your-service-account-name> | GRACUSERROLE | USER_ID | TABLE | C | GRAC_USER | 50 |
| <your-service-account-name> | GRACUSERROLE | VALID_FROM | TABLE | GRFN_TIMESTAMP | 15 | |
| <your-service-account-name> | GRACUSERROLE | VALID_TO | TABLE | GRFN_TIMESTAMP | 15 | |
| <your-service-account-name> | USRSYSACT | SUBSYSTEM | TABLE | C | RFCRCVSYS | 10 |
| <your-service-account-name> | USRSYSACT | AGR_NAME | TABLE | C | F_AGR_NAME | 30 |
| <your-service-account-name> | USRSYSACT | COL_AGR | TABLE | C | XUFLAG | 4 |
| <your-service-account-name> | CVERS | COMPONENT | TABLE | C | DLVUNIT | 30 |
| <your-service-account-name> | CVERS | RELEASE | TABLE | C | SAPRELEASE | 10 |
| <your-service-account-name> | CVERS | EXTRELEASE | TABLE | C | SAPPATCHLV | 10 |
| <your-service-account-name> | PRDVERS | NAME | TABLE | C | BORM_NAME | 30 |
| <your-service-account-name> | PRDVERS | VERSION | TABLE | C | BORM_VERS | 30 |
| <your-service-account-name> | PRDVERS | VENDOR | TABLE | C | BORM_VEND | 30 |
Additional Table Permissions for GRC AC12 SP19 and Above Versions
Note
For SAP GRC AC12 SP19 and above versions, the following additional permissions for the GRACUSERSOURCE table are required.
| SERVICE_ACCOUNT | NAME | COLUMNNAME | ENTITY_TYPE | COLUMN_DTYPE | COLUMN_DENAME | COLUMN_LENGTH |
|---|---|---|---|---|---|---|
| <your-service-account-name> | GRACUSERSOURCE | CONNECTOR | TABLE | C | GRFN_CONNECTORID | 32 |
| <your-service-account-name> | GRACUSERSOURCE | DATA_SOURCE_TYPE | TABLE | N | GRAC_DATA_SOURCE | 2 |
| <your-service-account-name> | GRACUSERSOURCE | SEQUENCE | TABLE | N | GRAC_SEQUENCE | 4 |
Table Permissions for Configuring FireFighterID
For FFOwner
| SERVICE_ACCOUNT | NAME | COLUMNNAME | ENTITY_TYPE | COLUMN_DTYPE | COLUMN_DENAME | COLUMN_LENGTH |
|---|---|---|---|---|---|---|
| <your-service-account-name> | GRACFFOWNER | CONNECTOR | TABLE | C | GRFN_CONNECTORID | 32 |
| <your-service-account-name> | GRACFFOWNER | FFOBJECT | TABLE | C | GRAC_FFOBJECT | 30 |
| <your-service-account-name> | GRACFFOWNER | OWNER | TABLE | C | GRAC_OWNER | 12 |
For FFController
| SERVICE_ACCOUNT | NAME | COLUMNNAME | ENTITY_TYPE | COLUMN_DTYPE | COLUMN_DENAME | COLUMN_LENGTH |
|---|---|---|---|---|---|---|
| <your-service-account-name> | GRACFFCTRL | CONNECTOR | TABLE | C | GRFN_CONNECTORID | 32 |
| <your-service-account-name> | GRACFFCTRL | FFOBJECT | TABLE | C | GRAC_FFOBJECT | 30 |
| <your-service-account-name> | GRACFFCTRL | CNTRL_ID | TABLE | C | GRAC_CONTROLLER | 12 |
For DefaultValidityDays
| SERVICE_ACCOUNT | NAME | COLUMNNAME | ENTITY_TYPE | COLUMN_DTYPE | COLUMN_DENAME | COLUMN_LENGTH |
|---|---|---|---|---|---|---|
| <your-service-account-name> | GRACCONFIGSET | PARAMID | TABLE | C | GRAC_CONFIG_PARAMID | 4 |
| <your-service-account-name> | GRACCONFIGSET | PARAM_VALUE | TABLE | C | GRAC_CONFIG_VALUE | 100 |
For FFUserID & Connector
| SERVICE_ACCOUNT | NAME | COLUMNNAME | ENTITY_TYPE | COLUMN_DTYPE | COLUMN_DENAME | COLUMN_LENGTH |
|---|---|---|---|---|---|---|
| <your-service-account-name> | GRACFFOBJECT | APP_TYPE | TABLE | C | GRAC_APP_TYPE | 1 |
| <your-service-account-name> | GRACFFOBJECT | CONNECTOR | TABLE | C | GRFN_CONNECTORID | 32 |
| <your-service-account-name> | GRACFFOBJECT | FFOBJECT | TABLE | C | GRAC_FFOBJECT | 30 |
For FireFighterIds for Account Schema
| SERVICE_ACCOUNT | NAME | COLUMNNAME | ENTITY_TYPE | COLUMN_DTYPE | COLUMN_DENAME | COLUMN_LENGTH |
|---|---|---|---|---|---|---|
| <your-service-account-name> | GRACFFUSER | APP_TYPE | TABLE | C | GRAC_APP_TYPE | 1 |
| <your-service-account-name> | GRACFFUSER | CONNECTOR | TABLE | C | GRFN_CONNECTORID | 32 |
| <your-service-account-name> | GRACFFUSER | FFOBJECT | TABLE | C | GRAC_FFOBJECT | 30 |
| <your-service-account-name> | GRACFFUSER | FF_USER | TABLE | C | GRAC_FIREFIGHTER | 12 |
| <your-service-account-name> | GRACFFUSER | VALID_FROM | TABLE | GRAC_VALID_FROM | 8 | |
| <your-service-account-name> | GRACFFUSER | VALID_TO | TABLE | GRAC_VALID_TO | 8 |
Role Aggregation Based on Connector Group and System
| Service Account | Name | COLUMNNAME | ENTITY_TYPE | COLUMN_DTYPE | COLUMN_DENAME | COLUMN_LENGTH |
|---|---|---|---|---|---|---|
| <your-service-account-name> | GRFNCCICONNECTOR | CONNECTOR | TABLE | C | GRFN_CONNECTORID | 32 |
| <your-service-account-name> | GRFNCCICONNECTOR | CONNECTOR_GRP | TABLE | C | GRFN_CONNECTORID | 10 |
For more information refer to Troubleshooting.
Configuration Table for IAG Bridge
The following are additional table permissions for the SAP IAG Bridge integration.
| SERVICE_ACCOUNT | NAME | COLUMNNAME | ENTITY_TYPE | COLUMN_DTYPE | COLUMN_DENAME | COLUMN_LENGTH |
|---|---|---|---|---|---|---|
| <your-service-account-name> | GRFNCCICONNECTOR | CONNECTOR | TABLE | C | GRFN_CONNECTORID | 32 |
| <your-service-account-name> | GRFNCCICONNECTOR | CONNECTION_TYPE | TABLE | C | GRFN_CONNECTTYPE | 08 |
Importing Support Packages for Add-On SAILPOIN
Prerequisites
- Add-On "SAILPOIN" is already installed in your SAP GRC system.
- You are logged into client 000.
- You can import support packages using SPAM t-code.
Installation
- Download the PAT file(s) for the support packages from the New Package Download Matrix.
-
Copy the PAT file(s) on your server location:
(Windows :
<DRIVE>:\usr\sap\trans\EPS\in; Linux/Unix :/usr/sap/trans/EPS/in). -
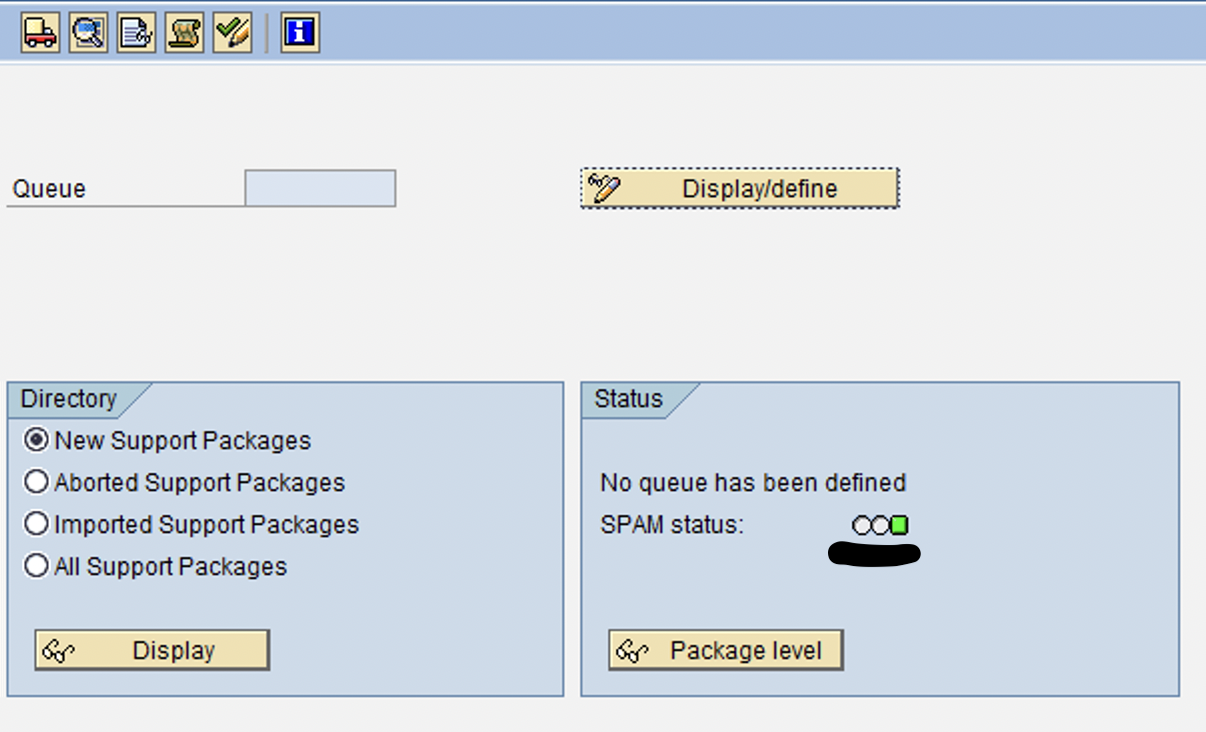
Sign in to the SAP GUI and execute the SPAM t-code. The status of the queue for importing support package should be green as shown in the following figure.
Screenshot
-
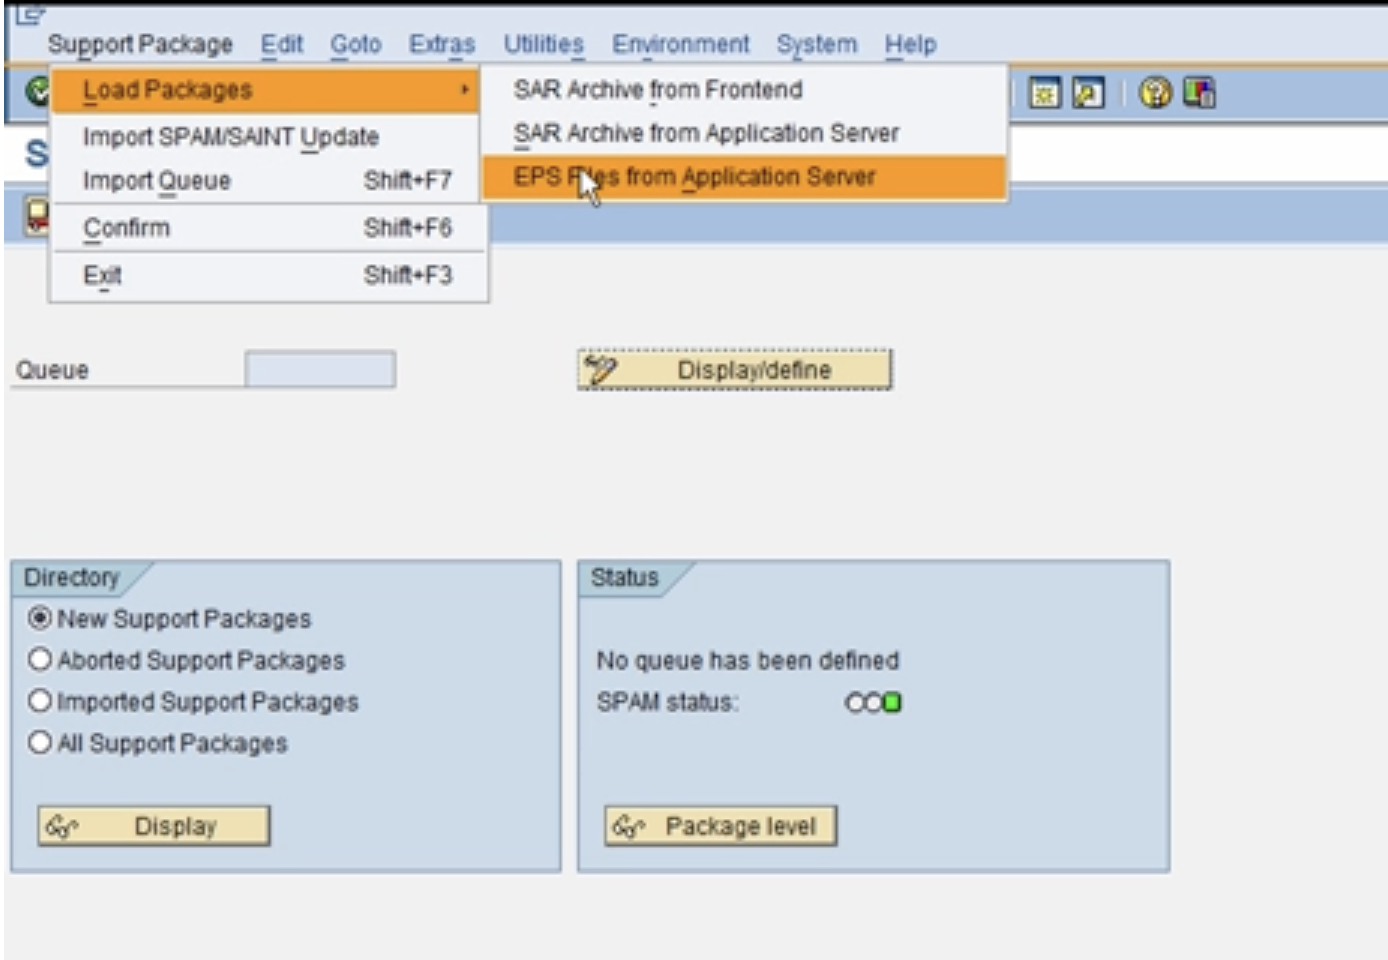
Go to Installation Package > Load Packages > EPS Files From Application Server.
Screenshot
-
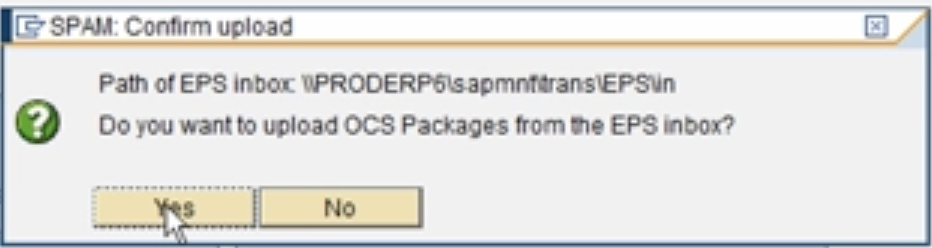
When prompted to upload OCS packages from the EPS inbox, select Yes.
Screenshot
-
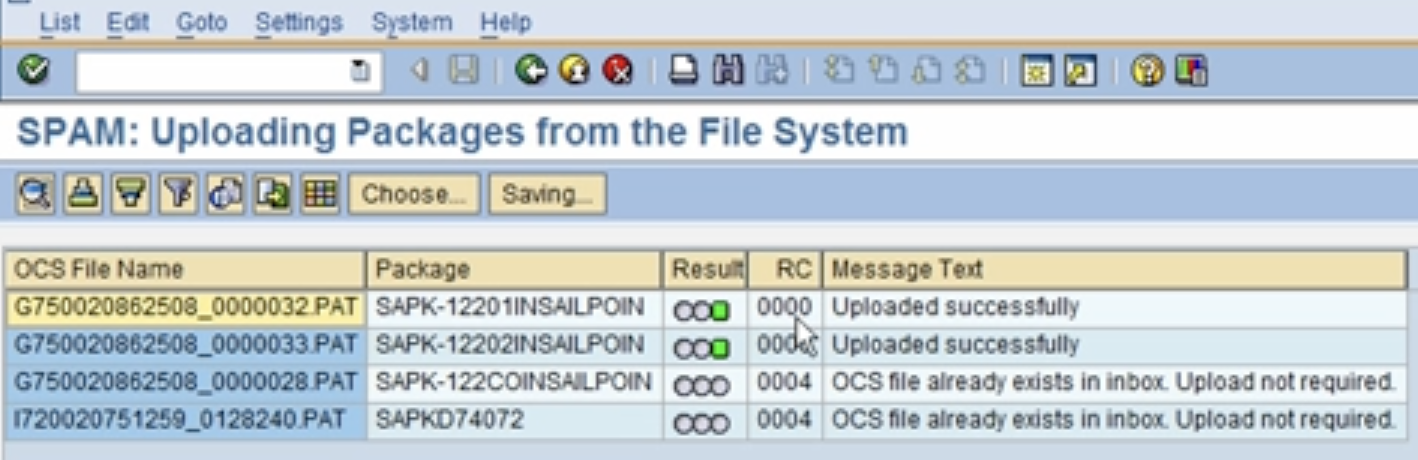
Verify that the upload was successful.
Screenshot
-
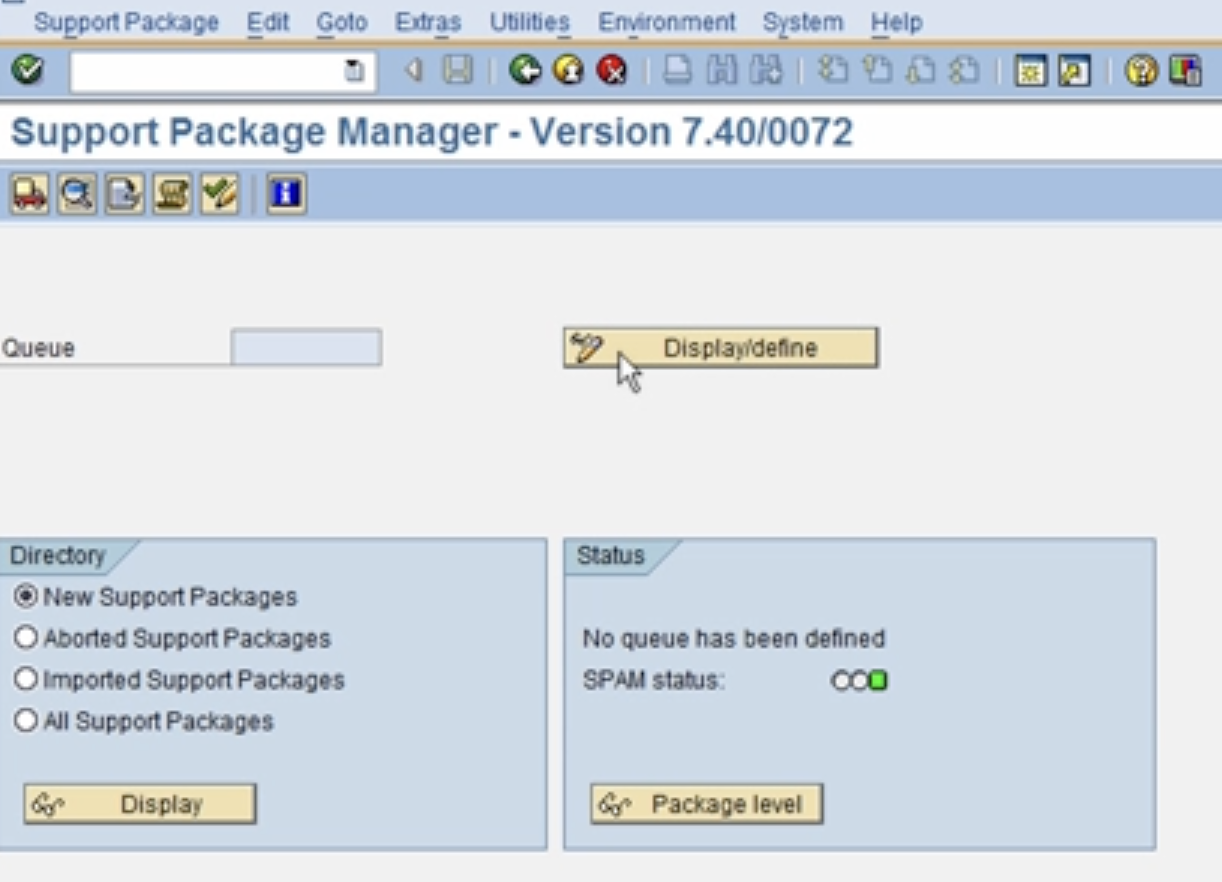
Select Display/Define to choose the software component for which you want to import Support Packages.
Screenshot
-
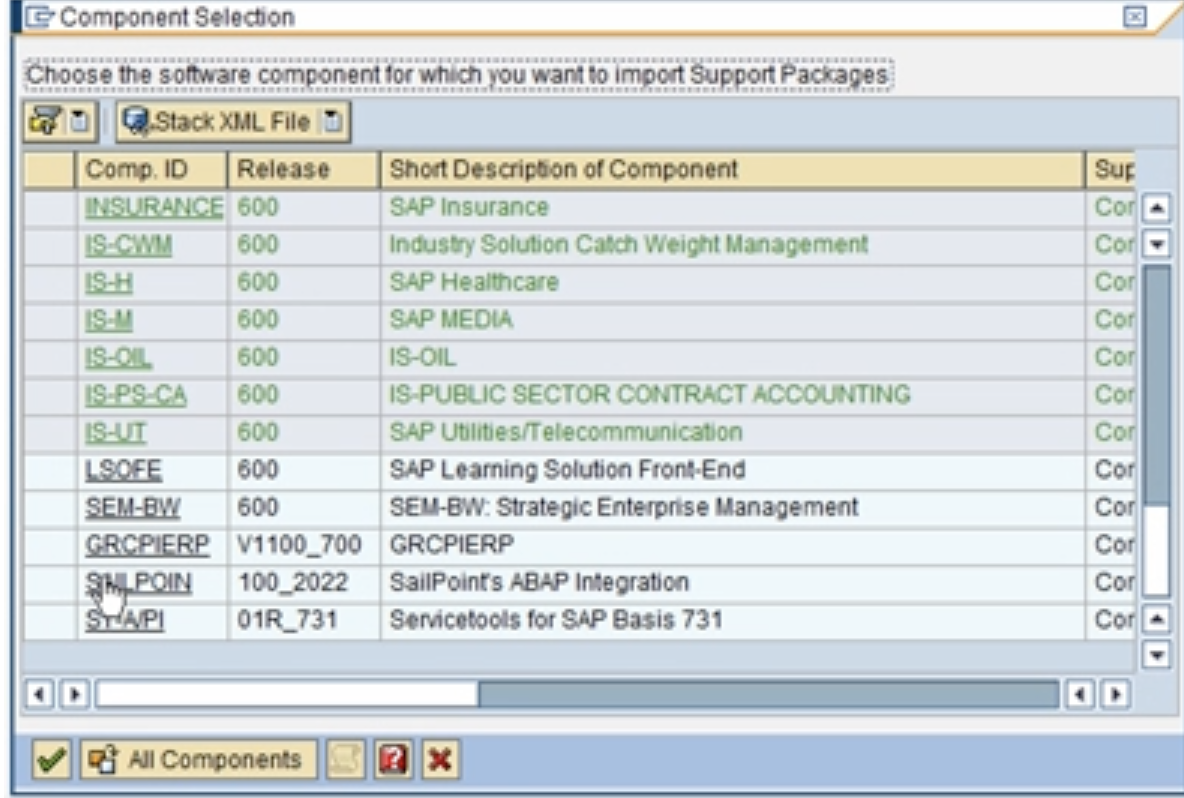
Select the SAILPOIN component.
Screenshot
-
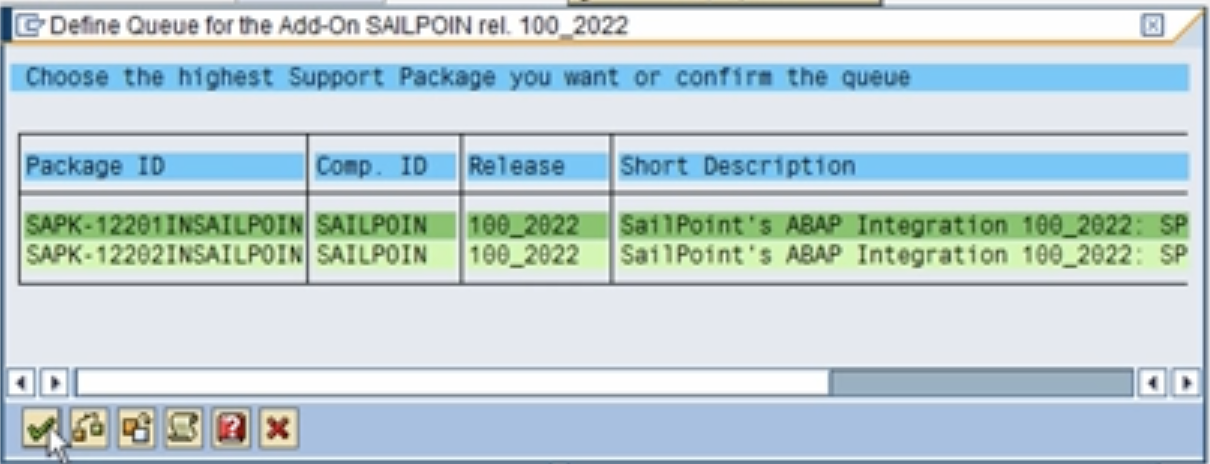
Confirm the queue by selecting Continue.
Note
The image below shows the number of support packages that can be installed based on the PAT files placed on your server location. The following example shows importing 2 support packages.
Screenshot
-
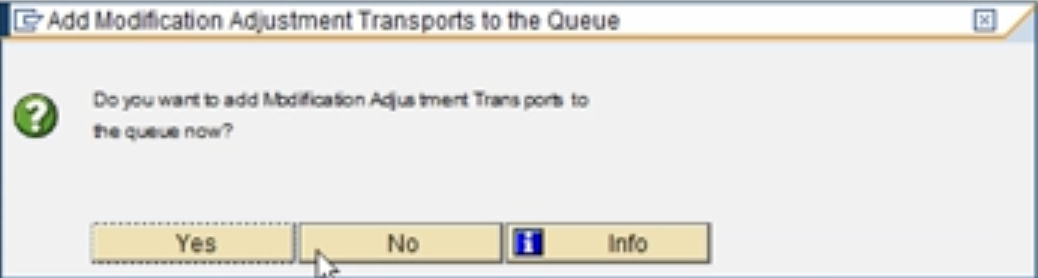
When prompted to add the Modification Adjustment Transports to the queue, select No.
Screenshot
-
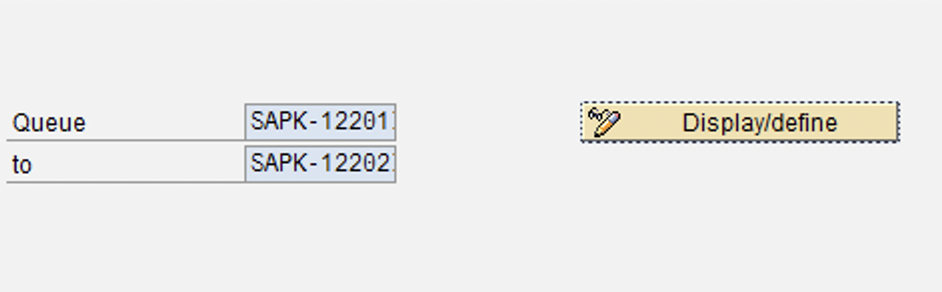
Verify that the queue contains the intended support packages for import that were added/defined in the queue in the previous steps.
Screenshot
-
Go to Support Package > Import Queue.
Screenshot
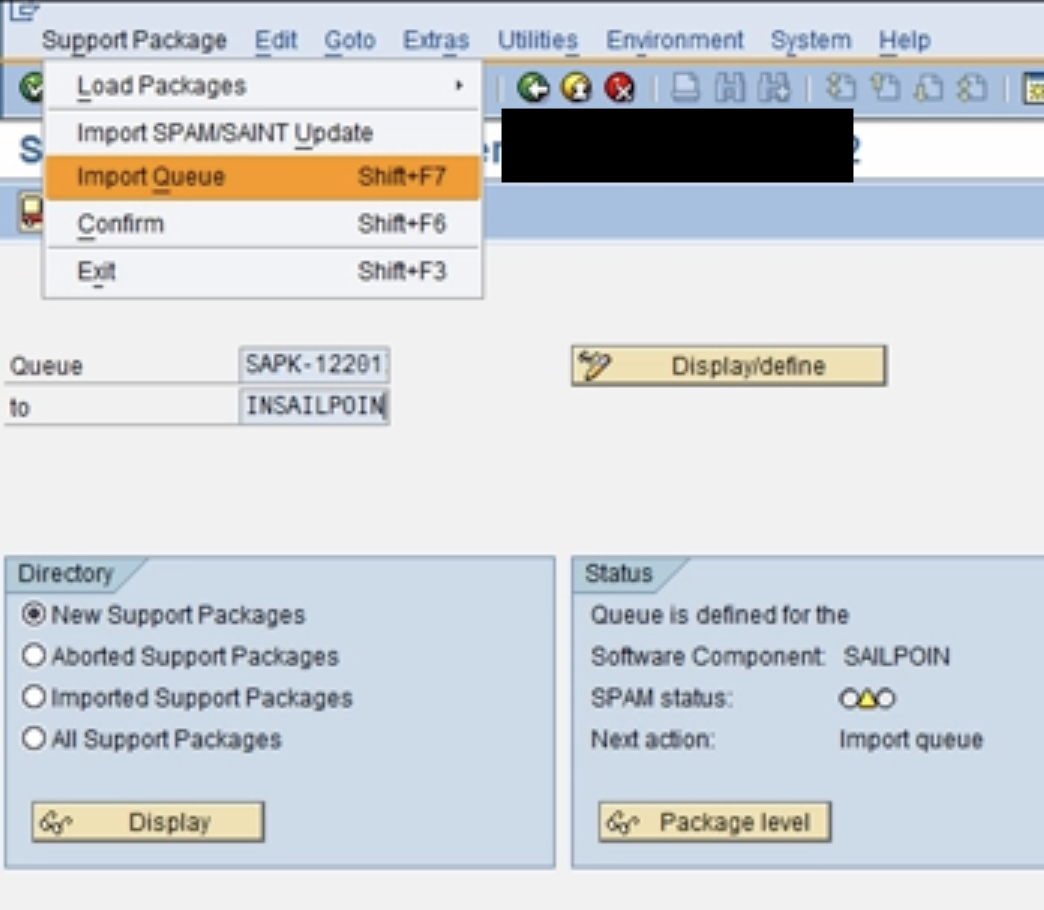
-
Select Continue to import the queue.
Screenshot
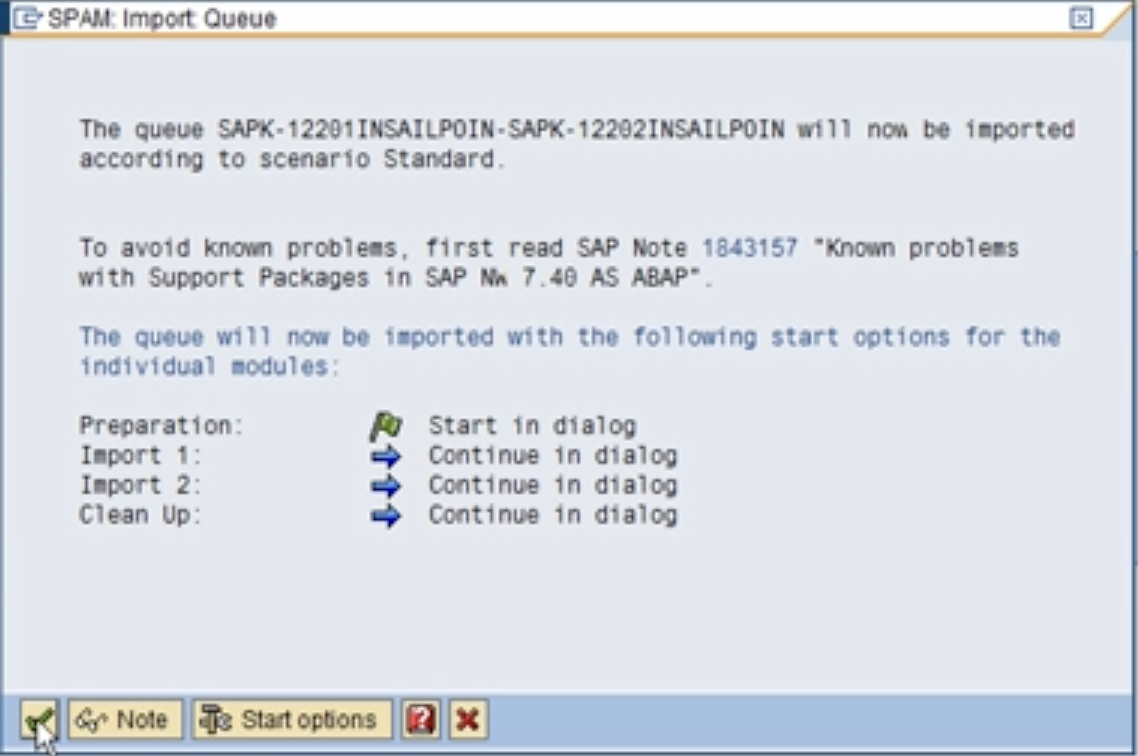
Note
The support package will begin installing, and the progress can be seen at the bottom of the window.
-
After the support package(s) are successfully imported, the below prompt should appear. Select Continue to proceed with the import.
Screenshot
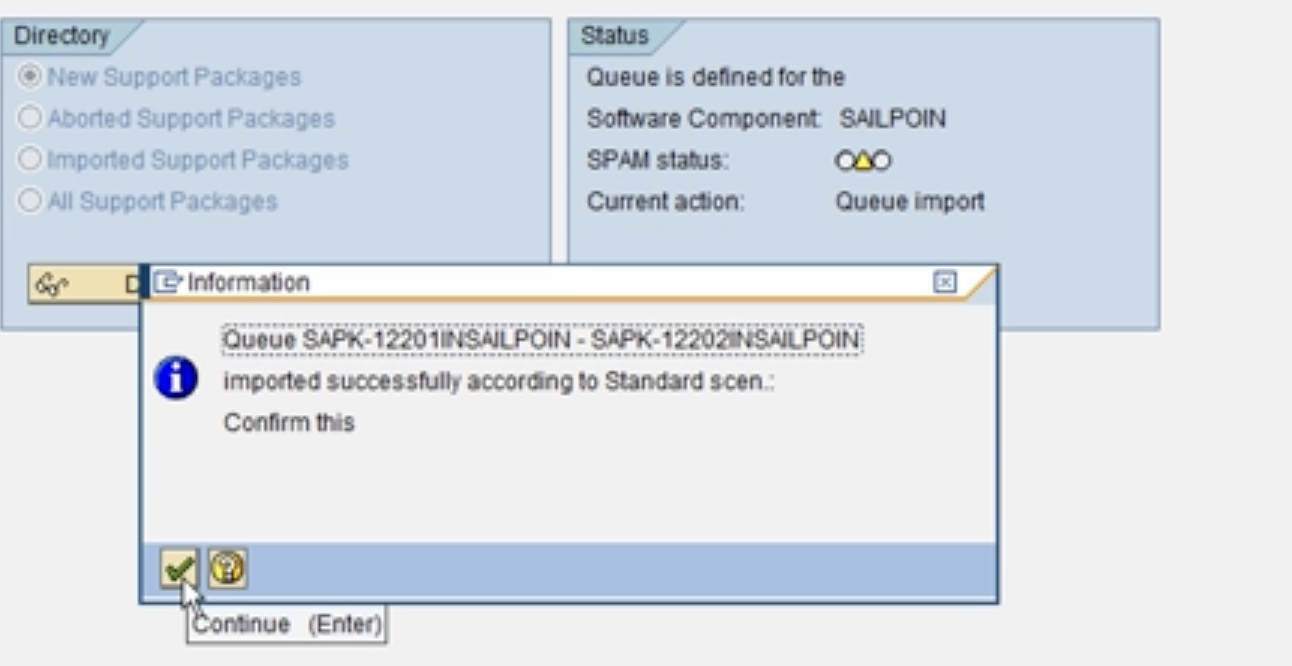
-
Go to Support Package > Confirm to confirm the queue.
Screenshot
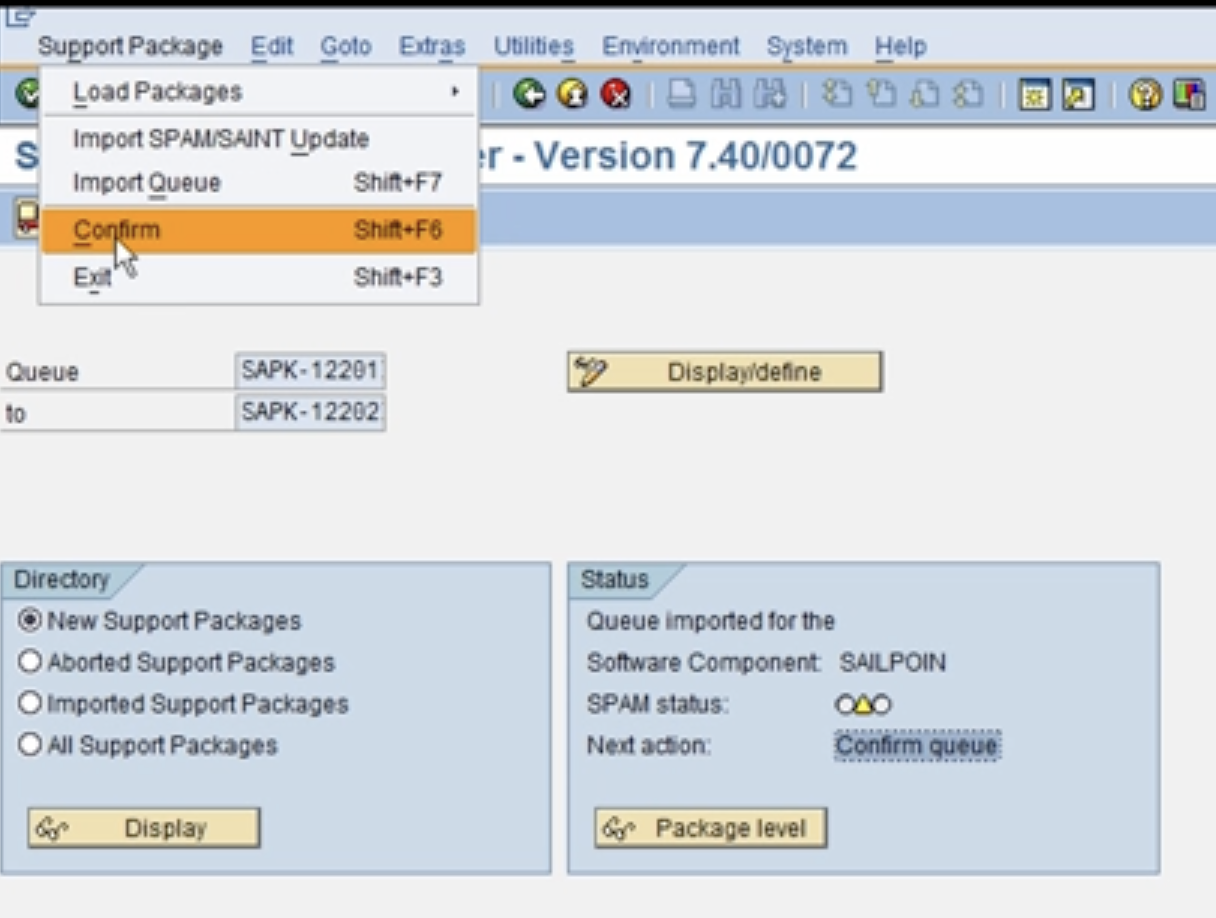
-
When prompted to send Runtime Analysis, select Do not send.
-
Go to System > Status > Details > Installed Software Component Versions to confirm that the Add-on's support package is now set to the desired support package level. For example,
0002.Screenshot
New Package Download Matrix
Refer the SailPoint SAP ABAP Add-on PAT Files for downloading the new package.
| Release | Installed Software Component Level and Support Package Name | Downloadable Package Type | PAT File Name | Download Link |
|---|---|---|---|---|
| 100_2022 | Base Component | AOI (Add-On Installation Package) | G750020862508_0000028.PAT |
https://community.sailpoint.com/knowledge/SailPoint-SAP-ABAP-Add-on-PAT-Files |
| 100_2022 | SP-Level: 0001, Support Package: SAPK-12201INSAILPOIN | CSP (Component Support Package) | G750020862508_0000032.PAT |
|
| 100_2022 | SP-Level: 0002, Support Package: SAPK-12202INSAILPOIN | CSP (Component Support Package) | G750020862508_0000033.PAT |
To overcome dependency errors during Add-on installation, use these Attribute Change Package (ACP) files:
| Installed Software Component Level and Support Package Name | PAT File Name |
|---|---|
| DW4CORE, S4CORE, SAP_GWFND | G750020862508_0000076.PAT |
| S4FND, MDG_FND, SAP_GWFND | G750020862508_0000077.PAT |
Uninstallation of SAILPOIN Add-On
- Sign in to the SAP GUI and execute the Tcode SAINT.
-
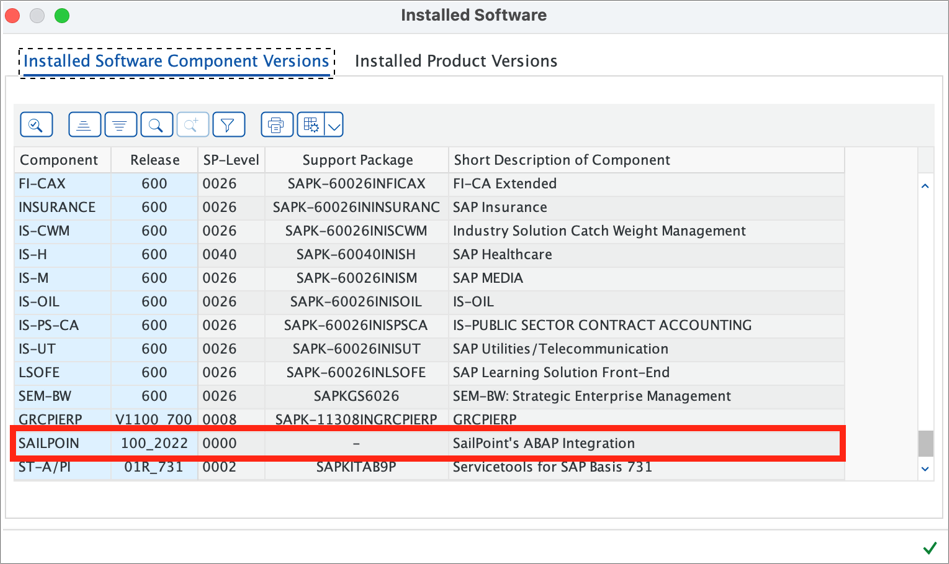
Ensure that the Add-on SAILPOIN was successfully installed by confirming that it is visible in the Installed Components list.
Screenshot
-
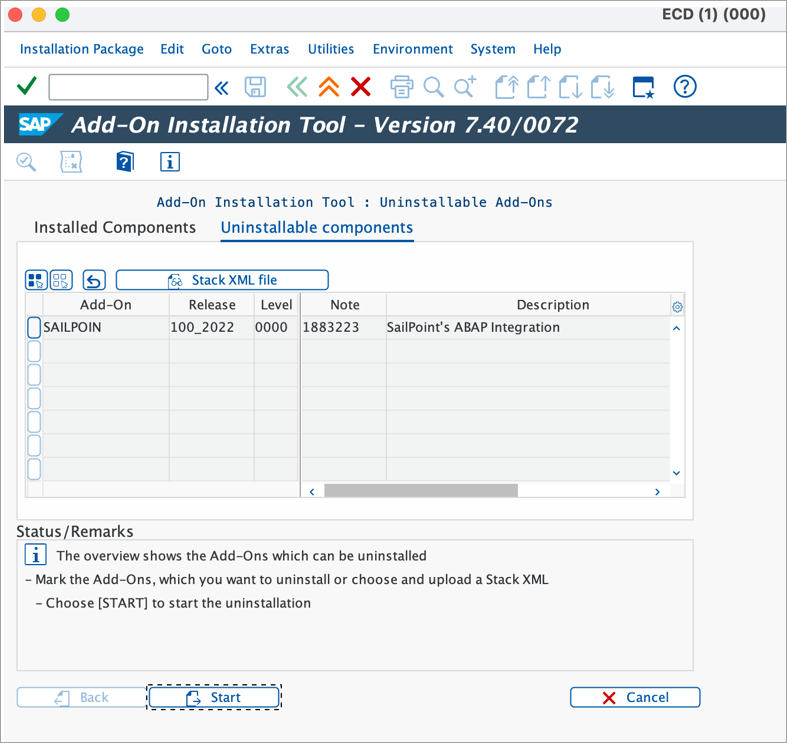
Select Uninstallable Components. The Add-on SAILPOIN should be visible.
Screenshot
-
Select SAILPOIN from the grid, and then select Start.
-
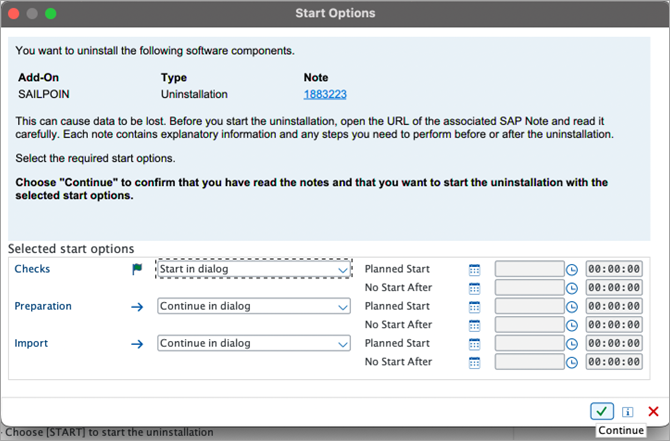
Select Continue when prompted on the Start Options dialog box.
Screenshot
Note
If there are any specific preferences for any of the start options, those can be selected as per your requirements.
-
Select Finish.
-
If prompted to send Runtime Analysis, select Do not send.
Screenshot
-
Perform the following to confirm that the Add-on SAILPOIN was uninstalled:
- Select Installable Components and scroll through the list to ensure SAILPOIN is not found.
- Select Uninstallable Components and scroll through the list to ensure SAILPOIN is not found.
- Go to System > Status > Product Version > Details > Installed Software Component Versions. Ensure Add-on SAILPOIN is not found.
Configuring Provisioning Settings
Configure the provisioning settings to change GRC access requests.
Screenshot
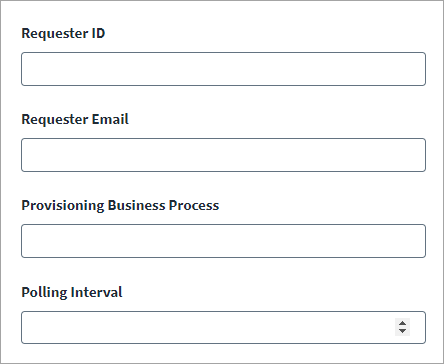
- Enter the Requester ID to use for provisioning on the SAP GRC service. For one method of finding the requester ID, refer to Finding the Requester ID.
- Enter the Requester Email to use for provisioning on the SAP GRC service.
- Enter the Provisioning Business Process. By default, the value is
basis. - Enter the Polling Interval in minutes. This indicates the time interval for requesting data from SAP GRC. The interval can be from 1 to 360 minutes. The default is 60.
-
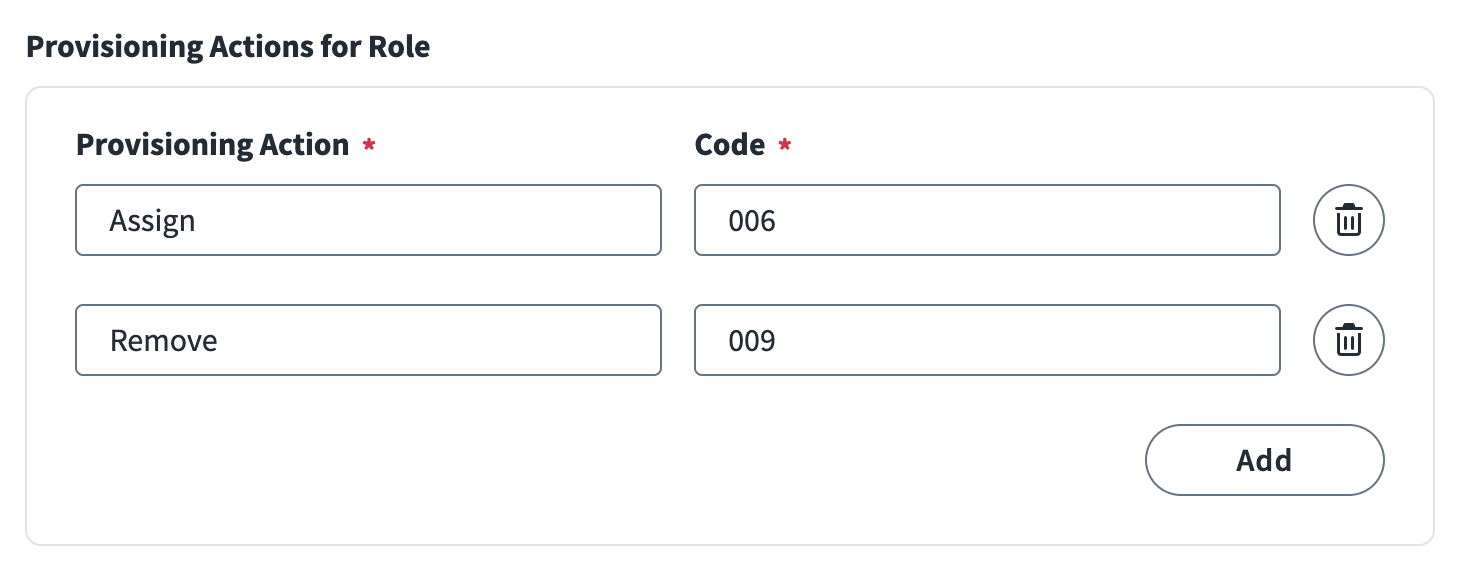
Configure the mapping for the following:
Screenshot
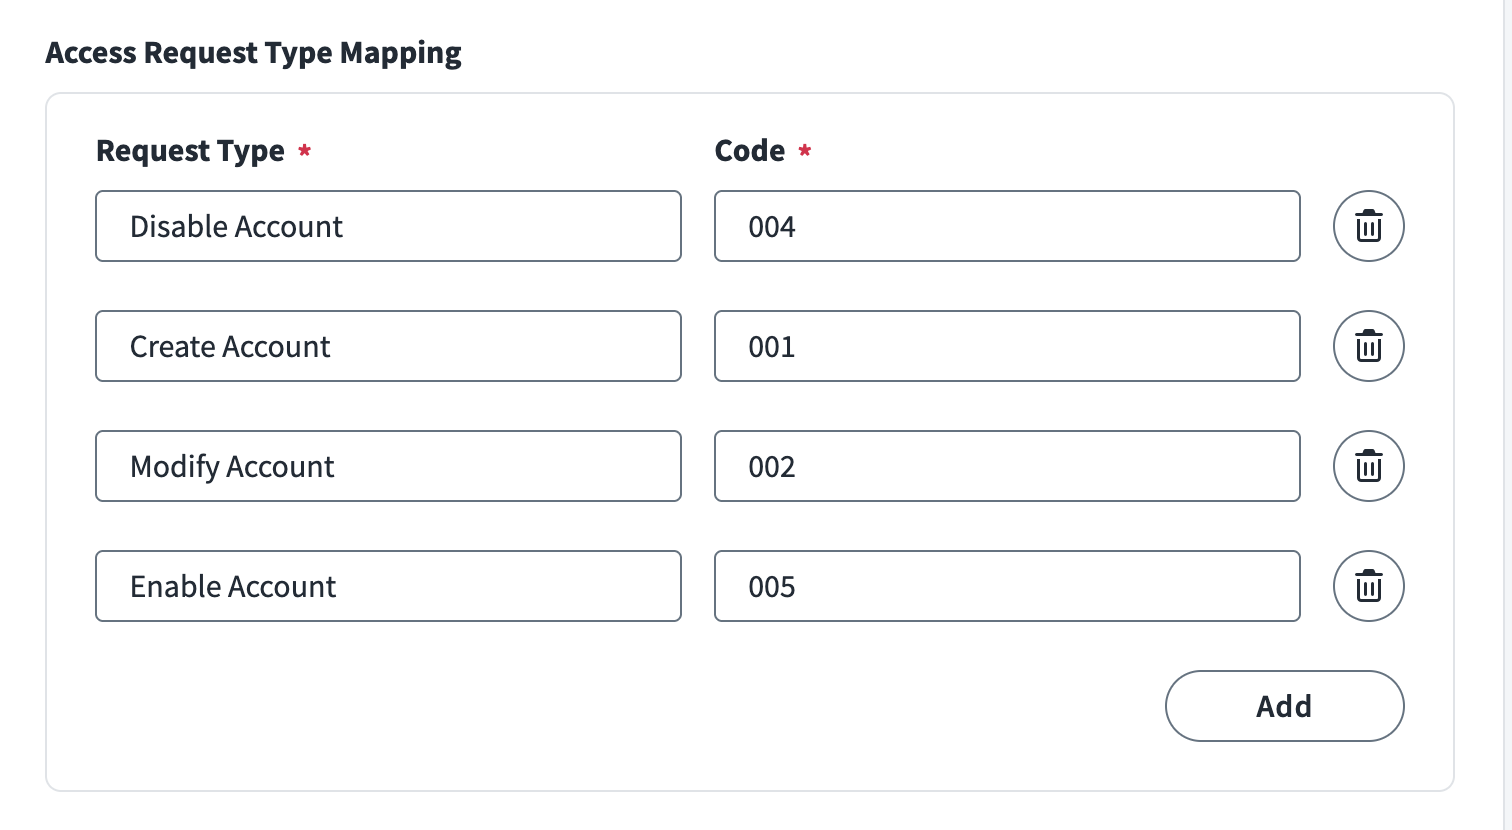
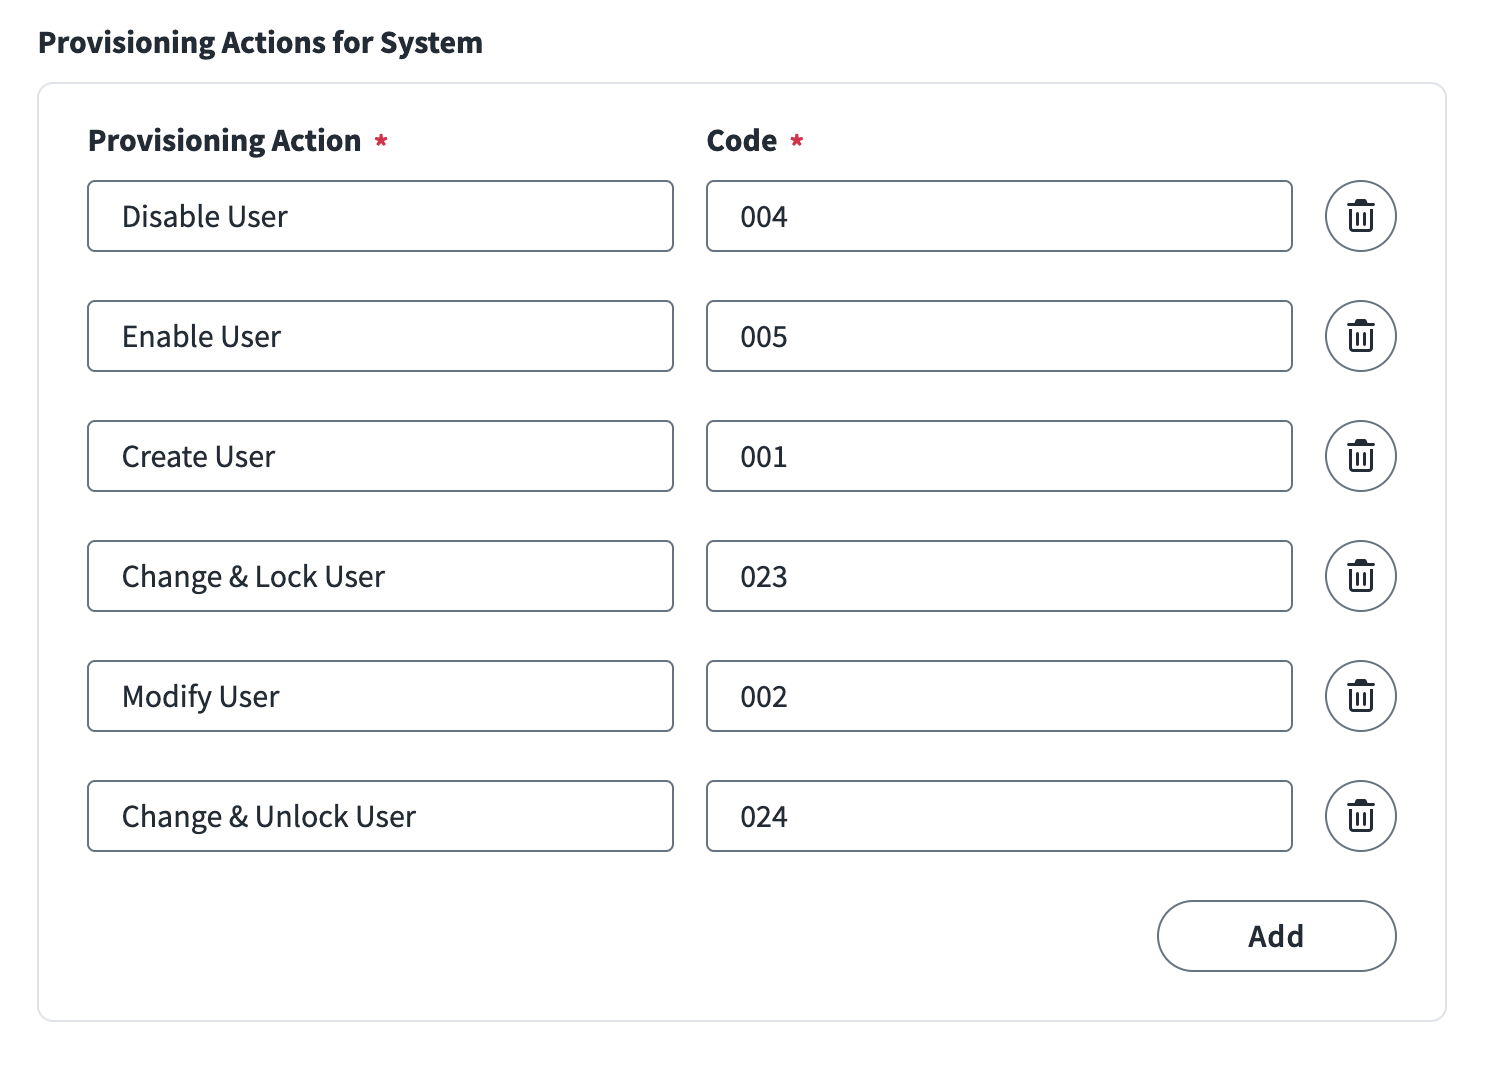

- Access Request Type
- Provisioning Actions for Role
- Provisioning Actions for System
For more information, refer to Verify the Request Type and Configuration.
-
Enter the Access Request Priority. This is the 3-digit number that indicates the priority for all SAP GRC access requests triggered by SailPoint. The default is 006.
- The connector will disable all systems connected to SAP GRC. For more information, refer to Disable All Systems Connected to SAP GRC.
- Select Save.
Review and Test
Perform a test to confirm the connection to SailPoint.
- Go to Review and Test.
-
Confirm that the entries in each field are correct.
If you note any mistakes, return to the section and make corrections.
-
Select Test Connection.
SailPoint Application Onboarding
SailPoint application onboarding enables you to easily onboard new applications and create sources following the successful onboarding of a discovery source. To use this feature, continue to Discovered Applications in the SailPoint user interface.
For more information, refer to Application Onboarding in the SailPoint SaaS documentation.
Finding Aggregation Values for Child Roles
The SAP GRC connector supports aggregation of the Associated Child Roles attribute. The child roles are the roles associated with composite or business roles. For new connectors the Associated Child Roles attribute is available by default. For existing sources, you must manually add it. For more information on adding the attribute to the schema, refer to Adding Attributes to a Source Schema.
When the Associated Child Roles attribute is present in the schema for existing and new connectors, you must assign additional permissions such as GRACROLERELAT and GRACRLCOMPRL field values for the S_TABU_NAM authorization object.
Finding the Request ID
When users are provisioned, a request is sent to the SAP GRC system, and a Request ID is created in SAP GRC. To find the Request ID, refer to the following procedure:
- In the SAP GRC system, go to Dashboard > Provisioning.
- Select View All.
- Enter a search query for the identity for which a request is placed.
- Select Account Activity.
-
Select the Lifecycle Change Refresh row under the Action column.
The Request ID appears.
System Bypass Configuration
The System Bypass Configuration enhancement supports customer use cases where a SAP GRC connected system needs to be skipped during all operations, such as:
- Aggregation
- Provisioning
- Modifying
With this configuration, you can selectively govern the systems that you intend to use with SailPoint. There are two modes available for use:
- Systems to Bypass for All Operations: To configure systems where all operations need to be skipped.
-
Systems to Bypass for Provisioning Operations: To configure systems where only provisioning operations need to be skipped.
Screenshot
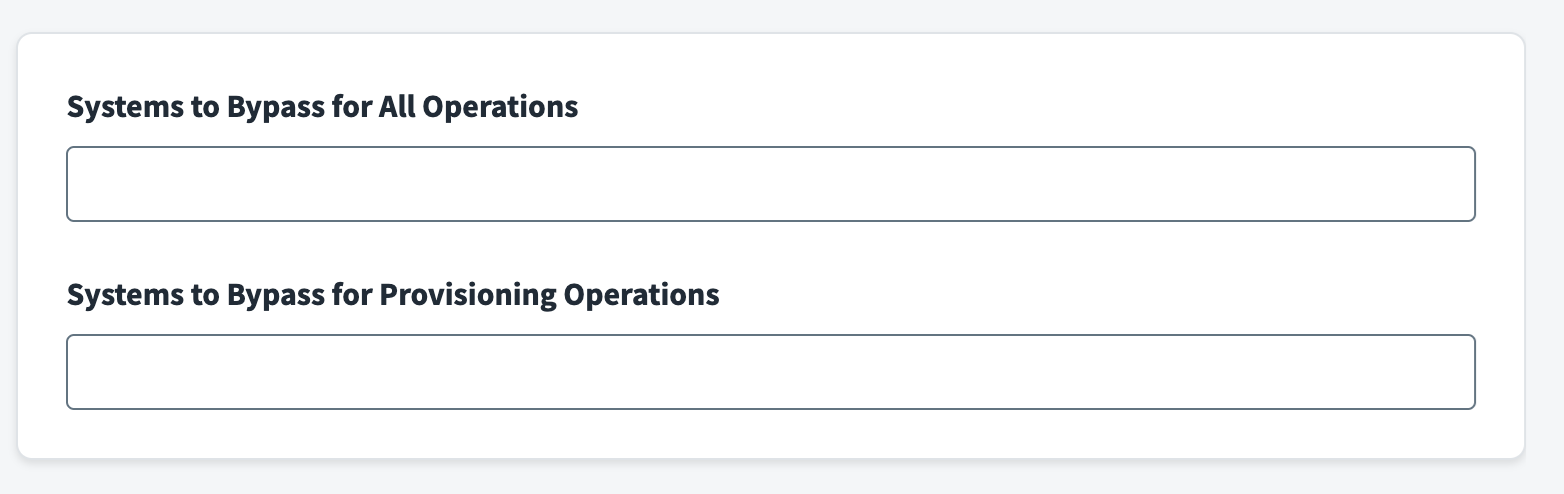
Use the Systems to Bypass for All Operations field to specify one or more systems that are connected to SAP GRC, and need to be bypassed during all connector operations. For example, aggregation, provisioning, or modifying users, attributes, and entitlements.
-
Specify the system names separated by a new line for each system name. The expected outcome for the specified systems are as follows:
- Account Aggregation
- Users will not be aggregated if all the roles associated with it belong to the systems being bypassed.
- Users will be aggregated if they have roles from multiple systems and any one of the roles is not set to be bypassed. In this case, the connector will only fetch the roles from systems that are not being bypassed.
- Users and associated business roles will be aggregated if there is a business role that gives access to users from multiple systems and any one of the roles is not set to be bypassed. If all the roles inside a business role belong to the bypassed system, the business role will not be aggregated.
- Group Aggregation
- Entitlements associated with systems that are set be bypassed will not be aggregated.
- Provisioning
- All provisioning operations will fail for systems specified in the Systems to Bypass for All Operations field.
- Provisioning for business roles will fail if the business role contains any role from the systems that are set to be bypassed.
- Account Aggregation
Use the Systems to Bypass for Provisioning Operations field to specify one or more systems that are connected to GRC that need to be bypassed during the provisioning operation (mostly read-only systems).
-
Specify the system names separated by a new line for each system name. The expected outcome for the specified systems are as follows:
- Provisioning
- All provisioning operations will fail for systems specified in the Systems to Bypass for Provisioning Operations field.
- Provisioning for business roles will fail if the business role contains any role from the systems that are set to be bypassed.
- The connector (by default) aggregates all the users, entitlements, and attributes from all of the SAP GRC connected systems unless explicitly configured to bypass under Aggregation Settings.
- Provisioning
Note
SailPoint recommends running full account and group aggregation tasks after configuring these settings.
Configuration Summary Table
The following table lists the expected behavior when a particular system is added to Systems to Bypass for All Operations and/or Systems to Bypass for Provisioning Operations.
| Systems to Bypass for All Operations | Systems to Bypass for Provisioning Operations | Expected Behavior |
|---|---|---|
| Present | Present | Aggregation will exclude users/roles from systems to be bypassed. Provisioning will be restricted for bypassed systems. |
| Not Present | Present | Provisioning will be restricted for bypassed systems. |
| Present | Not Present | Aggregation will exclude users/roles from systems to be bypassed. Provisioning will be restricted for bypassed systems. |
| Not Present | Not Present | No restrictions. All users/roles will be aggregated. |
Configuring for Existing Sources
If systems are configured to be bypassed for an existing source that already has aggregated data, you must ensure the following aggregation settings in place.
- For the account aggregation task, enable the option to Enable Account Deletion. Existing accounts, with all the entitlements from the system configured to be bypassed, can then be removed. For more information, refer to Loading Account Data.
- For entitlement aggregation, entitlements can't be deleted directly in SailPoint. To remove entitlements that are associated with the system to be bypassed, delete them directly from the source and then run an entitlement aggregation. For more information, refer to Managing Entitlements.
Additional Information
Enable and Disable Account
Update the Valid From and/or Valid To Dates When the Account Is Enabled or Disabled
Note
The Valid From or Valid To date must be present in the provisioning plan in the format SystemName/yyyyMMdd to update the dates when the account is enabled or disabled.
-
Example AttributeRequest for single account disable/enable:
-
Example Attribute Request for Multiple account disable/enable:
Update the User Group and/or User Group Assignments When the Account Is Disabled
Note
The User Group or User Group Assignments must be present in the provisioning plan in the format SystemName/<Group name> to update the dates when the account is disabled. Existing groups will be replaced with those provided in the provisioning plan.
-
Example attribute request to update the User Group:
-
Example attribute request to update the User Group Assignments:
Disable All Systems Connected to SAP GRC
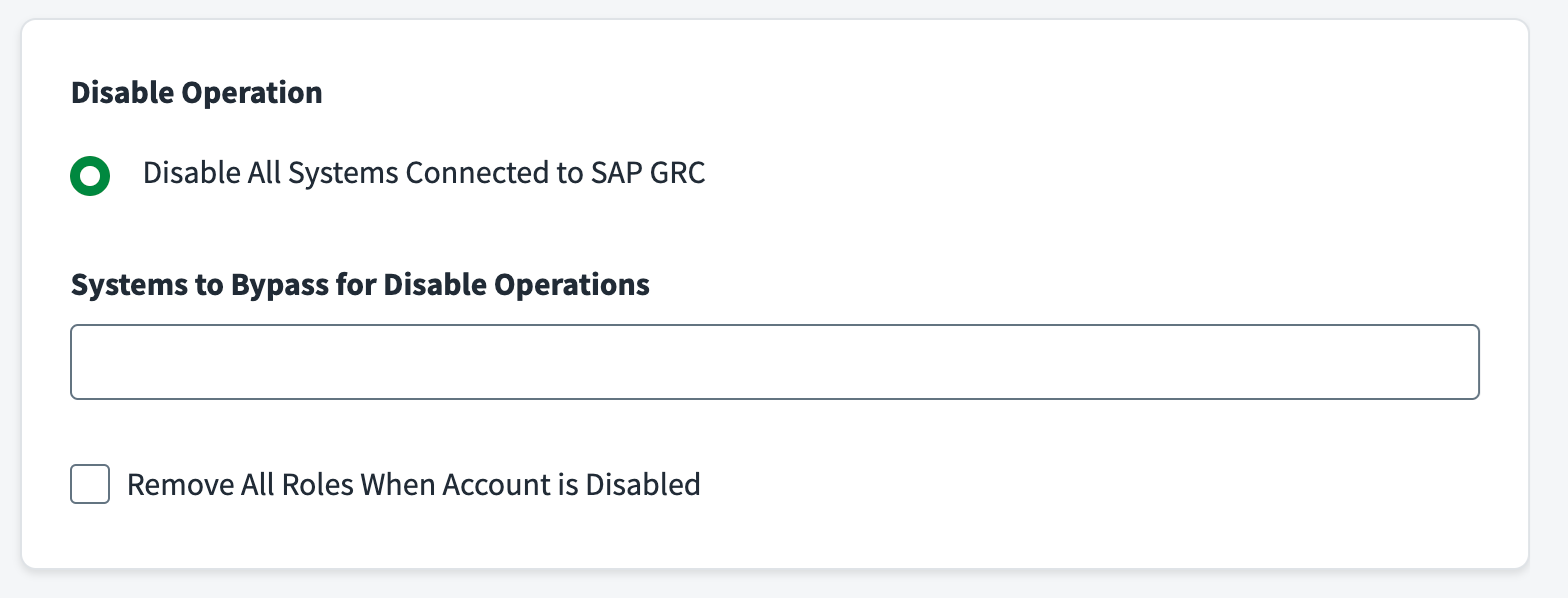
- Systems to Bypass for Disable Operations: Provide the name(s) of systems that the connector should bypass during the disable operation. The requested line item for specified systems will not be created in the GRC portal.
Remove All Roles When Account Is Disabled
To remove all of the roles when account is disabled, select Remove All Roles When Account is Disabled option. All of the roles from the GRC user account will be removed during the disable operation.
Note
Role(s) associated with bypass systems configured during System Bypass Configuration will also be removed when Remove All Roles When Account is Disabled option is selected.
Modify Account
Note
- This is applicable for SAP GRC AC12 SP19 and above versions.
- Modify Attributes only supports updating the values of the attributes on the user's highest priority connector. For example, the
Systemvalue for the user.
SAP has introduced a new process where any modifications in the user attributes reflect in GRC tables only after completing a Repository Sync Job from the GRC side.
The following steps must be performed sequentially for a successful modify operation:
- Configure the Attribute Sync request on the user in SailPoint for the GRC source. To configure the attribute sync request, refer to Synchronizing Attributes - SailPoint Identity Services.
- Run the Repository Object Sync job on your GRC system.
- Execute User Aggregation on your GRC source to get the updated values of the user attributes.
Provisioning Multiple Systems Using User Group Attribute
The SAP GRC connector supports modification of the User Group attribute for multiple systems. To enable this functionality, follow these steps:
-
Pass the User Group attribute as a list in the provisioning plan:
-
Set the
setUserGroupInUserInfoflag to true in the source configuration:Key=setUserGroupInUserInfo
Value=true
The
setUserGroupInUserInfois a boolean attribute.Note
The
setUserGroupInUserInfoflag must be set to true for the provisioning of multiple systems to be supported.
Firefighter ID Configuration
Screenshot
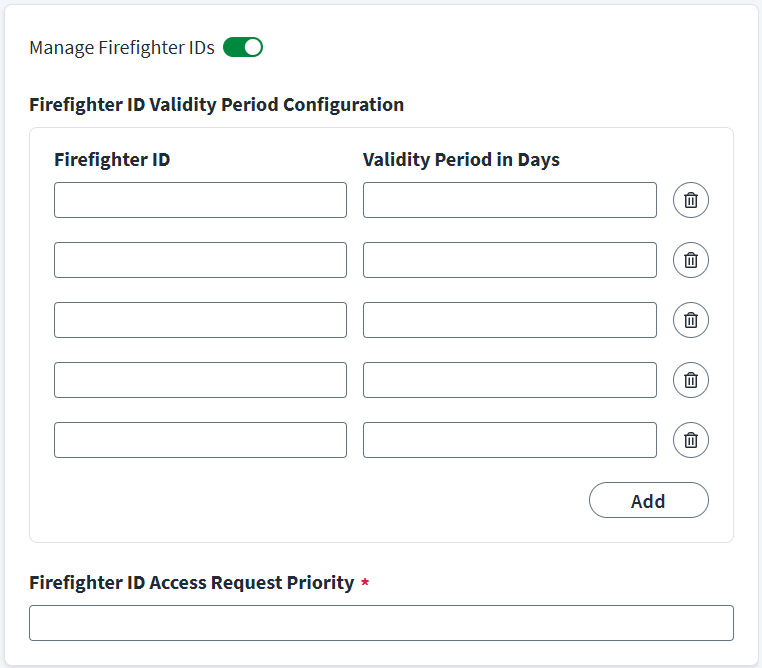
- Enable the Manage Firefighter IDs setting to aggregate and provision Firefighter IDs where applicable. By default, this checkbox is unselected for new and existing applications.
-
Enter Firefighter ID with days to configure the Validity Period in Days for Firefighter ID or Superuser Access in days.
This setting overrides SAP GRC configurations when applied in SailPoint. If no value is provided, the system defaults to the standard SAP GRC Firefighter ID validation period (days). The start date is automatically set to the current system date, and the end date is determined by adding the specified number of days.
-
Enter the Firefighter ID Access Request Priority, which is a 3-digit number that indicates the priority for all SAP GRC FFID access requests triggered by SailPoint. The default value is 006.
Documentation Feedback
Feedback is provided as an informational resource only and does not form part of SailPoint’s official product documentation. SailPoint does not warrant or make any guarantees about the feedback (including without limitation as to its accuracy, relevance, or reliability). All feedback is subject to the terms set forth at https://developer.sailpoint.com/discuss/tos.