Connecting SailPoint and Microsoft Entra ID
To connect SailPoint with Microsoft Entra ID, perform the following tasks:
Adding the Source in SailPoint
To connect to SailPoint, perform the following steps. Once the connection is made, you can configure it to meet your company's needs.
Important
By default, the provisioning feature is disabled, and the connector only supports read-only operations. To support provisioning operations, you must manually enable the feature in the source configuration.
To configure a new source:
- Sign in to SailPoint.
- Go to Admin > Connections > Sources.
- Select Create New.
- Search for the connector by entering the name in the search box, and then select Actions.
-
In the Actions dropdown list, select the setup method:
-
Express Setup - Quickly create a read-only connection to your target system by providing minimal configurations and authentication. On completion, aggregation is automatically started.
Note
Express Setup supports Credential Providers. For information on supported credential providers and configuration, refer to Credential Providers. For more information, contact your SailPoint Customer Service Manager.
-
Standard Setup - Provide detailed basic configuration to create the source. Once the source is created, continue with source setup.
-
Configuring a Source Using Express Setup
Express Setup minimizes the initial configuration process so you can quickly connect the application and immediately begin aggregating user account and entitlement data.
- Review the directions and select Start Express Setup.
-
Review the pre-populated Source Name, Source Owner, and Description. To update, select Edit.
Note
The source name must be unique. You can change these settings later in the source configuration.
-
Select Virtual Appliance. A virtual appliance is a Linux-based virtual machine that connects to your sources and apps using SailPoint APIs, connectors, and integrations. For more information about configuring and deploying virtual appliances, refer to SailPoint Virtual Appliances.
-
(Optional) If enabled for your organization, select the Use a Credential Provider checkbox to manage the source's authentication using a credential provider.
Note
To add a Credential Provider in SailPoint, go to Admin > Connections > Credential Providers. For more information about credential providers, refer to Credential Providers.
-
Configure the authentication to allow SailPoint to connect to the source. For more information, refer to the Connection Settings section.
-
Select Finish.
After a successful test connection, the system creates your source and prompts you to run an aggregation.
-
If you want to aggregate now, select Aggregate.
- To see the latest account aggregation history, go to Account Management > Account Aggregation.
- To see the list of aggregated source accounts, go to Account Management > Accounts.
-
If you want to aggregate later, select Exit. This returns you to the Sources page. Your new source is listed, but contains no accounts or aggregation history yet.
-
Configuring a Source Using Standard Setup
Use Standard Setup to configure the connector for full feature support.
- In the Source Name field, enter a unique and descriptive name for your source. Source names cannot exceed 128 characters.
- In the Description field, provide additional details about the source to help distinguish it from similar sources. This field allows a maximum of 2,000 characters.
- In the Source Owner field, begin typing the name of an owner. Matches appear after you type two or more letters. For more information, refer to Assigning a Source Owner.
-
Under Connection Type, select Direct Connection or Flat File.
- Direct Connection - A direct connection fetches data from the Virtual Appliance Cluster you choose as the application connector for the source. A direct connection configuration allows for real-time updates. For more information about configuring and deploying virtual appliances, refer to the Virtual Appliance Reference Guide.
- Flat File - Select the flat file if no connector is available, or if another system restricts the connection. This option allows only reading and aggregating data as a generic/delimited application. Provisioning activity is unsupported, and additional configuration pages like connection settings and aggregation settings are unavailable.
-
If you selected Direct Connection, in Virtual Appliance Cluster, select the virtual appliance cluster that will be used as the application connector for the source.
- (Optional) Select a governance group to grant its members source or role sub-admin level oversight of the source and its access. For more information, refer to Creating and Managing Governance Groups.
- If this source represents a primary system containing your organization's personnel records, select the Authoritative Source checkbox. For more information, refer to Creating Identity Profiles.
- Select Continue. The source is created, and you are navigated to the Source Setup > Base Configuration page. Continue to configure your connected source there.
Base Configuration
Provide the base configuration parameters. Information you entered in the Create New Source dialog is automatically entered into the fields in the Base Configuration page. You can edit this information if necessary.
- Enter a unique name and description for the source.
-
In the Source Owner dropdown list, select the identity that owns this source.
- To find a source owner, begin entering their name.
-
In the Virtual Appliance Cluster dropdown list, select the virtual appliance to use when communicating with your organization's systems. For more information, refer to SailPoint Virtual Appliances.
-
(Optional) If enabled for your organization, select the Use a Credential Provider checkbox to manage the source's authentication using a credential provider.
Note
To add a credential provider, go to Admin > Connections > Credential Providers. For more information about credential providers, refer to Credential Providers.
-
Configure the authentication to allow SailPoint to connect to the source. Refer to Connection Settings for more information.
-
(Optional) In the Governance Group for Source Management dropdown list, select a governance group to associate with this source. For more information about governance groups, refer to Associating Governance Groups with a Source.
-
(Optional) Choose whether to enable or disable provisioning for the source. Provisioning is disabled by default.
-
Enable Provisioning - Set the toggle to Enabled to allow the source to create, update, and deactivate accounts in the connected source system.
-
Disable Provisioning - Set the toggle to Disabled to disable provisioning for the source. Disabling provisioning will prevent the creation, updating, or deactivating of accounts on this source.
-
-
Select Save.
Connection Settings
Provide the information required to connect to the Microsoft Entra instance based on the selected Grant Type for OAuth 2.0 authentication:
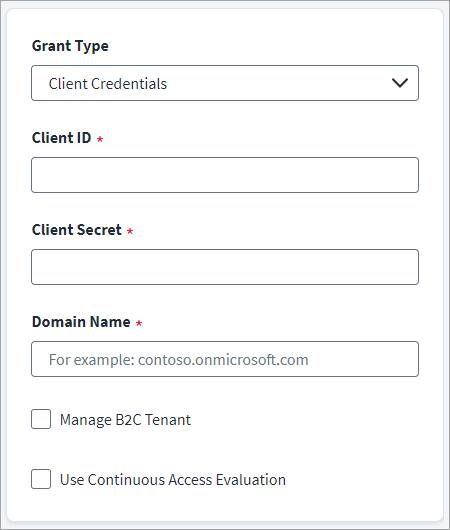
Client Credentials
Screenshot
-
In the Client ID field, enter the Microsoft Entra ID API Client ID for OAuth2 authentication.
-
In the Client Secret field, enter the Microsoft Entra ID API Client Secret.
-
In the Domain Name field, enter the name of the Microsoft Entra ID domain to be managed. For example, contoso.onmicrosoft.com.
-
(Optional) Select the Manage B2C Tenant checkbox to manage identities in the Azure Active Directory B2C Tenant.
Note
Delta Aggregation is not applicable if the Manage B2C Tenant checkbox is selected.
-
(Optional) Select the Use Continuous Access Evaluation checkbox to enable the connector to leverage the Microsoft Entra ID real-time enforcement of Conditional Access location and risk policies along with instant enforcement of token revocation events for an enterprise application (service principal).
-
Select Save.
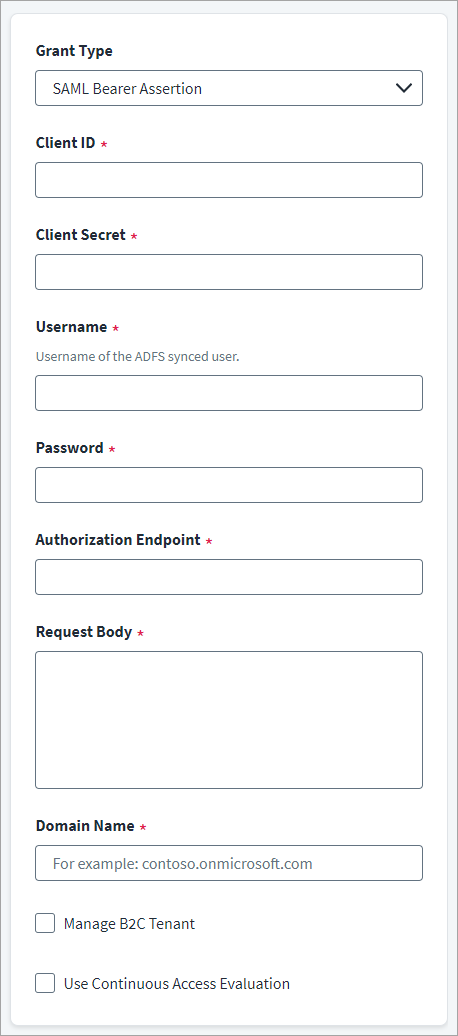
SAML Bearer Assertion
Screenshot
-
In the Client ID field, enter the Microsoft Entra ID API Client ID for OAuth2 authentication.
-
In the Client Secret field, enter the Microsoft Entra ID API Client Secret.
-
Enter the Username for authorization.
-
Enter the Password of the user for authorization.
-
In the Authorization Endpoint field, enter the endpoint URL of authorization server.
-
In the Request Body field, enter the request body for SAML assertion.
For more information on SAML Request Body, refer to SAML Request Body.
-
In the Domain Name field, enter the name of the Microsoft Entra ID domain to be managed. For example, contoso.onmicrosoft.com.
-
(Optional) Select Manage B2C Tenant checkbox to manage identities in the Azure Active Directory B2C Tenant.
Note
Delta Aggregation is not applicable if the Manage B2C Tenant checkbox is selected.
-
(Optional) Select the Use Continuous Access Evaluation checkbox to enable the connector to leverage the Microsoft Entra ID real-time enforcement of Conditional Access location and risk policies along with instant enforcement of token revocation events for an enterprise application (service principal).
-
Select Save.
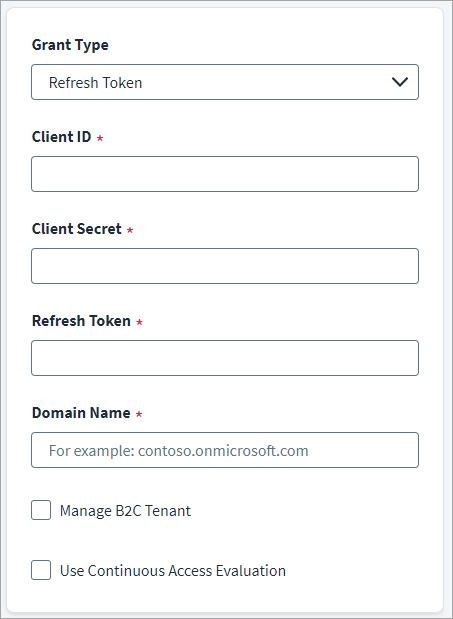
Refresh Token
Screenshot
-
In the Client ID field, enter the Microsoft Entra ID API Client ID for OAuth2 authentication.
-
In the Client Secret field, enter the Microsoft Entra ID API Client Secret.
-
Enter the valid Refresh Token.
-
In the Domain Name field, enter the name of the Microsoft Entra ID domain to be managed. For example, contoso.onmicrosoft.com.
-
(Optional) Select Manage B2C Tenant checkbox to manage identities in the Azure Active Directory B2C Tenant.
Note
Delta Aggregation is not applicable if the Manage B2C Tenant checkbox is selected.
-
(Optional) Select the Use Continuous Access Evaluation checkbox to enable the connector to leverage the Microsoft Entra ID real-time enforcement of Conditional Access location and risk policies along with instant enforcement of token revocation events for an enterprise application (service principal).
-
Select Save.
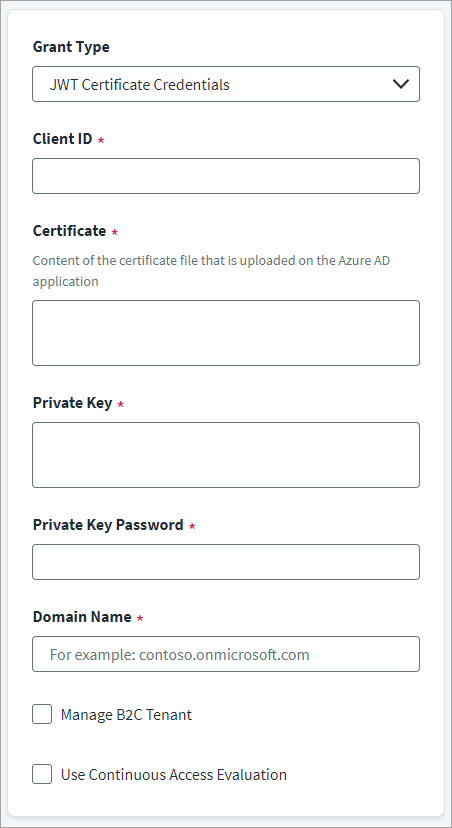
JWT Certificate Credentials
Screenshot
To generate the JWT certificate credentials, refer to Creating OAuth 2.0 JWT Certificate Credentials.
-
In the Client ID field, enter the Microsoft Entra ID API Client ID for OAuth2 authentication.
-
In the Certificate field, provide the unique alpha-numeric value of certificate used to sign the JWT assertion.
-
Enter the Private Key text used for encrypting the JWT assertion.
-
Enter the Private Key Password that is used for decrypting the private key.
-
In the Domain Name field, enter the name of the Microsoft Entra ID domain to be managed. For example, contoso.onmicrosoft.com.
-
(Optional) Select Manage B2C Tenant checkbox to manage identities in the Azure Active Directory B2C Tenant.
Note
Delta Aggregation is not applicable if the Manage B2C Tenant checkbox is selected.
-
(Optional) Select the Use Continuous Access Evaluation checkbox to enable the connector to leverage the Microsoft Entra ID real-time enforcement of Conditional Access location and risk policies along with instant enforcement of token revocation events for an enterprise application (service principal).
-
Select Save.
Aggregation, Filter, and Partitioning Settings
This section contains the configuration parameters for aggregation, filter, and partitioning settings.
For more information about aggregation, refer to Loading Account Data.
For more information on the key factors to consider when choosing between Full Aggregation and Delta Aggregation, refer to FAQs.
Aggregation Settings
Screenshot
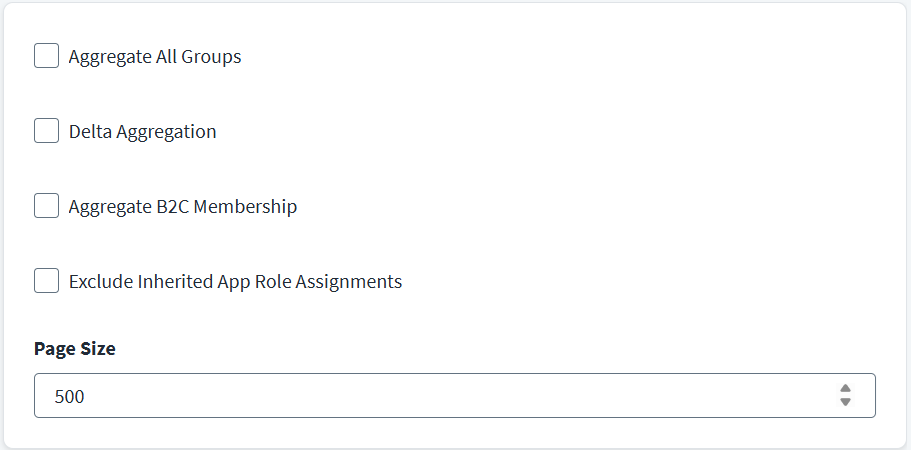
-
Select the Aggregate All Groups checkbox to aggregate Security, Microsoft 365, Distribution List, and Mail Enabled Security Groups. If this option is cleared, only Security Groups are aggregated.
-
Select the Delta Aggregation checkbox to aggregate delta changes for accounts and groups.
-
(Applicable for B2C tenant only) Select the Aggregate B2C Membership checkbox to fetch B2C user memberships for all users.
-
Select Exclude Inherited App Role Assignments to exclude inherited appRoleAssignments during account aggregation. Only application roles assigned directly to the account are aggregated. Application roles inherited through group membership are excluded. Group memberships continue to be aggregated.
By default, both inherited and direct appRoleAssignments are aggregated.
-
Enter the value of Page Size for the number of objects to be fetched in a single page when iterating over large data sets.
Filter Settings
When configuring the filters, consider that the connector prioritizes account filters over group filters during aggregation. For example, the connector aggregates groups, which fall outside of the group filter, if the group is associated with an account included within the account filter.
Screenshot

Note
-
If the filter (either Group Filter or User Filter) uses any advanced query filter (per the Microsoft documentation), then Advanced User Filter and Advanced Group Filter should also be selected.
-
The connector supports advanced query filters like
endsWith,NOT, andNEduring aggregation. The Azure API does not support the advanced query filters while also using an expanded attribute such asmanagerin the URL. When using the advanced filters, ensure that you remove themanagerattribute from the account schema and remove theownersattribute from the group schema. -
If you're using the advanced filters you must add the
supportsAdvancedAccountFilterattribute to the source XML using the SailPoint REST API. The connector will then automatically add the required header (ConsistencyLevel:eventual) in the header and add&$count=truekey:
supportsAdvancedAccountFiltervalue:
true
-
Set the User Filters to define the scope of Accounts applied during account aggregation. For example, to aggregate those Microsoft Entra ID users who are active, use
accountEnabled eq true. For more information on filters, refer to the Microsoft documentation. -
Select Advanced User Filter to include advanced filter queries such as endsWith, NOT, and NE during aggregation processes.
To use the extension attributes from
onPremisesExtensionAttributese.g.extensionAttribute1,extensionAttribute4etc. as user filter, please use the below syntax:onPremisesExtensionAttributes/extensionAttribute1 eq '21'User Filters
Screenshot

Note
Select the “Advanced User Filter” checkbox as it is advanced query filter.
-
Set the Group Filters to define the scope of Groups applied during group aggregation. Group filters apply during entitlement aggregation. For example, to only aggregate Microsoft Entra ID groups whose display name is starting with letter A, use
startswith(displayName,'A'). For more information on filters, refer to the Microsoft documentation. -
Select Advanced Group Filter to include advanced filter queries such as endsWith, NOT, and NE during group aggregation processes.
-
Select the Group Membership Filters to define the scope of the group memberships included in account aggregation. These filters apply during the account aggregation and are only applicable to memberships belonging to
objectType = group. These are only applicable to the Security, Office 365, Mail Enabled Security, and Distributed type of group memberships. For more information on filters, refer to the Microsoft documentation.Note
You can provide filters as mentioned in the examples below, and the connector ensures the formation of an appropriate advanced filter query. This field supports advanced filter queries such as
endsWith,NOT, andNE.For example,
- To aggregate only group memberships with group display name starting with 'A', use
startswith(displayName,'A'). - To aggregate only group memberships with groups not belonging to on-premises AD (or to only include cloud group memberships), use
onPremisesSyncEnabled ne true. - To exclude dynamic group memberships during account aggregation , use
NOT groupTypes/any(c:c eq 'DynamicMembership')
Important
SailPoint recommends excluding membership information is not a best practice from a governance and security standpoint. You should have full visibility into users and devices, including their groups, assigned permissions, and how these configurations impact access to resources. The group membership filter should be used carefully and only when necessary, ensuring that access is managed and only the right individuals have access to sensitive information or resources.
- To aggregate only group memberships with group display name starting with 'A', use
-
In the Directory Roles Filter field, when the entitlement schema "roles" is present in the source, enter filter statements to ensure that only the specified roles are aggregated during entitlement aggregation. For example,
isBuiltIn eq true. For more information on filtering conditions and values, refer to the Microsoft documentation. -
In the Application Role Filter field, enter any filter statements to apply during entitlement aggregation. An application role is an entitlement object that captures the details related to the AppRoles defined within the scope of enterprise applications. For example:
-
For a filter to match the Enterprise Application default view on the Azure portal use the following:
tags/Any(x: x eq 'WindowsAzureActiveDirectoryIntegratedApp') -
For a filter to exclude Microsoft's built-in service principals use the following:
appOwnerOrganizationId ne f8cdef31-a31e-4b4a-93e4-5f571e91255a&$top=100
-
-
Select Save.
Partitioning Settings
Partitioning enables your system to process data in parallel across multiple threads and can improve aggregation performance.
Important
SailPoint recommends to use aggregation without partitioning, if you want to enable PIM. This is because, aggregation with partitioning enabled, the connector has to fetch the PIM memberships by triggering individual APIs for each user, which takes time and may affect aggregation performance.
On the other hand, aggregation without partitioning, the connector fetches all the PIM memberships of the user using caching mechanism, making the process more efficient. So, whenever PIM is enabled, it is suggested to use full aggregation without partitioning.
Screenshot
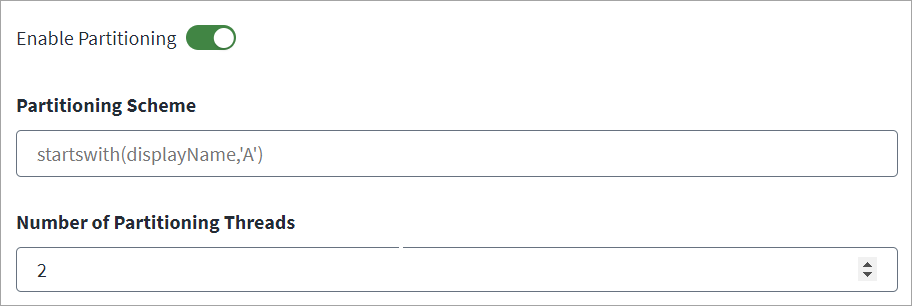
-
Select Enable Partitioning if you want to process data in parallel across multiple threads.
-
In the Partitioning Scheme field, enter user filters to define your aggregation partitions. Enter a supported user filter and then press Enter. You can add multiple filters using this method. The filter you define in Partitioning Scheme should evenly distribute all users to be managed across partitions.
This is a multi-valued attribute. The value consists of different search filters for the attributes that can be filtered (for example,
accountEnabled,city,displayName,mail,usageLocation, etc.). The partitioning scheme is a list of user filters where each user filter represents one user partition, and the partitioning scheme defines the scope of accounts applied during account aggregation. For more information, refer to the Microsoft Documentation on using query parameters.The following are some example Partitioning Scheme entries based on how you want to configure the partitions:
-
The following examples show you configurations based off of alphabetical inputs:
startswith(displayName, 'A')startswith(displayName, 'B')startswith(displayName, 'C')startswith(givenName, 'Smith')
-
You can also define schemes using other attributes:
accountEnabled eq trueuserPrincipalName eq 'Paul@contoso.onmicrosoft.com'
-
-
Enter the Number of Partitioning Threads the connector should use to concurrently execute your defined partitions. By default, it is set to 2 partitioning threads. If the VA is configured for multiple CPU cores, you can configure a higher number of partition threads to increase the performance.
Note
The Number of Partitioning Threads should equal the number of CPU cores on VA*2.
-
Select Save.
Note
Due to PowerShell limitations, partitioning aggregation does not aggregate Exchange Online attribute details and Shared Mailbox as an entitlement.
Additional Configurations
Additional Settings
This section provides the details about the additional configuration parameters required to customize the connector behavior.
Screenshot
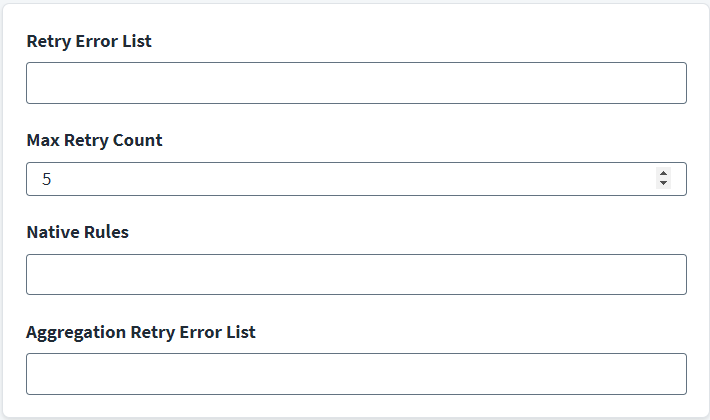
- Enter the list of errors in Retry Error List which must be retried if occurred during the provisioning operation. Press Enter after each error string to add it to the list.
- Enter the value for Max Retry Count which indicates the number of times the read operation must be performed on the errors that appear. The default value is 5.
- If you want to provision a specific role, you can specify this using create policy or Native Rules.
- Enter the list of errors in Aggregation Retry Error List which must be retried if occurred during aggregation or get operation. Press Enter after each error string to add it to the list.
- Select Save.
Additional Configuration Parameters
You must add the following attributes in the connector using the SailPoint REST API. Refer to Best Practices: REST API Authentication and REST API - Update Source (Partial).
| Parameter | Description |
|---|---|
| createAppTemplateSPNDelay | (Only applicable for create service principals and applications that are created making use of gallery templates). The time, in seconds, to wait after the create service principal and application, and before making the update for basic SAML configuration. The default is 24 seconds. For example, <entry key="createAppTemplateSPNDelay" value="30"/> |
| performGetObjectForEXOAttributes | To enable / disable reading of exchange online attributes from exchange system (real time exchange online attribute values) during explicit get object call for specified user, set the value of performGetObjectForEXOAttributes attribute to true.Note This configuration parameter is applicable only for get object call. Enabling this configuration parameter will degrade performance of get object calls. |
| createAccountTimelag | Time in seconds to wait after create account and before calling get account. The default is 20 seconds. |
| fetchB2CMembership | (Applicable for B2C tenant only) If set to true B2C user memberships is fetched for all users. The default value is false. |
| createGroupTimelag | Time in seconds to wait between creating and fetching a group. The default is 5 seconds. Add the createGroupTimelag attribute using SailPoint REST API and set it as required. |
| useMSGraphAPI | Enables use of Microsoft Graph API for all connector operations. To use the latest attributes and features supported by Microsoft Graph API, add the useMSGraphAPI attribute using the REST API and set it to true. |
| msgraph-api-version | The Microsoft Graph API version is configurable. You must add the msgraph-api-version attribute in the source using the REST API.The value of the attribute must be a valid version stated by Microsoft for MS Graph APIs. |
| skipEncodingImmutableId | Enable to skip encoding of ImmutableID while creating a federated user. Enable this feature by using the REST API to set the skipEncodingImmutableID parameter to true. The default value is false. |
| skipPIMMembershipOnCreateAccount | By setting skipPIMMembershipOnCreateAccount to true, you prevent the connector from fetching PIM membership details during account creation, which significantly reduces the overall time required for the account creation process.The default value for this parameter is false. |
| fetchServicePlan | To disable fetching of service plans during account and group aggregation, set the value of fetchServicePlan to false using the REST APIs. For example:curl -L -X PATCH 'https:// |
| sleepBetweenAssignedPlans | Time in seconds to wait between adding or removing assignedPlans. The default is 3 seconds.Add the sleepBetweenAssignedPlans attribute using the REST API and set it as required. |
Review and Test
Perform a test to confirm the connection to SailPoint.
- Go to Review and Test.
-
Confirm that the entries in each field are correct.
If you note any mistakes, return to the section and make corrections.
-
Select Test Connection.
SailPoint Application Onboarding
SailPoint application onboarding enables you to easily onboard new applications and create sources following the successful onboarding of a discovery source. To use this feature, continue to Discovered Applications in the SailPoint user interface.
For more information, refer to Application Onboarding in the SailPoint SaaS documentation.
Documentation Feedback
Feedback is provided as an informational resource only and does not form part of SailPoint’s official product documentation. SailPoint does not warrant or make any guarantees about the feedback (including without limitation as to its accuracy, relevance, or reliability). All feedback is subject to the terms set forth at https://developer.sailpoint.com/discuss/tos.