JSON and XML Response Examples
This section provides specific examples of the following format responses or inputs for the supported fields or the operations on the Web Services source:
JSON Operations
This section provides examples of JSON responses for the supported operations.
Test Connection
Note
SailPoint recommends that you have a single endpoint set up for test connections because there may be timeout issues for multiple endpoints in test connections.
This topic provides an example of a JSON response for a test connection operation.
Test Connection Example
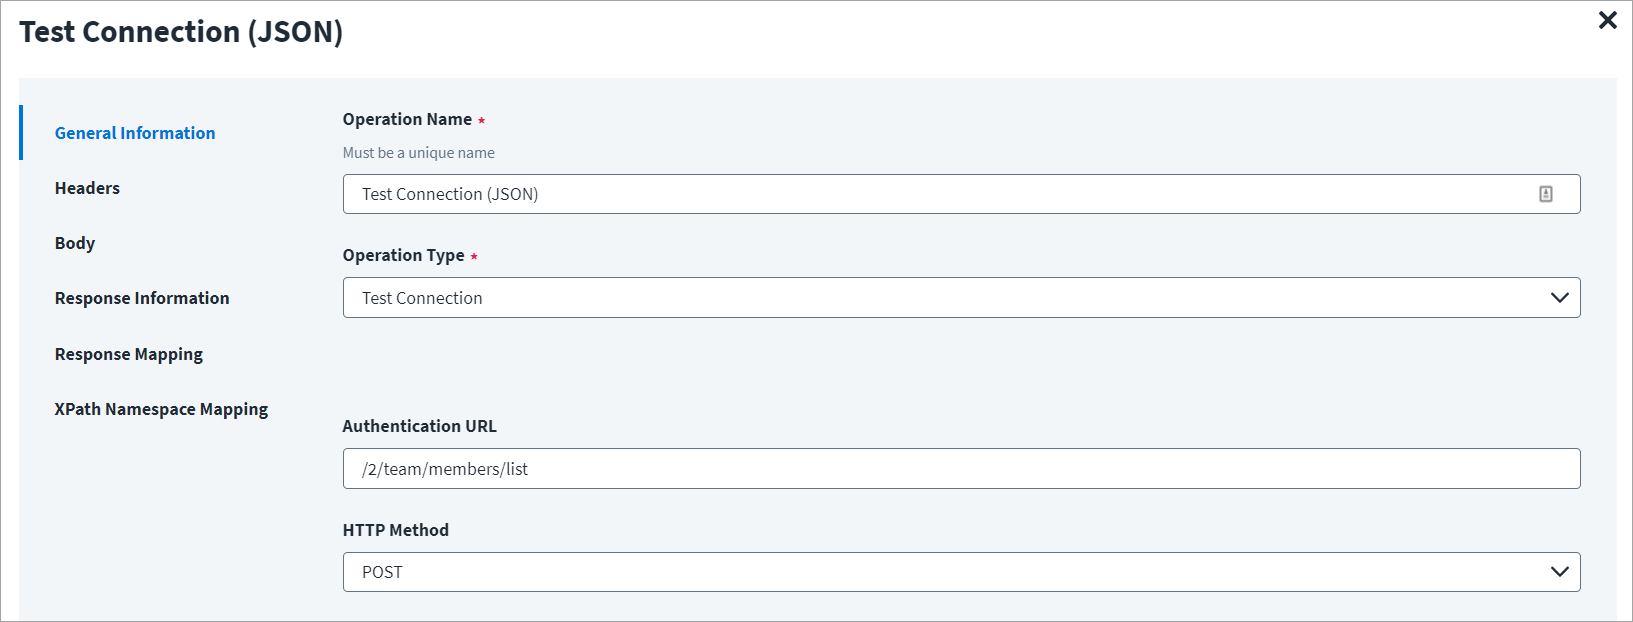
On the General Information tab:
- In the Operation Name field, enter
Test Connection (JSON)as the operation name. - From the Operation Type dropdown list, select Test Connection.
- In the Context URL field, enter the URL specific to the test connection.
- In the HTTP Method dropdown list, select POST.
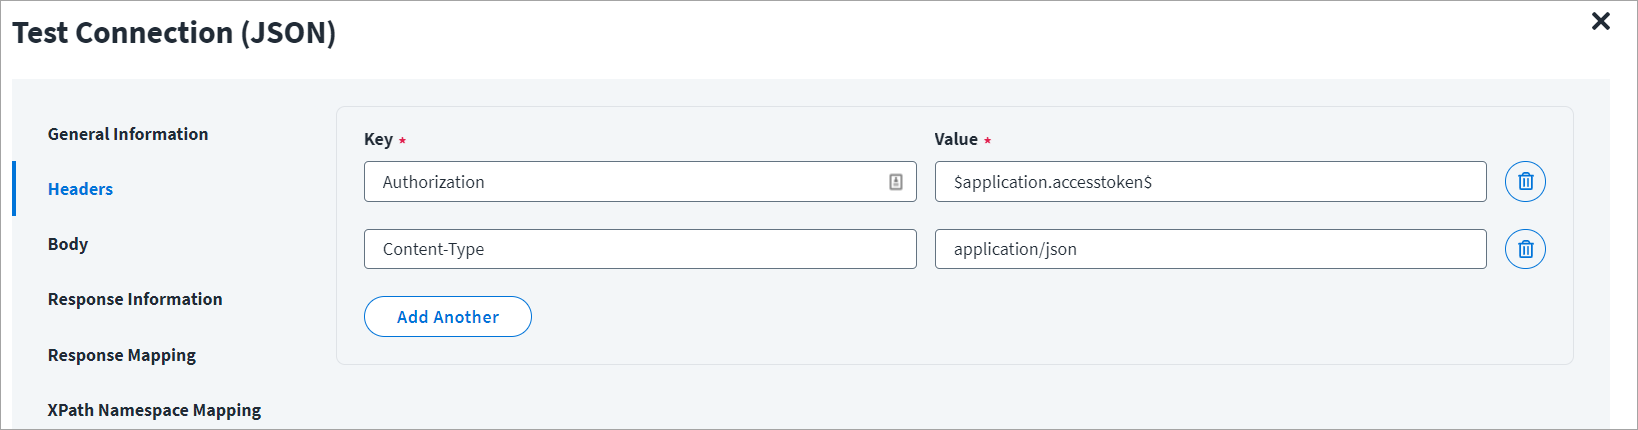
On the Header and Body tab:
The Header has the data keys and their corresponding values. These key value pairs are sent as part of the header in the HTTP request.
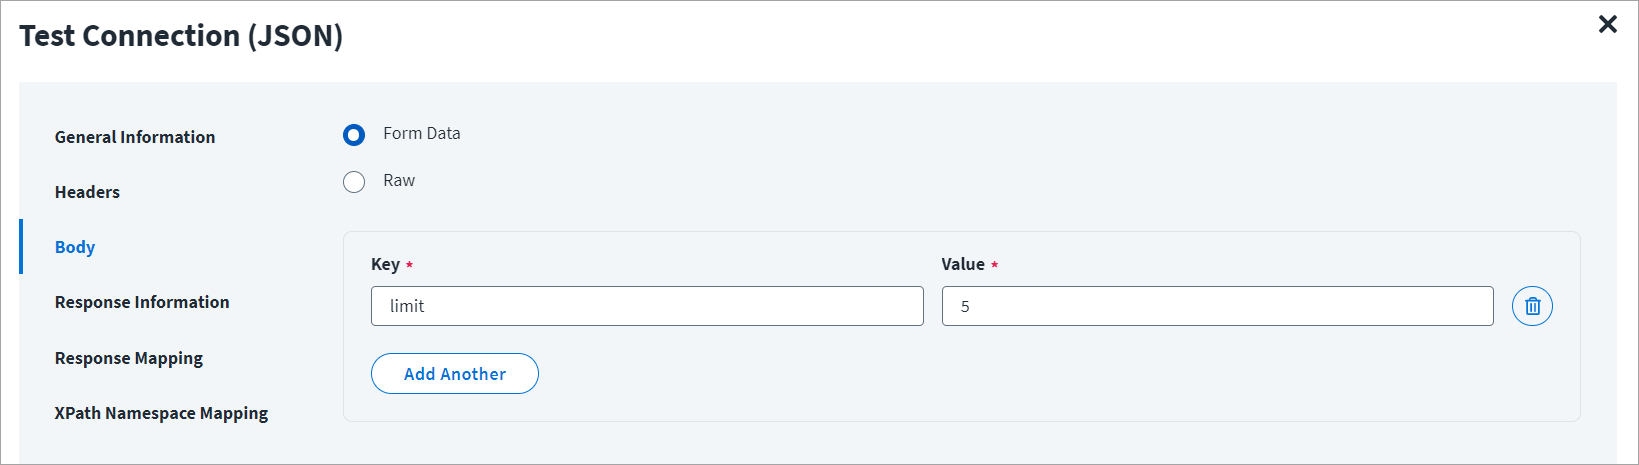
The HTTP body is used for posting the data with a request. The body has two data entry types, Form Data and Raw. You can use either of them for a test connection.
In the Raw field, enter the JSON payload for the test connection.
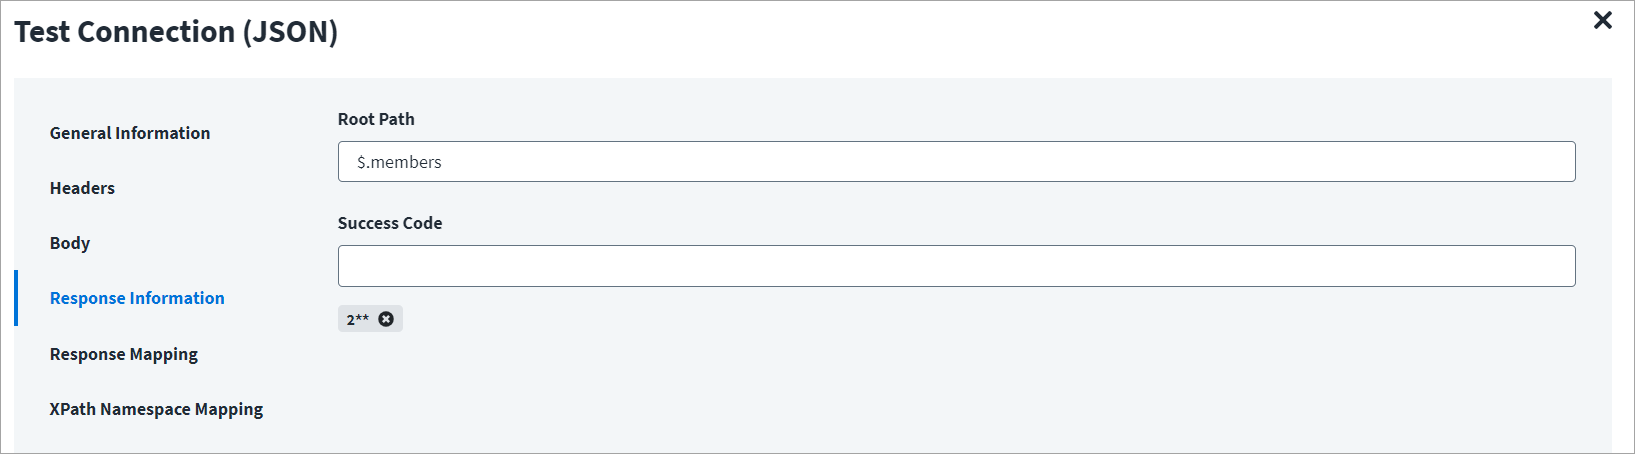
On the Response Information tab:
The Root Path is the common path present in the JSON response. The Success Code is the successful HTTP response code expected by the respective Web Service operation. By default, the success code is 2**.
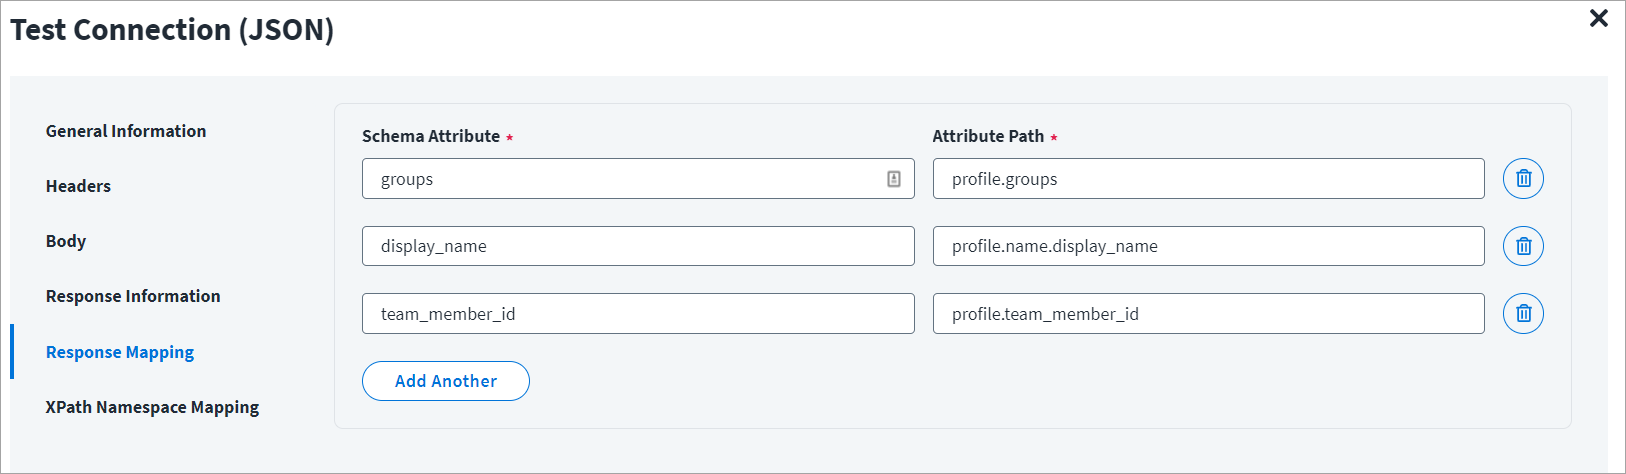
On the Response Mapping tab:
Below is an example of a schema that is mapped to JSON response. Refer to Configuration for Response for more information.
Aggregation
This topic provides an example of a JSON response for an account aggregation operation.
Account Aggregation - 1
Using the Web Services SaaS source, you can have multiple account aggregation operations.
For example: Aggregation - 1 and Aggregation - 2.
You can aggregate two attributes from EndPoint1 and three more attributes from EndPoint2.
When you configure multiple operations, the response of first operation can be used as an input in the second operation.
Account Aggregation - 1 Example
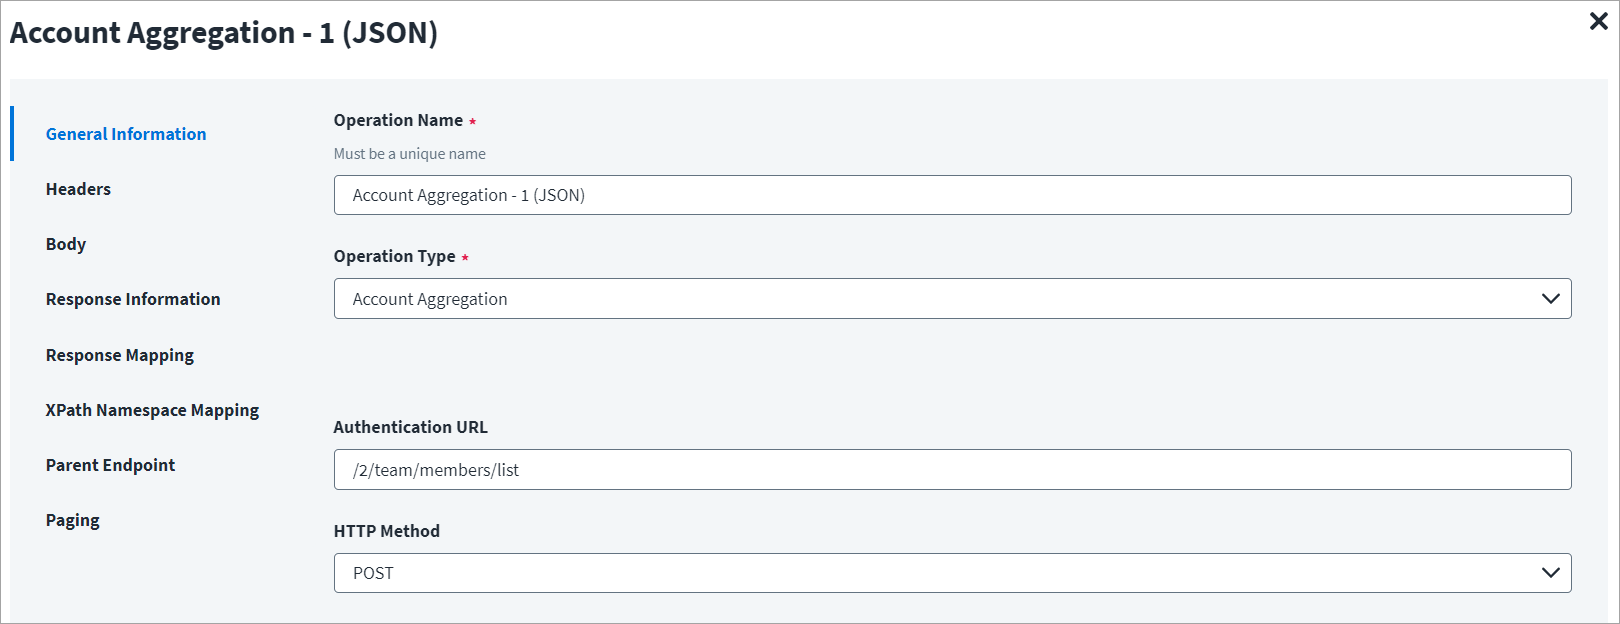
On the General Information tab:
- In the Operation Name field, enter
Account Aggregation - 1 (JSON)as the operation name. - From the Operation Type dropdown list, select Account Aggregation.
- In the Context URL field, enter the URL specific to the account aggregation.
- In the HTTP Method dropdown list, select POST.
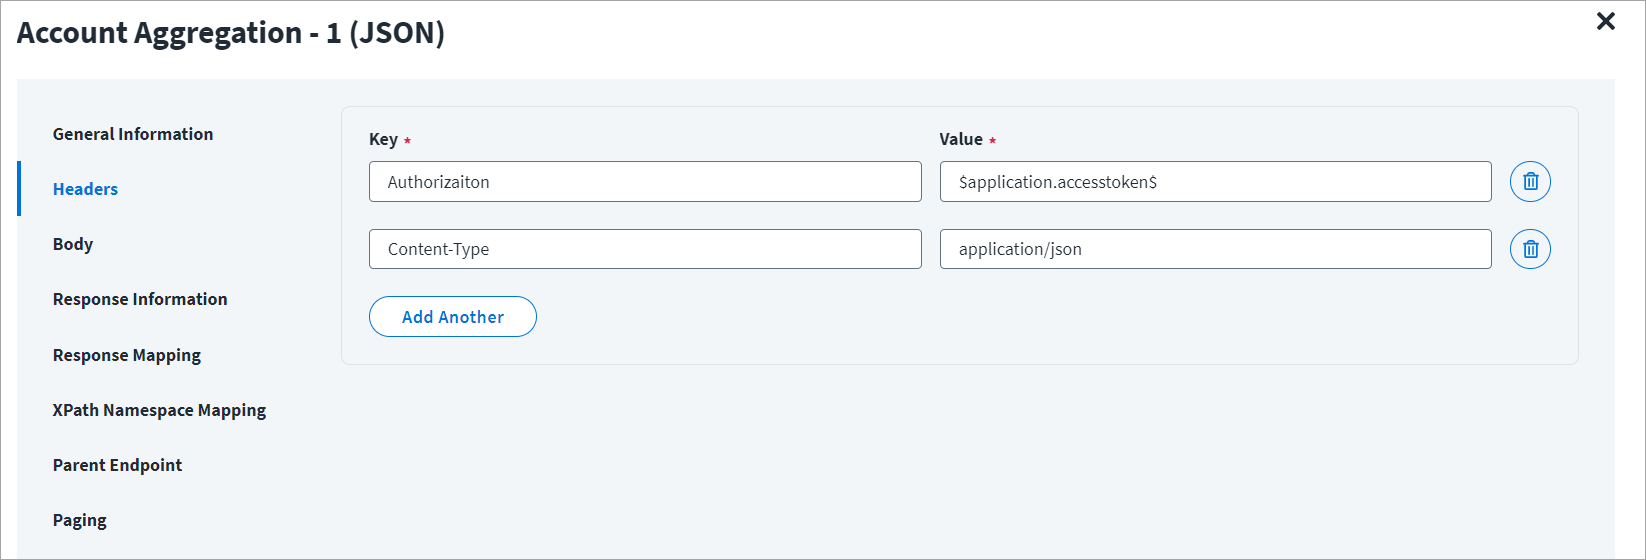
On the Header and Body tab:
The Header has the data keys and their corresponding values. These key value pairs will be sent as part of the Header in the HTTP Request.
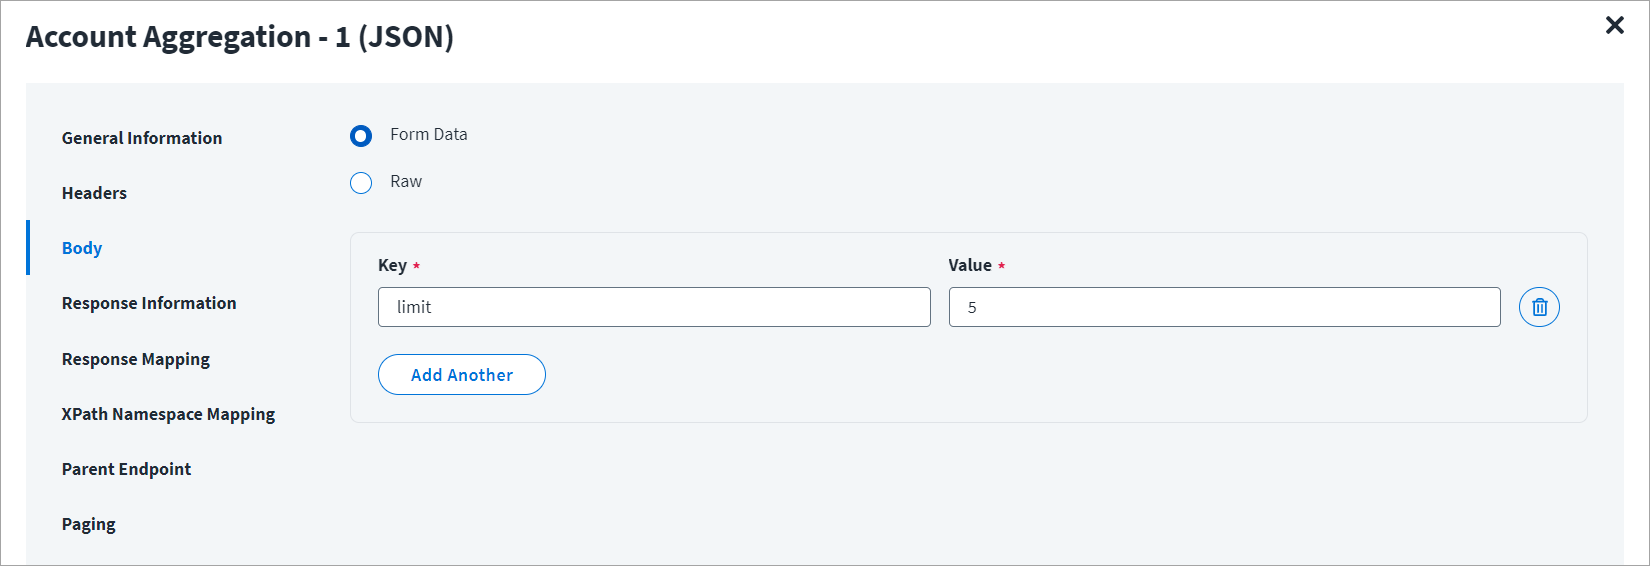
The HTTP body is used for posting the data with a request. The body has two data entry types, Form Data and Raw. You can use either of them for an account aggregation.
In the Raw field, enter the JSON payload for the account aggregation.
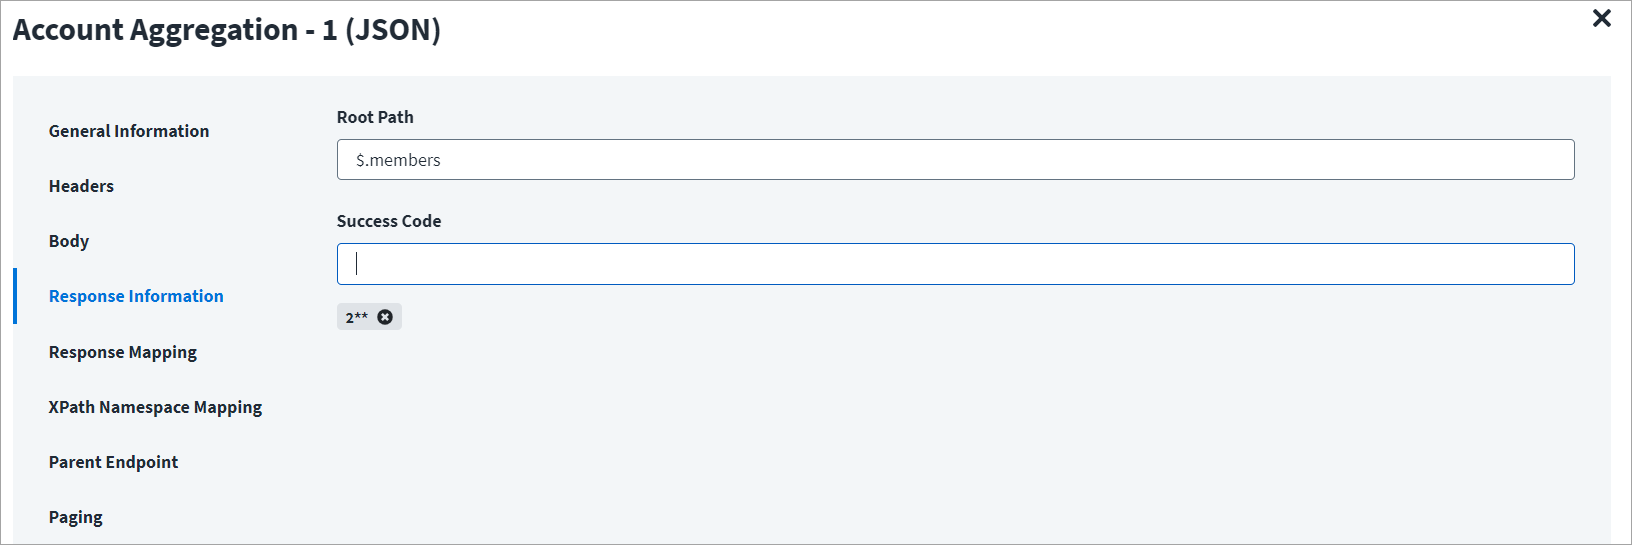
On the Response Information tab:
The Root Path is the common path present in the JSON response. The Success Code is the successful HTTP response code expected by the respective Web Service operation. By default, the success code is 2**.
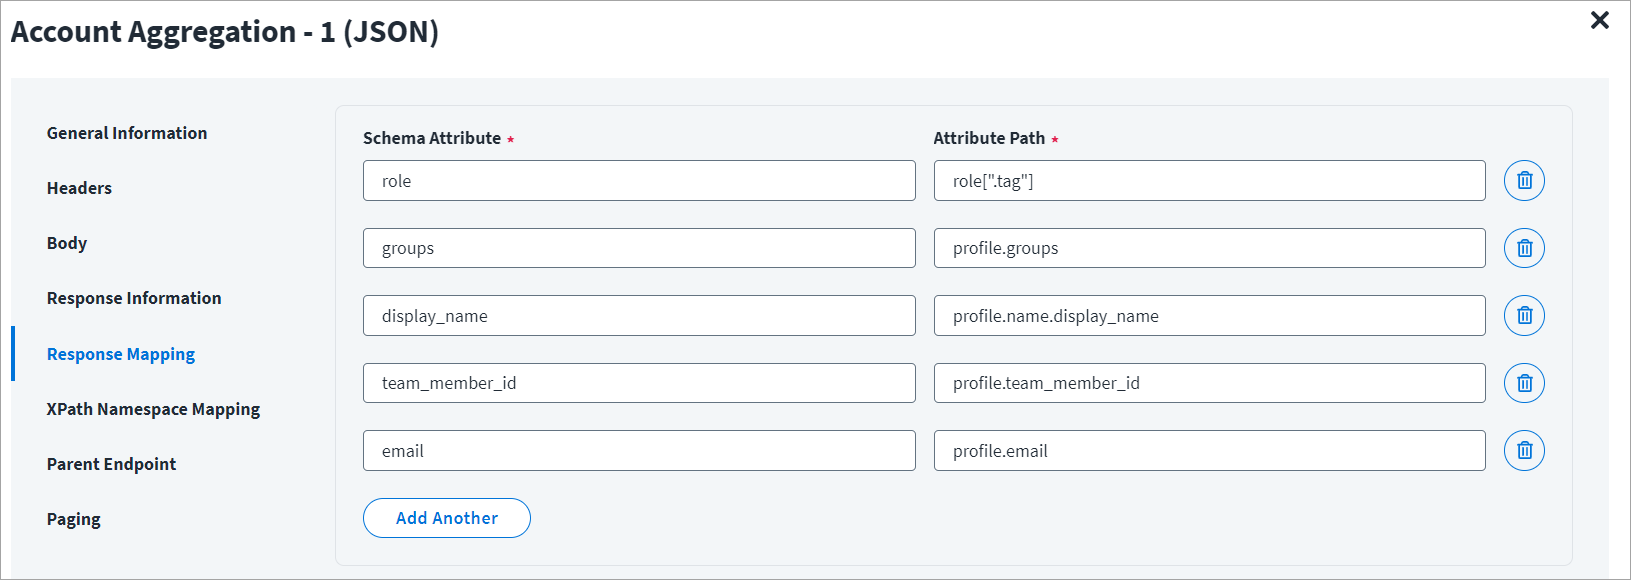
On the Response Mapping tab:
Refer to Configuration for Response for more information about the raw JSON response on which the Response Information schema is mapped.
Account Aggregation - 2
For example, during aggregation of Dropbox, the response of the first endpoint will return the id, Username, firstName, among others.
This response must be provided as an input to the second endpoint. This can be provided with the help of a keyword "response" ($response.team_member_id$), where team_member_id is the value fetched from Account Aggregation -1 and it is an identity attribute in the source schema.
Account Aggregation - 2 Example
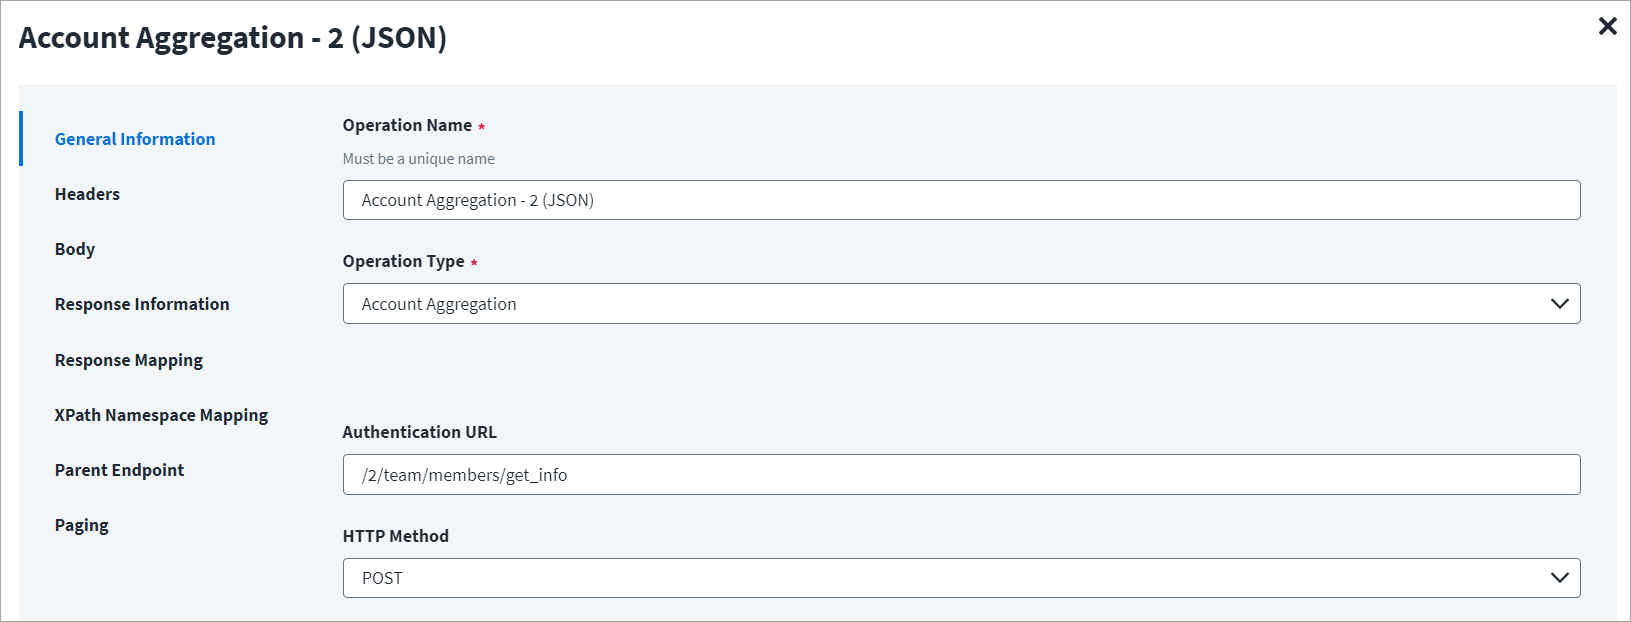
On the General Information tab:
- In the Operation Name field, enter
Account Aggregation - 2 (JSON)as the operation name. - From the Operation Type dropdown list, select Account Aggregation.
- In the Context URL field, enter the URL specific to the account aggregation.
- In the HTTP Method dropdown list, select POST.
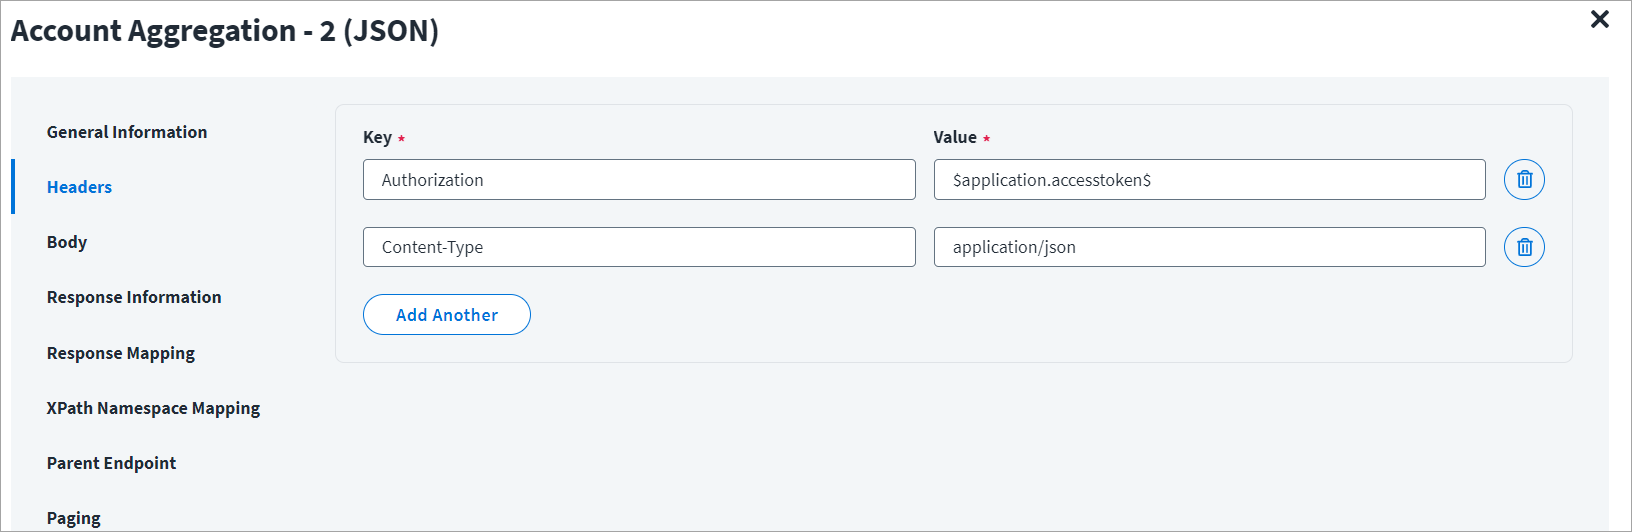
On the Header and Body tab:
The Header has the data keys and their corresponding values. These key value pairs will be sent as part of the Header in the HTTP Request.
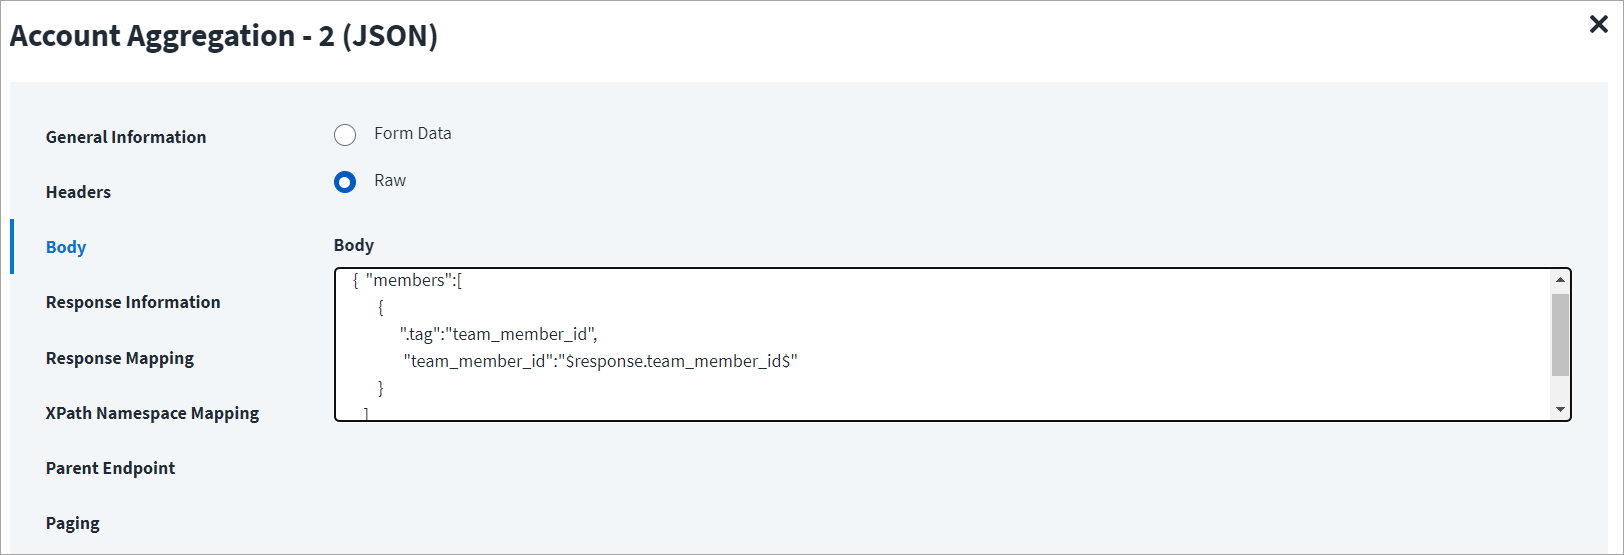
The HTTP body is used for posting the data with a request. The body has two data entry types, Form Data and Raw. You can use either of them for an account aggregation.
In the Raw field, enter the JSON payload for the account aggregation.
To fetch additional attributes from another endpoint, use the id (identity attribute) from the previous response. Add these attributes in Schema Attribute section of Response Mapping of the first end point (Account Aggregation - 1).
In the following screenshot, $response.team_member_id$ represents the identity that was aggregated in the Account Aggregation-1 and is mentioned previously in the schema mapping section of Account Aggregation -1.
On the Response Information tab:
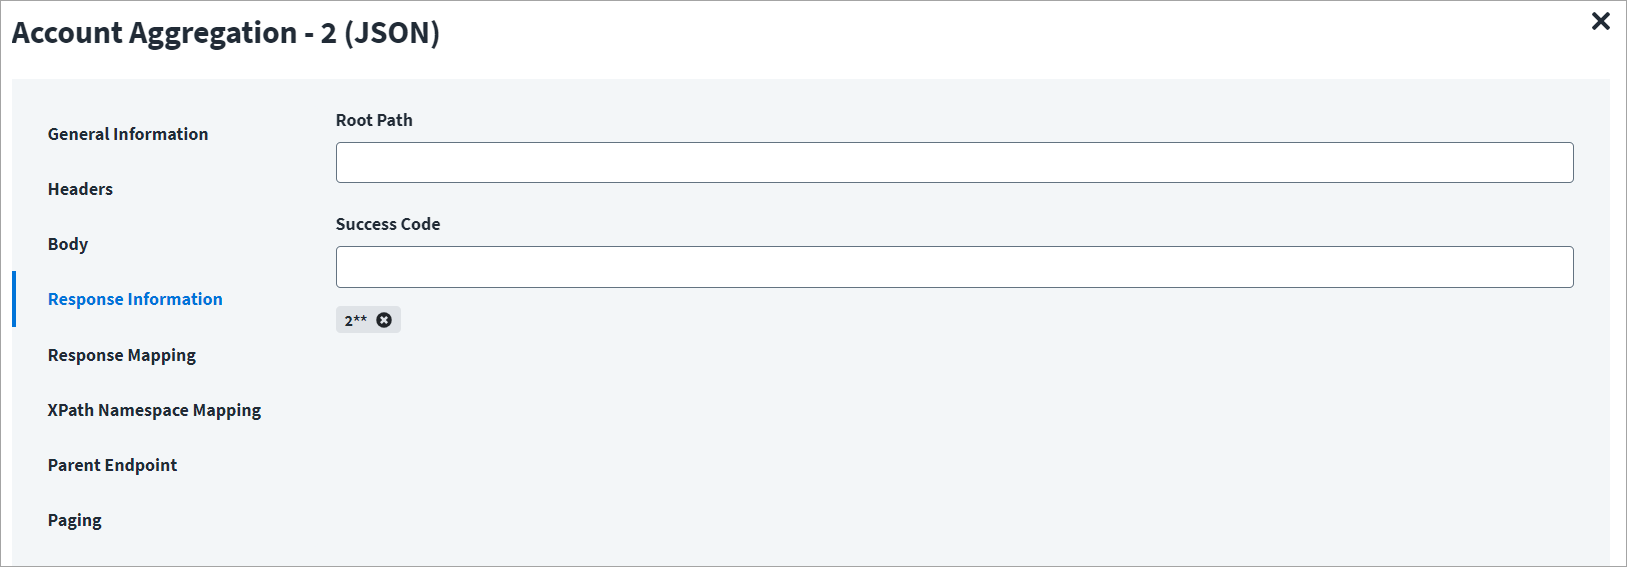
The Root Path is the common path present in the JSON response. The Success Code is the successful HTTP response code expected by the respective Web Service operation. By default, the success code is 2**.
On the Response Mapping tab:
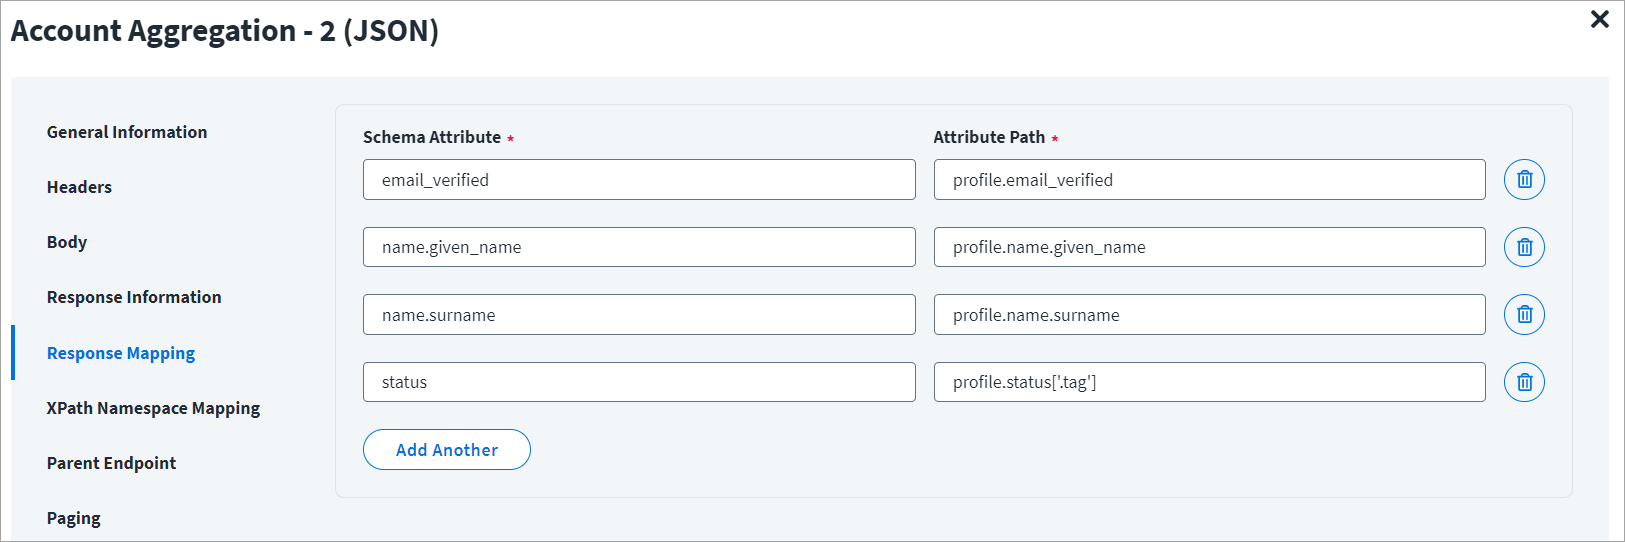
Below is an example of a schema that is mapped to XML response. Refer to Configuration for Response for more information.
On the Parent Endpoint tab:
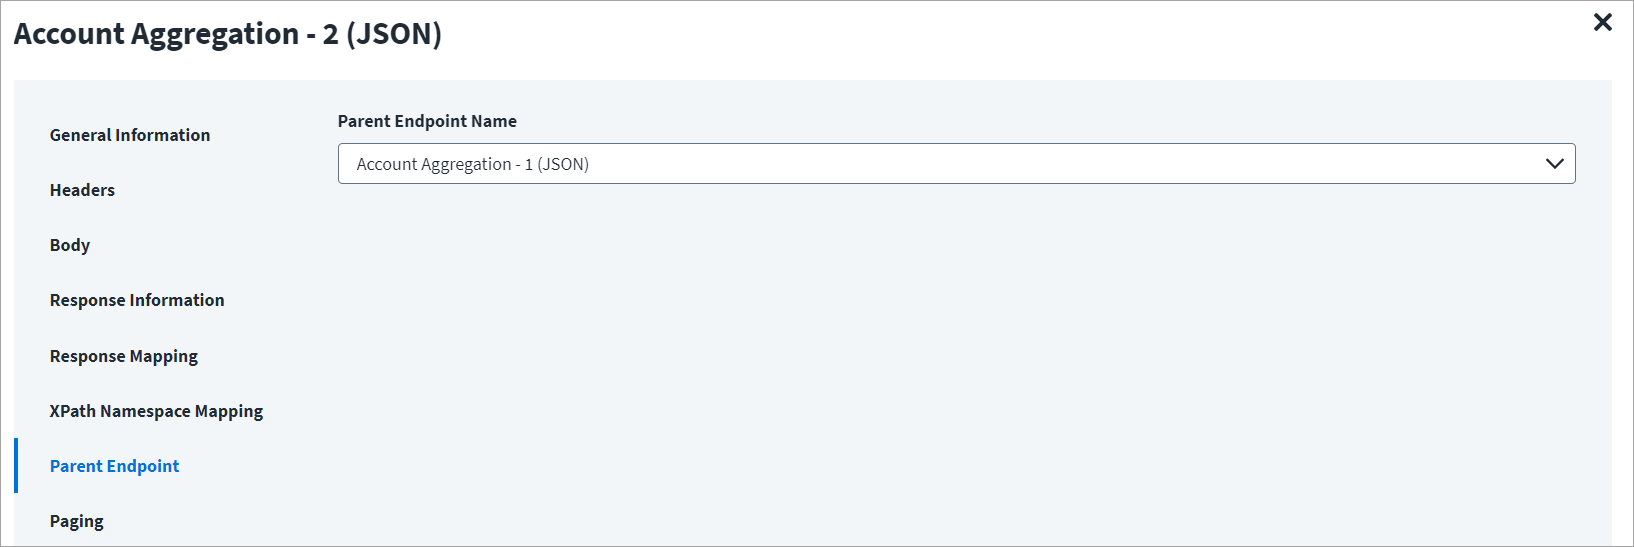
In the following example, Account Aggregation -1 (JSON) is the parent endpoint and Account Aggregation - 2(JSON) is its child endpoint.
From the Parent Endpoint Name dropdown list, select Account Aggregation - 1 (JSON), as shown below.
Account Aggregation - 3
For example, to aggregate users using GraphQL:
Account Aggregation - 3 Example
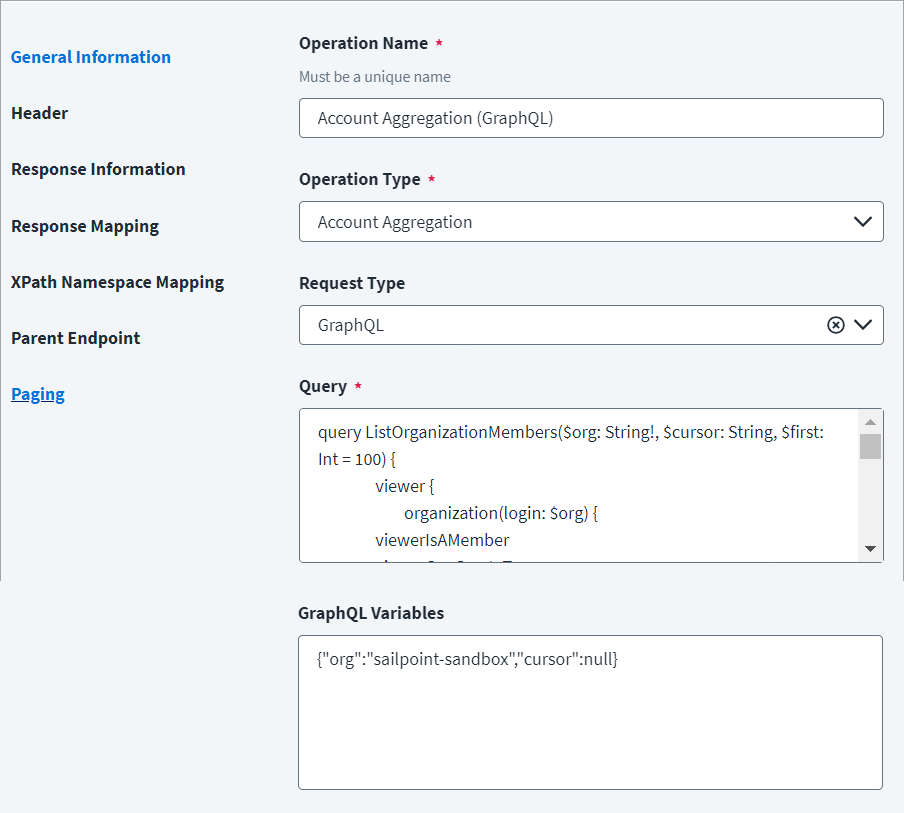
On the General Information tab:
- In the Operation Name field, enter
Account Aggregation (GraphQL). - From the Operation Type dropdown list, select Account Aggregation.
- In the Request Type field, select GraphQL.
- In the Query and GraphQL Variables sections, enter the query and variables specific to the account aggregation.
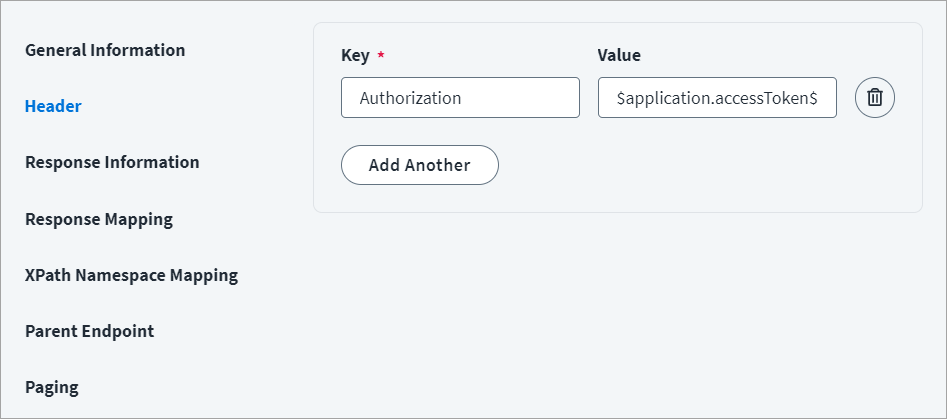
On the Header tab:
The Header has the data keys and their corresponding values. These key value pairs will be sent as part of the Header in the HTTP Request.
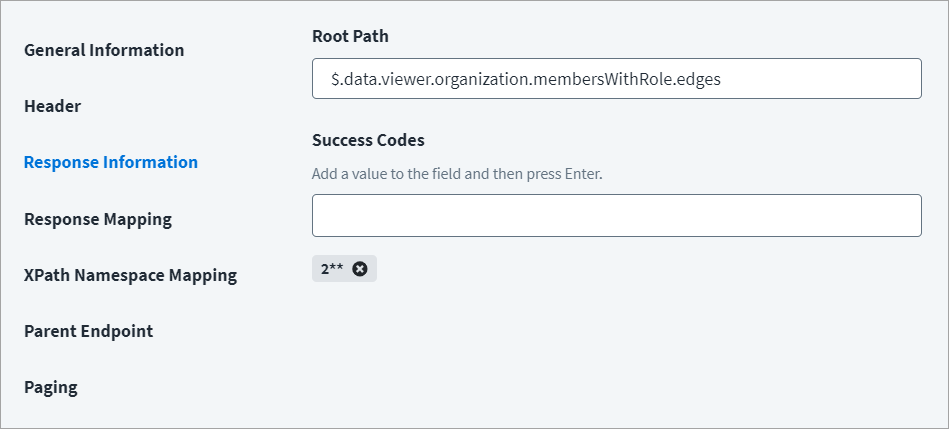
On the Response Information tab:
The Root Path is the common path present in the JSON response. The Success Code are the successful HTTP response codes expected by the respective Web Service operation. By default, the success code is 2**.
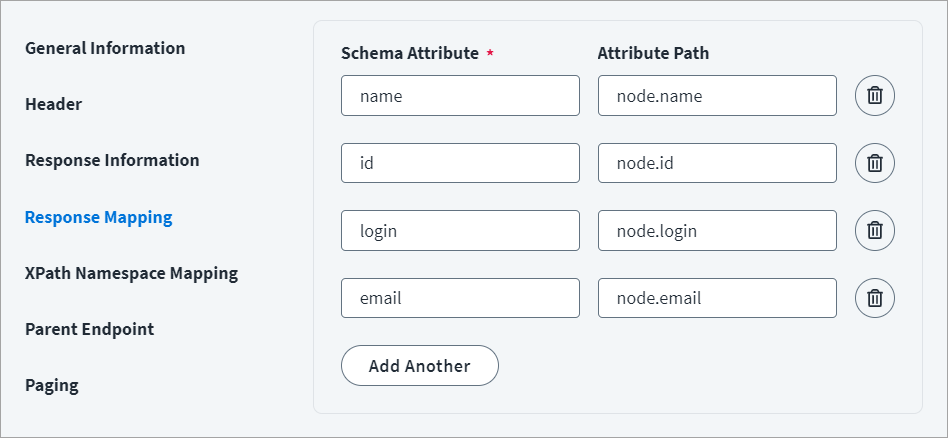
On the Response Mapping tab:
Enter the Schema Attribute and Attribute Path for JSON response. Refer to Configuration for Response for more information.
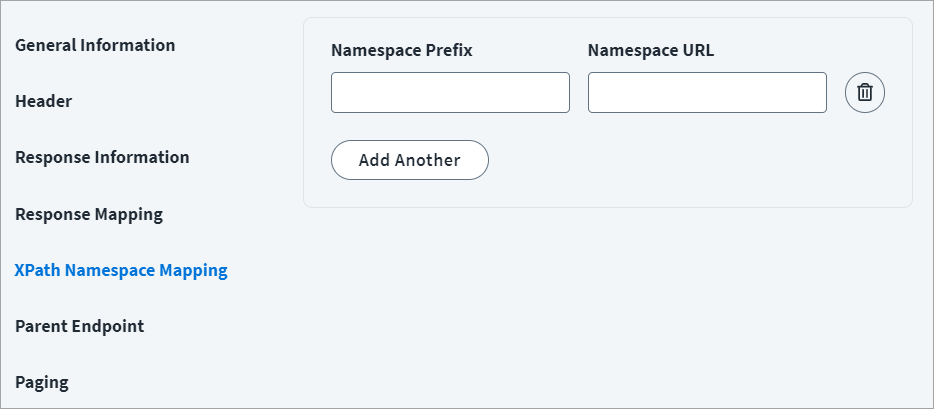
On the XPath Namespace Mapping tab:
Enter the Namespace Prefix and Namespace URL for JSON response.
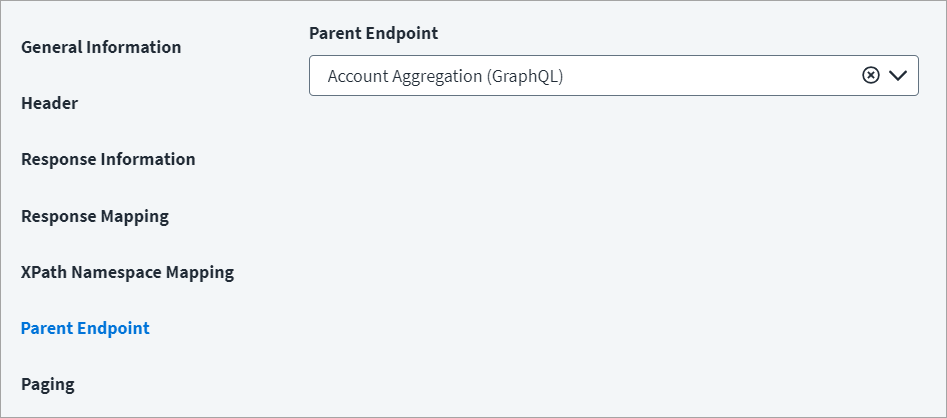
On the Parent Endpoint tab:
From the Parent Endpoint dropdown list, select Account Aggregation(GraphQL).
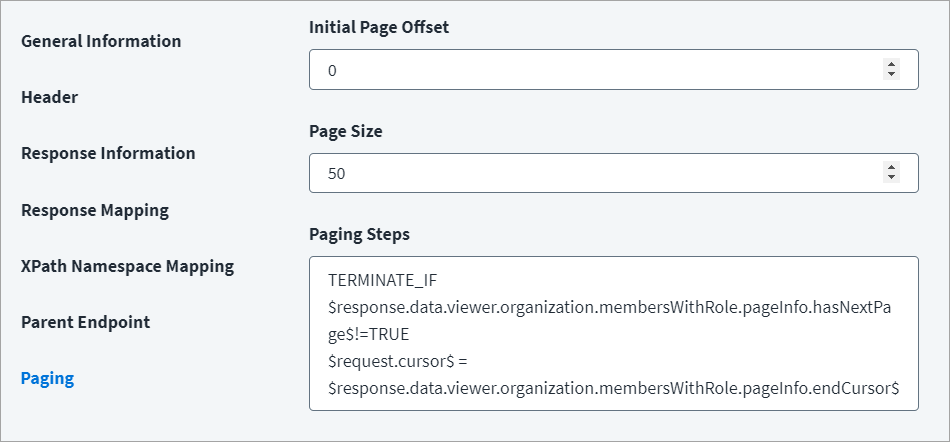
On the Paging tab:
Enter the cursor-based pagination values.
Create Account
This topic provides examples of a JSON response for the create account operation.
Create Account - 1
Create Account - 1 Example
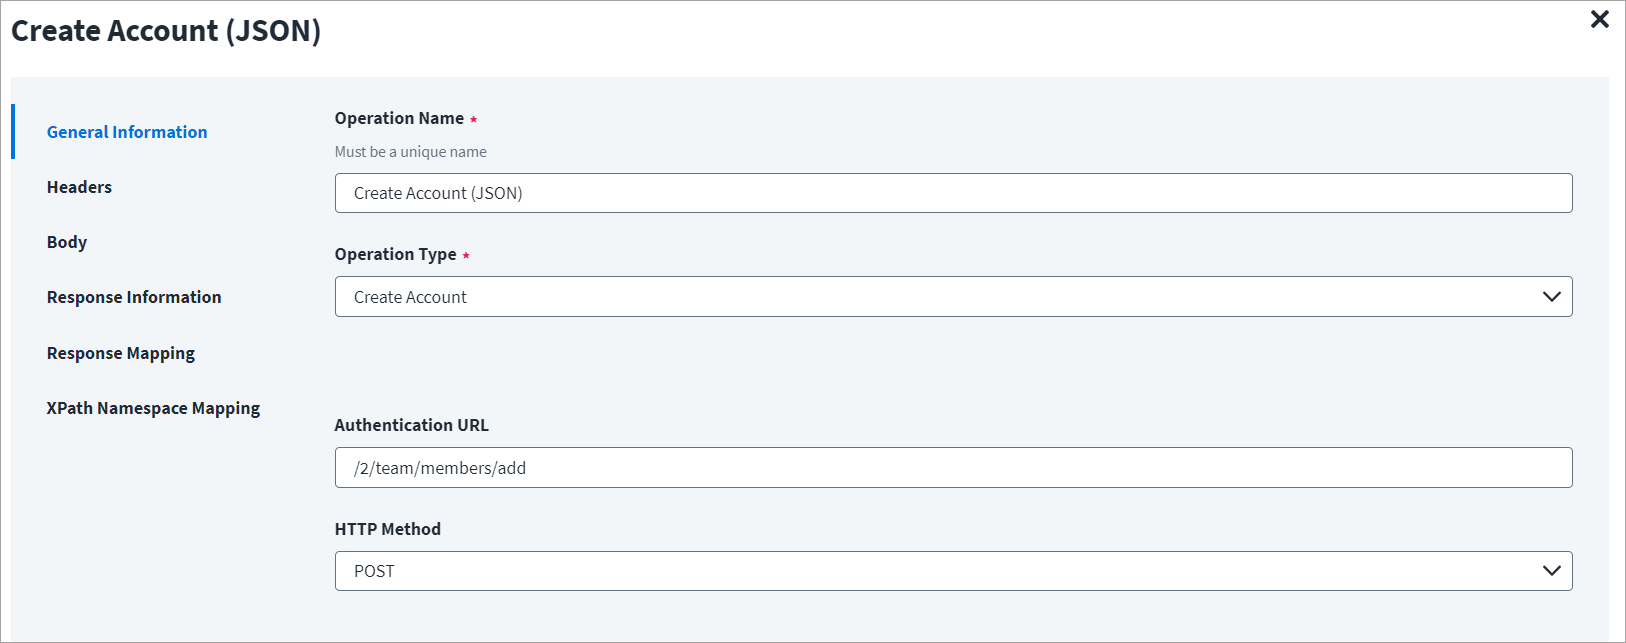
On the General Information tab:
- In the Operation Name field, enter
Create Account (JSON)as the operation name. - From the Operation Type dropdown list, select Create Account.
- In the Context URL field, enter the URL specific to the create account operation.
- In the HTTP Method dropdown list, select POST.
On the Header and Body tab:
The Header has the data keys and their corresponding values. These key value pairs will be sent as part of the Header in the HTTP Request.
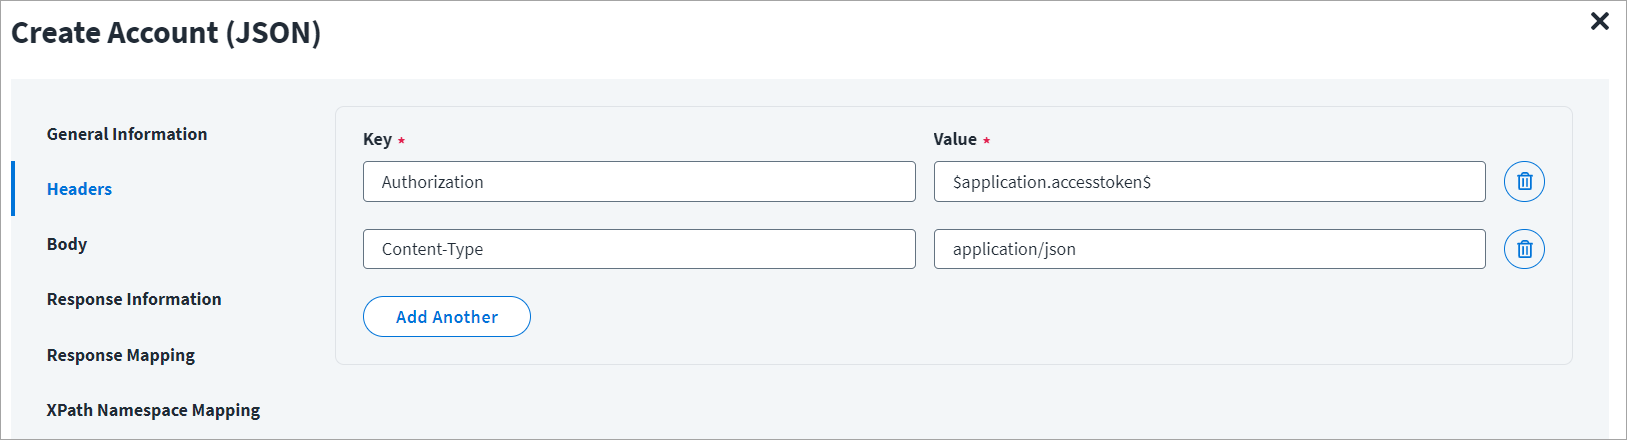
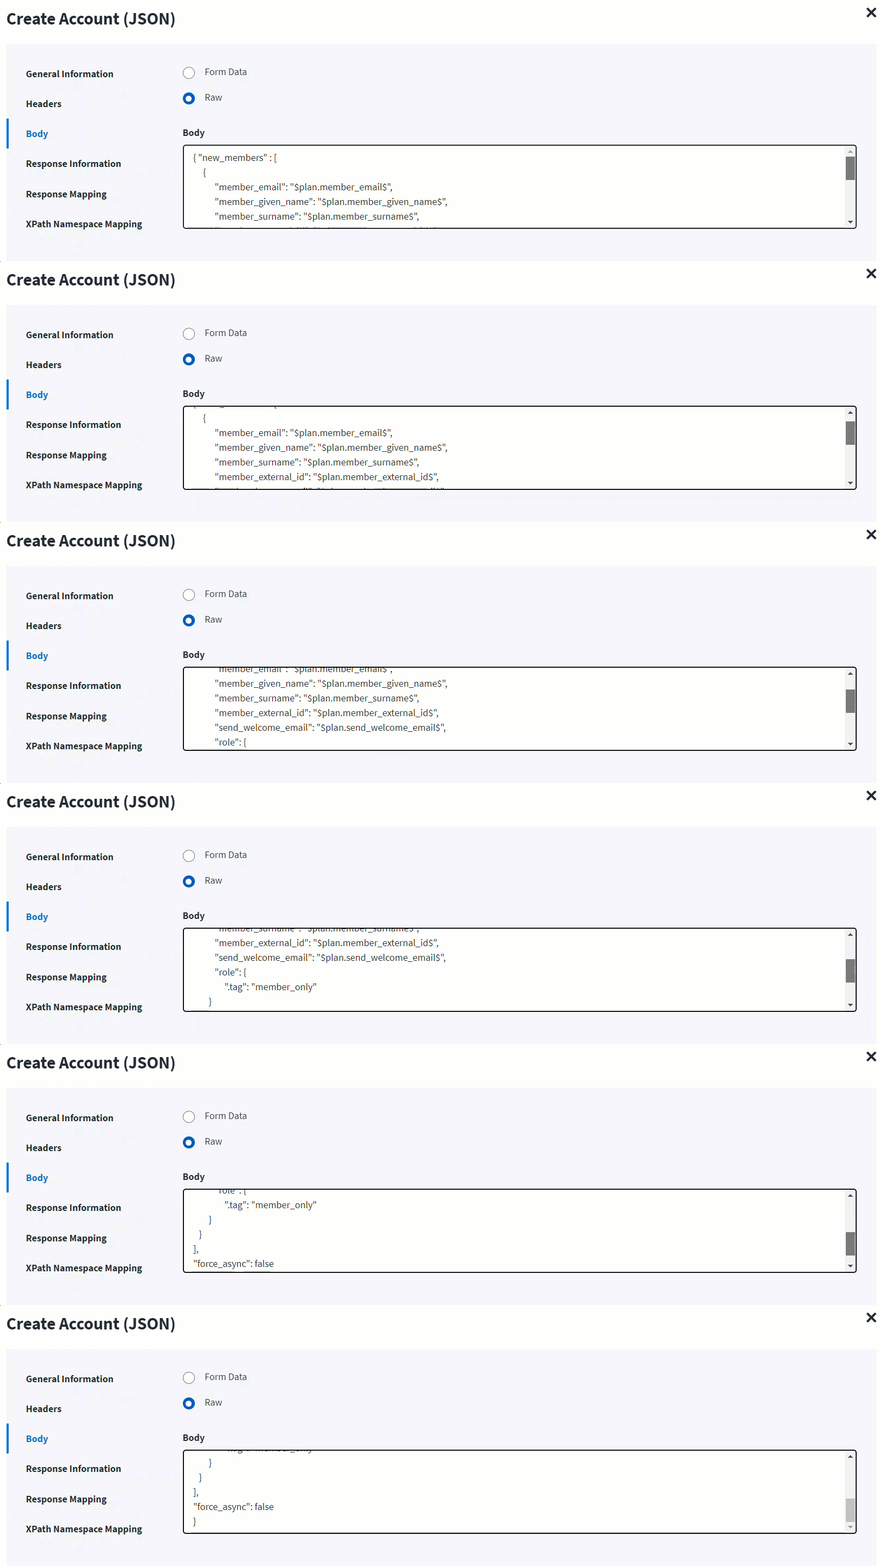
The HTTP body is used for posting the data with a request. The body has two data entry types, Form Data and Raw. You can use either of them for account creation.
In the Raw field, enter the JSON payload for the account creation.
In the following screenshot, the $plan keyword represents the provisioning plan that is passed to the provision method. For example, $plan.member_email$ checks for the email in the attribute request and updates in the body after it is found.
On the Response Information tab:
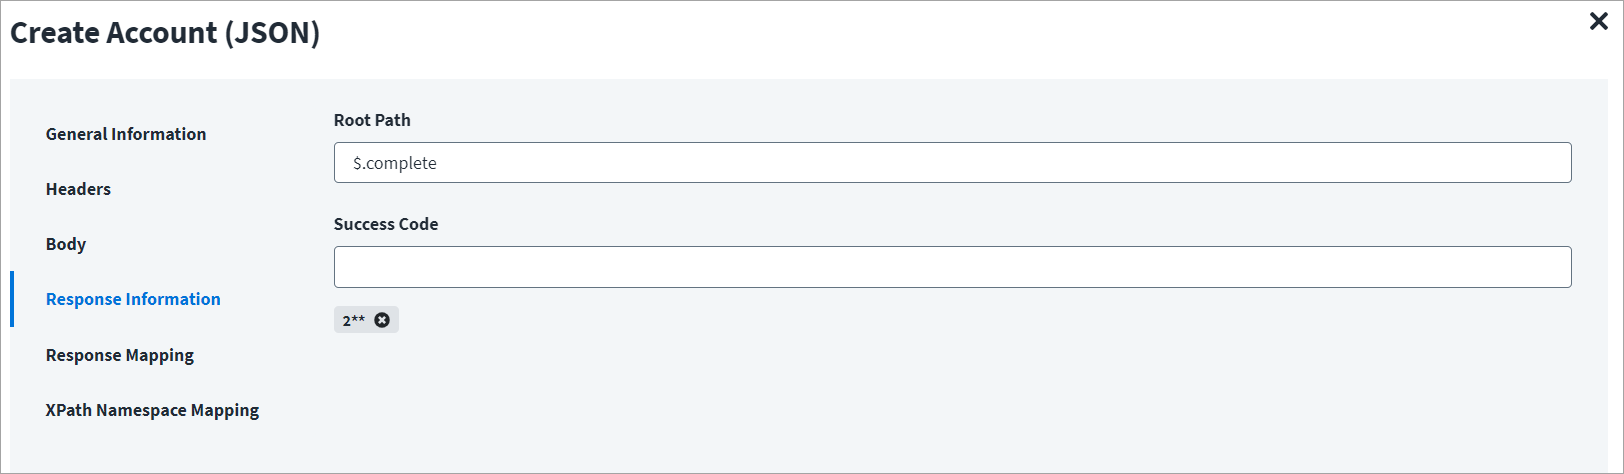
The Root Path is the common path present in the JSON response. The Success Code is the successful HTTP response code expected by the respective Web Service operation. By default, the success code is 2**.
On the Response Mapping tab:
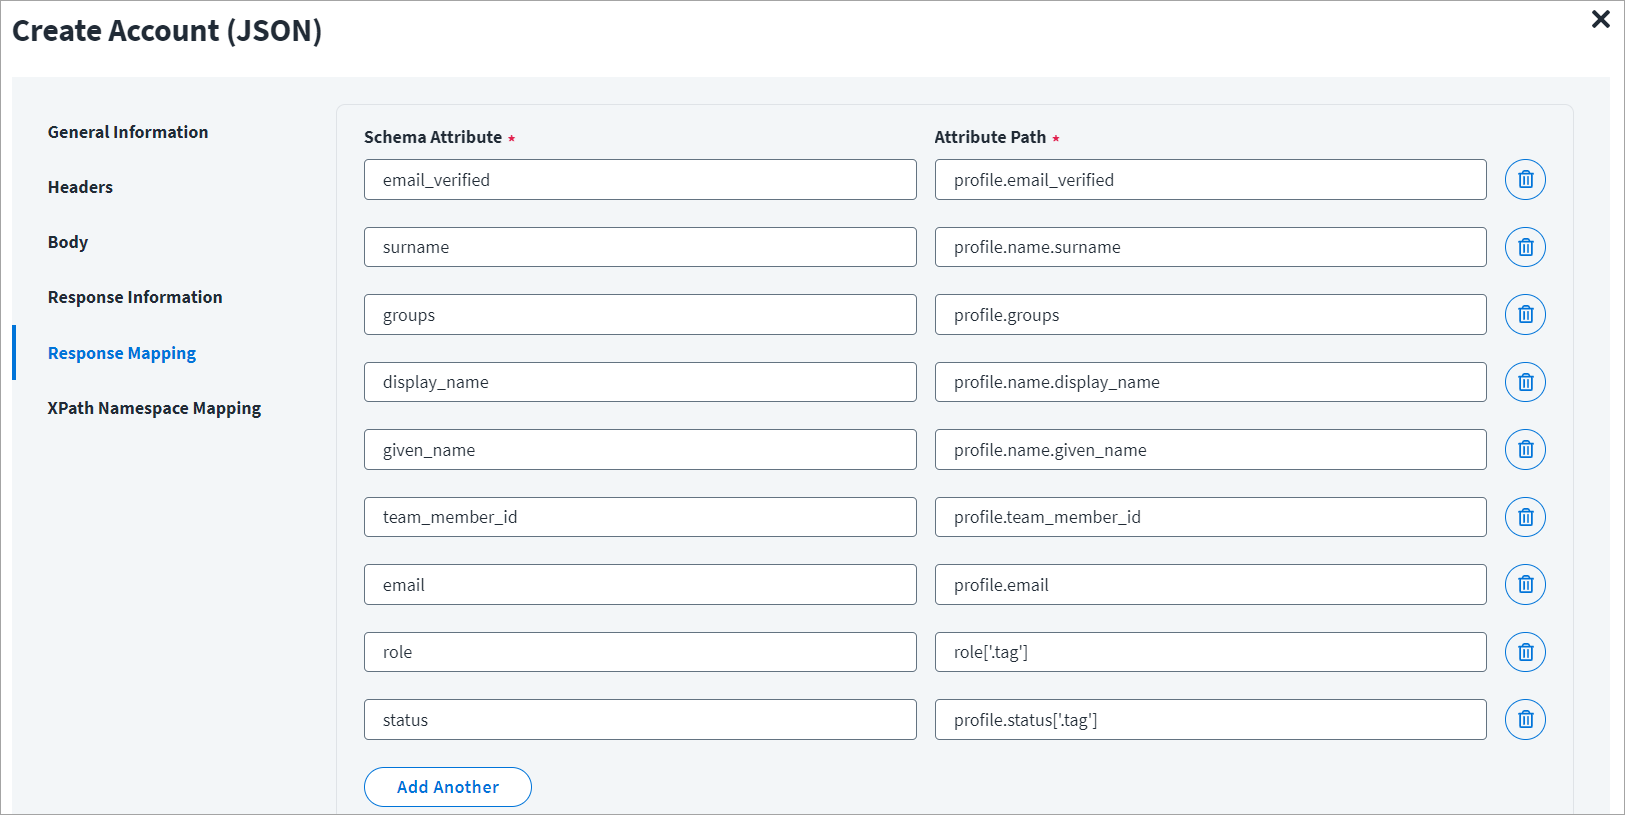
Refer to Configuration for Response for more information about the raw JSON response on which the Response Information schema is mapped.
Create Account - 2
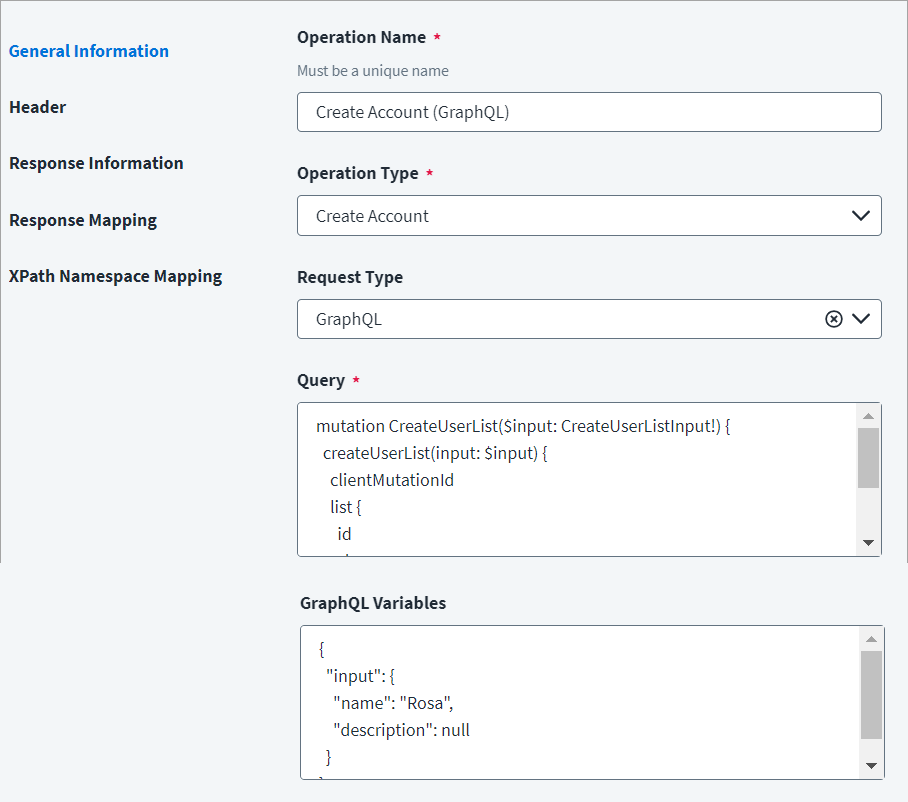
For example, to aggregate users using GraphQL:
Create Account - 2 Example
On the General Information tab:
- In the Operation Name field, enter
Create Account(GraphQL)as the operation name. - From the Operation Type dropdown list, select Create Account.
- In the Request Type field, select GraphQL.
- Enter the Query and GraphQL Variables specific to the account aggregation.
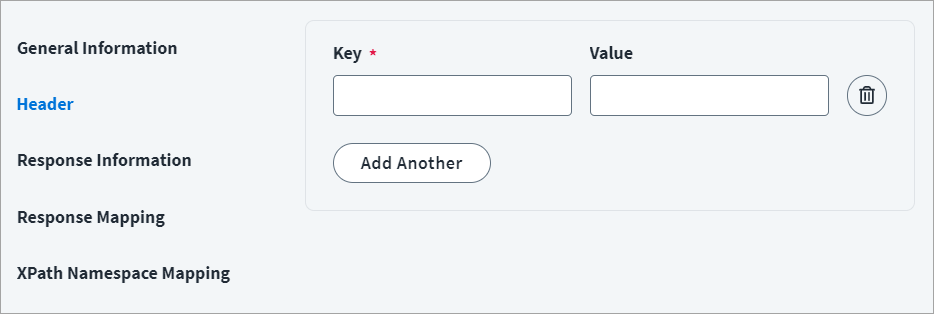
On the Header and Body tab:
The Header has the data keys and their corresponding values. These key value pairs will be sent as part of the Header in the HTTP Request.
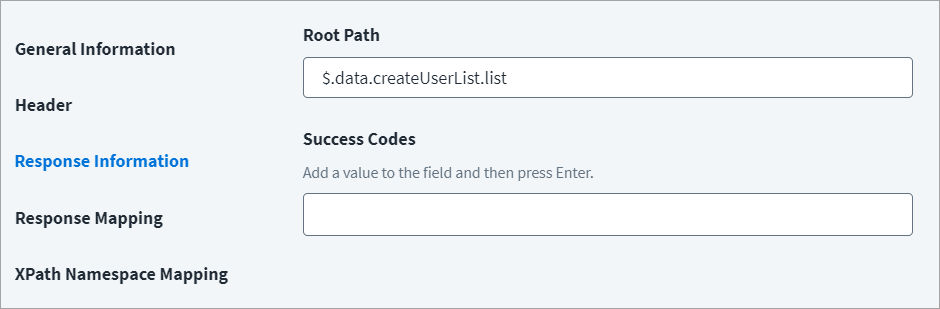
On the Response Information tab:
The Root Path is the common path present in the JSON response. The Success Code is the successful HTTP response code expected by the respective Web Service operation. By default, the success code is 2**.
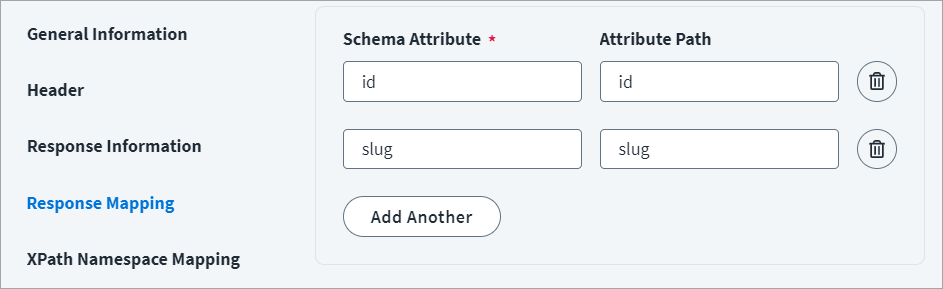
On the Response Mapping tab:
The following is an example of a schema that is mapped to the JSON response. For more information, refer to to Configuration for Response.
On the XPath Namespace Mapping tab:
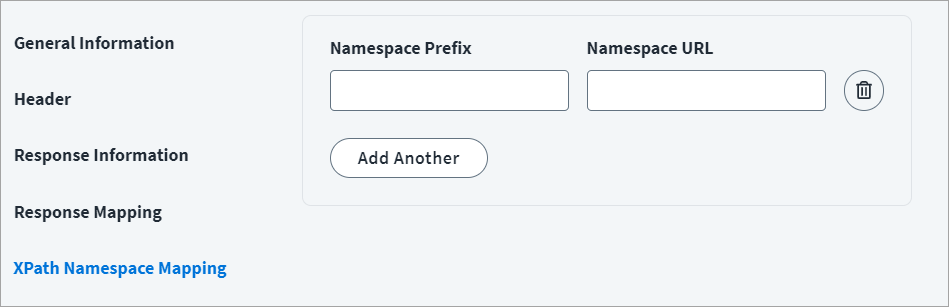
Enter the Namespace Prefix and Namespace URL for JSON response.
Add Entitlement
This topic provides an example of a JSON response for an add entitlement operation.
Add Entitlement Example
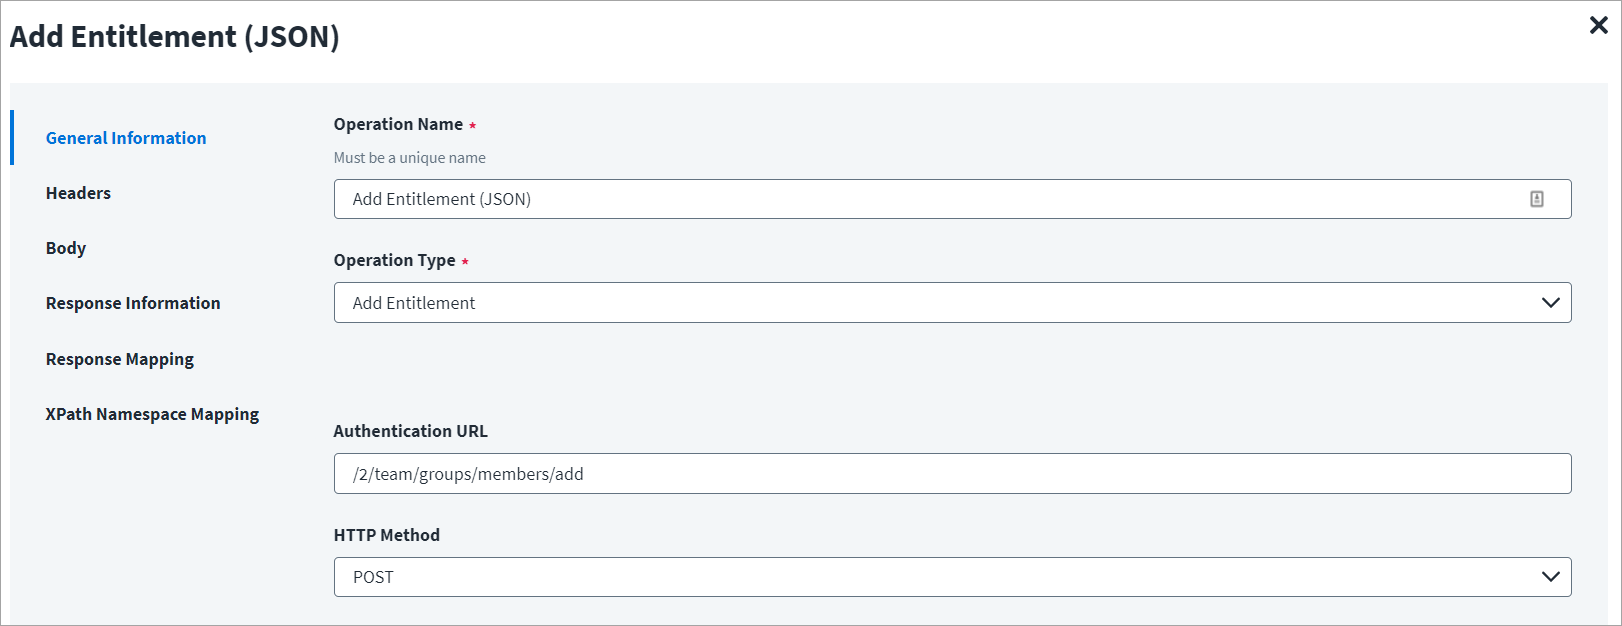
On the General Information tab:
- In the Operation Name field, enter
Add Entitlement (JSON)as the operation name. - From the Operation Type dropdown list, select Add Entitlement.
- In the Context URL field, enter the URL specific to the entitlement.
- In the HTTP Method dropdown list, select POST.
On the Header and Body tab:
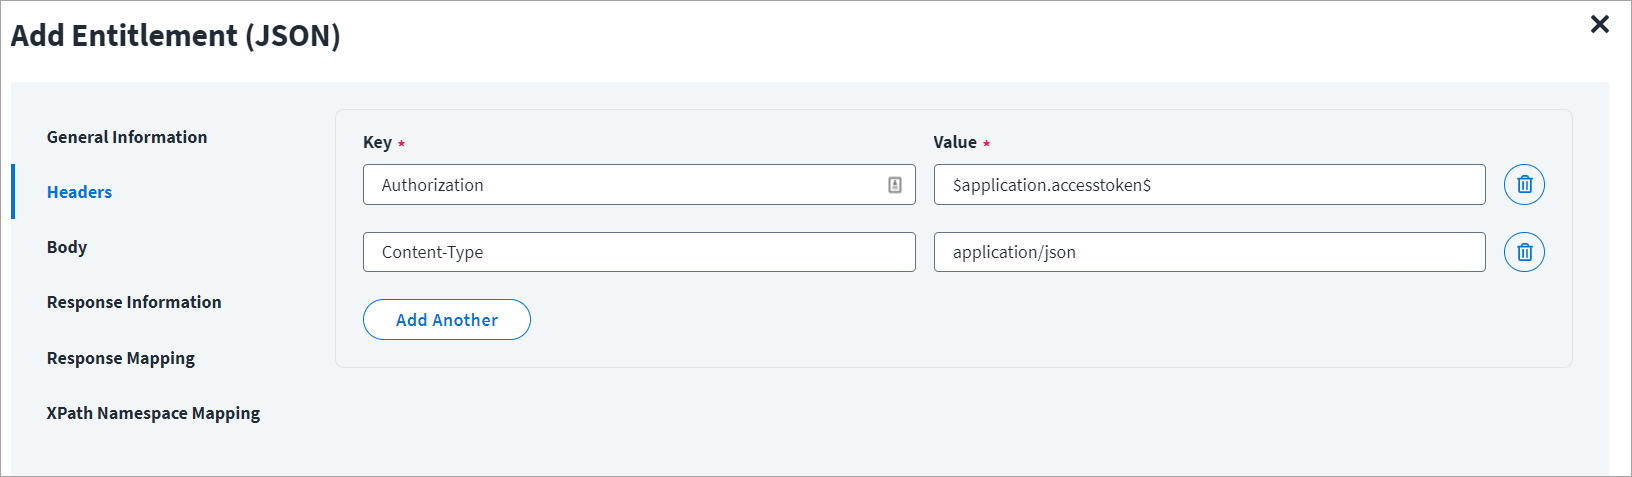
The Header has the data keys and their corresponding values. These key value pairs will be sent as part of the Header in the HTTP Request.
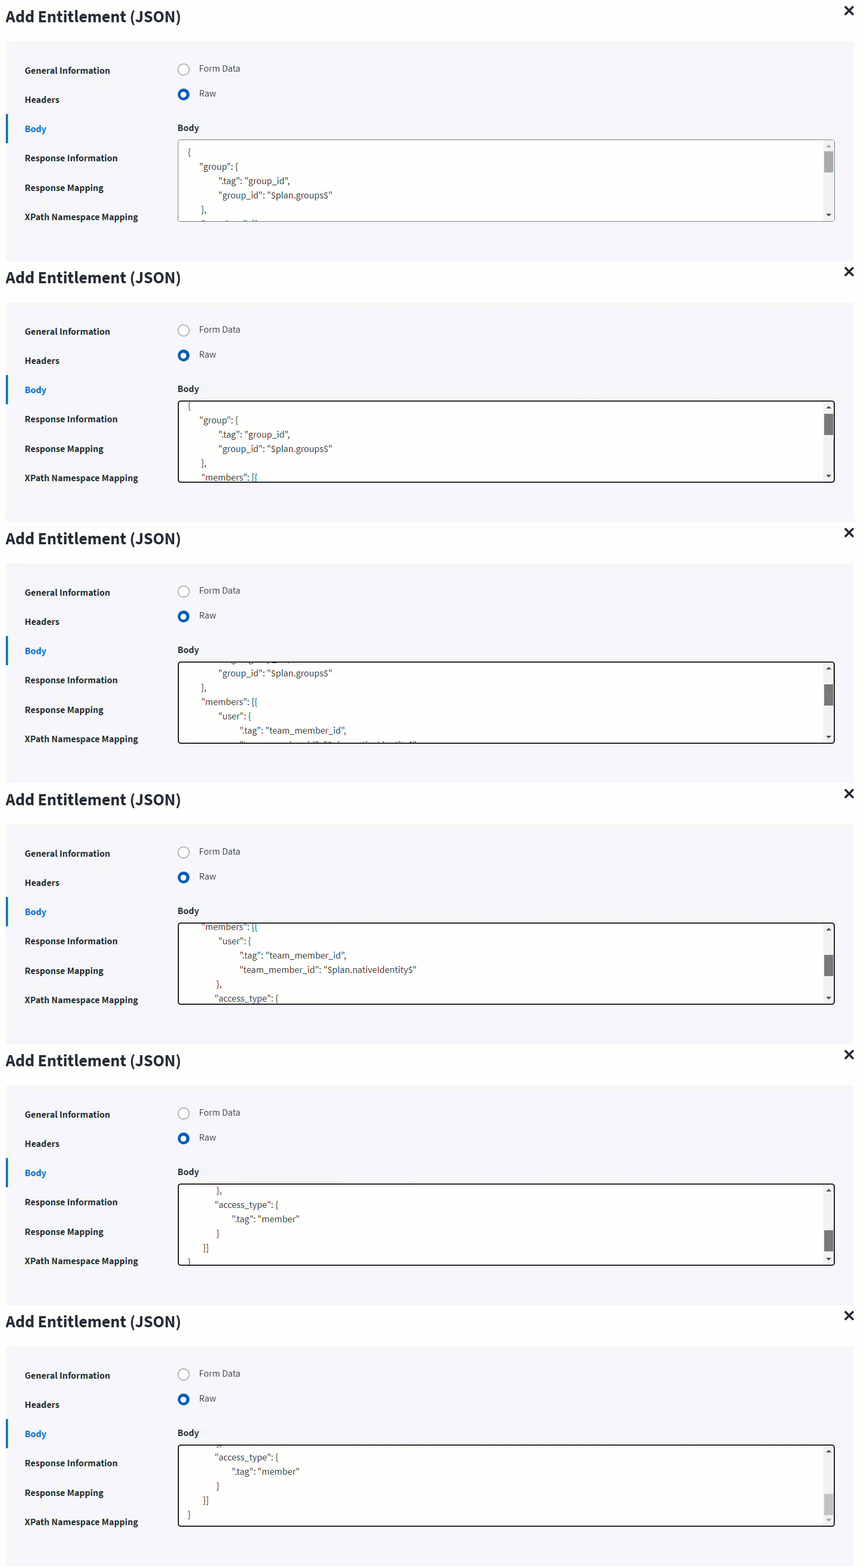
The HTTP body is used for posting the data with a request. The body has two data entry types, Form Data and Raw. You can use either of them for adding entitlements.
In the Raw field, enter the JSON payload for the entitlement.
In the following screenshot, the plan.nativeIdentity keyword signifies the AccountID (identity attribute) in the account request of the plan. If the plan contains the identity attribute of an account, it can be updated in the payload with $plan.nativeIdentity$.
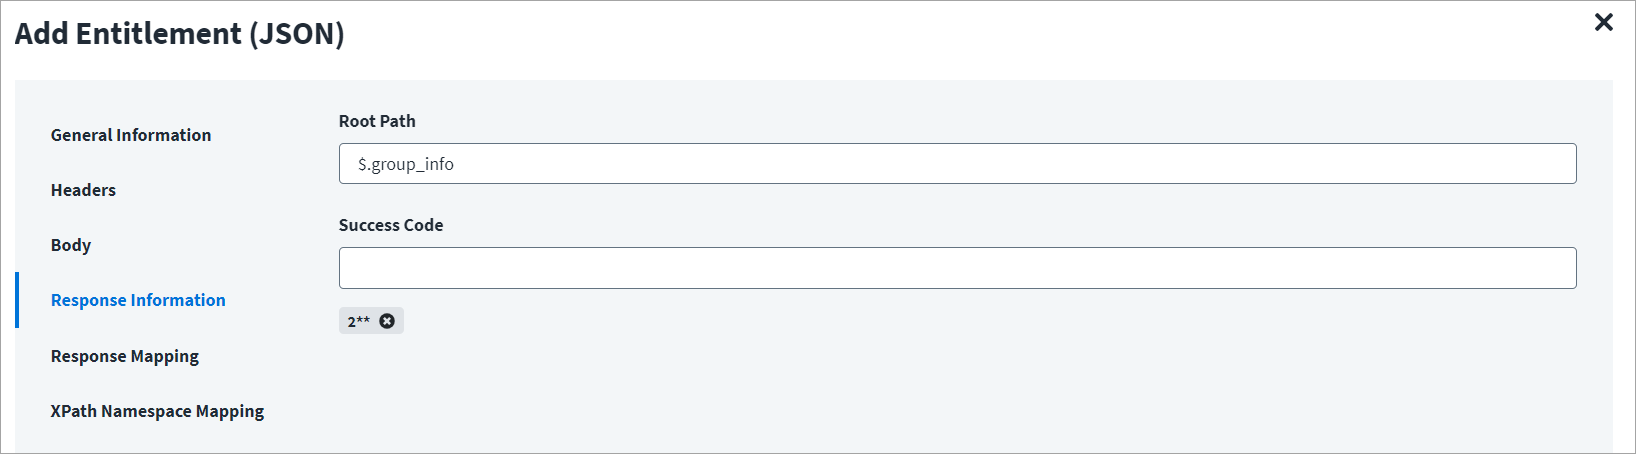
On the Response Information tab:
The Root Path is the common path present in the JSON response. The Success Code is the successful HTTP response code expected by the respective Web Service operation. By default, the success code is 2**.
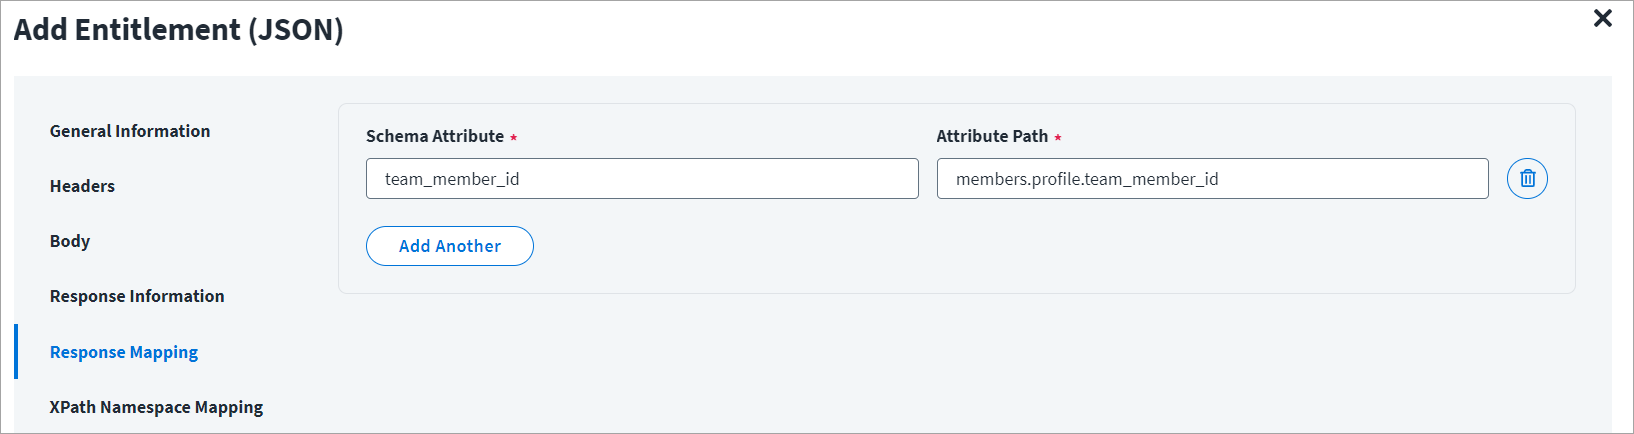
On the Response Mapping tab:
Refer to Configuration for Response for more information about the raw JSON response on which the Response Information schema is mapped.
Remove Entitlement
This topic provides an example of a JSON response for a remove entitlement operation.
Remove Entitlement Example
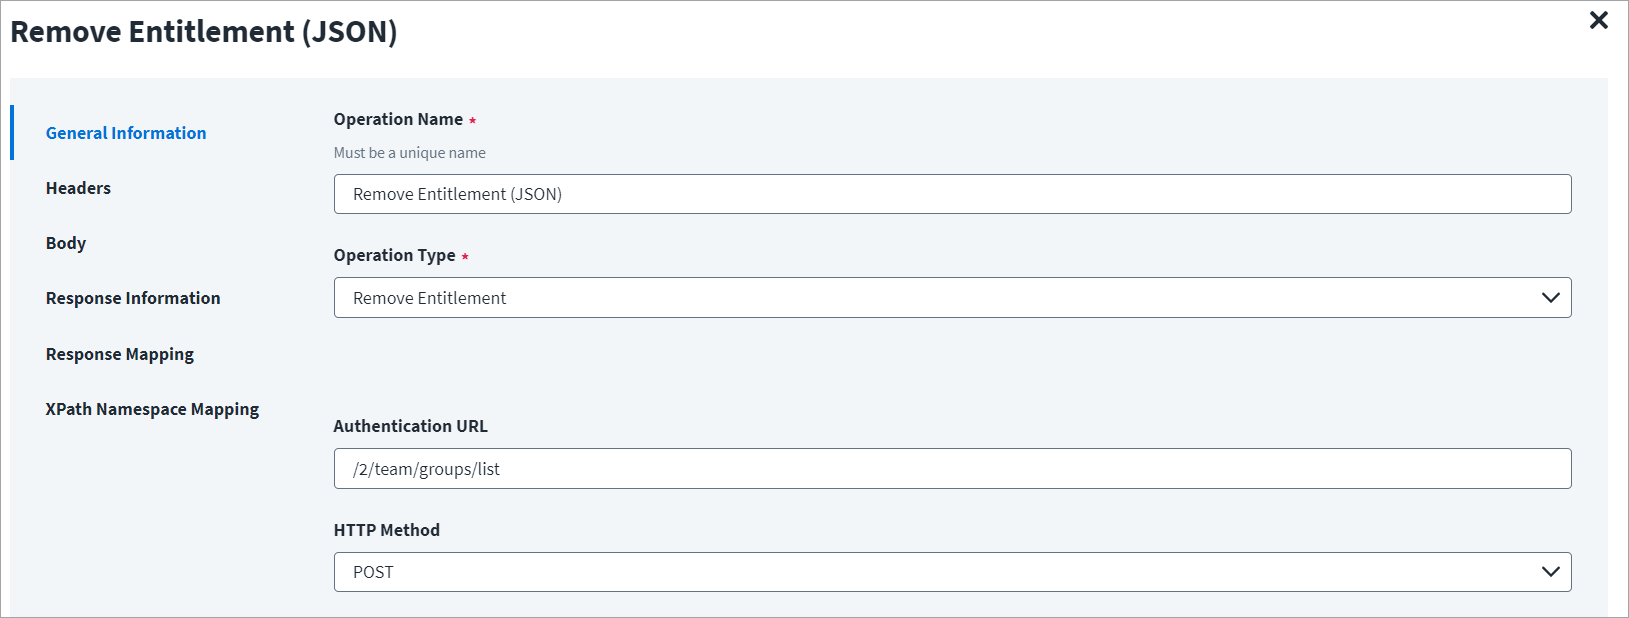
On the General Information tab:
- In the Operation Name field, enter
Remove Entitlement (JSON)as the operation name. - From the Operation Type dropdown list, select Remove Entitlement.
- In the Context URL field, enter the URL specific to the entitlement.
- In the HTTP Method dropdown list, select POST.
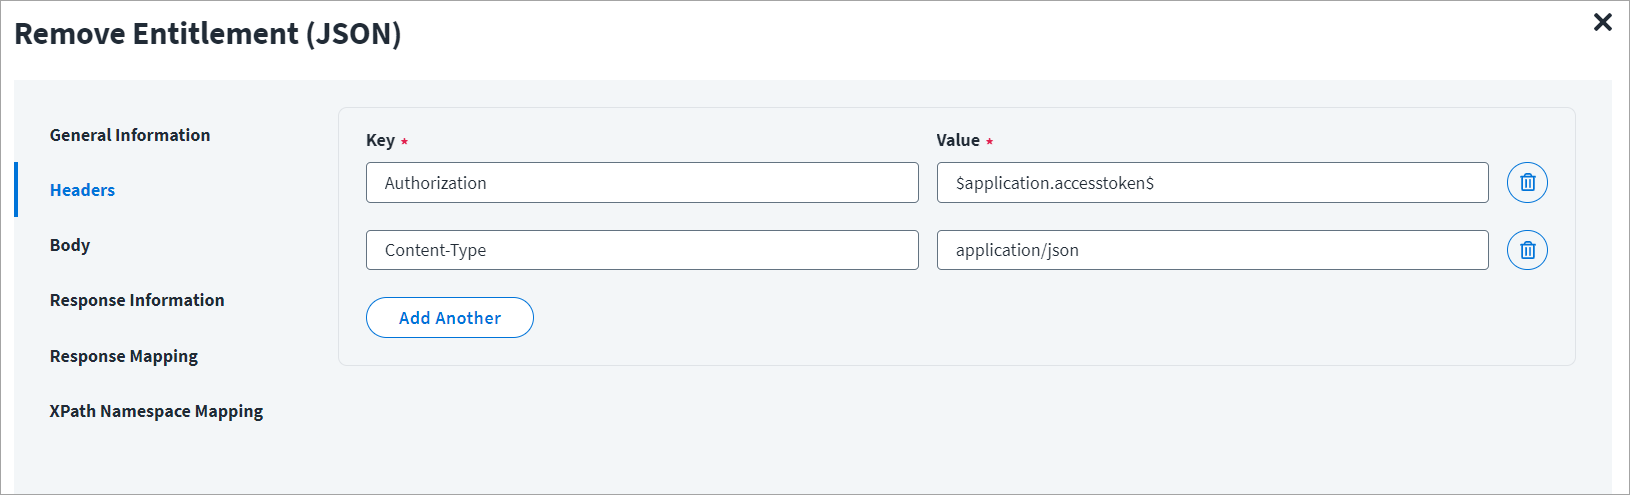
On the Header and Body tab:
The Header has the data keys and their corresponding values. These key value pairs will be sent as part of the Header in the HTTP Request.
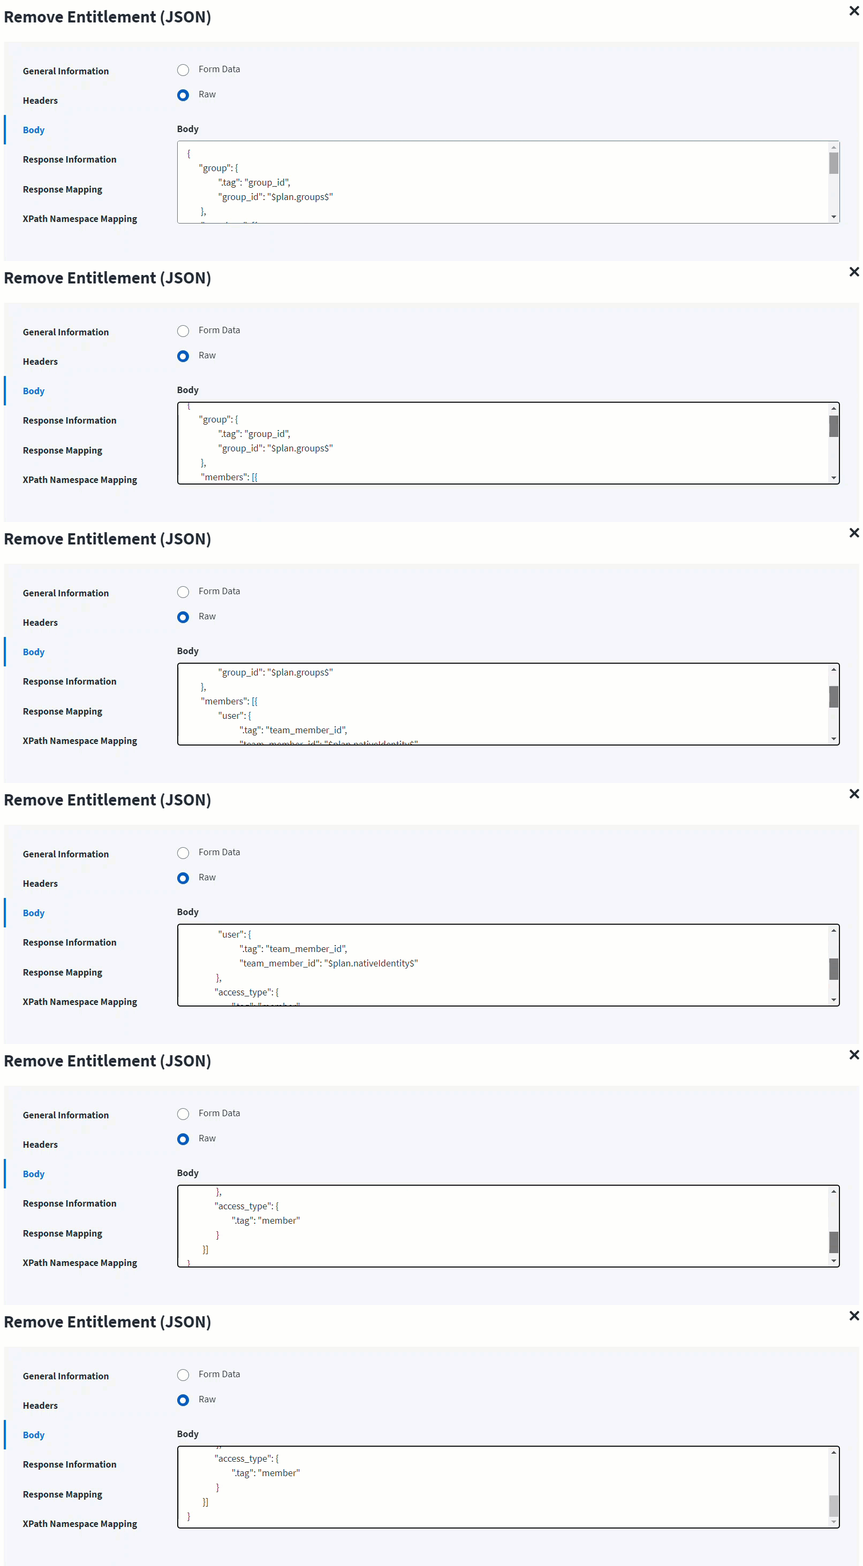
The HTTP body is used for posting the data with a request. The body has two data entry types, Form Data and Raw. You can use either of them for removing entitlements.
In the Raw field, enter the JSON payload for the entitlement.
In the following screenshot, the plan.nativeIdentity keyword signifies the AccountID (identity attribute) in the account request of the plan. If the plan contains the identity attribute of an account, it can be updated in the payload with $plan.nativeIdentity$.
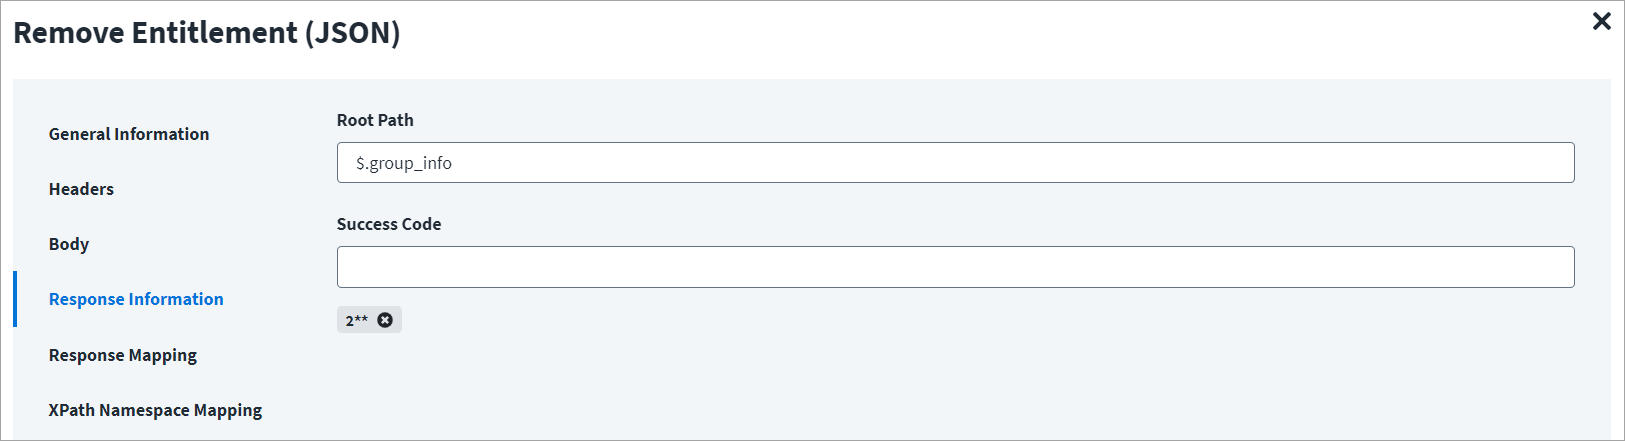
On the Response Information tab:
The Root Path is the common path present in the JSON response. The Success Code is the successful HTTP response code expected by the respective Web Service operation. By default, the success code is 2**.
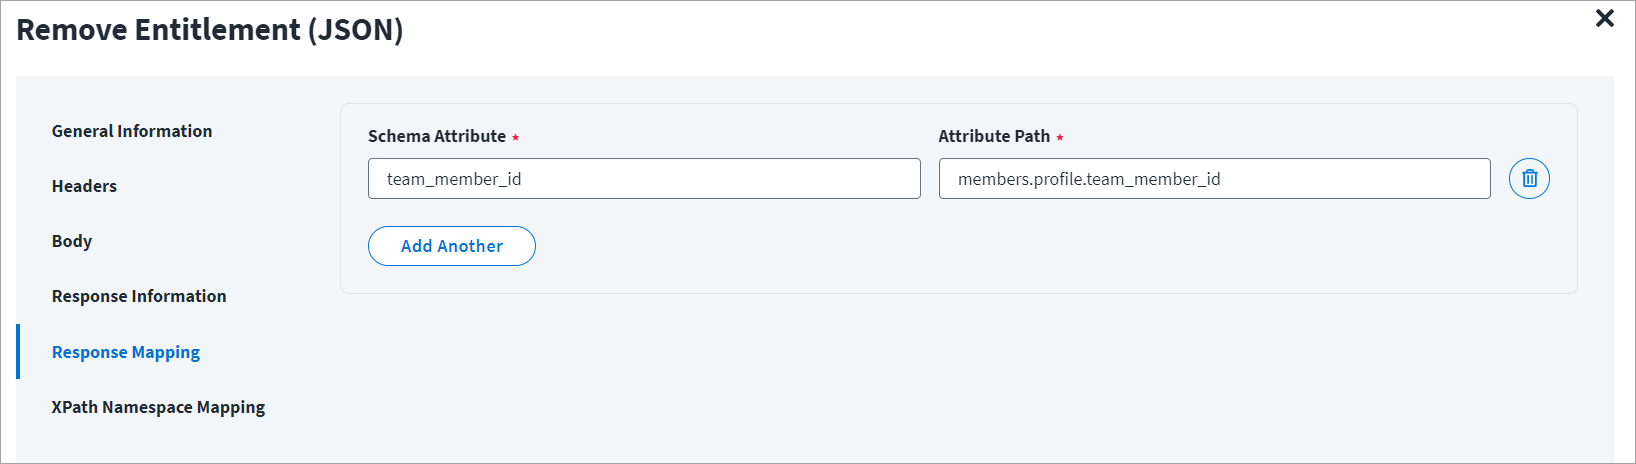
On the Response Mapping tab:
Refer to Configuration for Response for more information about the raw JSON response on which the Response Information schema is mapped.
Update Account
This topic provides an example of a JSON response for an update account operation.
Update Account Example
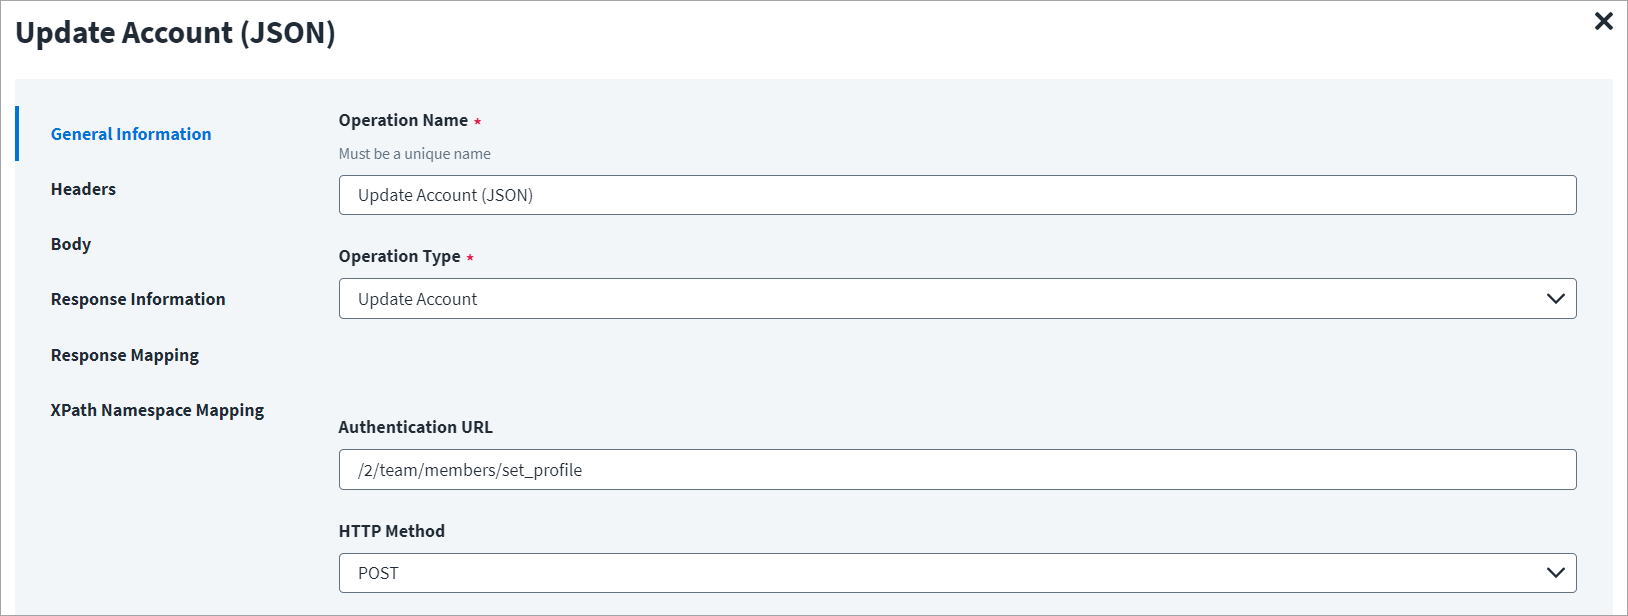
On the General Information tab:
- In the Operation Name field, enter
Update Account (JSON)as the operation name. - From the Operation Type dropdown list, select Update Account.
- In the Context URL field, enter the URL specific to the account.
- In the HTTP Method dropdown list, select POST.
On the Header and Body tab:
The Header has the data keys and their corresponding values. These key value pairs will be sent as part of the Header in the HTTP Request.
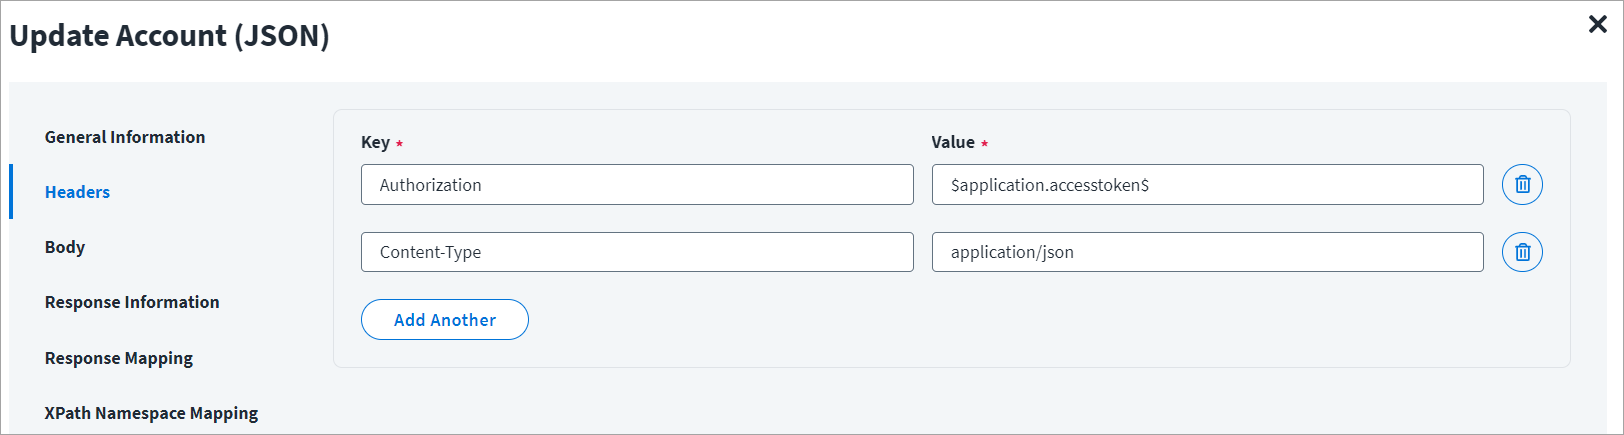
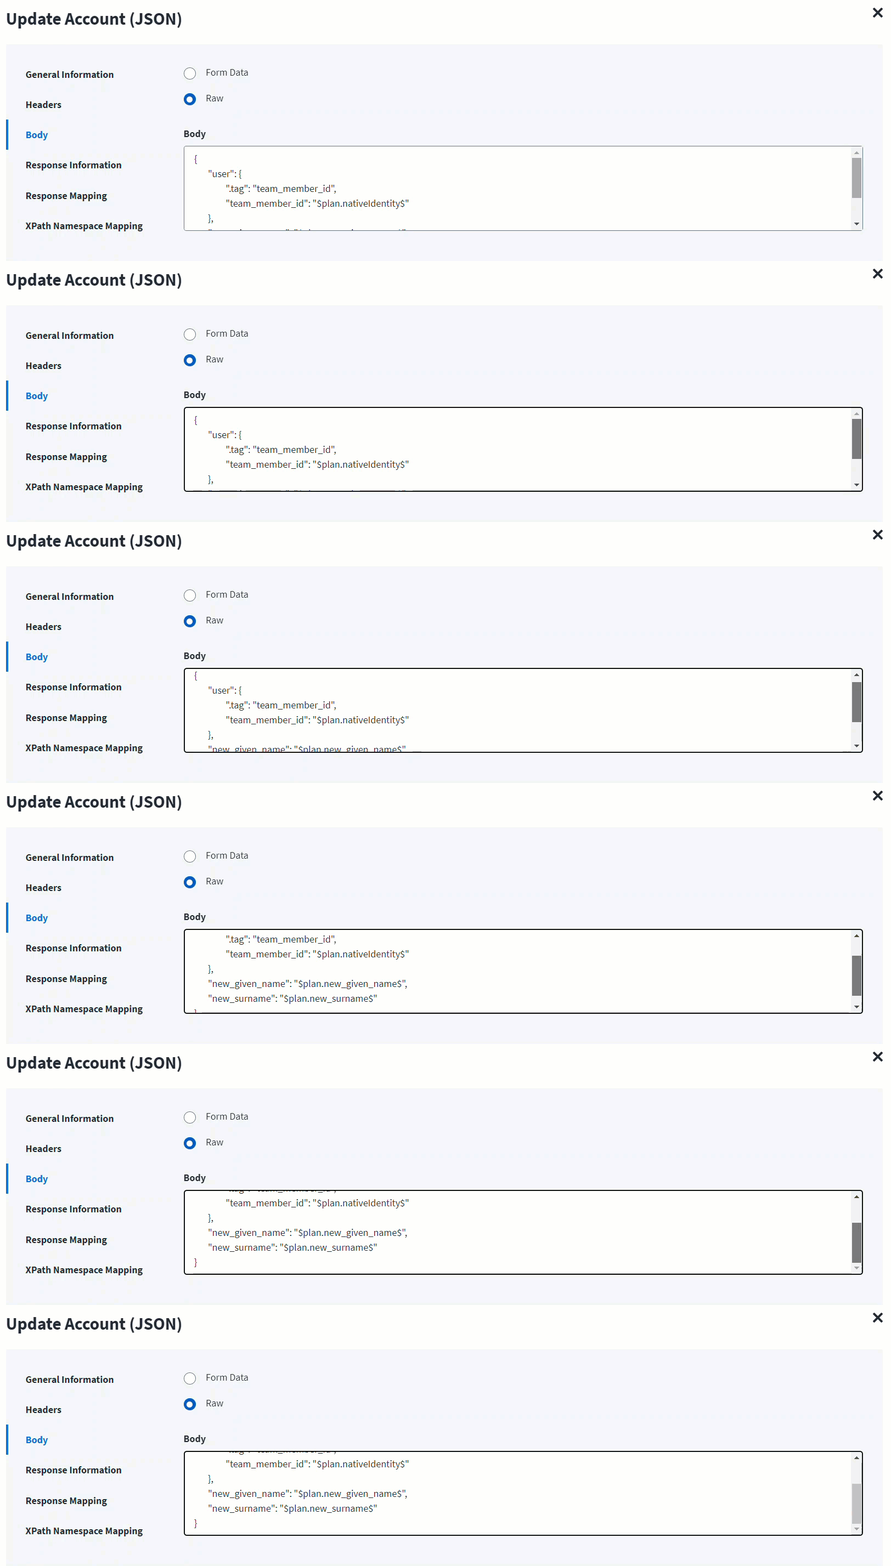
The HTTP body is used for posting the data with a request. The body has two data entry types, Form Data and Raw. You can use either of them for updating accounts.
In the Raw field, enter the JSON payload for the account.
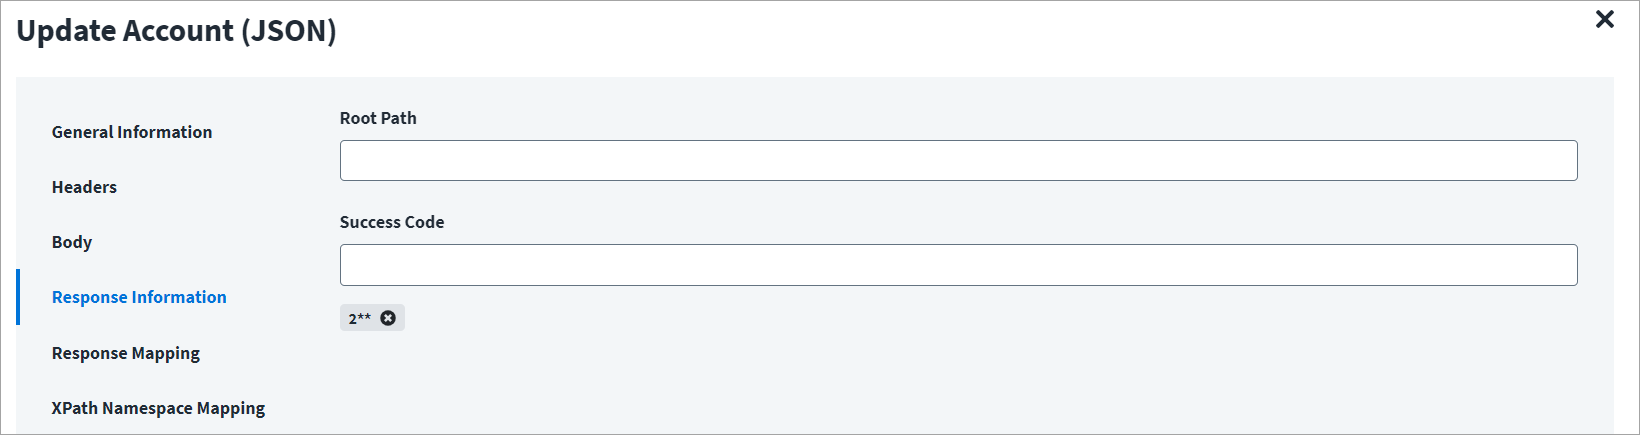
On the Response Information tab:
The Root Path is the common path present in the JSON response. The Success Code is the successful HTTP response code expected by the respective Web Service operation. By default, the success code is 2**.
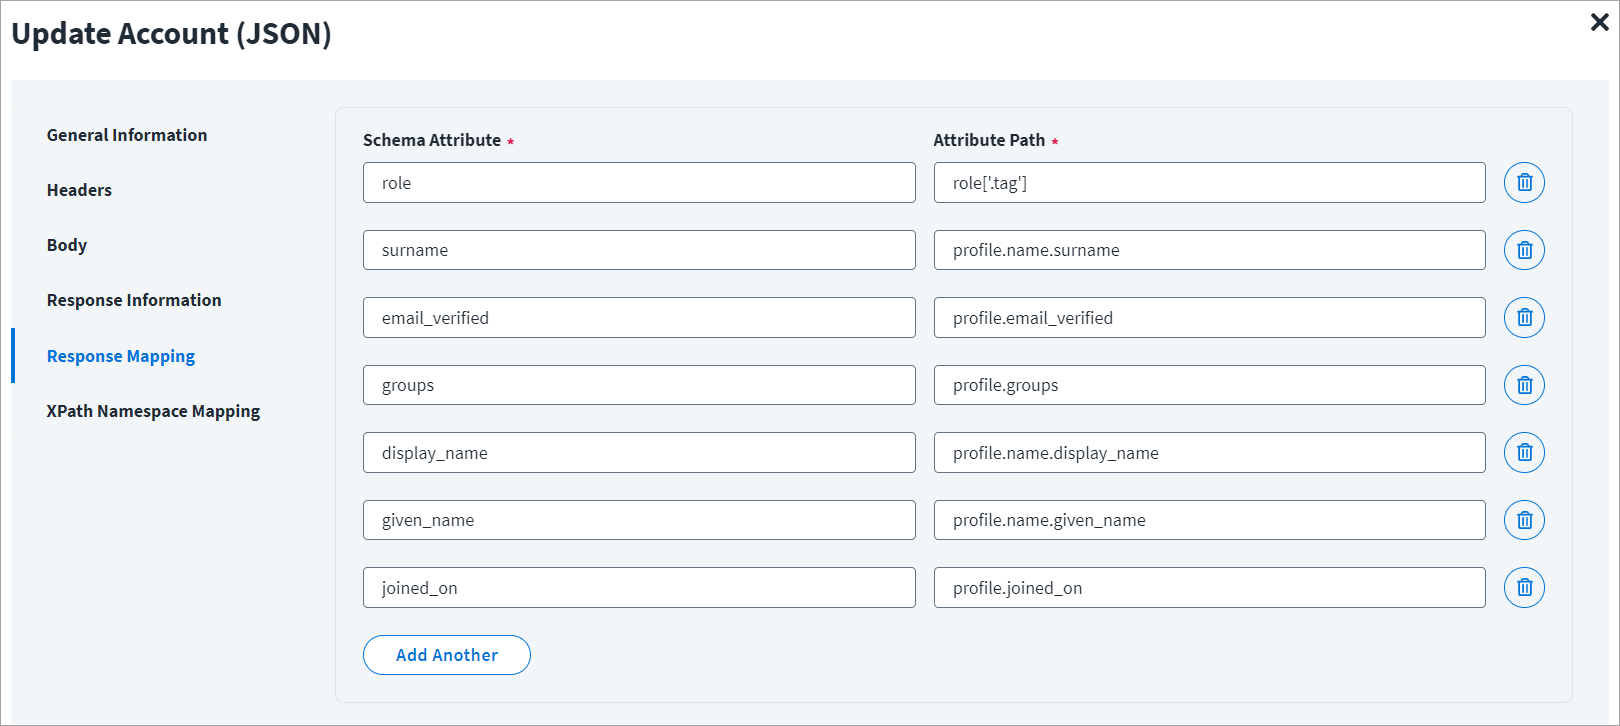
On the Response Mapping tab:
Refer to Configuration for Response for more information about the raw JSON response on which the Response Information schema is mapped.
Get Object
This topic provides an example of a JSON response for a get object operation.
Get Object Example
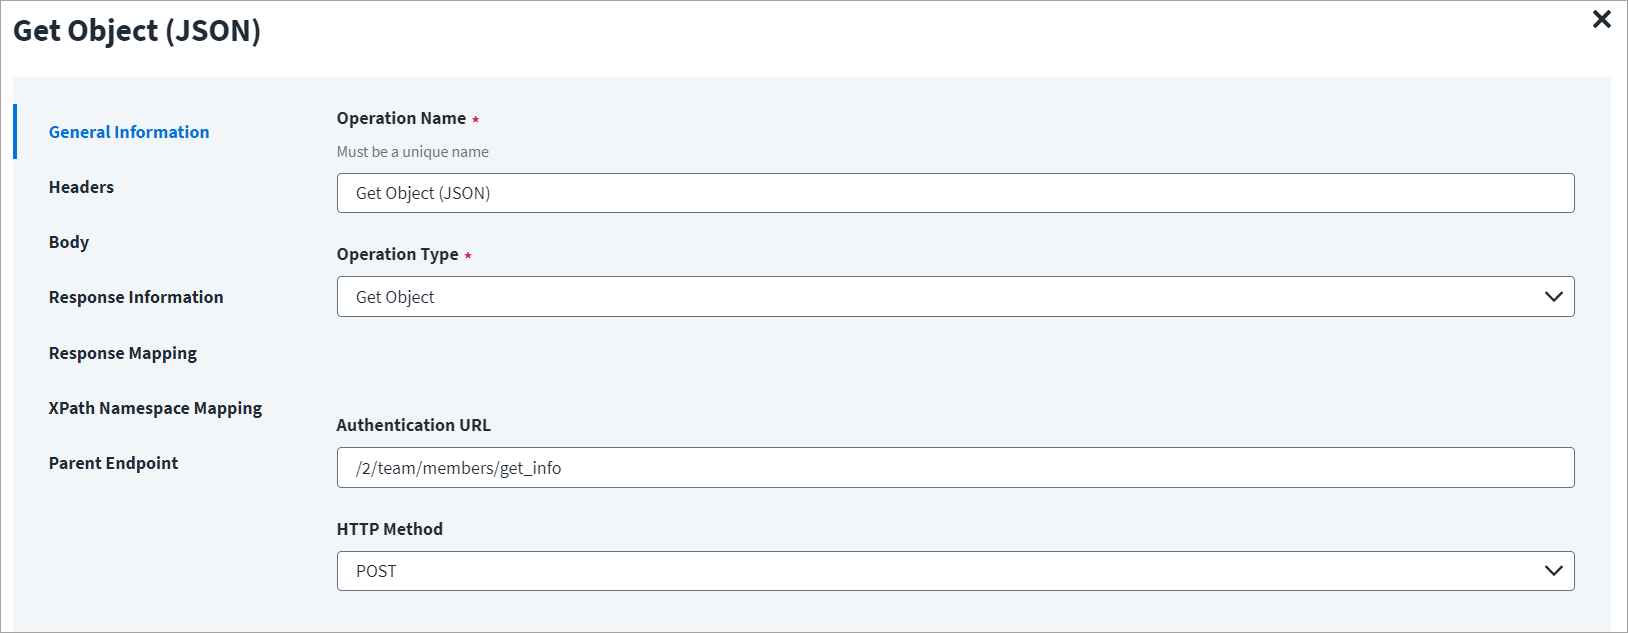
On the General Information tab:
- In the Operation Name field, enter
Get Object (JSON)as the operation name. - From the Operation Type dropdown list, select Get Object.
- In the Context URL field, enter the URL specific to the get object.
- In the HTTP Method dropdown list, select POST.
On the Header and Body tab:
The Header has the data keys and their corresponding values. These key value pairs will be sent as part of the Header in the HTTP Request.
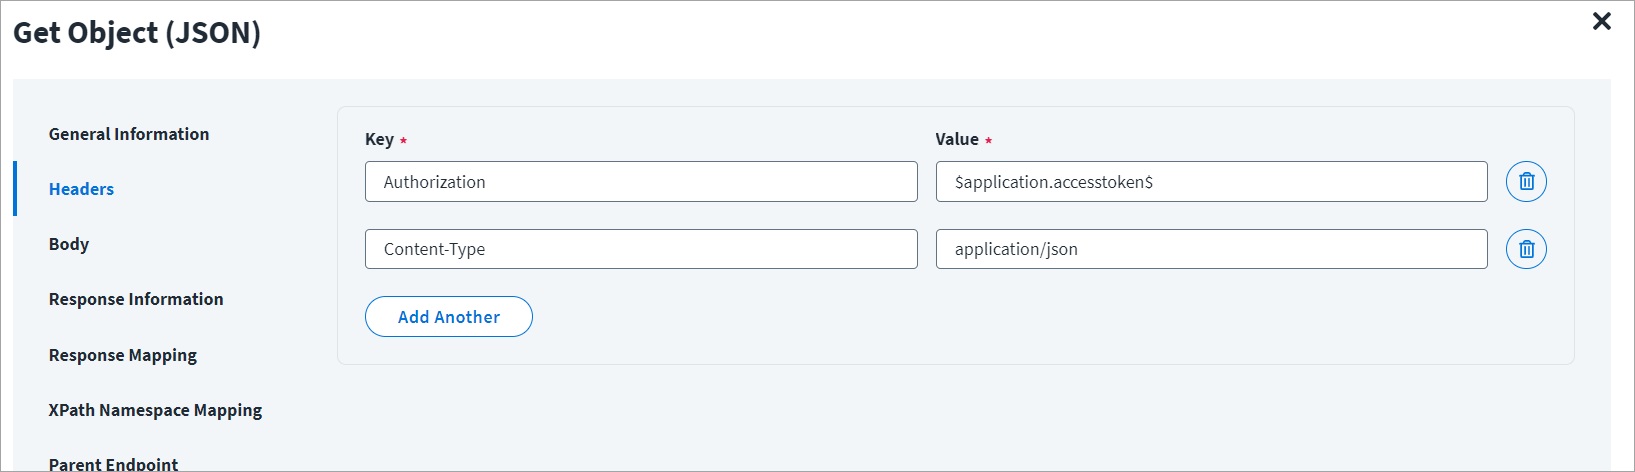
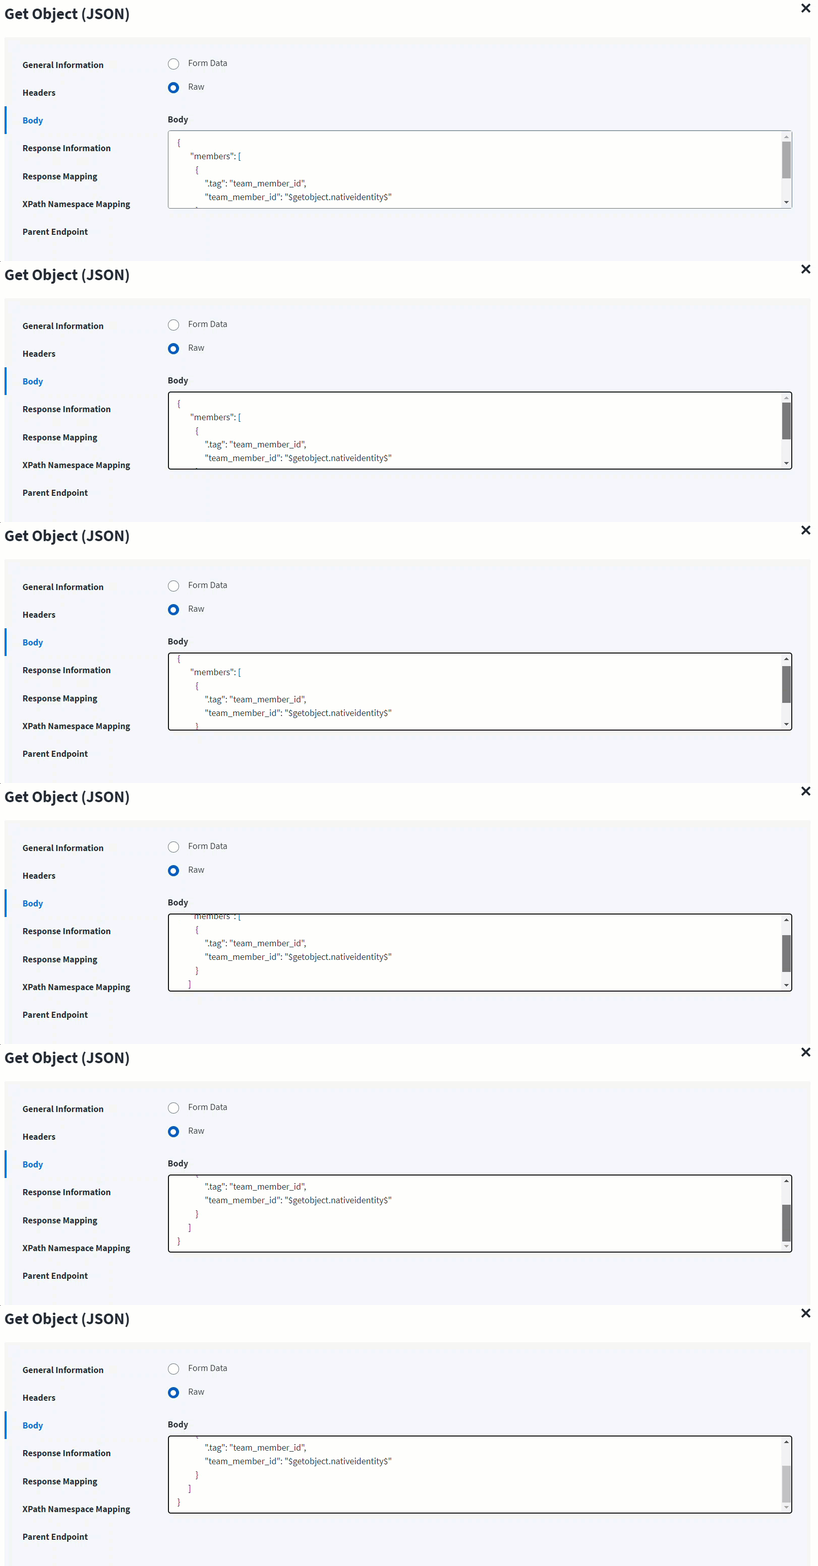
The HTTP body is used for posting the data with a request. The body has two data entry types, Form Data and Raw. You can use either of them for get object.
In the Raw field, enter the JSON payload for get object.
In the following screenshot, the $nativeIdentity$ signifies the AccountID (identity attribute) in the plan or during getObject operation. For example, nativeIdentity is used along with the keyword as follows:
getobject: getObject.nativeIdentity
This $nativeIdentity$ can be used in the Authentication URL.
On the Response Information tab:
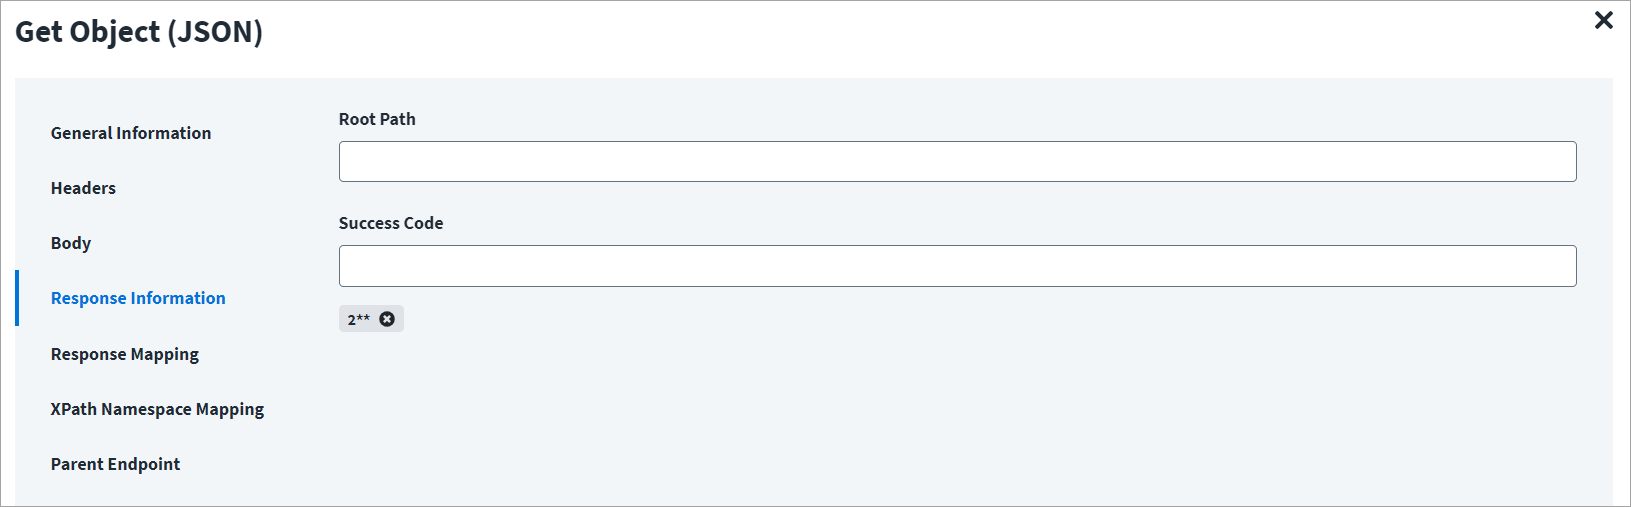
The Root Path is the common path present in the JSON response. The Success Code is the successful HTTP response code expected by the respective Web Service operation. By default, the success code is 2**.
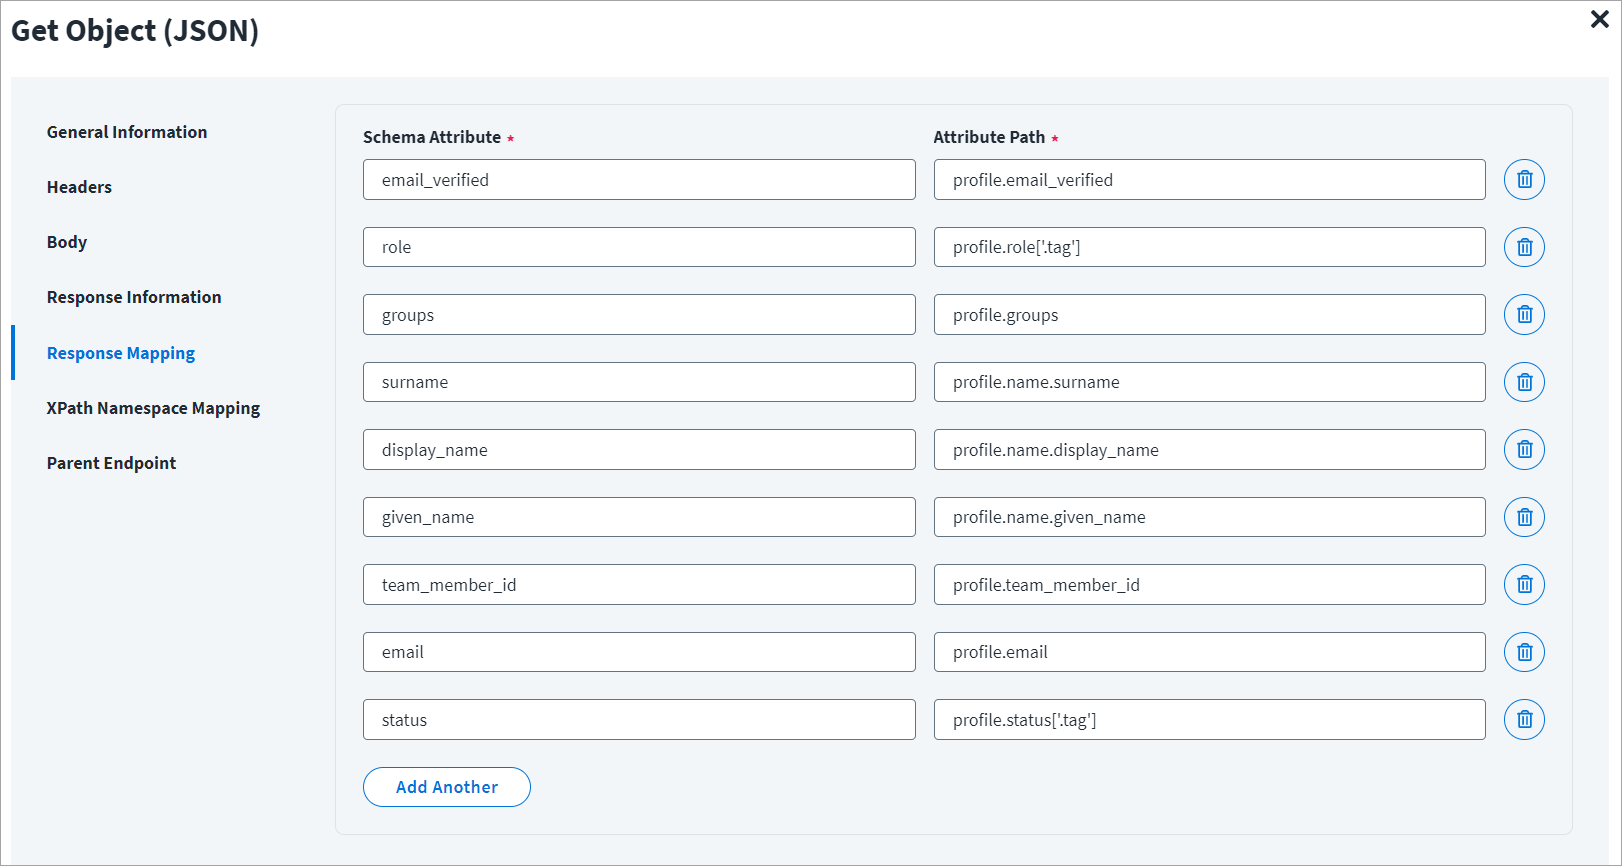
On the Response Mapping tab:
Refer to Configuration for Response for more information about the raw JSON response on which the Response Information schema is mapped.
Enable Account
This topic provides an example of a JSON response for an enable account operation.
Enable Account - 1
To enable an account using the Web Services SaaS source you may set two operations such as Enable Account -1 and Enable Account - 2. In the first operation (Enable Account -1), the get object can be done and the returned response object is used as the input for the second operation (Enable Account - 2). Refer to the Header and Body of Enable Account - 2.
Enable Account - 1 Example
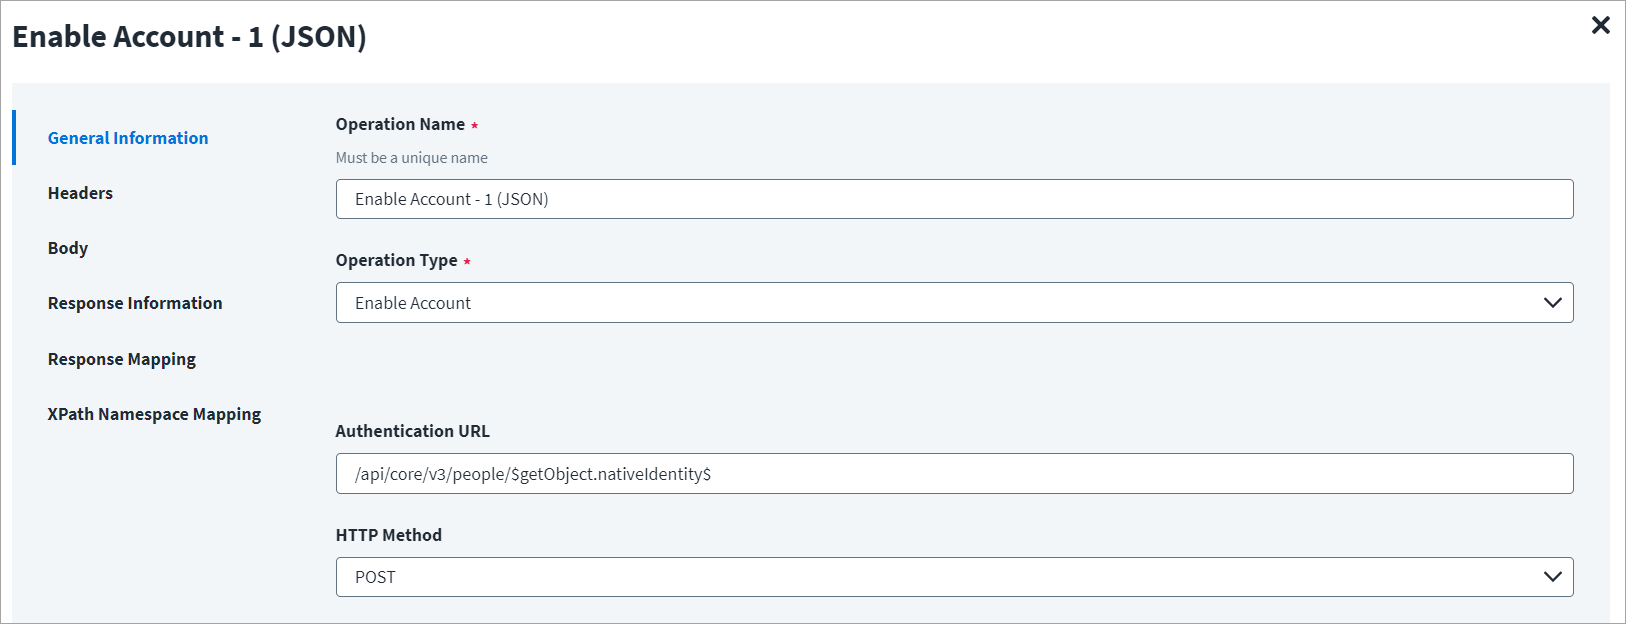
On the General Information tab:
- In the Operation Name field, enter
Enable Account - 1 (JSON)as the operation name. - From the Operation Type dropdown list, select Enable Account.
- In the Context URL field, enter the URL specific to the account.
- In the HTTP Method dropdown list, select POST.
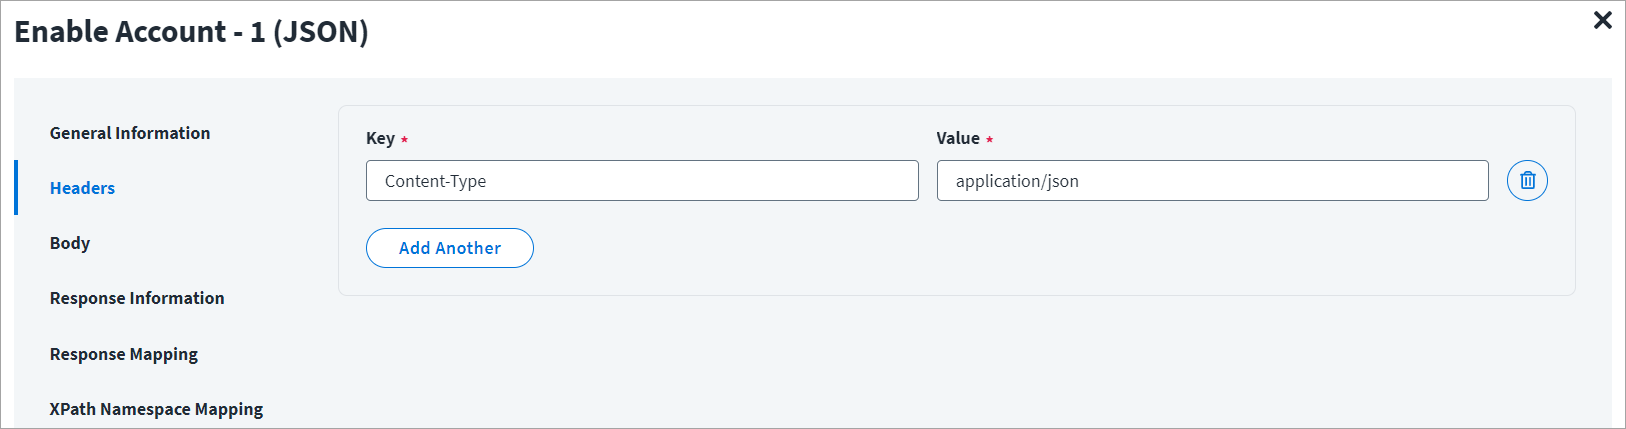
On the Header and Body tab:
The Header has the data keys and their corresponding values. These key value pairs will be sent as part of the Header in the HTTP Request.
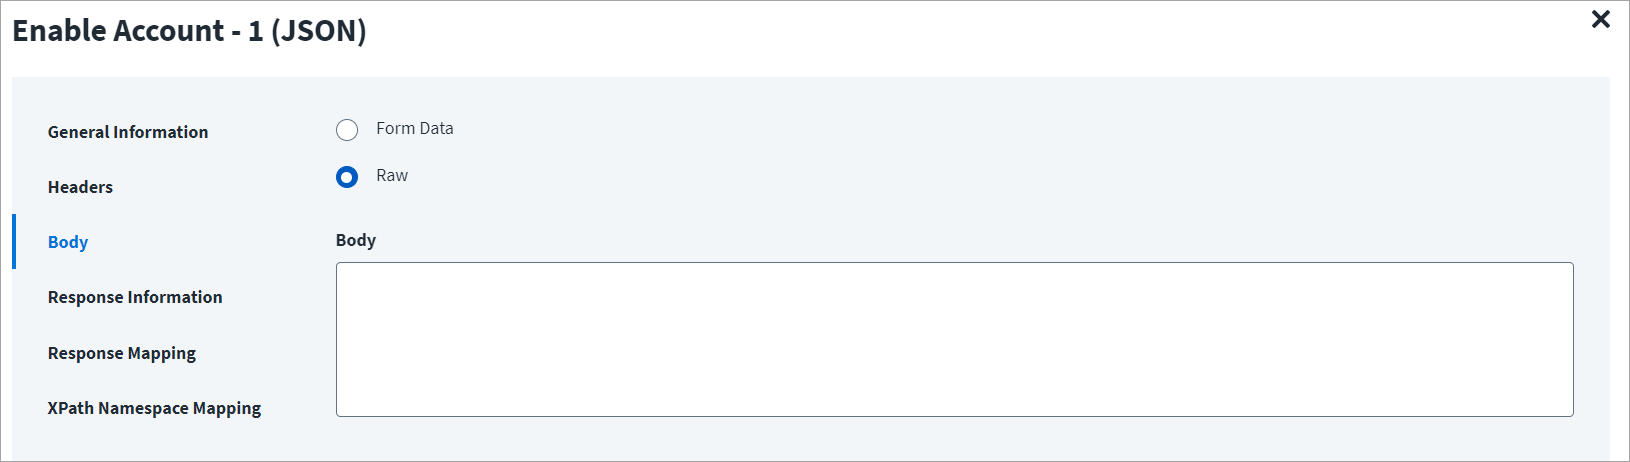
The HTTP body is used for posting the data with a request. The body has two data entry types, Form Data and Raw. You can use either of them for enabling an account.
In the Raw field, enter the JSON payload for the account.
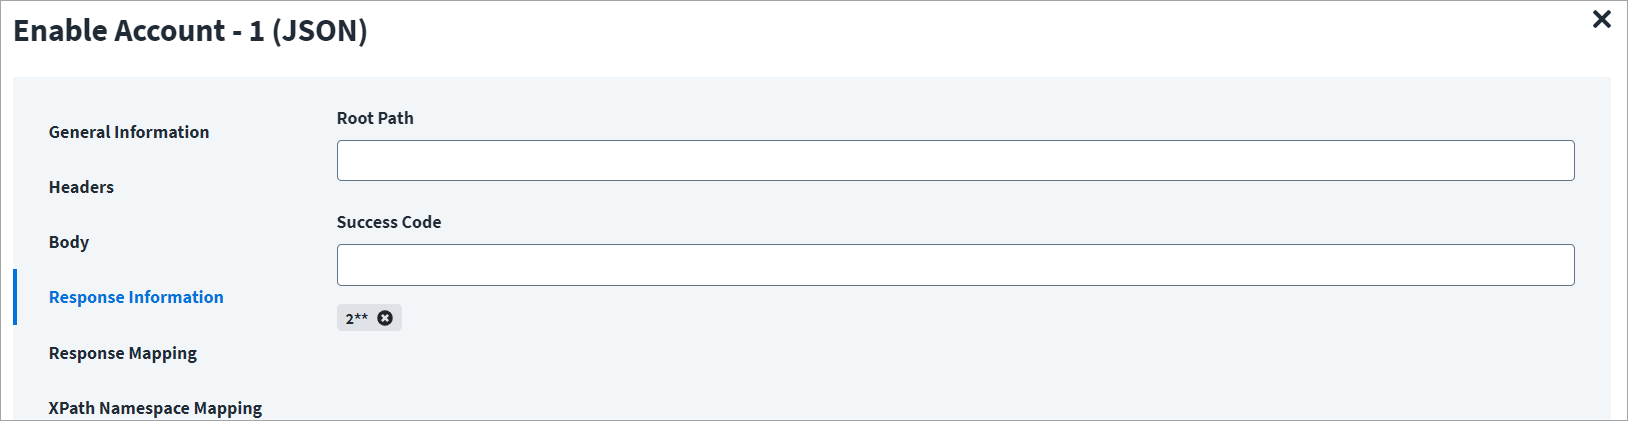
On the Response Information tab:
The Root Path is the common path present in the JSON response. The Success Code is the successful HTTP response code expected by the respective Web Service operation. By default, the success code is 2**.
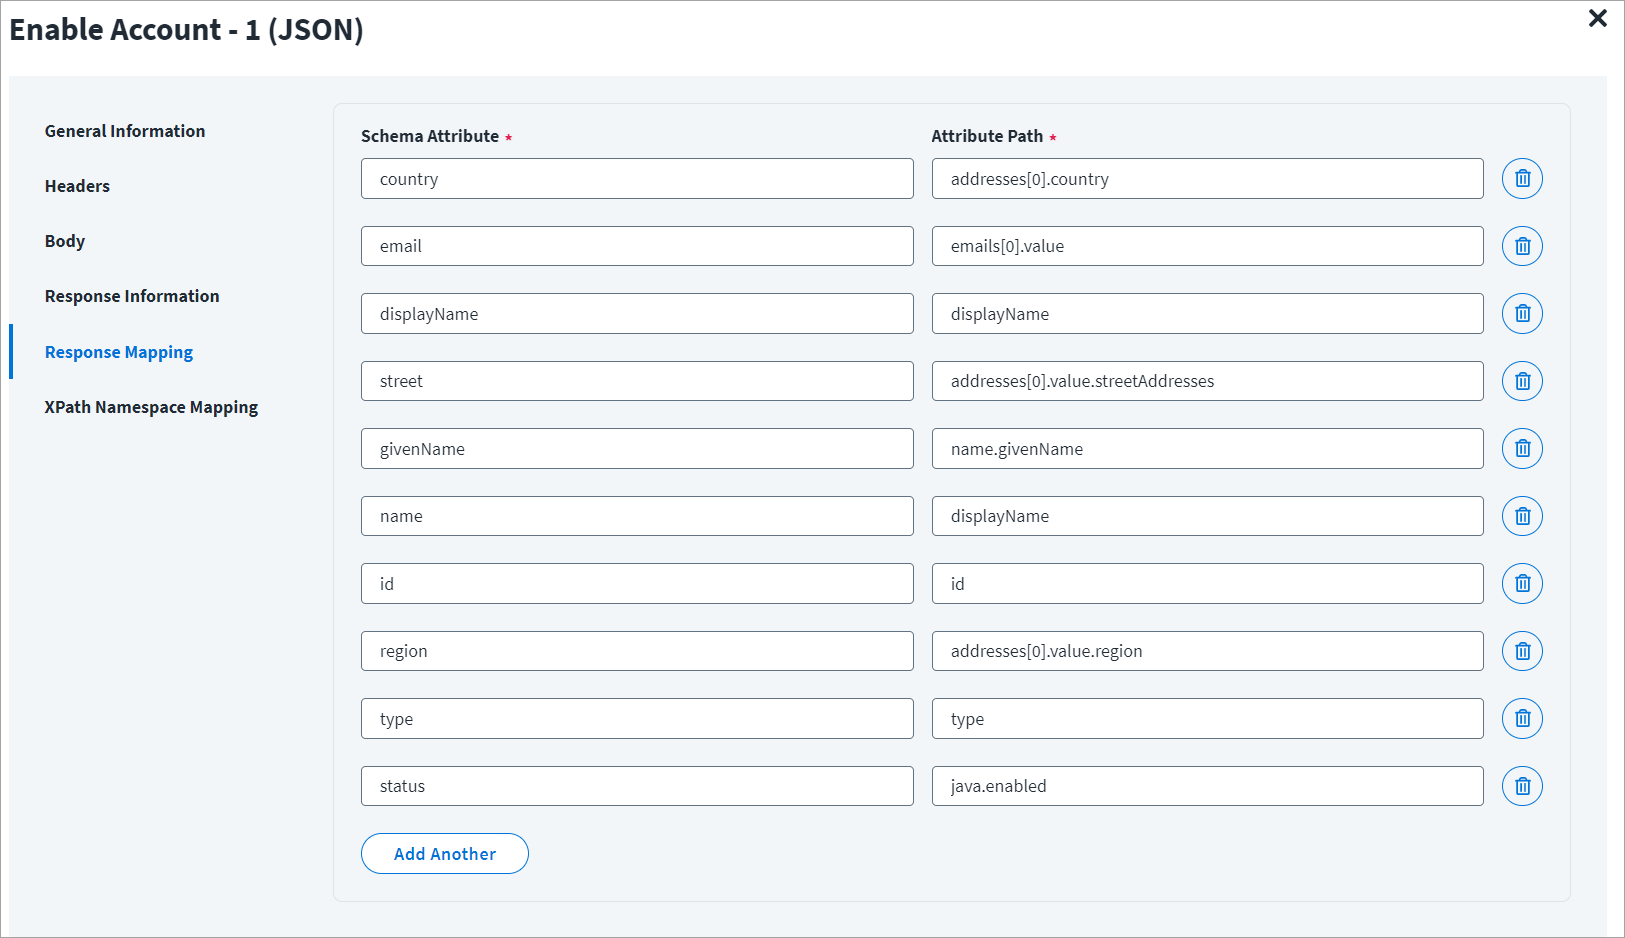
On the Response Mapping tab:
Refer to Configuration for Response for more information about the raw JSON response on which the Response Information schema is mapped.
Enable Account - 2
Enable Account - 2 Example
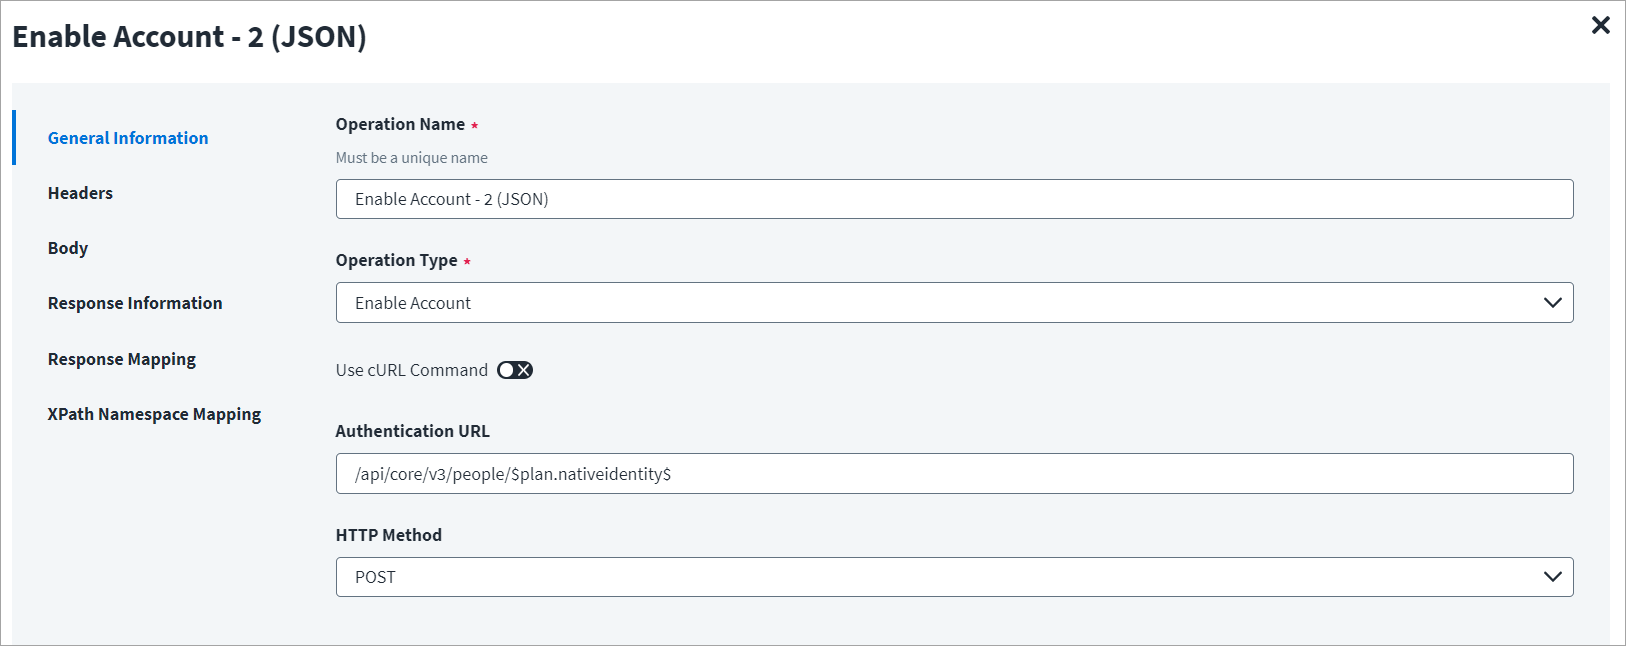
On the General Information tab:
- In the Operation Name field, enter
Enable Account - 2 (JSON)as the operation name. - From the Operation Type dropdown list, select Enable Account.
- In the Context URL field, enter the URL specific to the account.
- In the HTTP Method dropdown list, select POST.
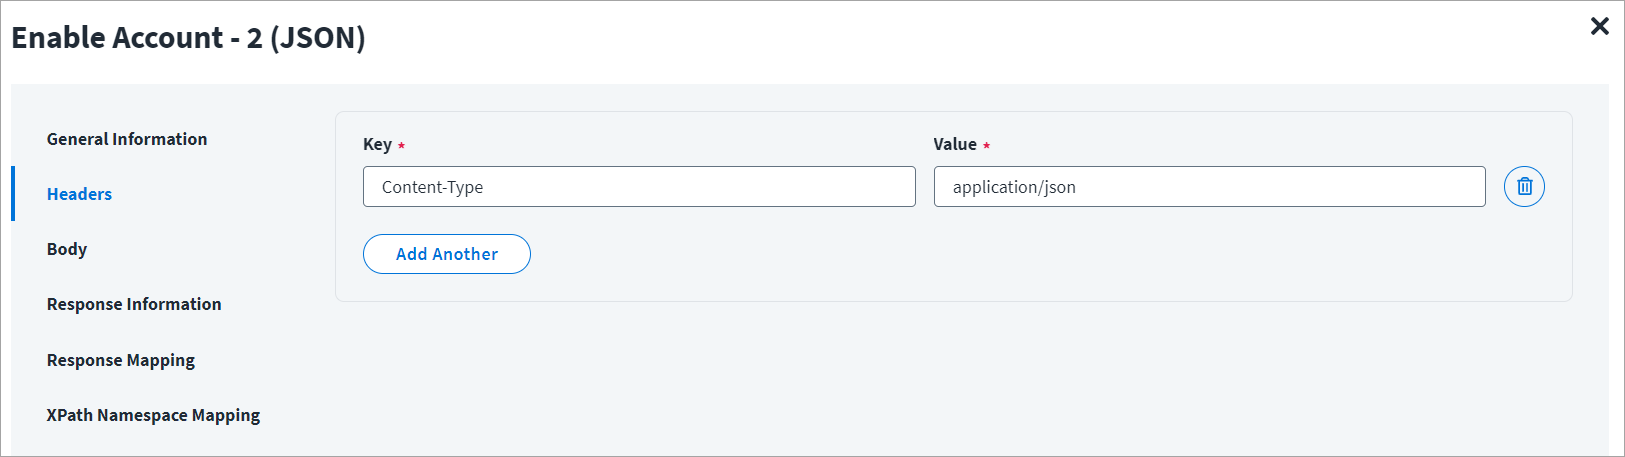
On the Header and Body tab:
The Header has the data keys and their corresponding values. These key value pairs will be sent as part of the Header in the HTTP Request.
The HTTP body is used for posting the data with a request. The body has two data entry types, Form Data and Raw. You can use either of them for enabling an account.
In the Raw field, enter the JSON payload for the account.
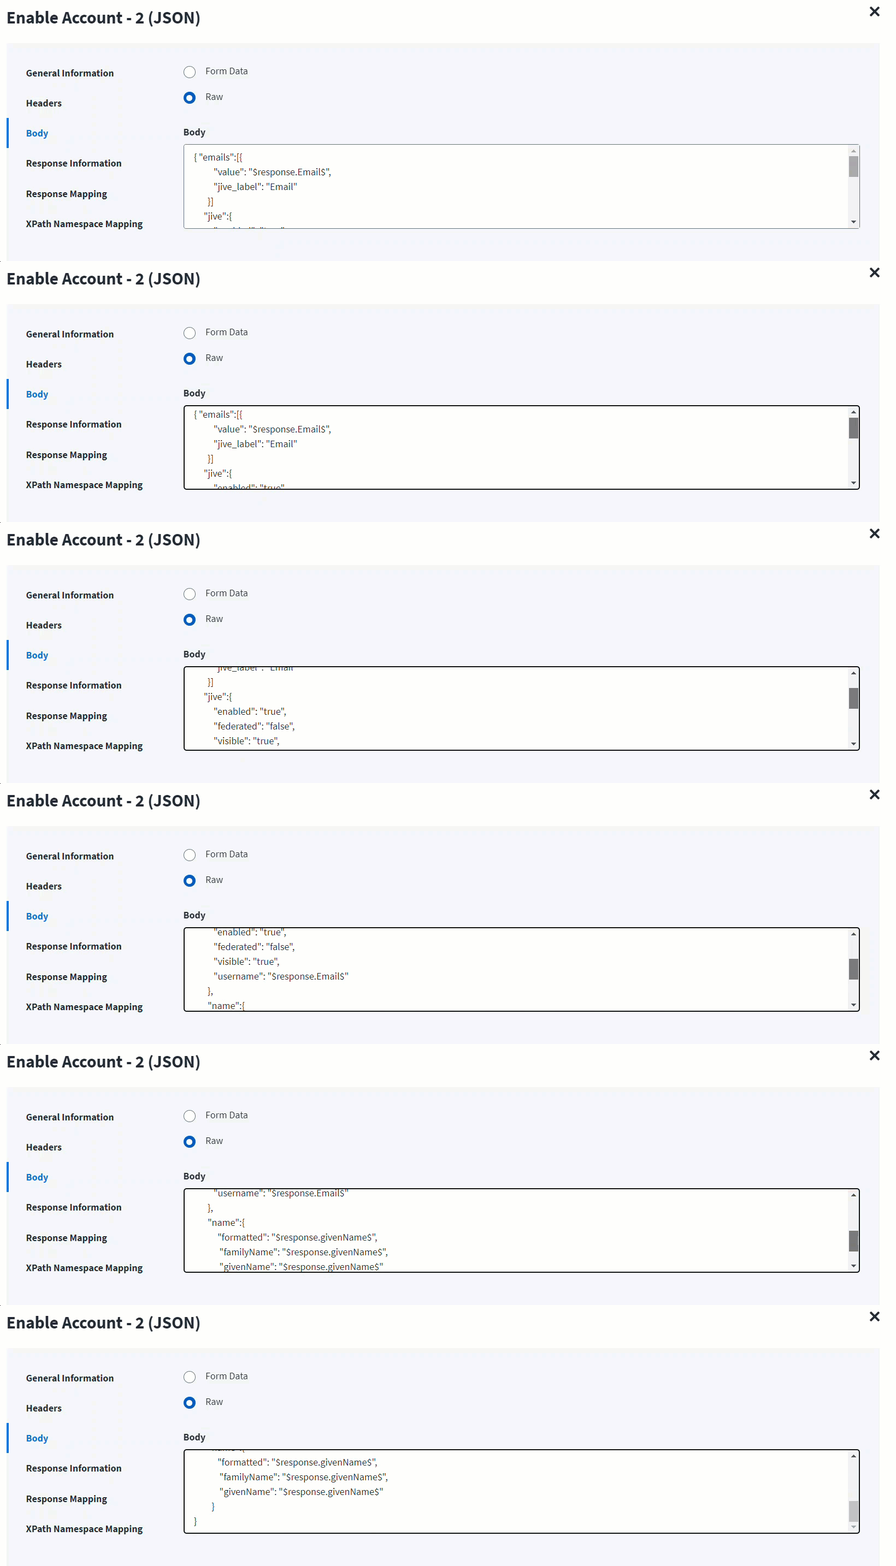
On the Response Information tab:
The Root Path is the common path present in the JSON response. The Success Code is the successful HTTP response code expected by the respective Web Service operation. By default, the success code is 2**.
Disable Account
This topic provides an example of a JSON response for a disable account operation.
Disable Account - 1
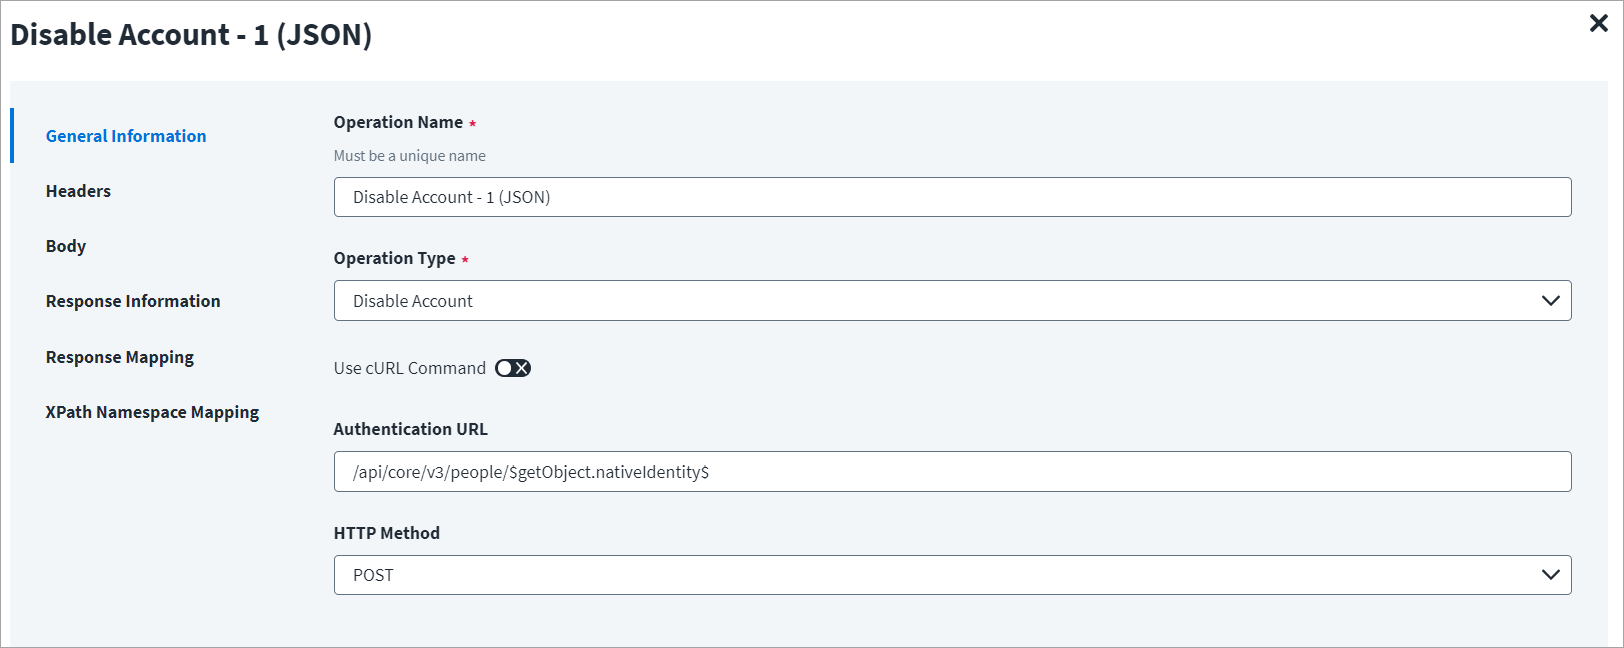
To disable an account using the Web Services SaaS source you must set two operations such as Disable Account -1 and Disable Account - 2. In the first operation (Disable Account -1), the get object is done and the returned object is used as the input for the second operation (Disable Account - 2). Refer to the Header and Body of Disable Account - 2.
Disable Account - 1 Example
On the General Information tab:
- In the Operation Name field, enter
Disable Account - 1 (JSON)as the operation name. - From the Operation Type dropdown list, select Disable Account.
- In the Context URL field, enter the URL specific to the account.
- In the HTTP Method dropdown list, select POST.
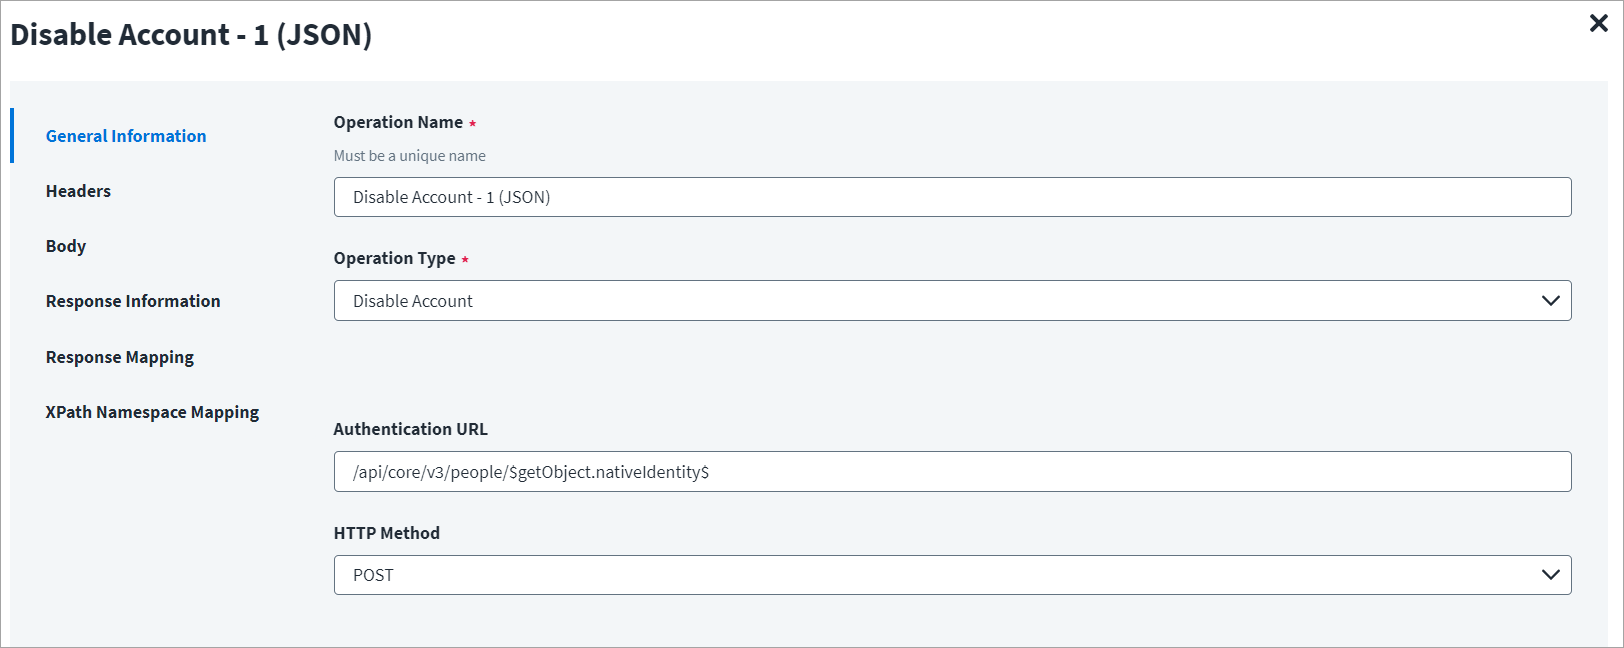
On the Header and Body tab:
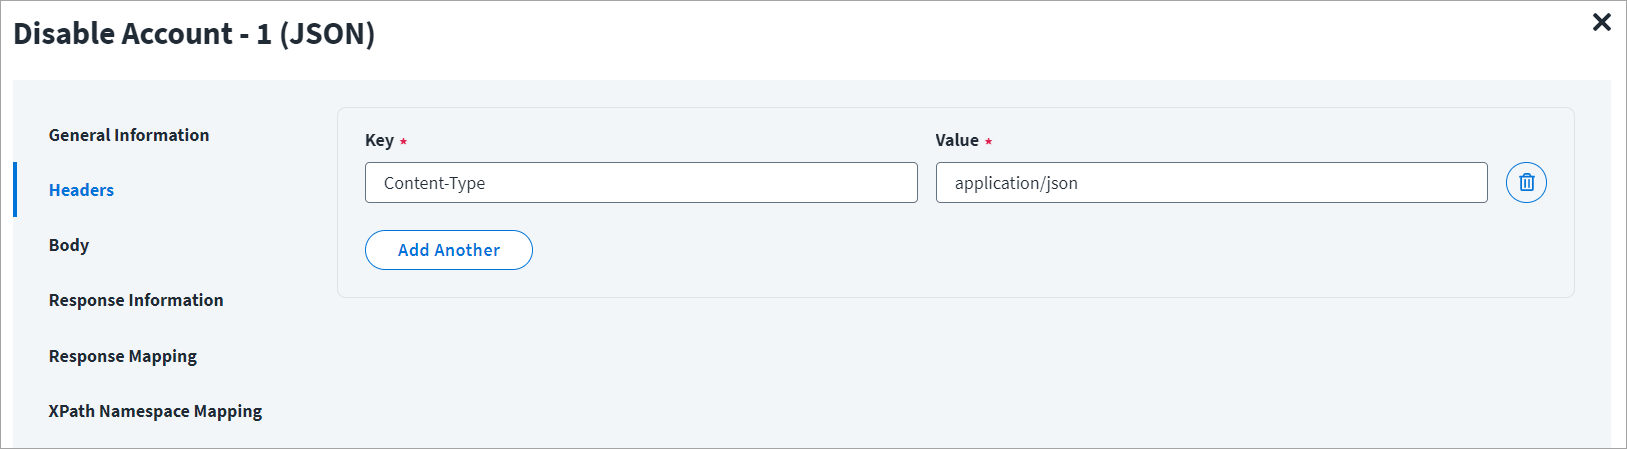
The Header has the data keys and their corresponding values. These key value pairs will be sent as part of the Header in the HTTP Request.
The HTTP body is used for posting the data with a request. The body has two data entry types, Form Data and Raw. You can use either of them for disabling an account.
In the Raw field, enter the JSON payload for the account.
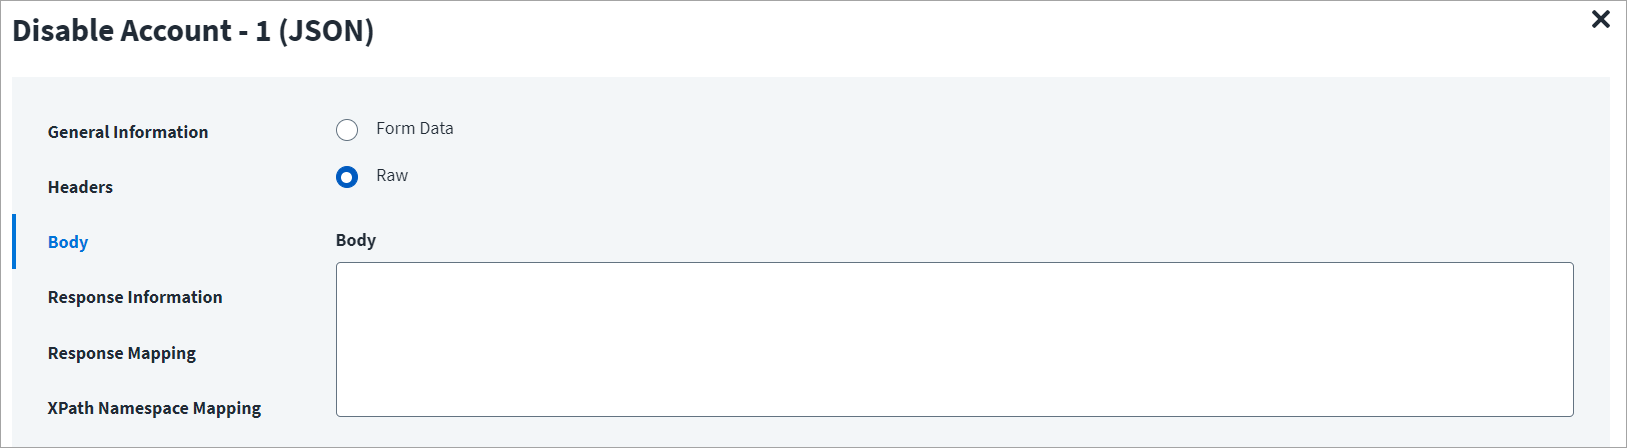
On the Response Information tab:
The Root Path is the common path present in the JSON response. The Success Code is the successful HTTP response code expected by the respective Web Service operation. By default, the success code is 2**.
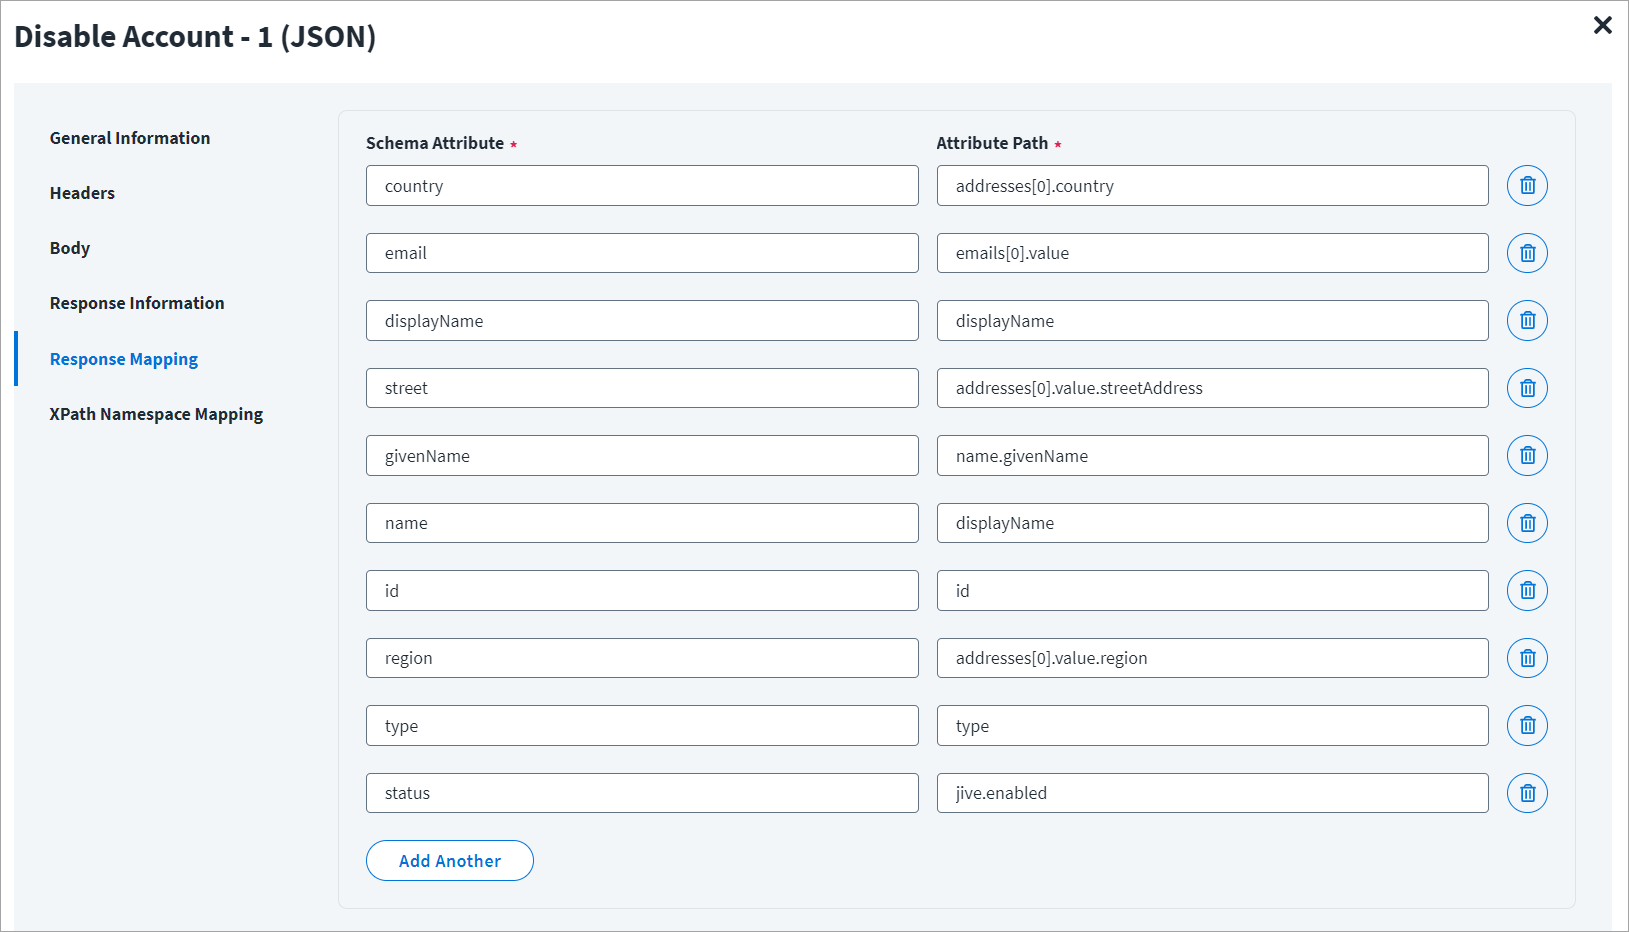
On the Response Mapping tab:
Refer to Configuration for Response for more information about the raw JSON response on which the Response Information schema is mapped.
Disable Account - 2
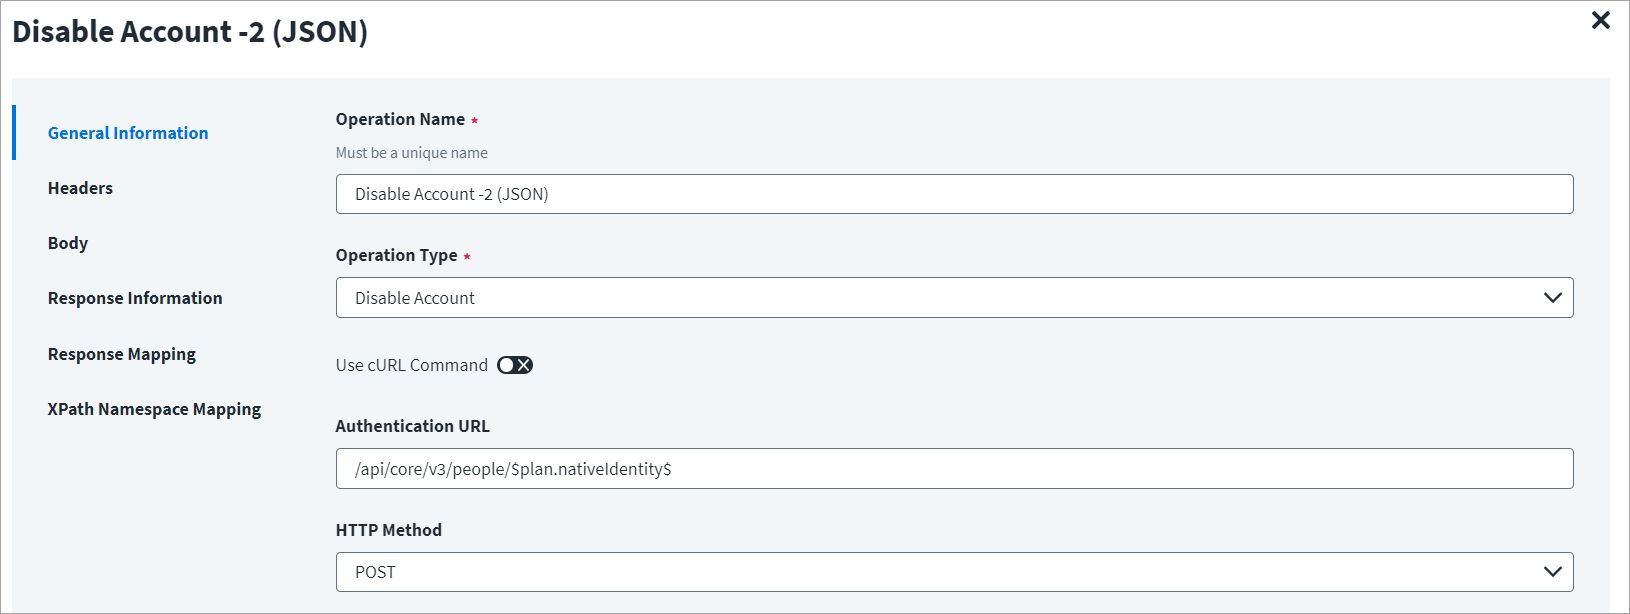
Disable Account - 2 Example
On the General Information tab:
- In the Operation Name field, enter
Disable Account - 2 (JSON)as the operation name. - From the Operation Type dropdown list, select Disable Account.
- In the Context URL field, enter the URL specific to the account.
- In the HTTP Method dropdown list, select POST.
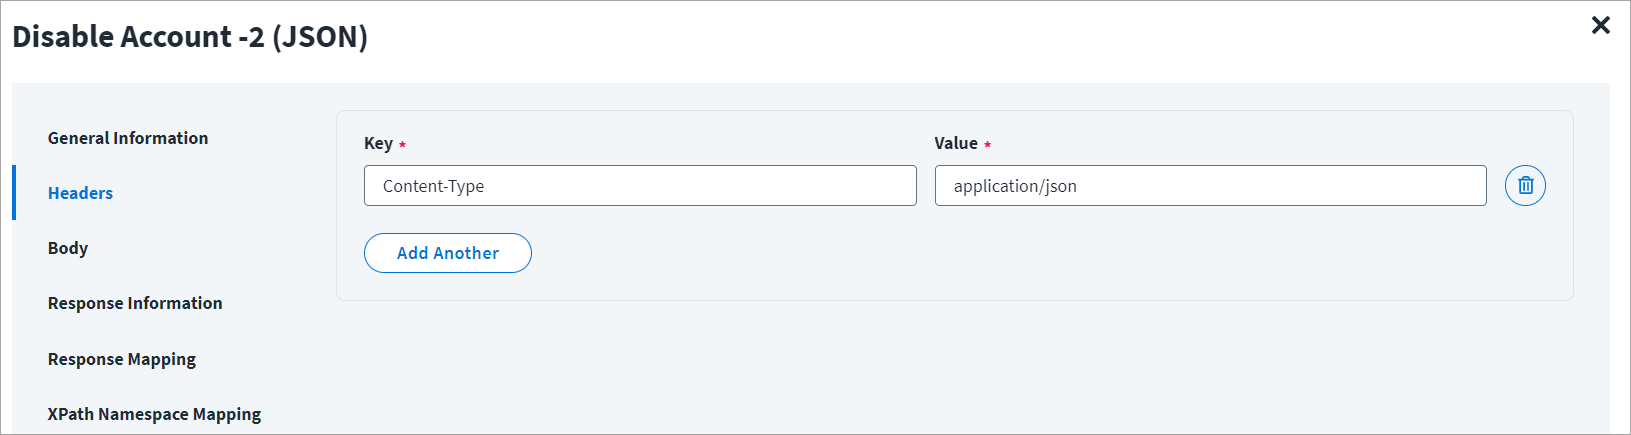
On the Header and Body tab:
The Header has the data keys and their corresponding values. These key value pairs will be sent as part of the Header in the HTTP Request.
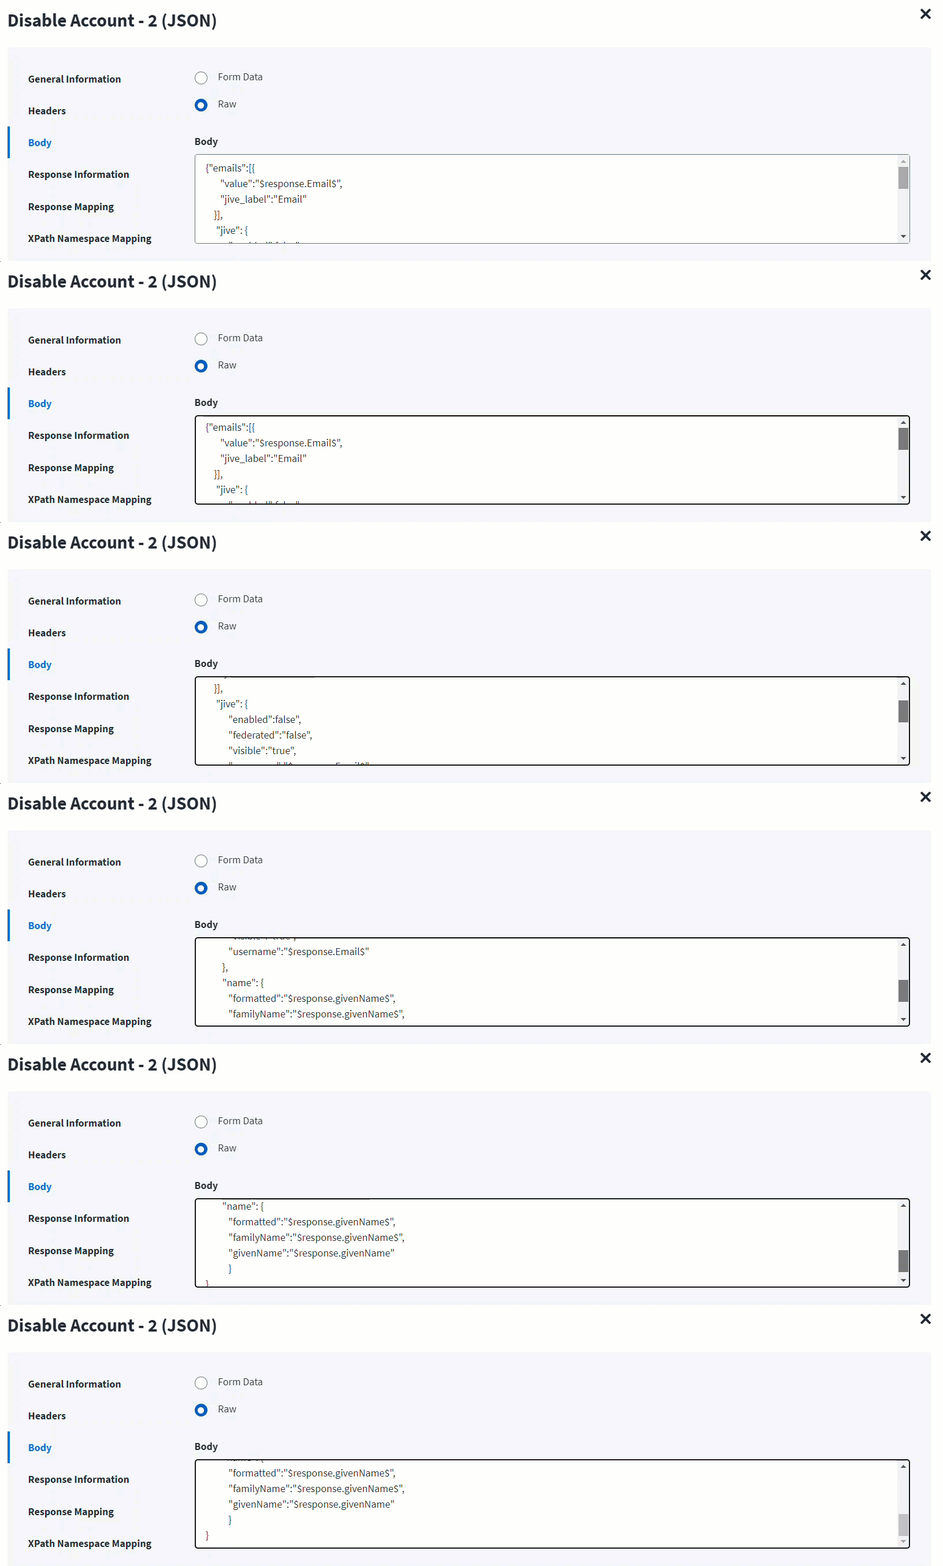
The HTTP body is used for posting the data with a request. The body has two data entry types, Form Data and Raw. You can use either of them for disabling an account.
In the Raw field, enter the JSON payload for the account.
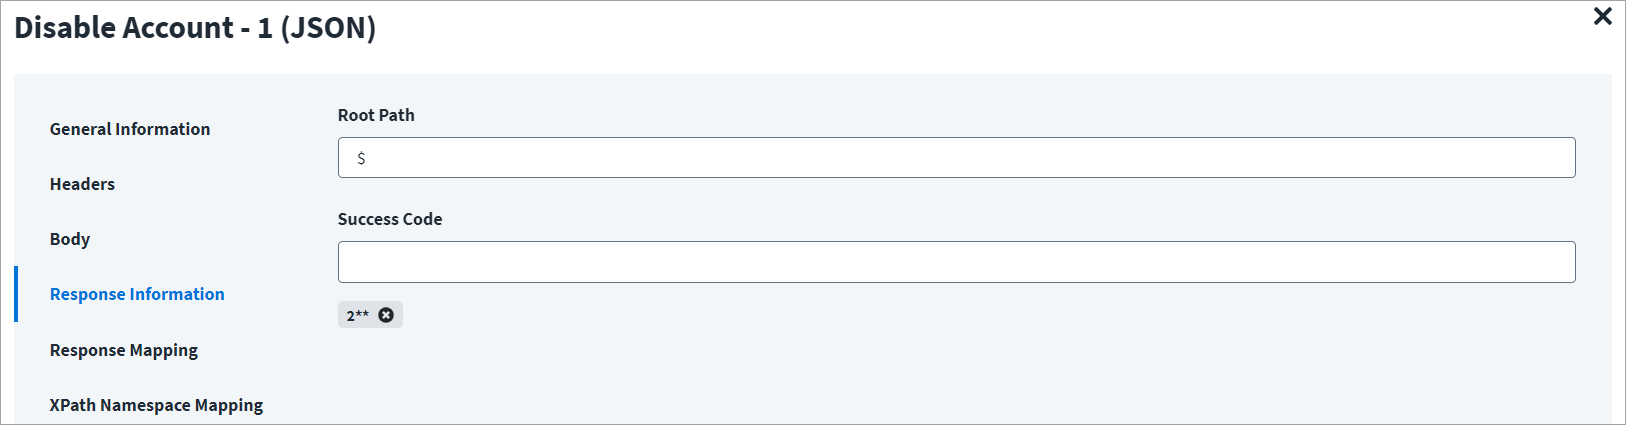
On the Response Information tab:
The Root Path is the common path present in the JSON response. The Success Code is the successful HTTP response code expected by the respective Web Service operation. By default, the success code is 2**.
Change Password
This topic provides an example of a JSON response for a change password operation.
Change Password Example
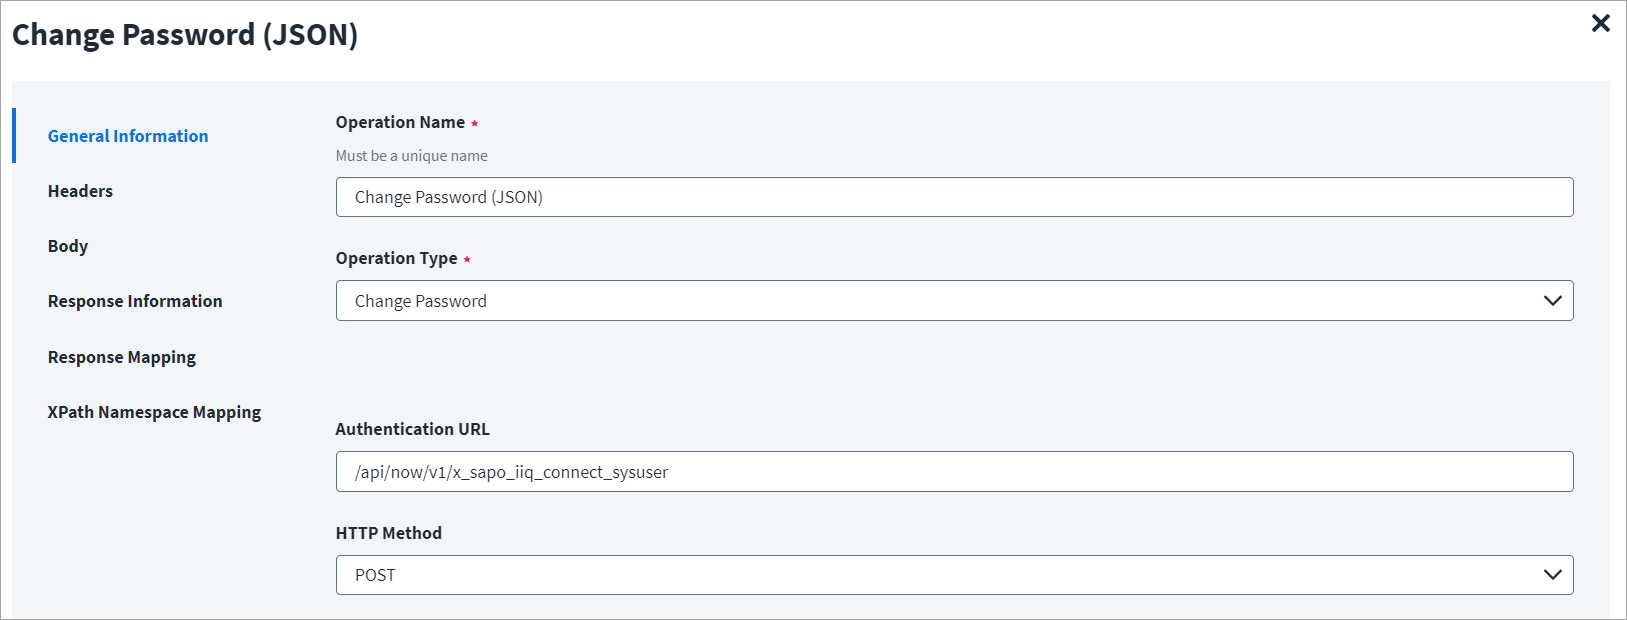
On the General Information tab:
- In the Operation Name field, enter
Change Password (JSON)as the operation name. - From the Operation Type dropdown list, select Chance Password.
- In the Context URL field, enter the URL specific to the change password operation.
- In the HTTP Method dropdown list, select POST.
On the Header and Body tab:
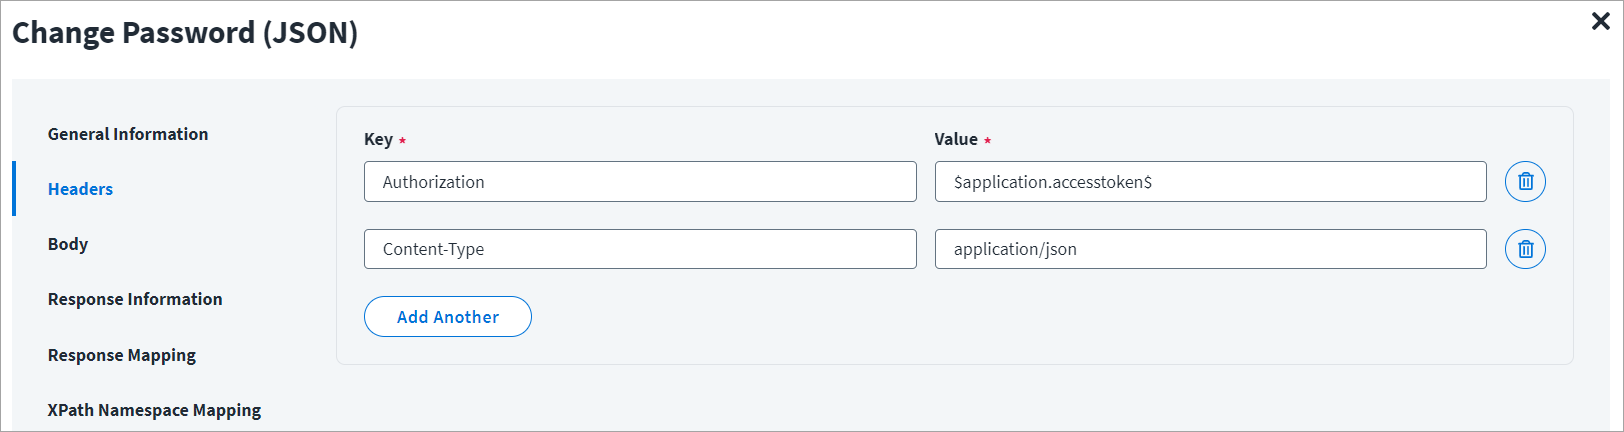
The Header has the data keys and their corresponding values. These key value pairs will be sent as part of the Header in the HTTP Request.
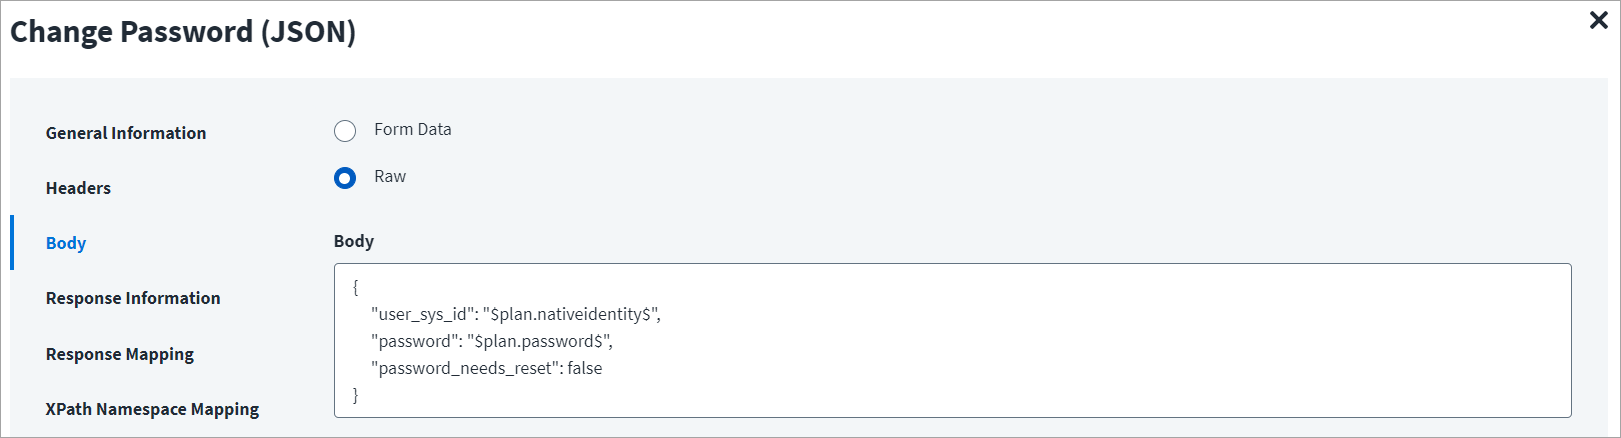
The HTTP body is used for posting the data with a request. The body has two data entry types, Form Data and Raw. You can use either of them for changing a password.
In the Raw field, enter the JSON payload for the password change.
On the Response Information tab:
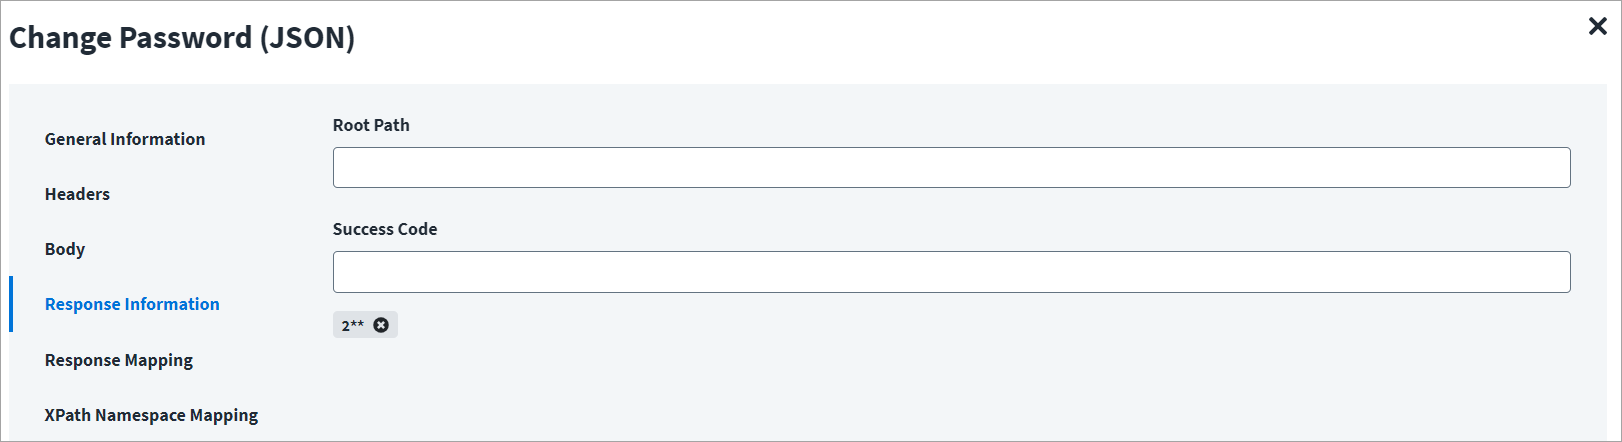
The Root Path is the common path present in the JSON response. The Success Code is the successful HTTP response code expected by the respective Web Service operation. By default, the success code is 2**.
XML Operations
This section provides examples of XML responses for the supported operations.
Test Connection
This topic provides an example of an XML response for a test connection operation.
Test Connection Example
On the General Information tab:
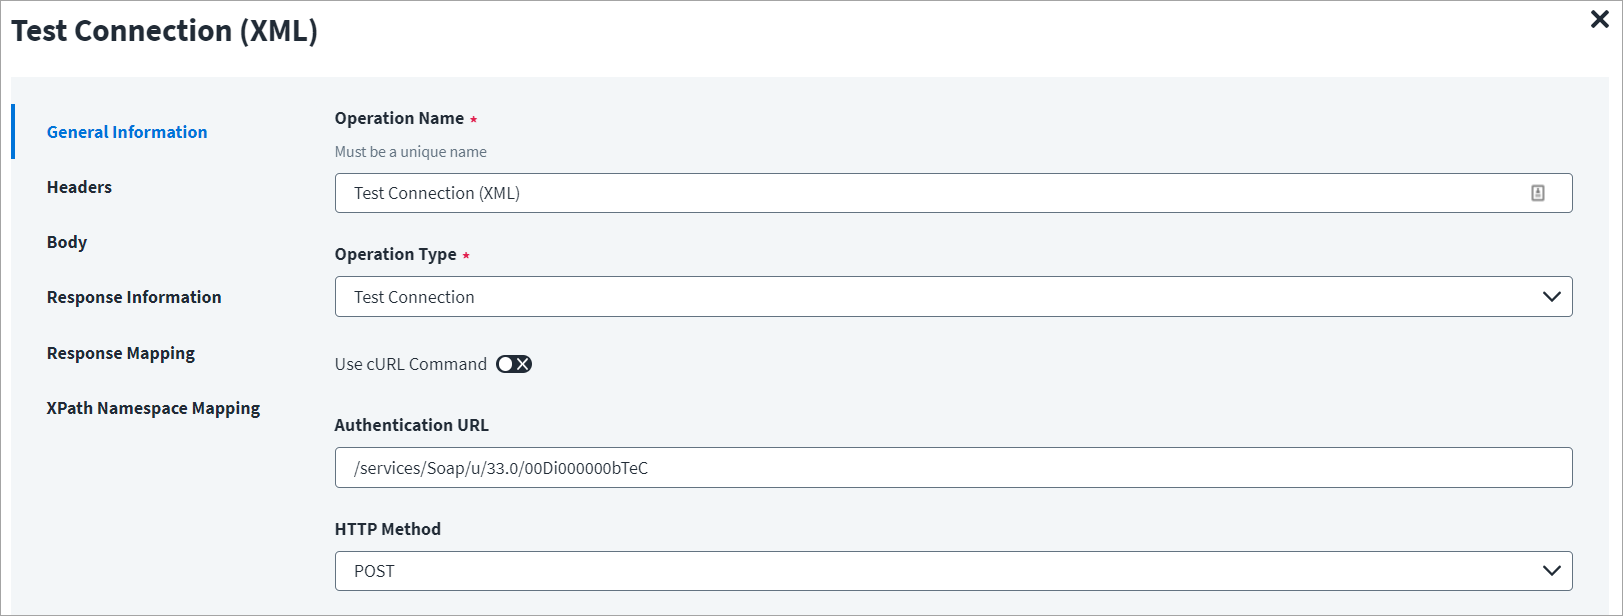
- In the Operation Name field, enter
Test Connection (XML)as the operation name. - From the Operation Type dropdown list, select Test Connection.
- In the Context URL field, enter the URL specific to the test connection.
- In the HTTP Method dropdown list, select POST.
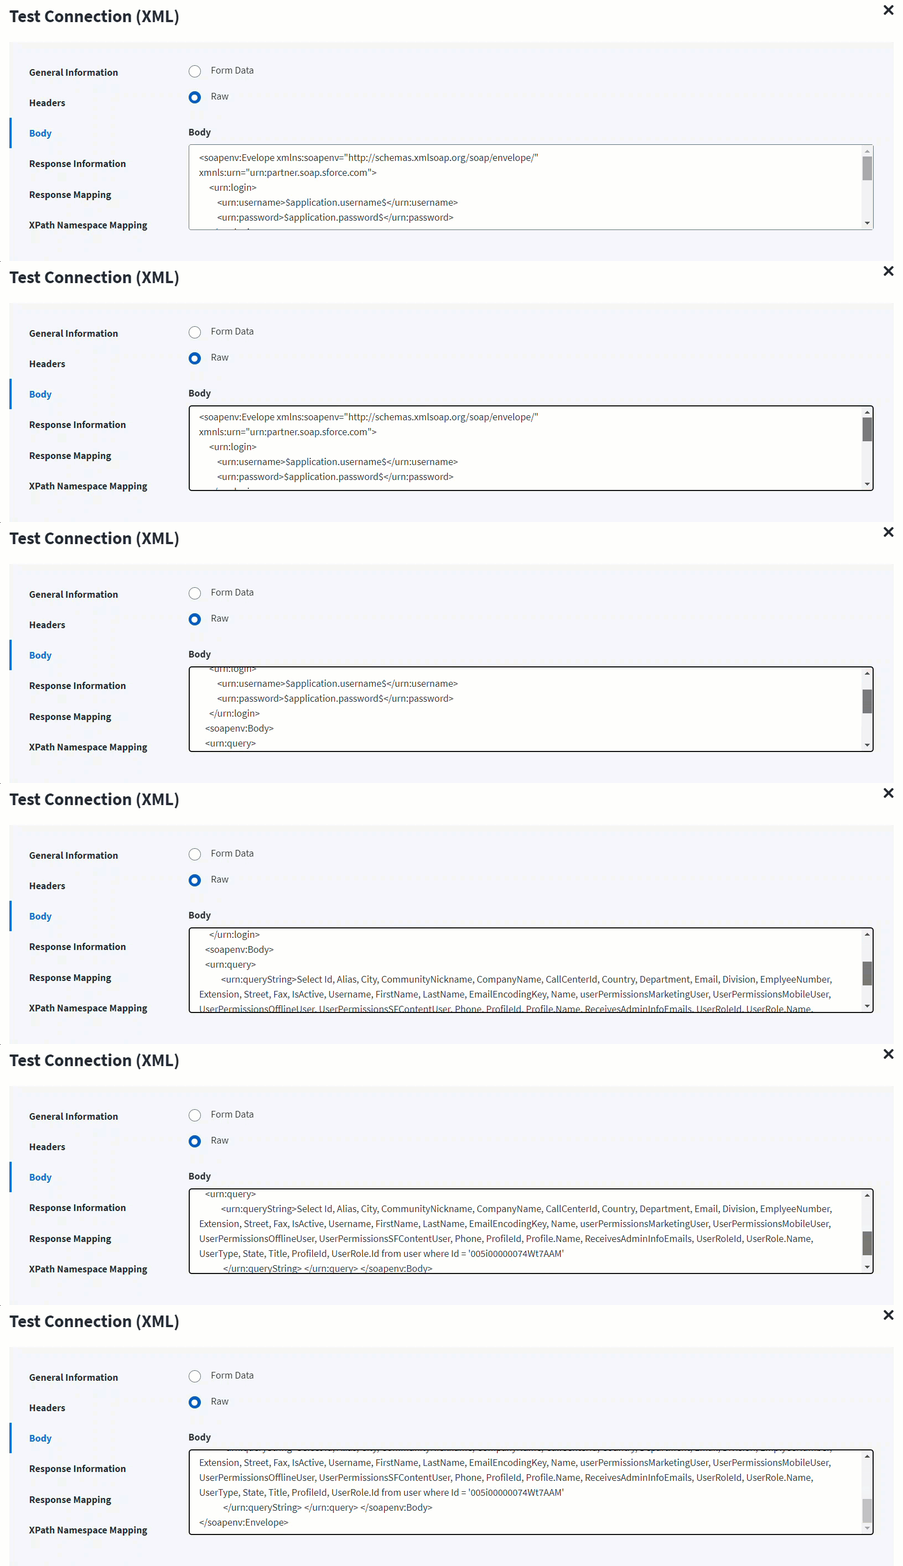
On the Header and Body tab:
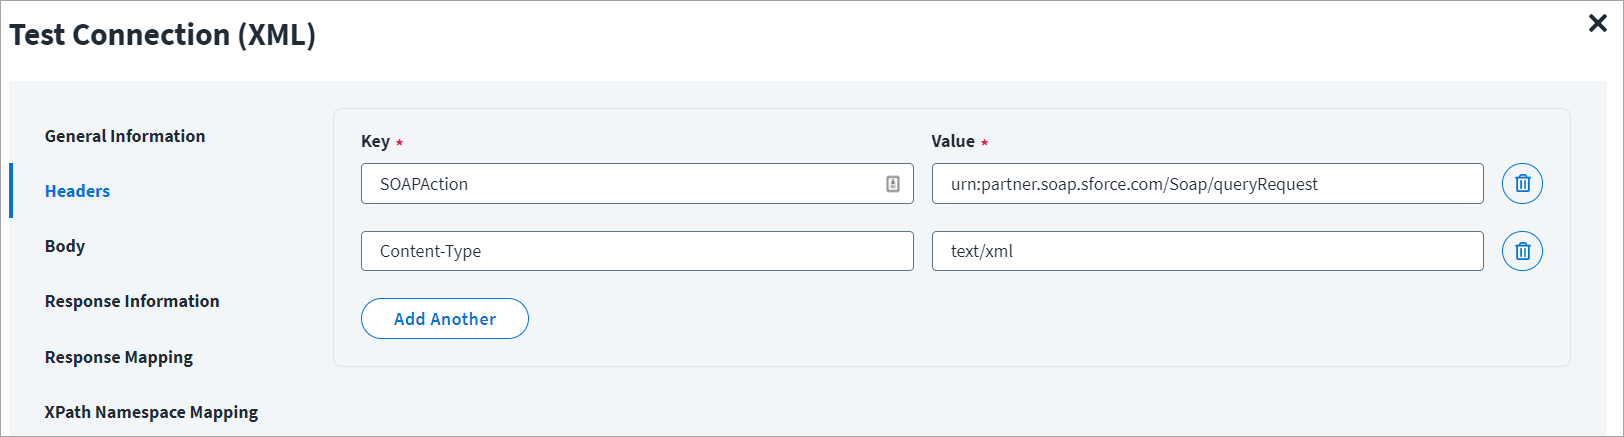
The Header has the data keys and their corresponding values. These key value pairs are sent as part of header in the HTTP request.
The HTTP body is used for posting the data with a request. The body has two data entry types, Form Data and Raw. The XML format does not support Form Data.
In the Raw field, enter the XML payload for the test connection.
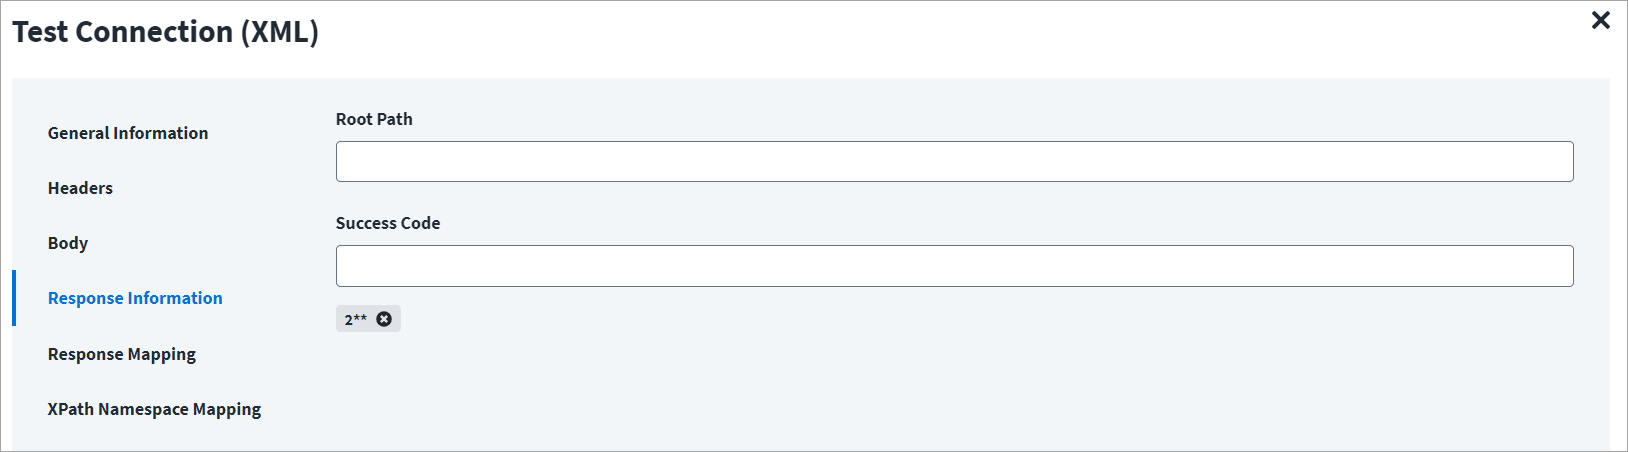
On the Response Information tab:
The Root Path is the common path present in the XML response. The Success Code is the successful HTTP response code expected by the respective Web Service operation. By default, the success code is 2**.
Account, Entitlement, or Get Object Aggregation
This topic provides an example of an XML response for an aggregation operation.
Account Aggregation - 1
Using the Web Services SaaS source, you can have multiple account aggregation operations.
For example: Aggregation - 1 and Aggregation - 2.
You can aggregate two attributes from EndPoint1 and three more attributes from EndPoint2.
When you configure multiple operations, the response of first operation can be used as an input in the second operation.
Account Aggregation - 1 Example
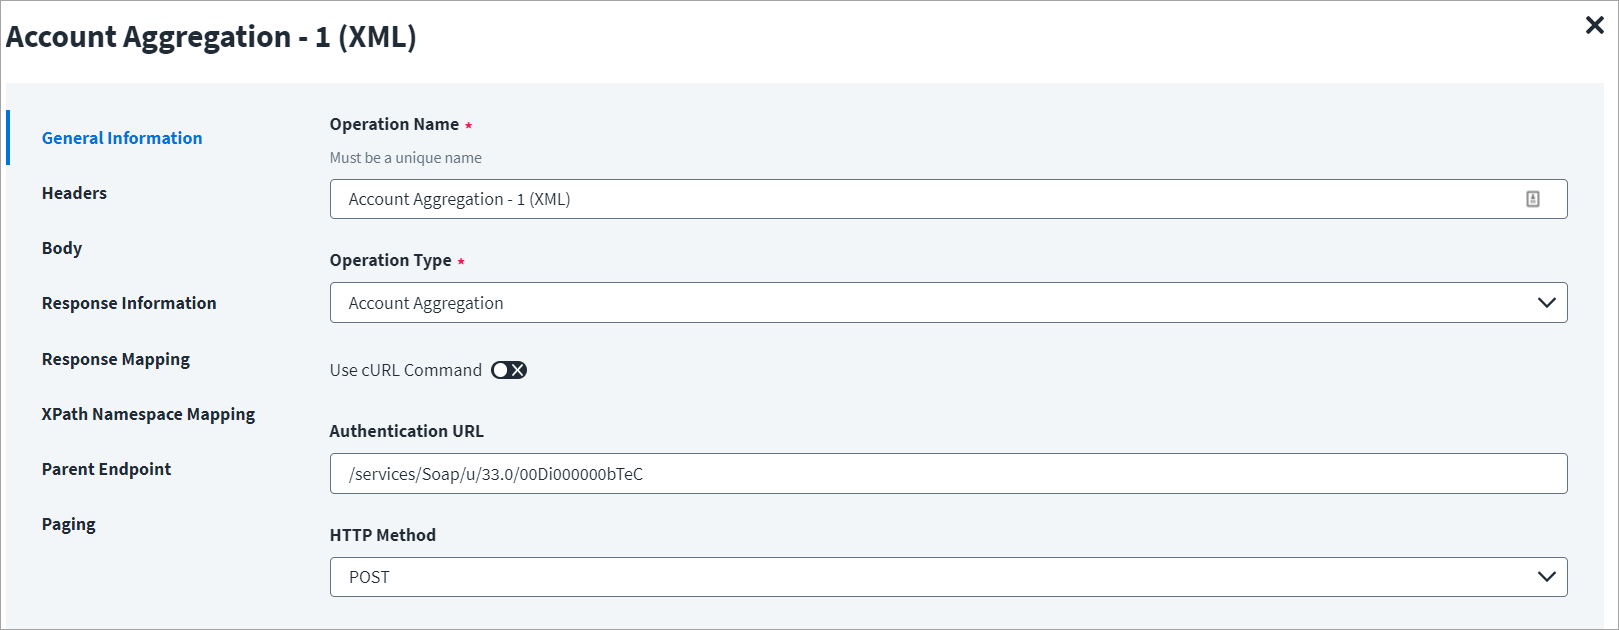
On the General Information tab:
- In the Operation Name field, enter
Account Aggregation - 1 (XML)as the operation name. - From the Operation Type dropdown list, select Account Aggregation.
- In the Context URL field, enter the URL specific to the account aggregation.
- In the HTTP Method dropdown list, select POST.
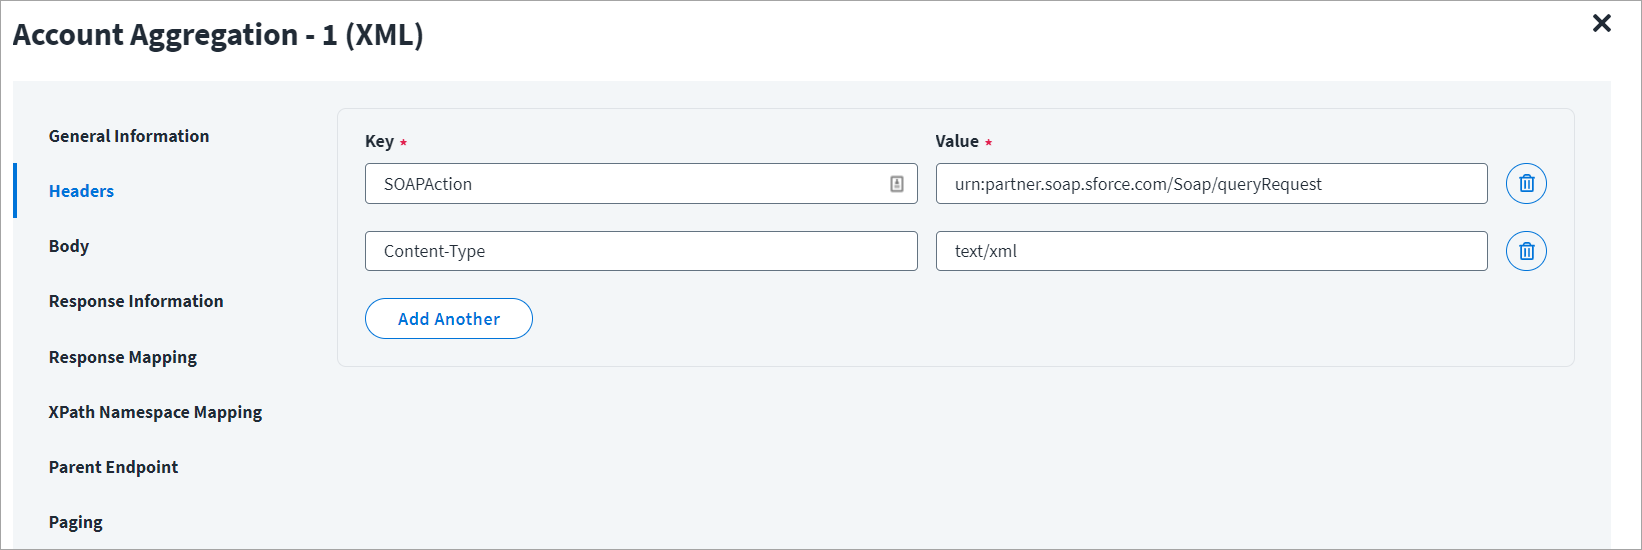
On the Header and Body tab:
The Header has the data keys and their corresponding values. These key value pairs will be sent as part of the Header in the HTTP Request.
The HTTP body is used for posting the data with a request. The body has two data entry types, Form Data and Raw. The XML format does not support Form Data.
In the Raw field, enter the XML payload for the account aggregation.
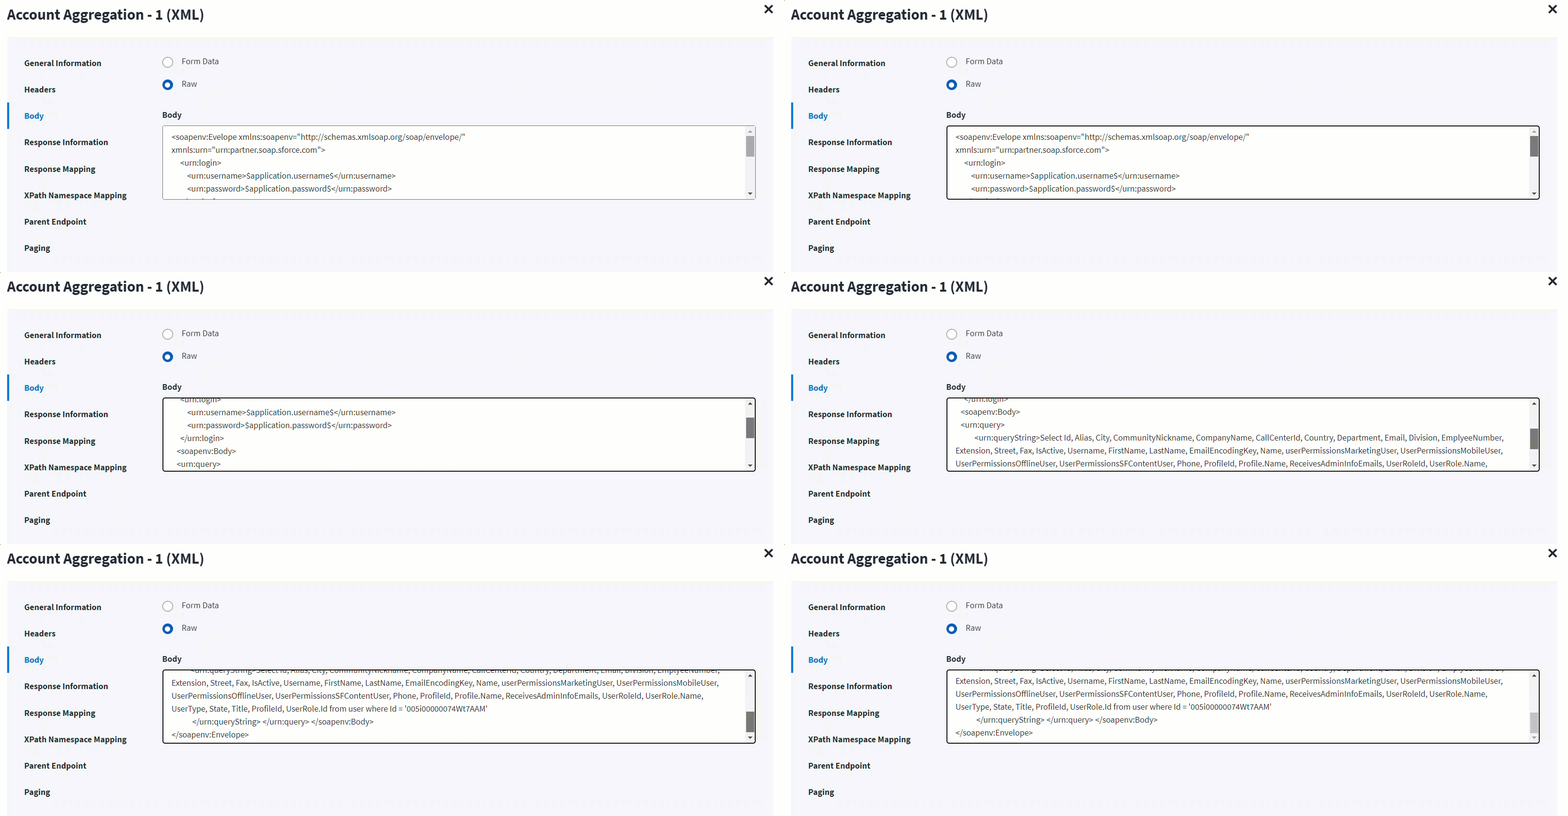
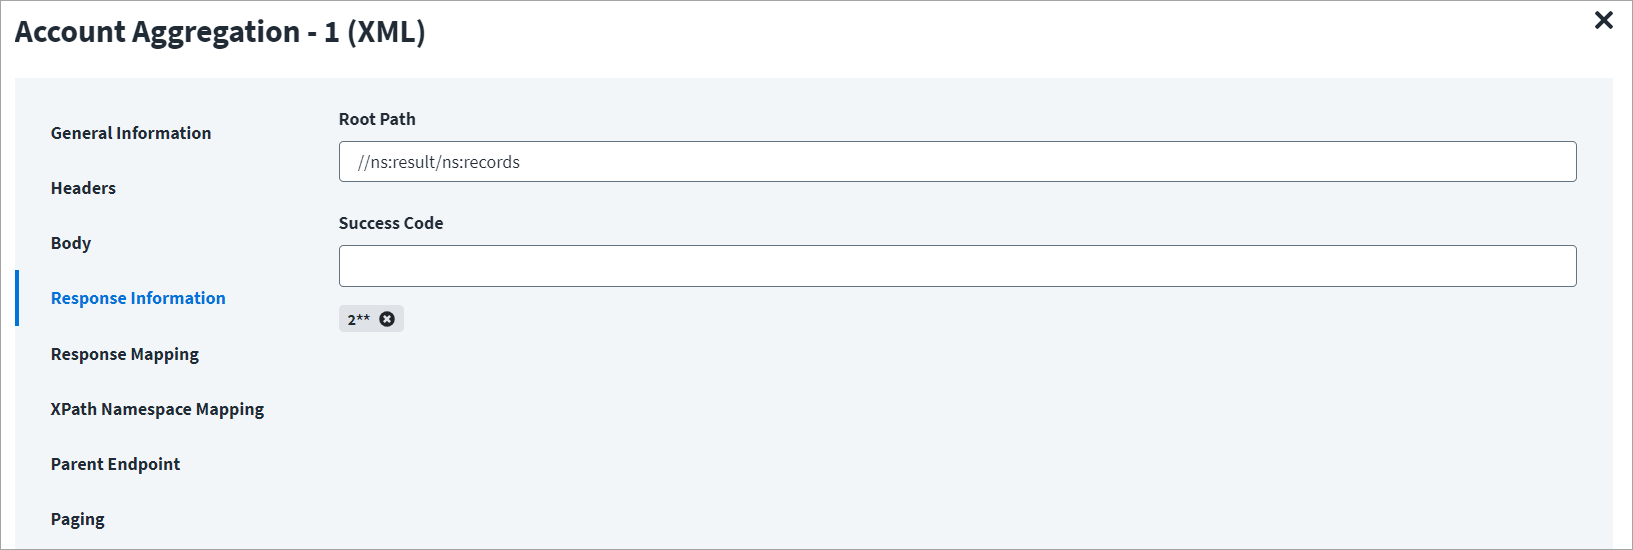
On the Response Information tab:
The Root Path is the common path present in the XML response. The Success Code is the successful HTTP response code expected by the respective Web Service operation. By default, the success code is 2**.
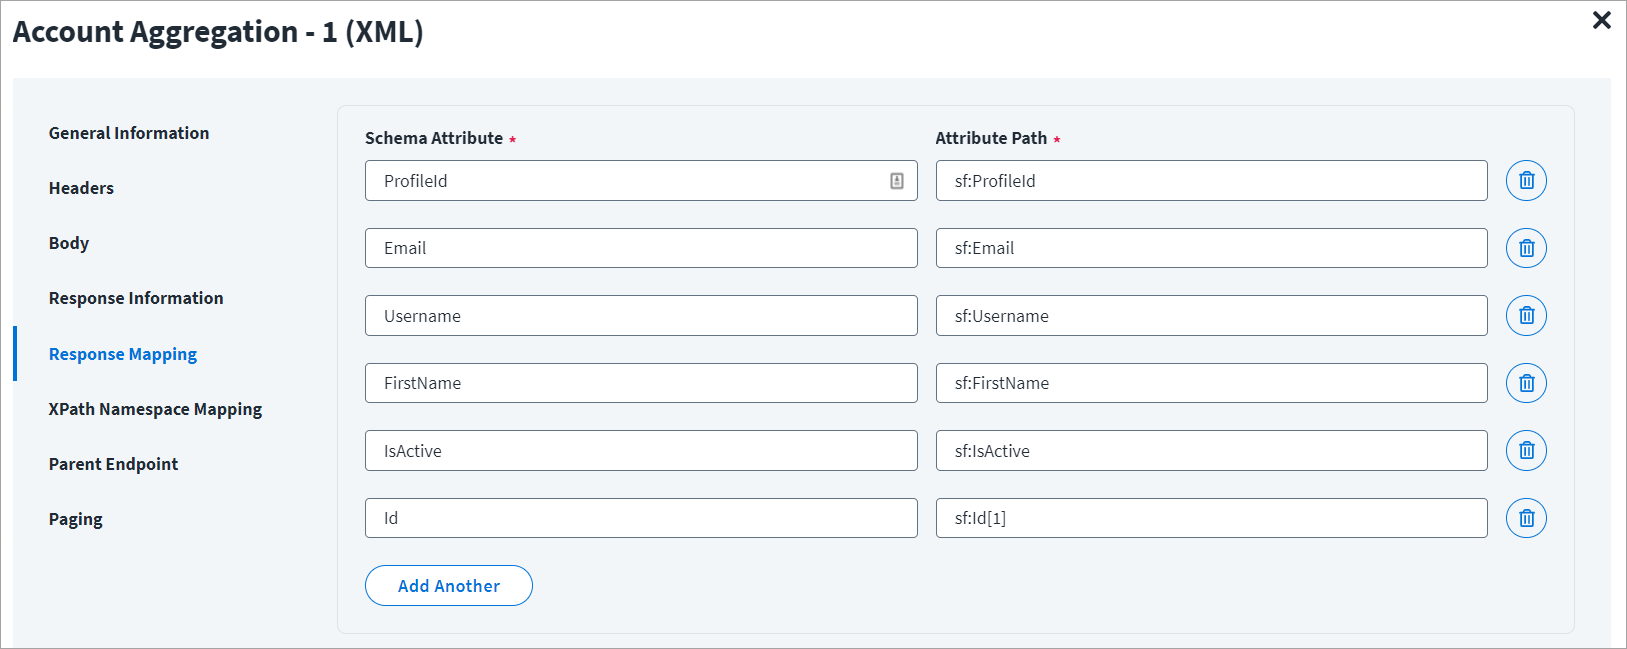
On the Response Mapping tab:
Below is an example of a schema that is mapped to XML response. Refer to Configuration for Response for more information.
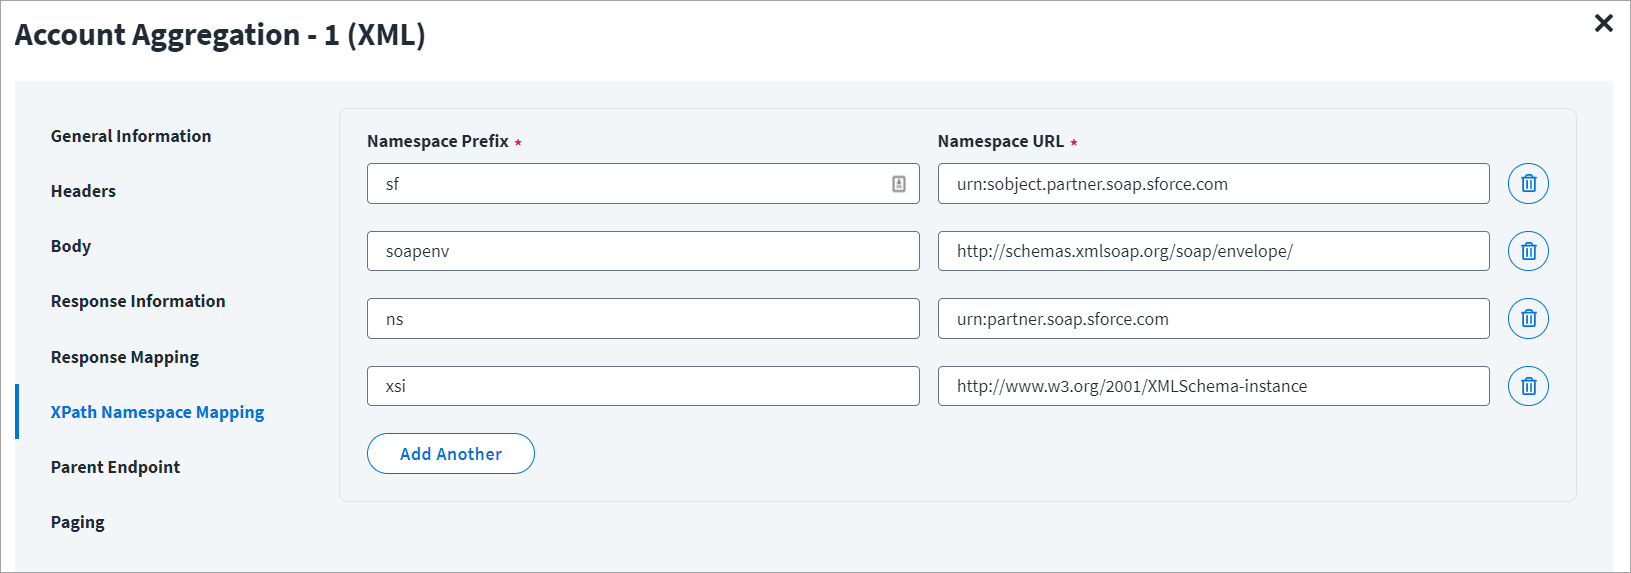
On the XPath Namespace Mapping tab:
The namespace xmlns is the default namespace for the example mentioned in this section, and it is represented as ns in the following screenshot.
Account Aggregation - 2
For example, during aggregation of Dropbox, the response of the first endpoint will return id, Username, firstName, among others.
This response must be provided as an input to the second endpoint, this can be provided with help of a keyword "response" ($response.team_member_id$), where the team_member_id is the value fetched from Account Aggregation -1 and it is an identity attribute in the source schema.
Account Aggregation - 2 Example
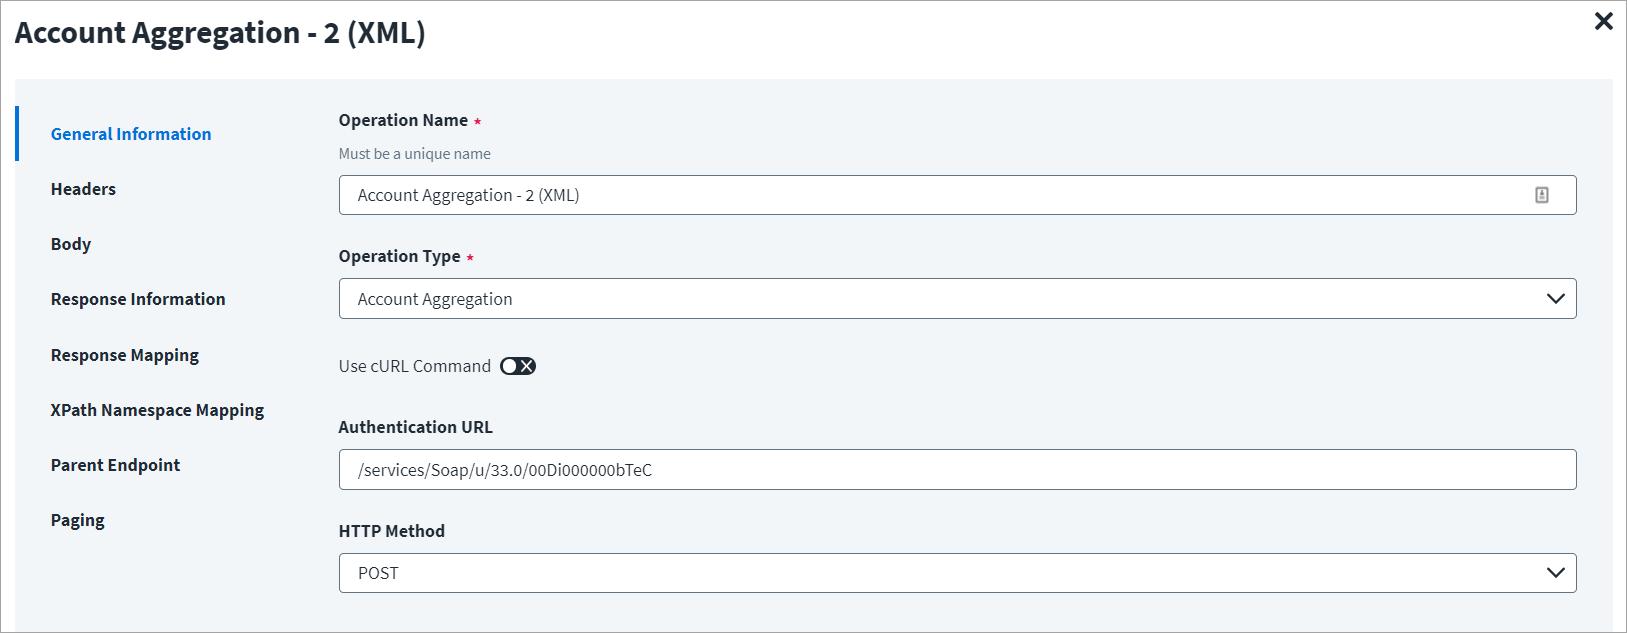
On the General Information tab:
- In the Operation Name field, enter
Account Aggregation - 2 (XML)as the operation name. - From the Operation Type dropdown list, select Account Aggregation.
- In the Context URL field, enter the URL specific to the account aggregation.
- In the HTTP Method dropdown list, select POST.
On the Header and Body tab:
The Header has the data keys and their corresponding values. These key value pairs will be sent as part of the Header in the HTTP Request.
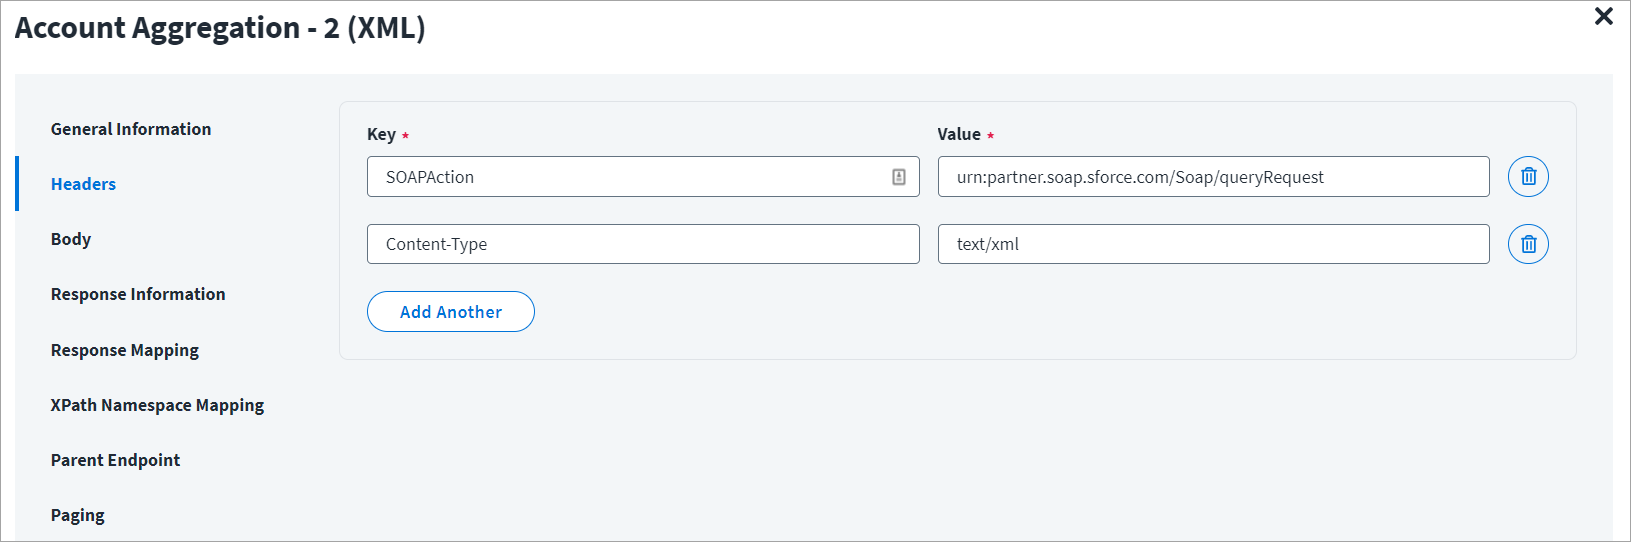
The HTTP body is used for posting the data with a request. The body has two data entry types, Form Data and Raw. The XML format does not support Form Data.
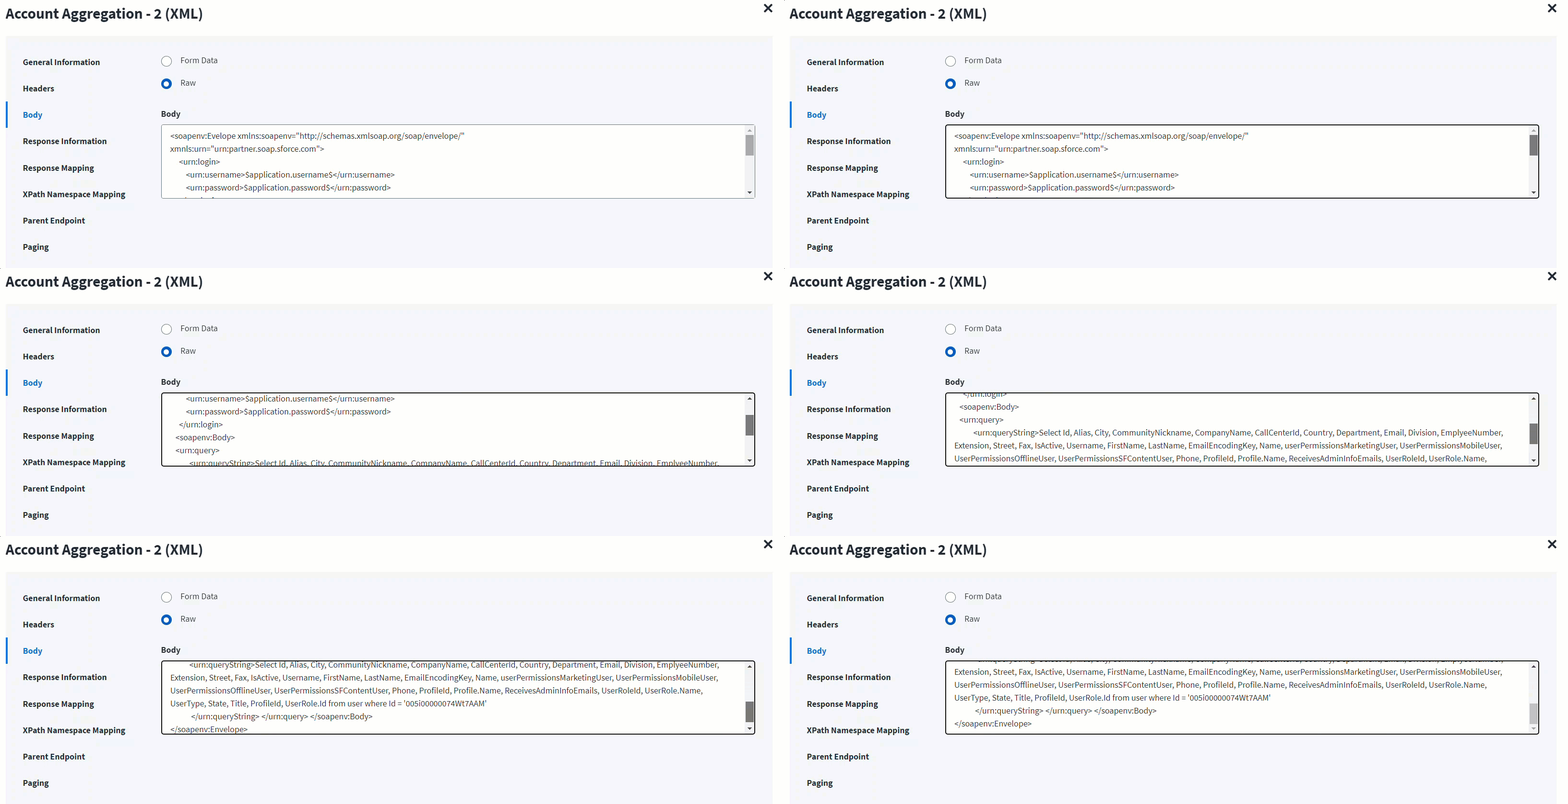
In the Raw field, enter the XML payload for the account aggregation.
To fetch additional attributes from another endpoint, use the id (identity attribute) from the previous response. Add these attributes in Schema Attribute section of Response Mapping of the first end point (Account Aggregation - 1).
In the following screenshot the $response.team_member_id$ represents the identity that was aggregated in Account Aggregation-1 and mentioned in the schema mapping section of Account Aggregation -1.
On the Response Information tab:
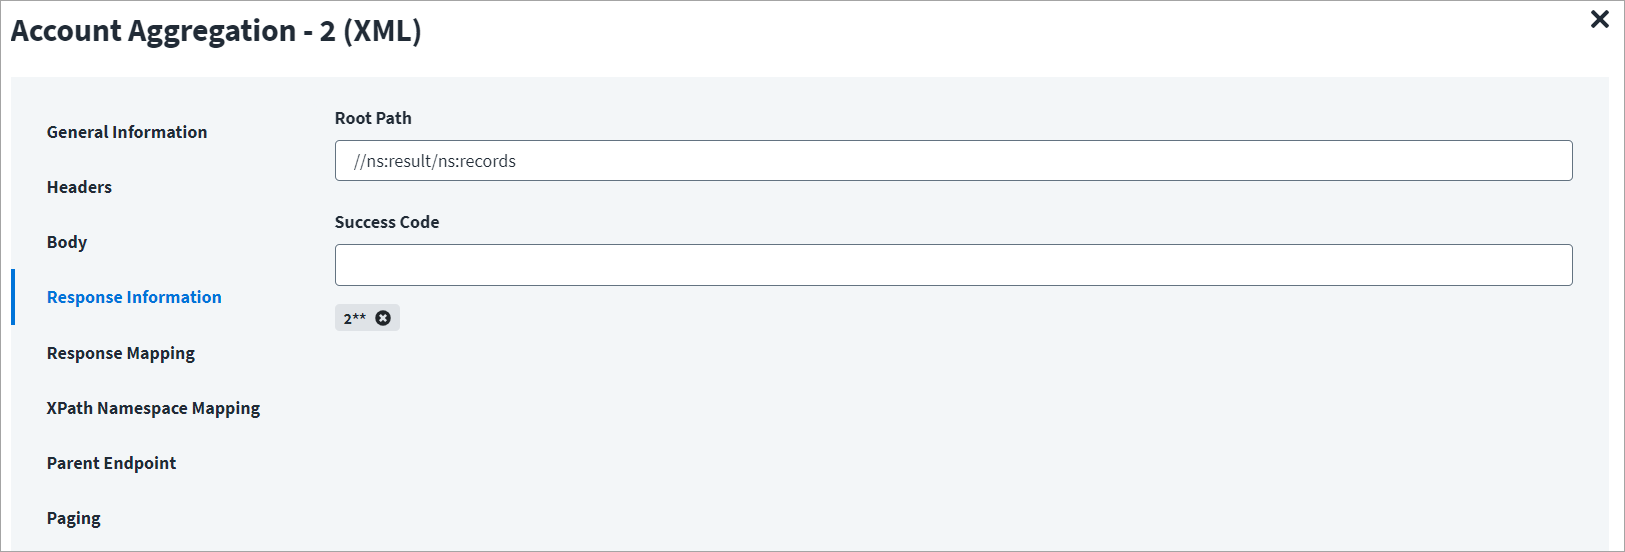
The Root Path is the common path present in the XML response. The Success Code is the successful HTTP response code expected by the respective Web Service operation. By default, the success code is 2**.
On the Response Mapping tab:
Below is an example of a schema that is mapped to XML response. Refer to Configuration for Response for more information.
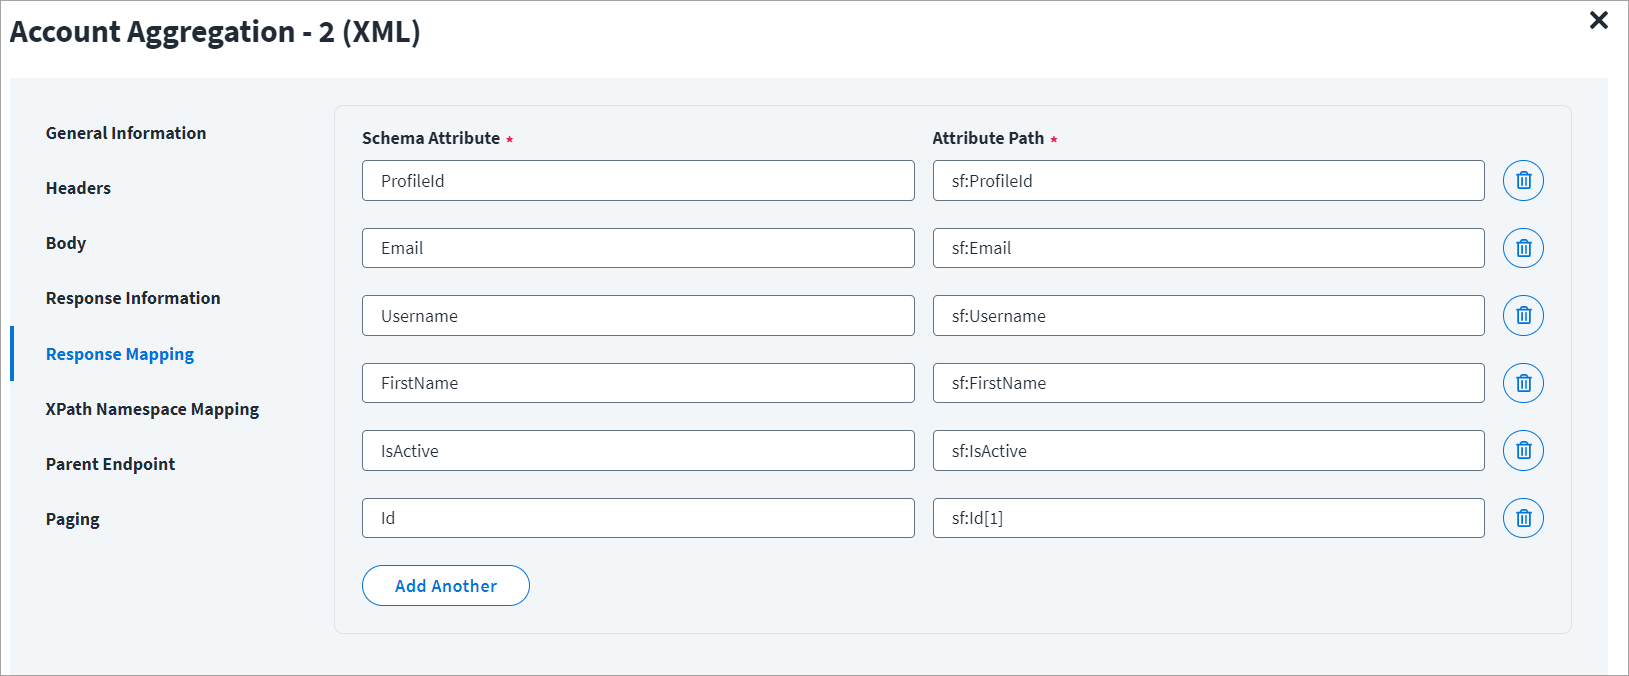
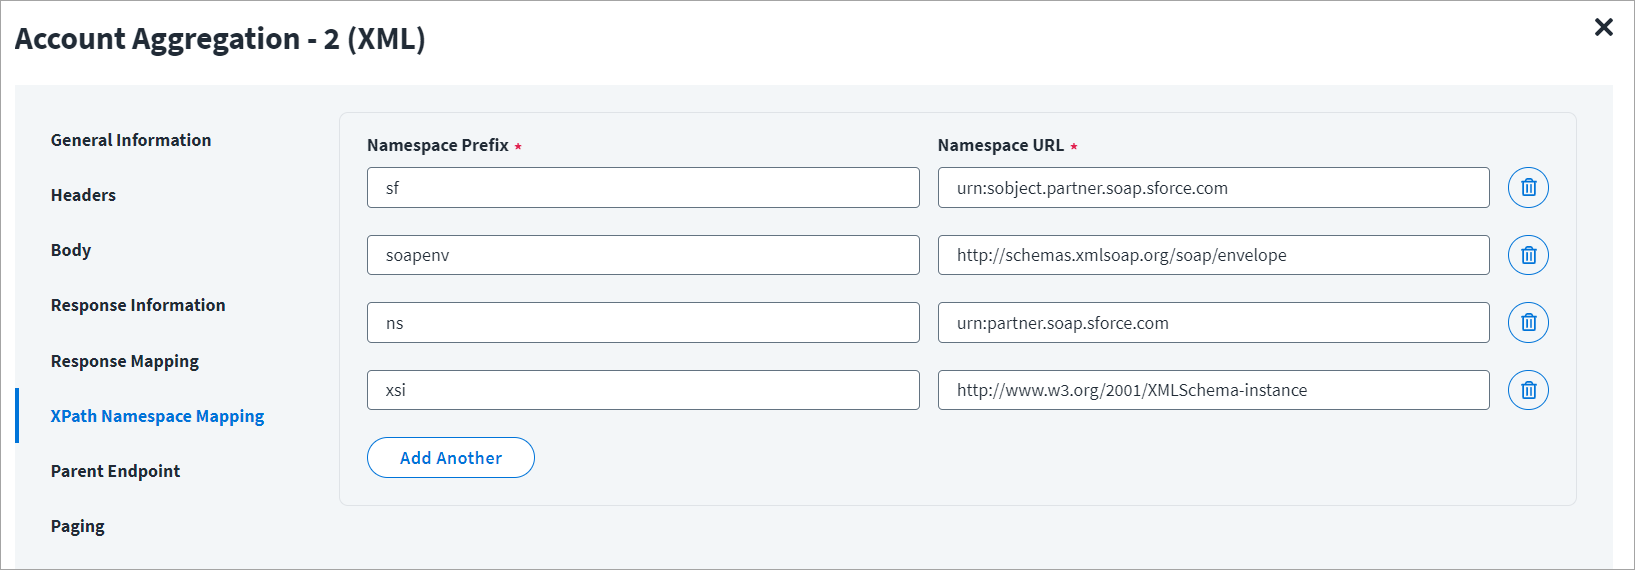
On the XPath Namespace Mapping tab:
The namespace xmlns is the default namespace for the example mentioned in this section, and it is represented as ns in the following screenshot.
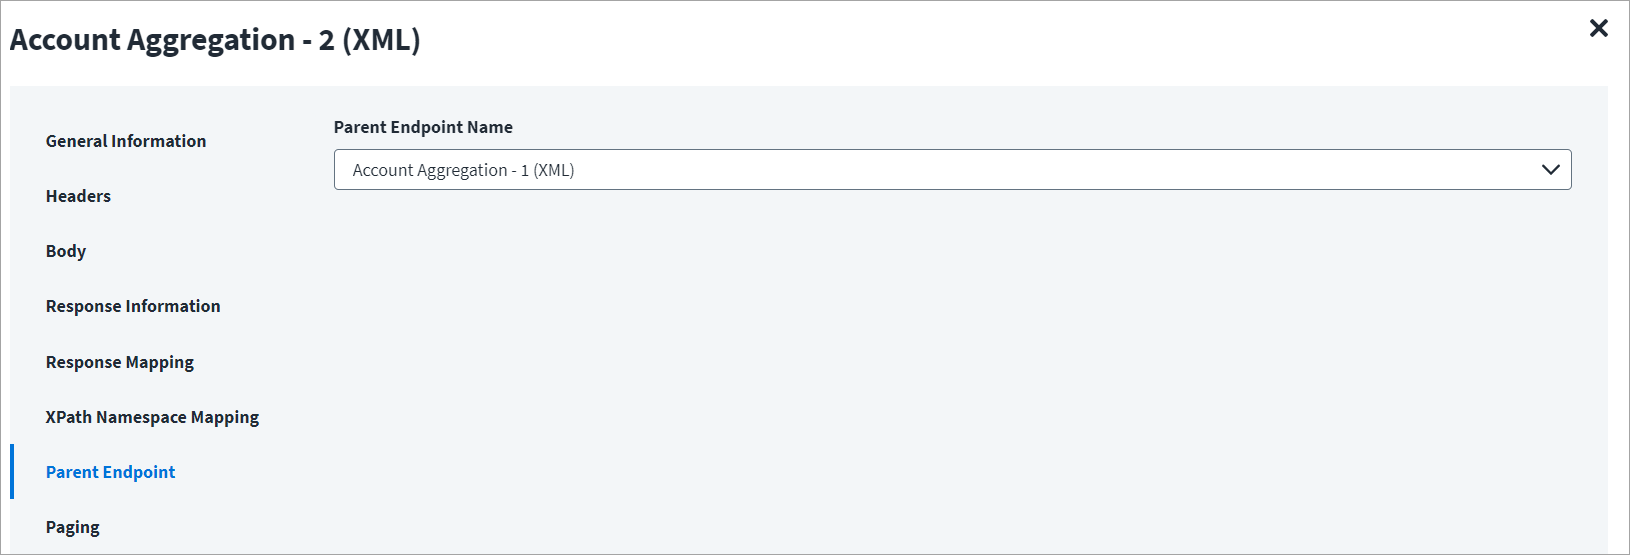
On the Parent Endpoint tab:
In the following example, Account Aggregation -1 (JSON) is the parent endpoint and Account Aggregation - 2(JSON) is its child endpoint.
From the Parent Endpoint Name dropdown list, select Account Aggregation - 1 (JSON), as shown below.
Create Account
This topic provides an example of an XML response for a create account operation.
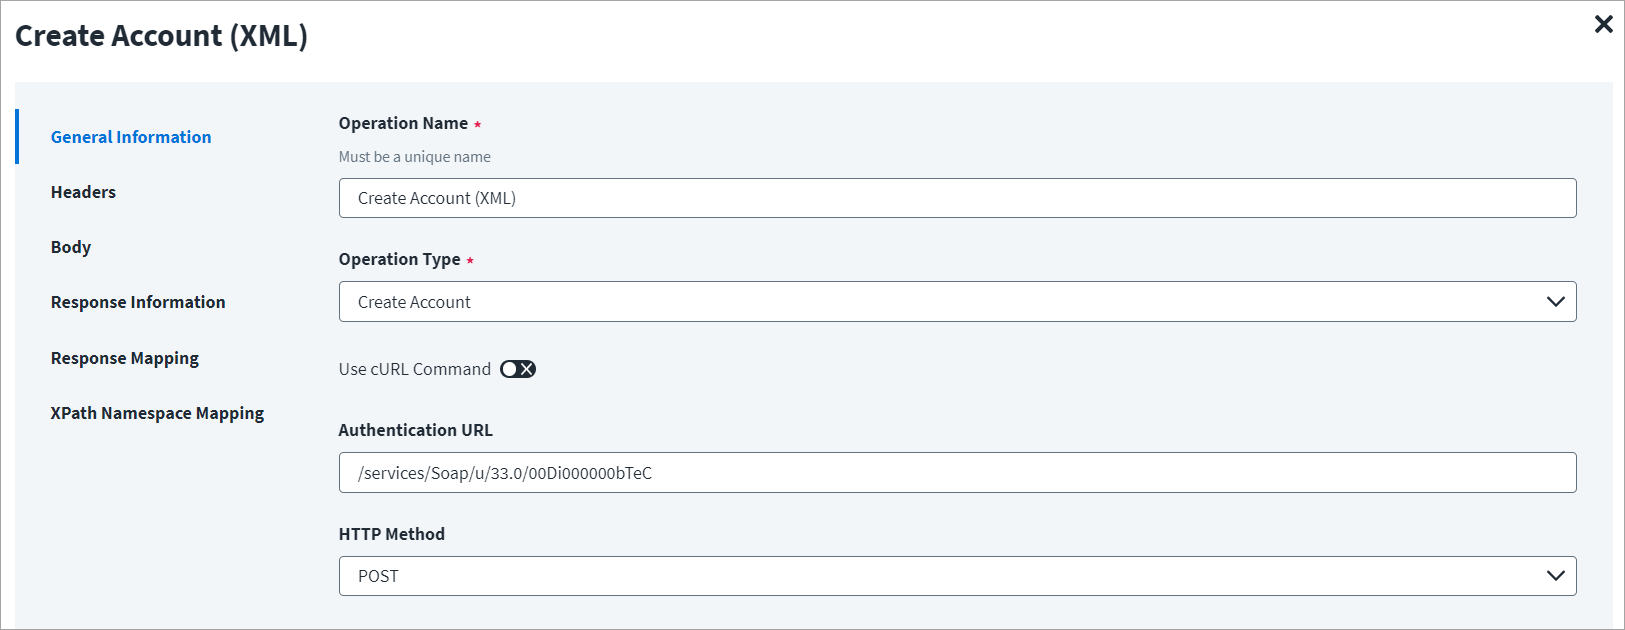
Create Account Example
On the General Information tab:
- In the Operation Name field, enter
Create Account (XML)as the operation name. - From the Operation Type dropdown list, select Create Account.
- In the Context URL field, enter the URL specific to the account creation.
- In the HTTP Method dropdown list, select POST.
On the Header and Body tab:
The Header has the data keys and their corresponding values. These key value pairs will be sent as part of the Header in the HTTP Request.
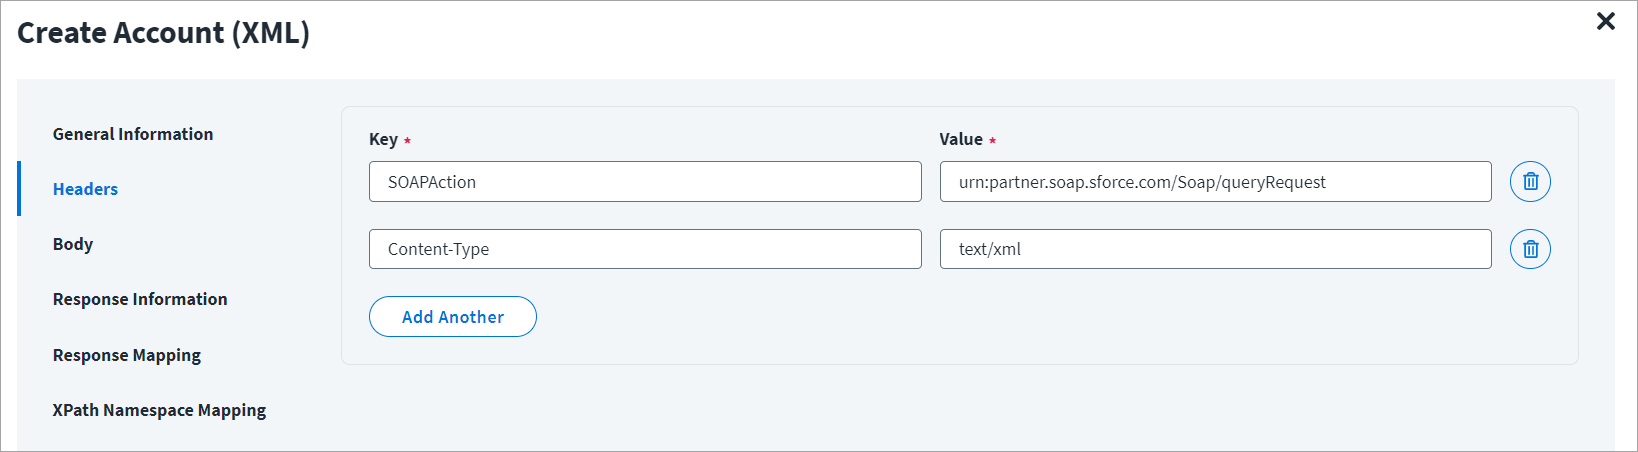
The HTTP body is used for posting the data with a request. The body has two data entry types, Form Data and Raw. The XML format does not support Form Data.
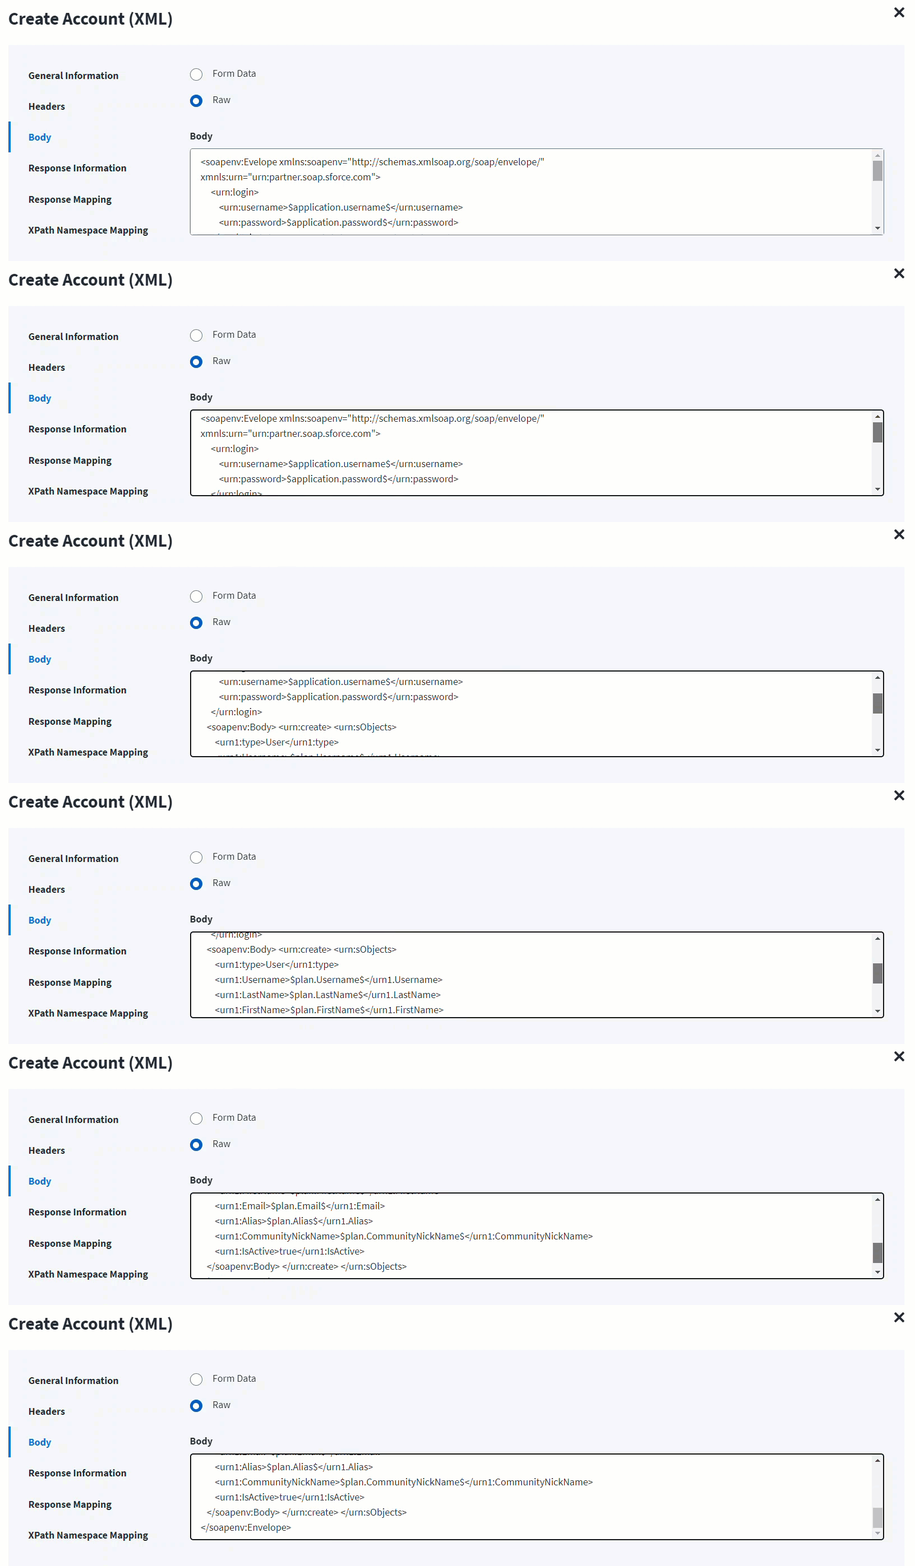
In the Raw field, enter the XML payload for the account creation.
In the following screenshot, the $plan keyword represents the Provisioning Plan that is passed to the provision method. For example, $plan.LastName checks for the last name in the attribute request and updates in the body after it is found.
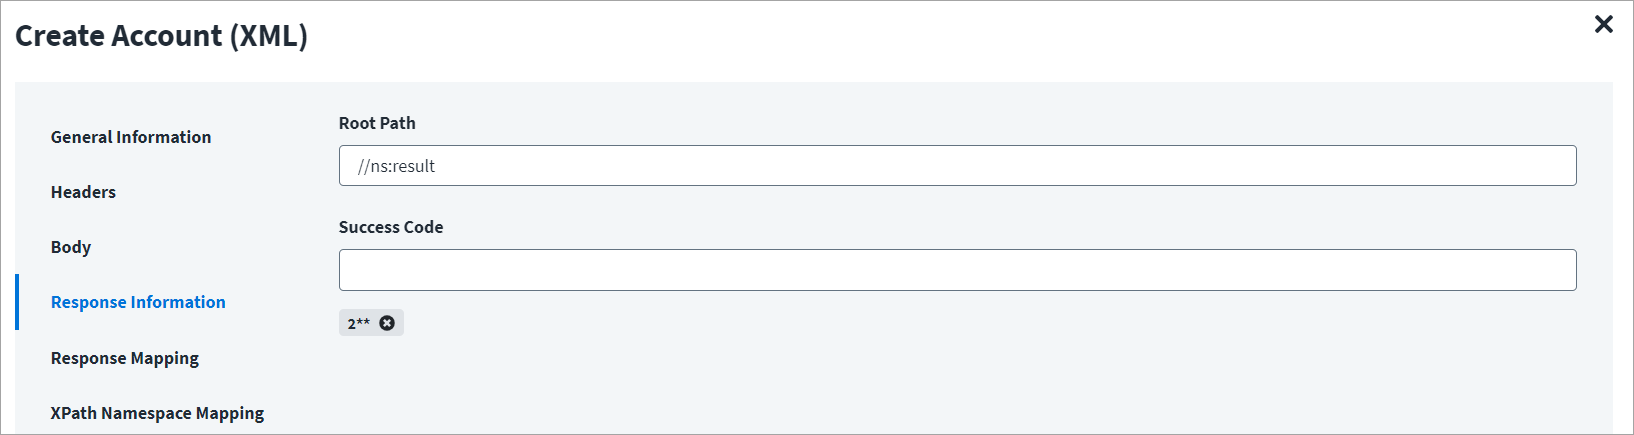
On the Response Information tab:
The Root Path is the common path present in the XML response. The Success Code is the successful HTTP response code expected by the respective Web Service operation. By default, the success code is 2**.
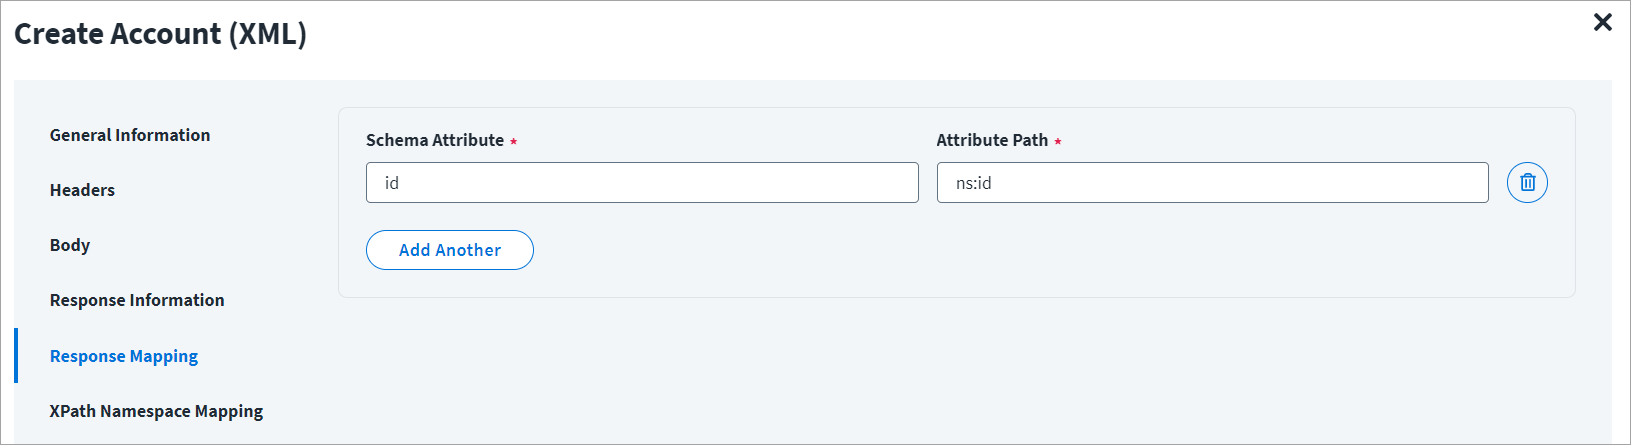
On the Response Mapping tab:
Below is an example of a schema that is mapped to XML response. Refer to Configuration for Response for more information.
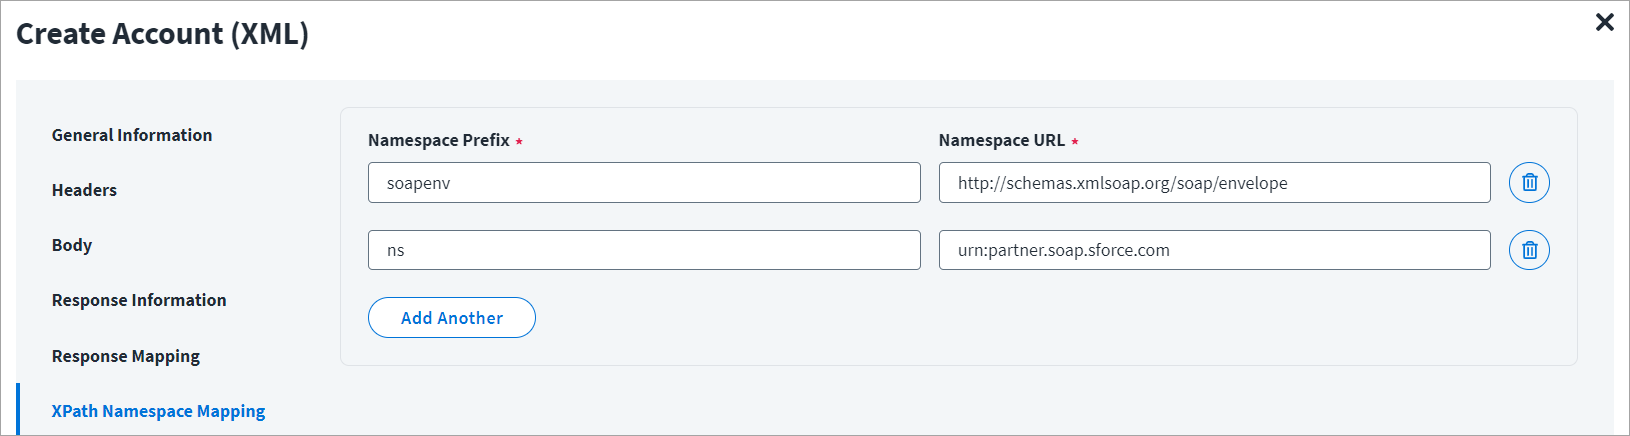
On the XPAth Namespace Mapping tab:
The namespace xmlns is the default namespace for the example mentioned in this section, and it is represented as ns in the following screenshot.
Account Delta Aggregation
This topic provides an example of an XML response for the delta aggregation operation.
Account Delta Aggregation - 3
Using the Web Services SaaS source, you can perform account delta aggregation operations.
Account Delta Aggregation - 3 Example
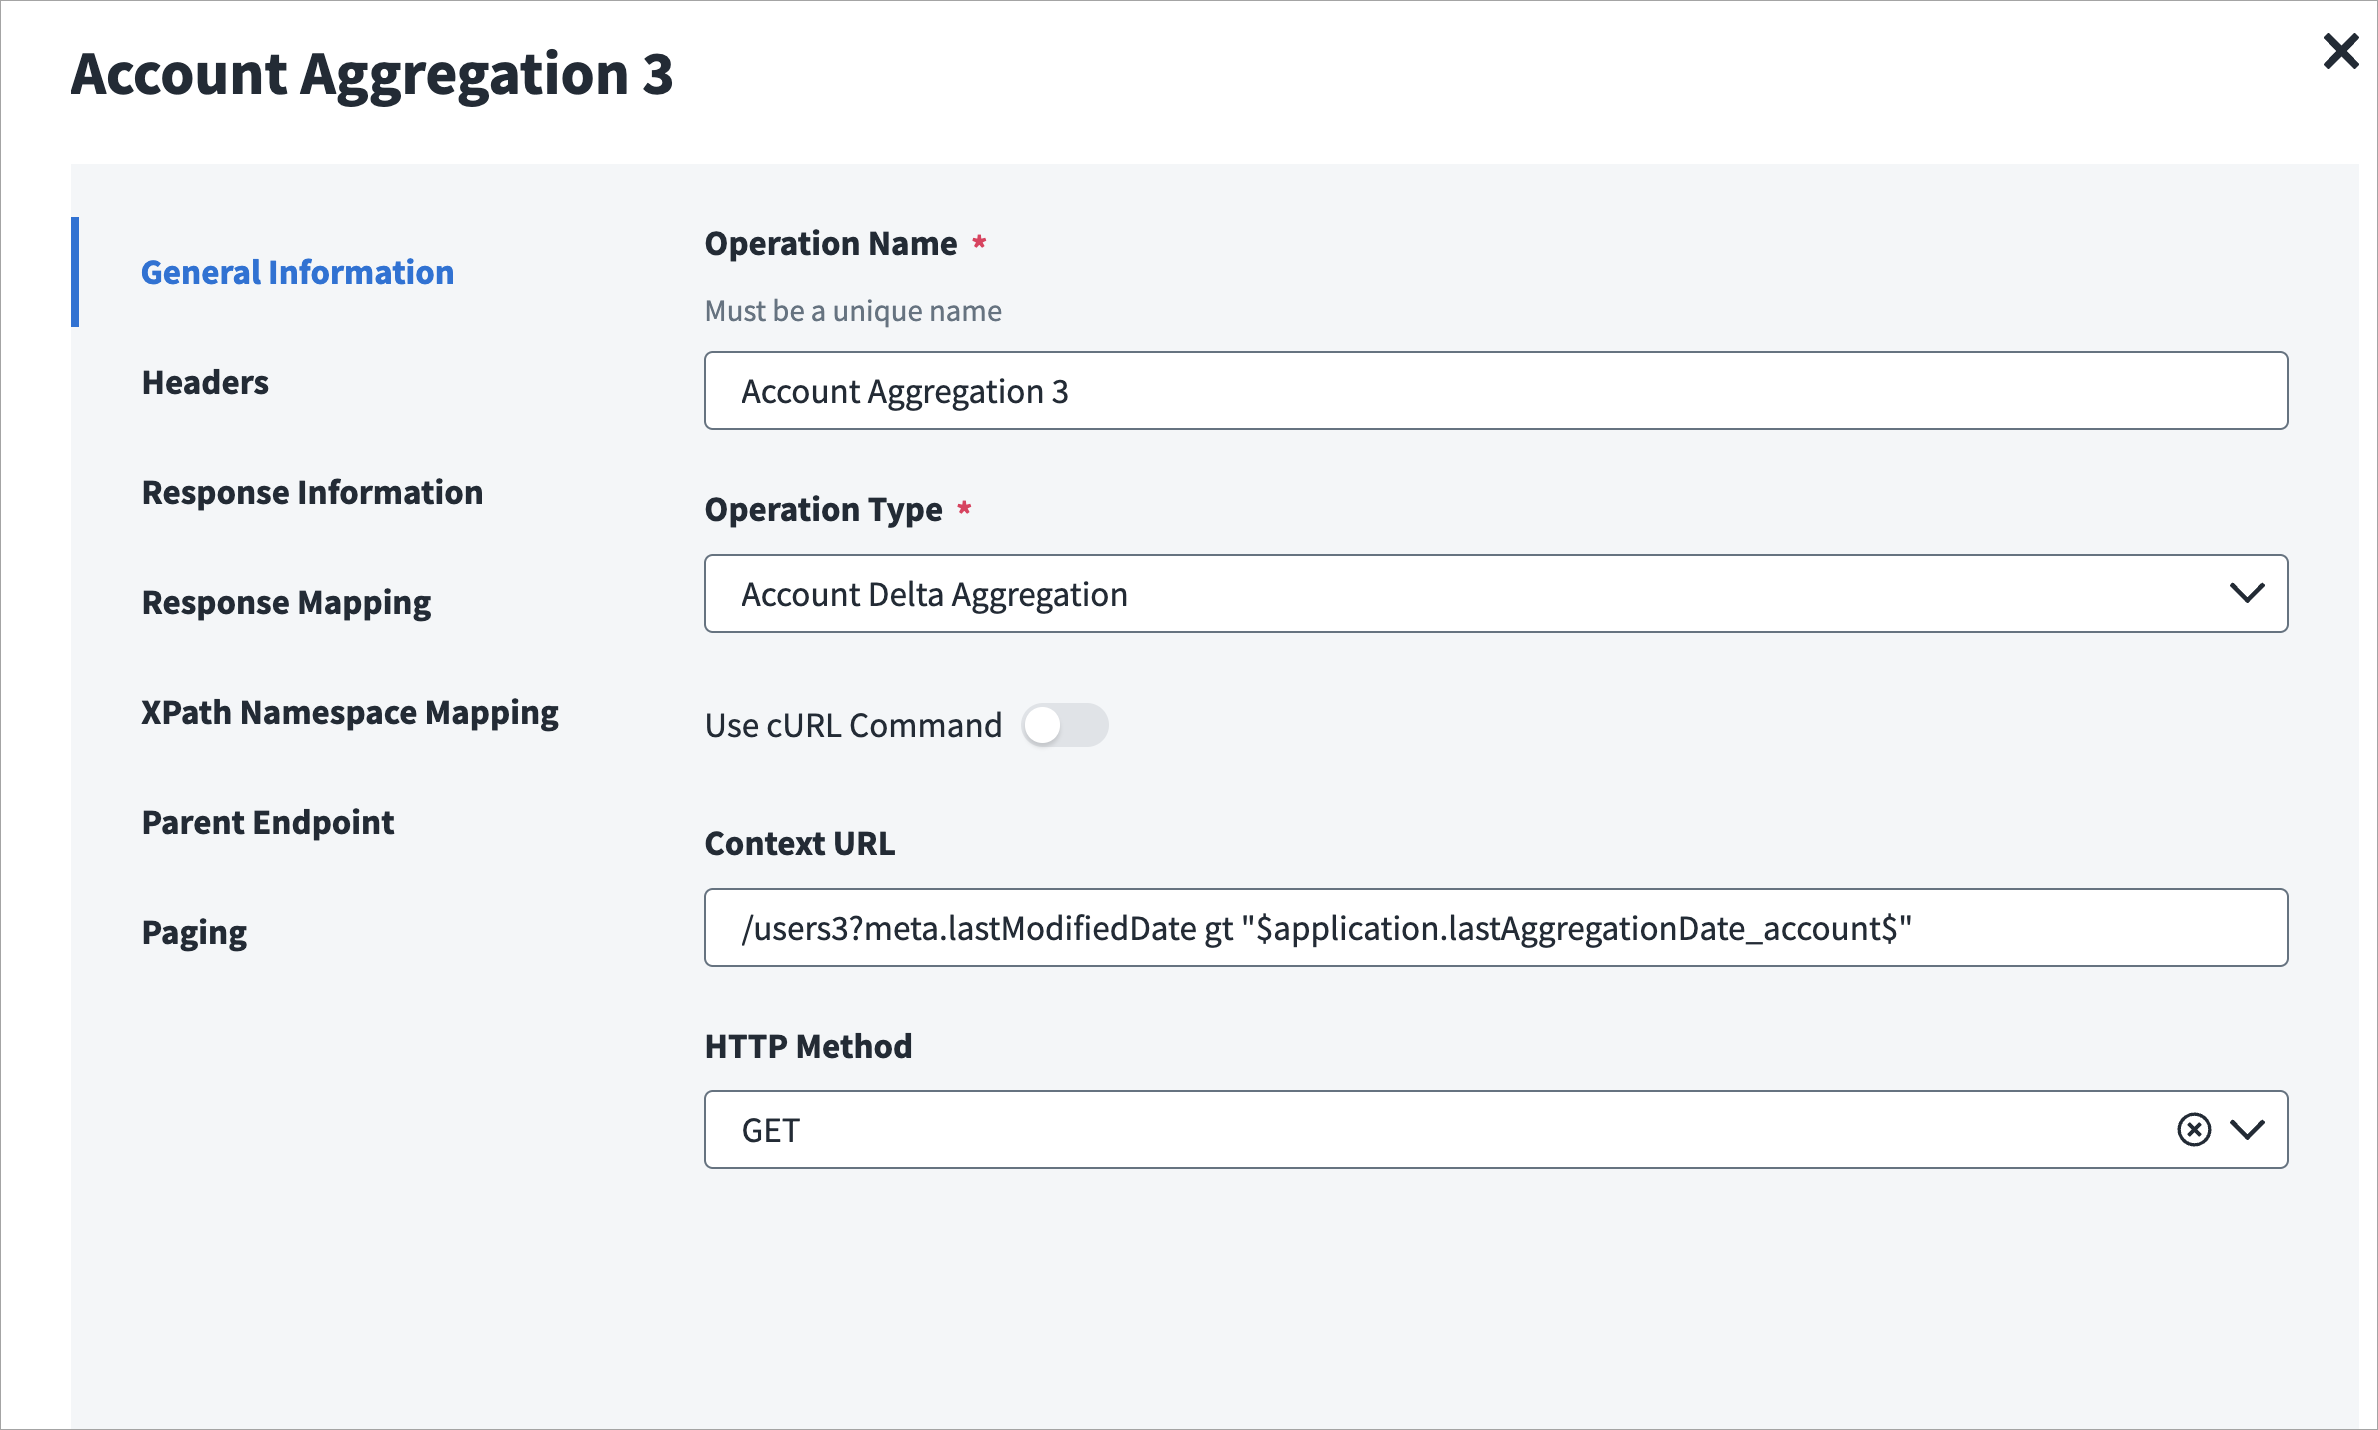
On the General Information tab:
- In the Operation Name field, enter
Account Aggregation - 3as the operation name. - From the Operation Type dropdown list, select Account Delta Aggregation.
-
In the Context URL field, enter the URL specific to the account delta aggregation. For example, the URL specified in the context URL is
/users?filter=meta.lastModifiedDate gt "$application.lastAggregationDate_account$"; where thelastAggregationDate_accountis the last successful aggregation timestamp.Note
The default time period is in format: "
yyyy-MM-dd'T'kk:mm:ss'Z'" If you want to change the time period format, use the following key-value pair to update the source via API: key:connector_dateTimePatternvalue: "yyyy-MM-dd'T'kk:mm:ss'Z'" key :connector_serverTimeZonevalue: "UTC" -
In the HTTP Method dropdown list, select GET.
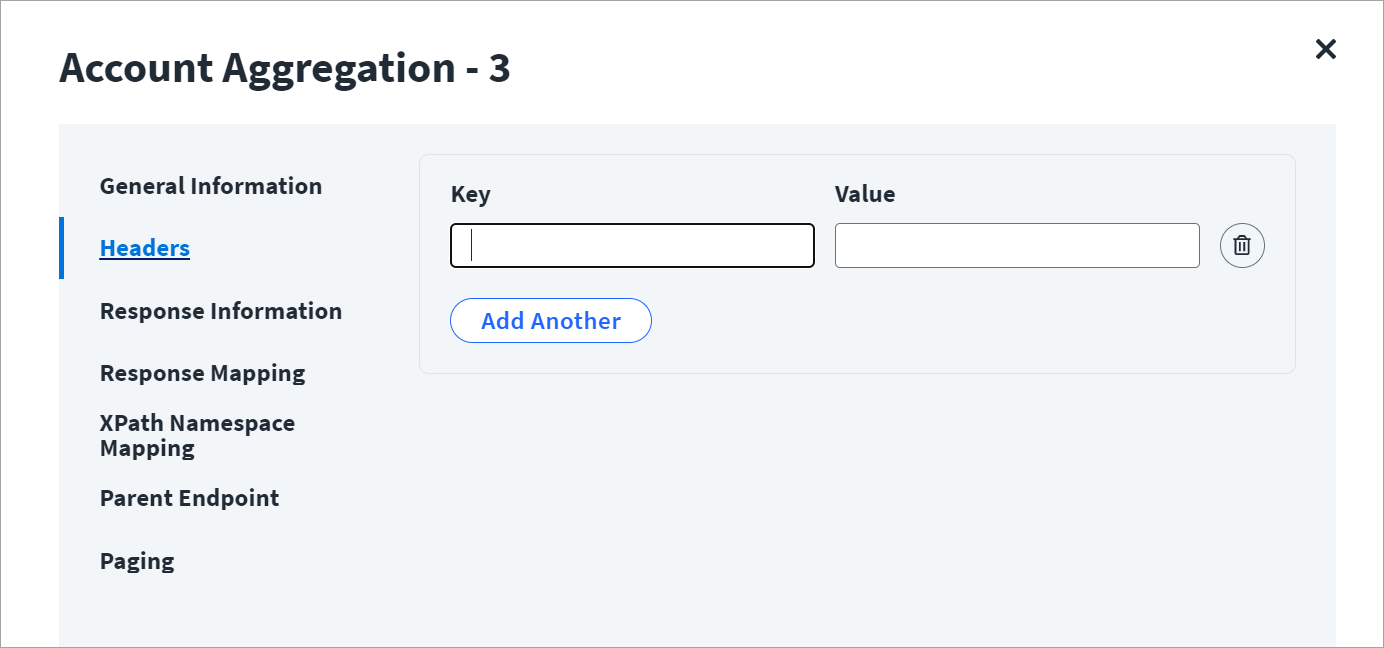
On the Headers tab:
The Header has the data keys and their corresponding values. These key value pairs will be sent as part of the Header in the HTTP Request.
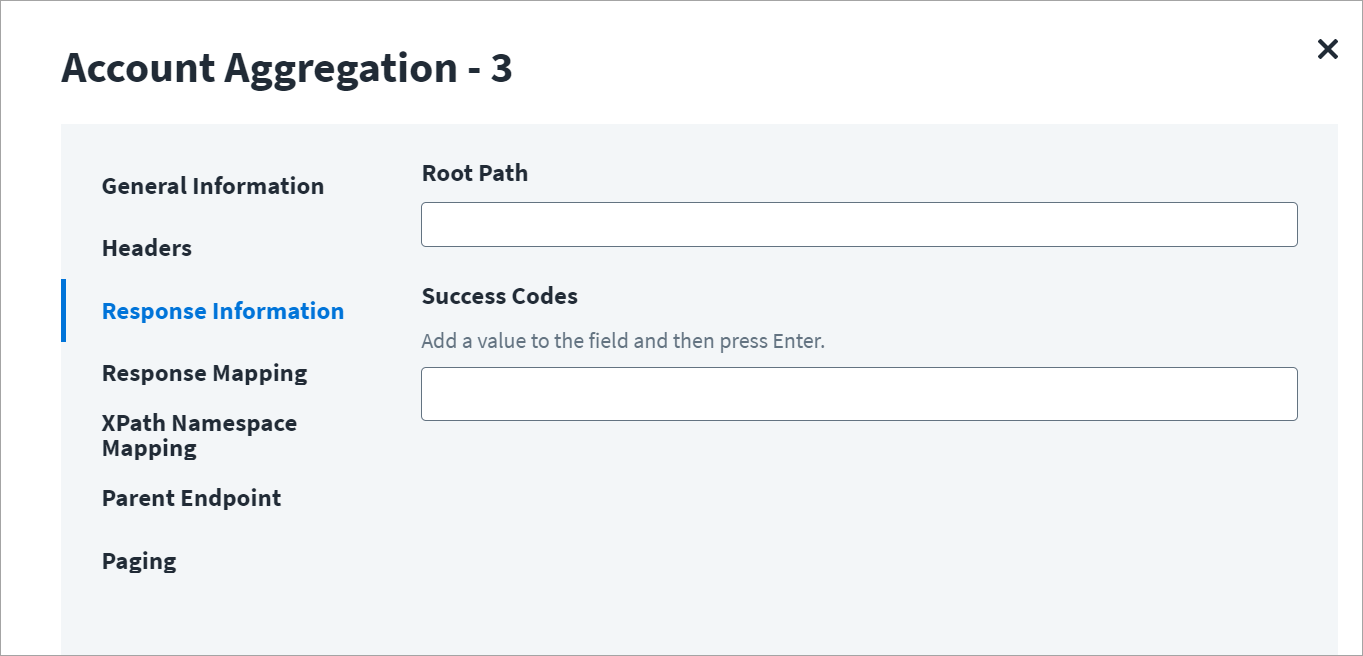
On the Response Information tab:
The Root Path is the common path present in the JSON response. The Success Code is the successful HTTP response code expected by the respective Web Service operation. By default, the success code is 2**.
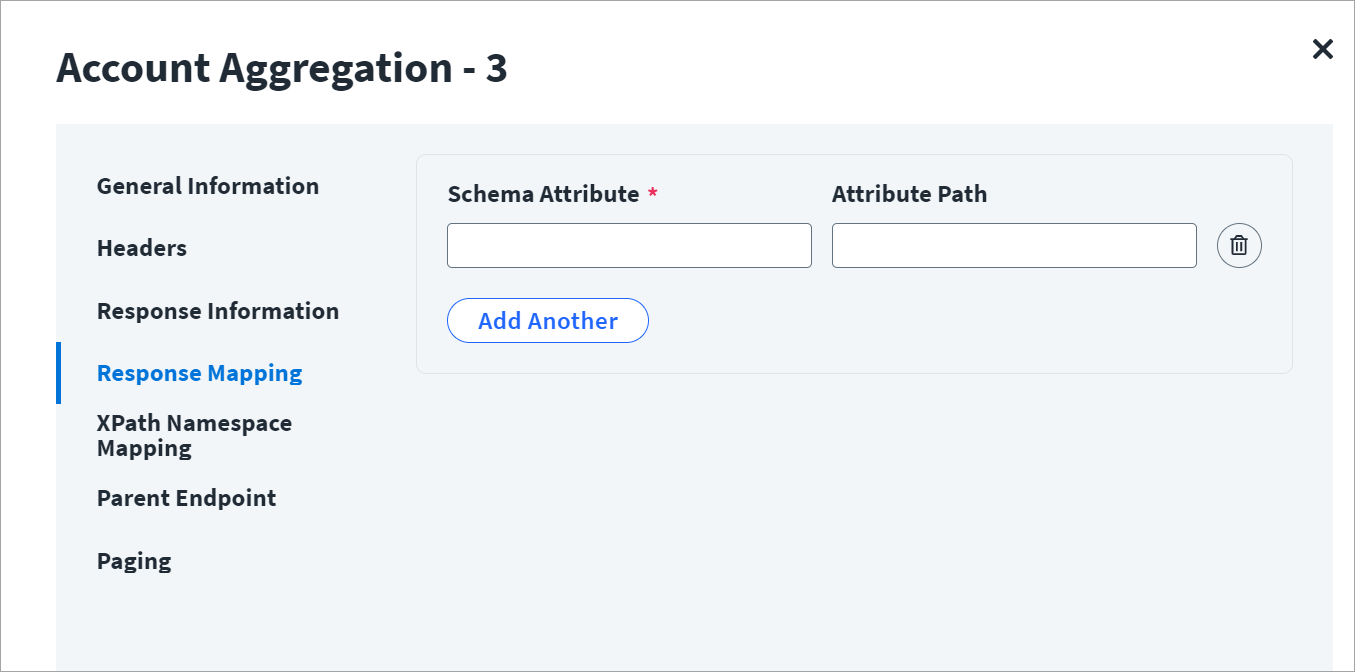
On the Response Mapping tab:
Refer to Configuration for Response for more information about the raw JSON response on which the Response Information schema is mapped.
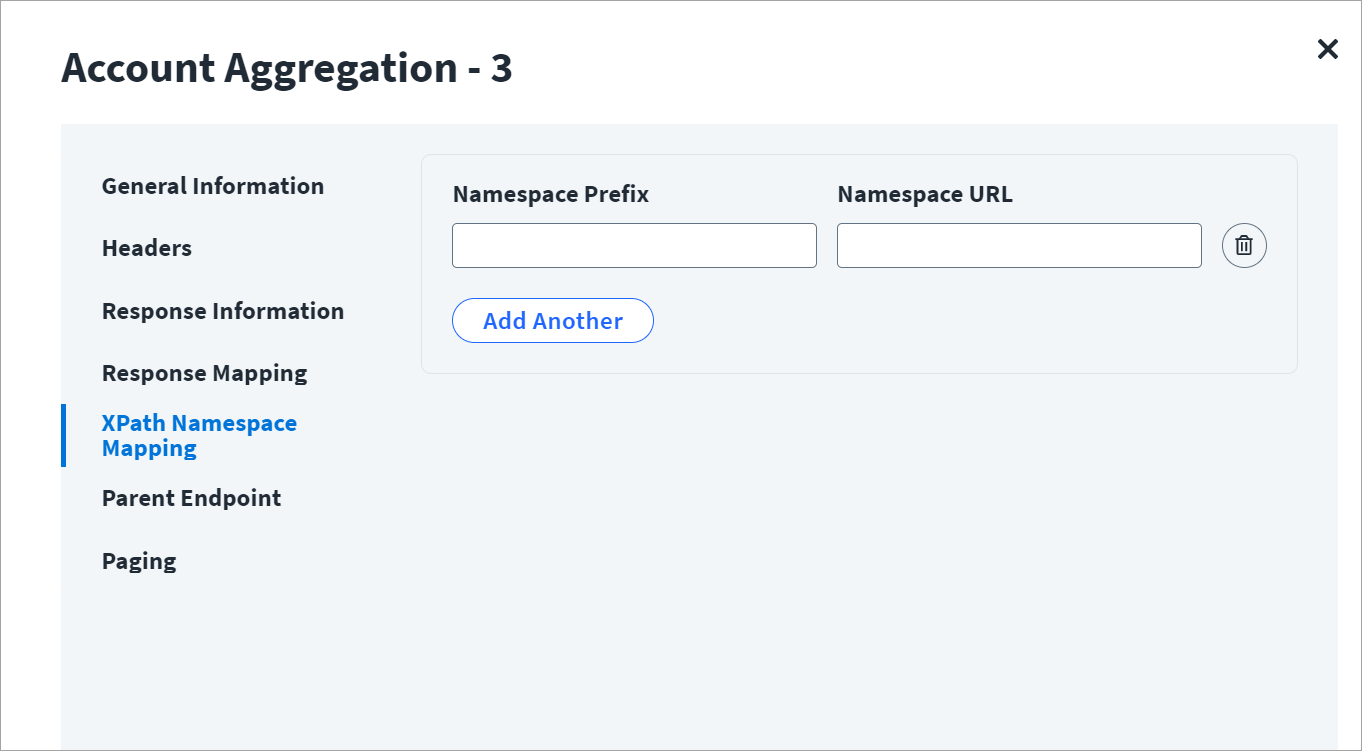
On the XPath Namespace Mapping tab:
The namespace xmlns is the default namespace for the example mentioned in this section, and it is represented as ns.
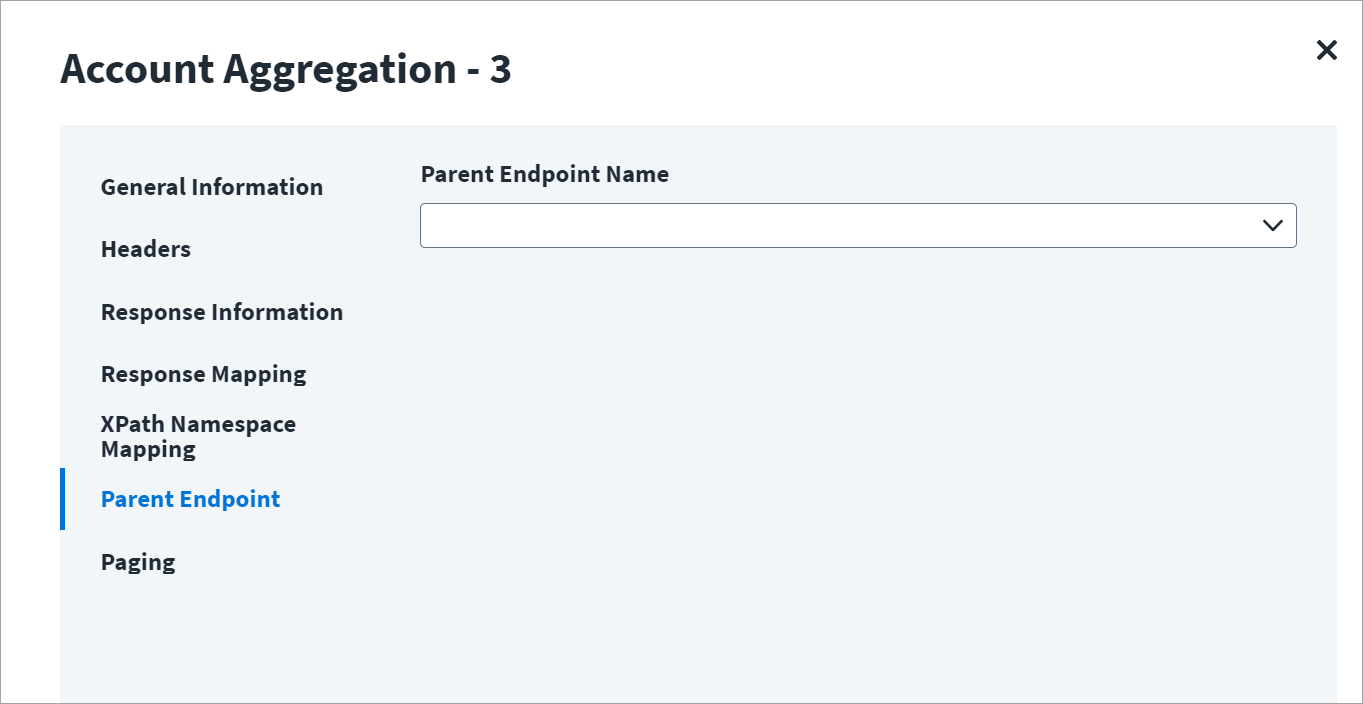
On the Parent Endpoint tab:
From the Parent Endpoint Name dropdown list, if needed select the endpoint on which the current operation is dependent to process the request.
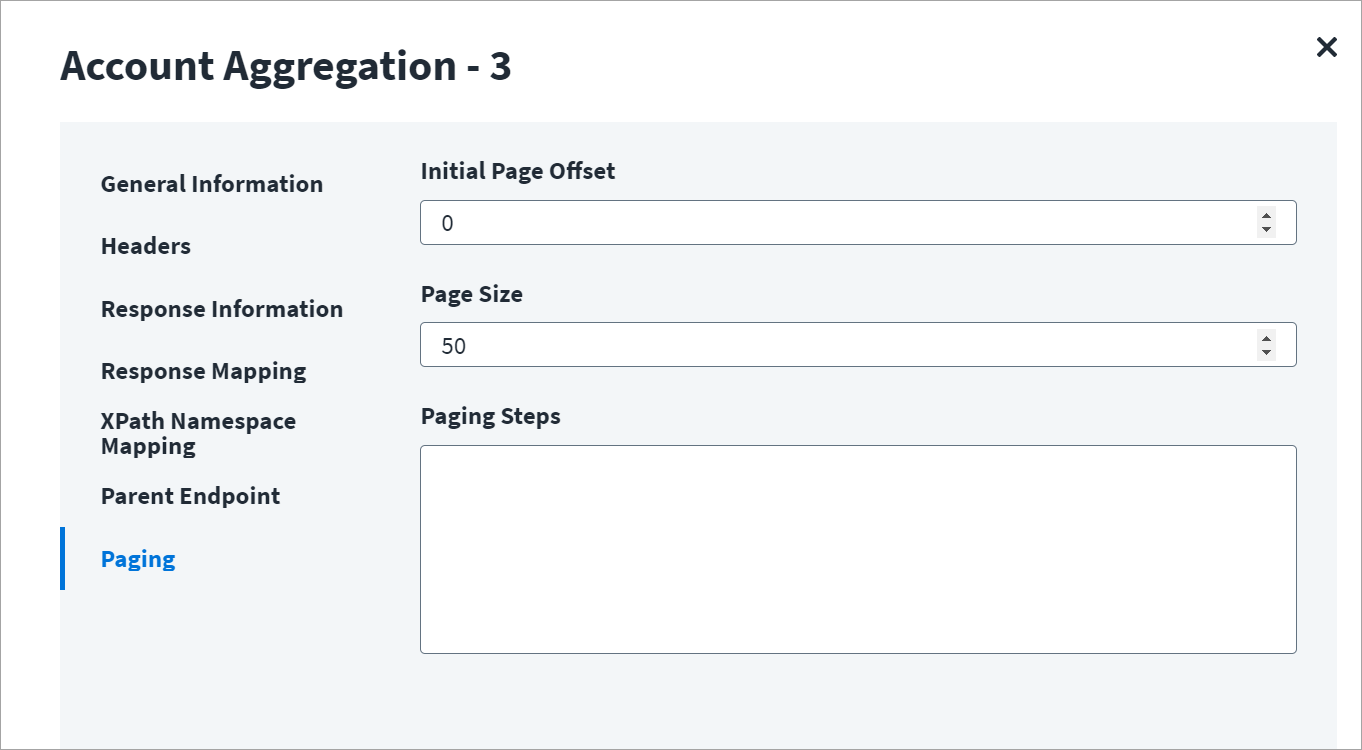
On the Paging tab:
- In the Initial Page Offset, select the page offset required.
- From the Page Size, select the required page size for delta aggregation.
- In the Paging Steps field, enter any necessary paging steps defined.
Get Object
This topic provides an example of an XML response for a get object operation.
Get Object Example
On the General Information tab:
- In the Operation Name field, enter
Get Object (XML)as the operation name. - From the Operation Type dropdown list, select Get Object.
- In the Context URL field, enter the URL specific to the get object.
- In the HTTP Method dropdown list, select POST.
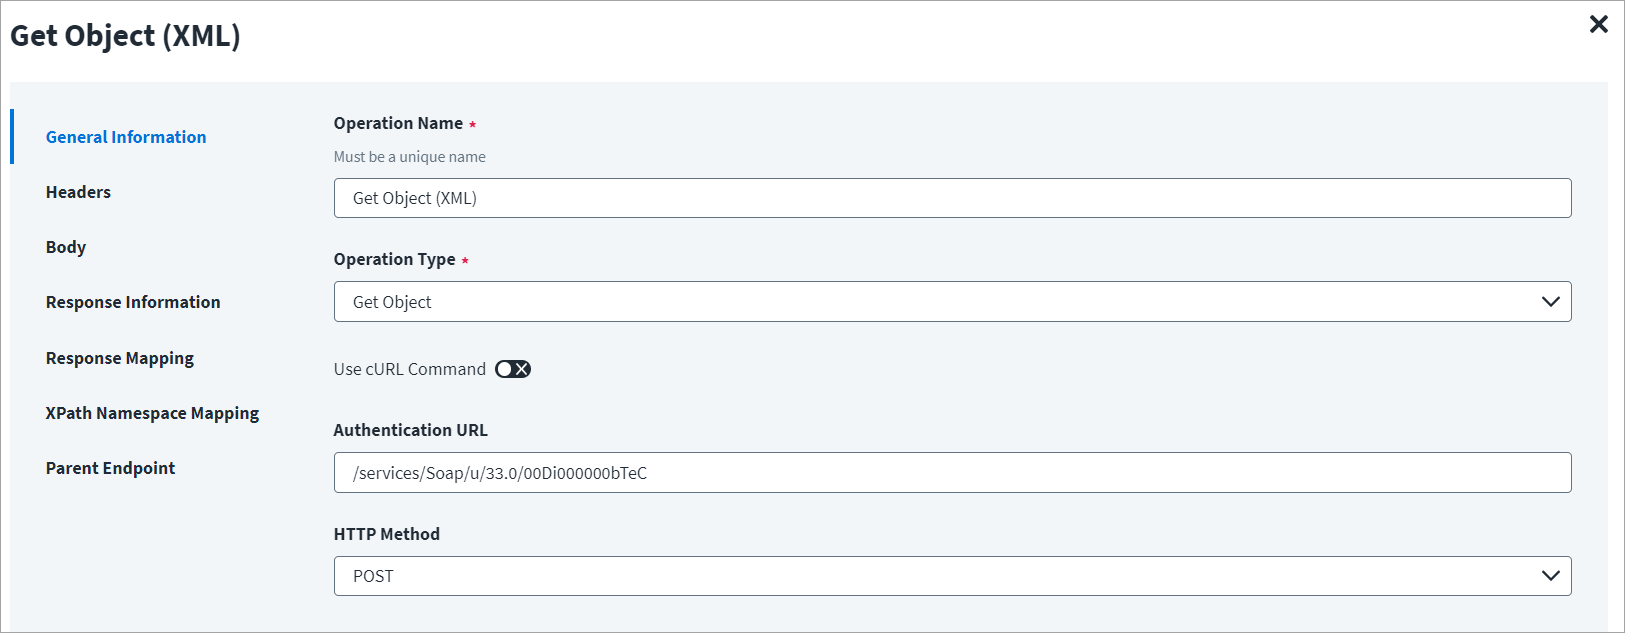
On the Header and Body tab:
The Header has the data keys and their corresponding values. These key value pairs will be sent as part of the Header in the HTTP Request.
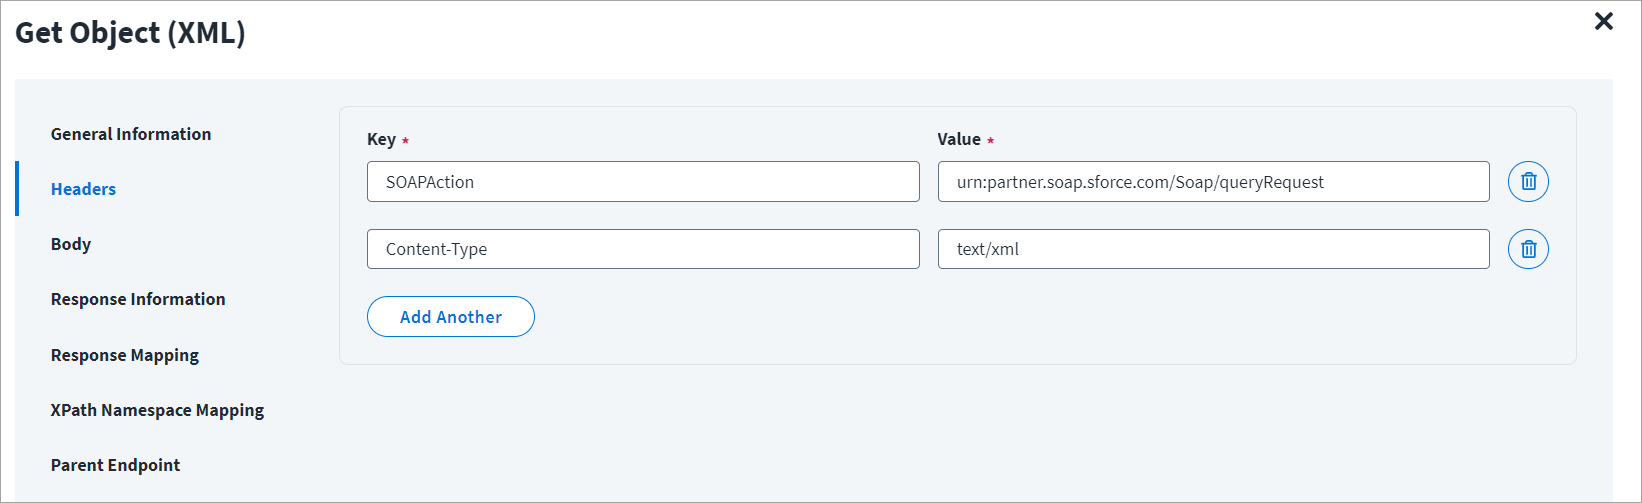
The HTTP body is used for posting the data with a request. The body has two data entry types, Form Data and Raw. The XML format does not support Form Data.
In the Raw field, enter the XML payload for the get object.
The $nativeIdentity$ signifies the AccountID (identity attribute) in the plan or during the get object operation. For example, nativeIdentity is used along with the following keywords:
- getobject -
$getObject.nativeIdentity$ - plan -
$plan.nativeIdentity$
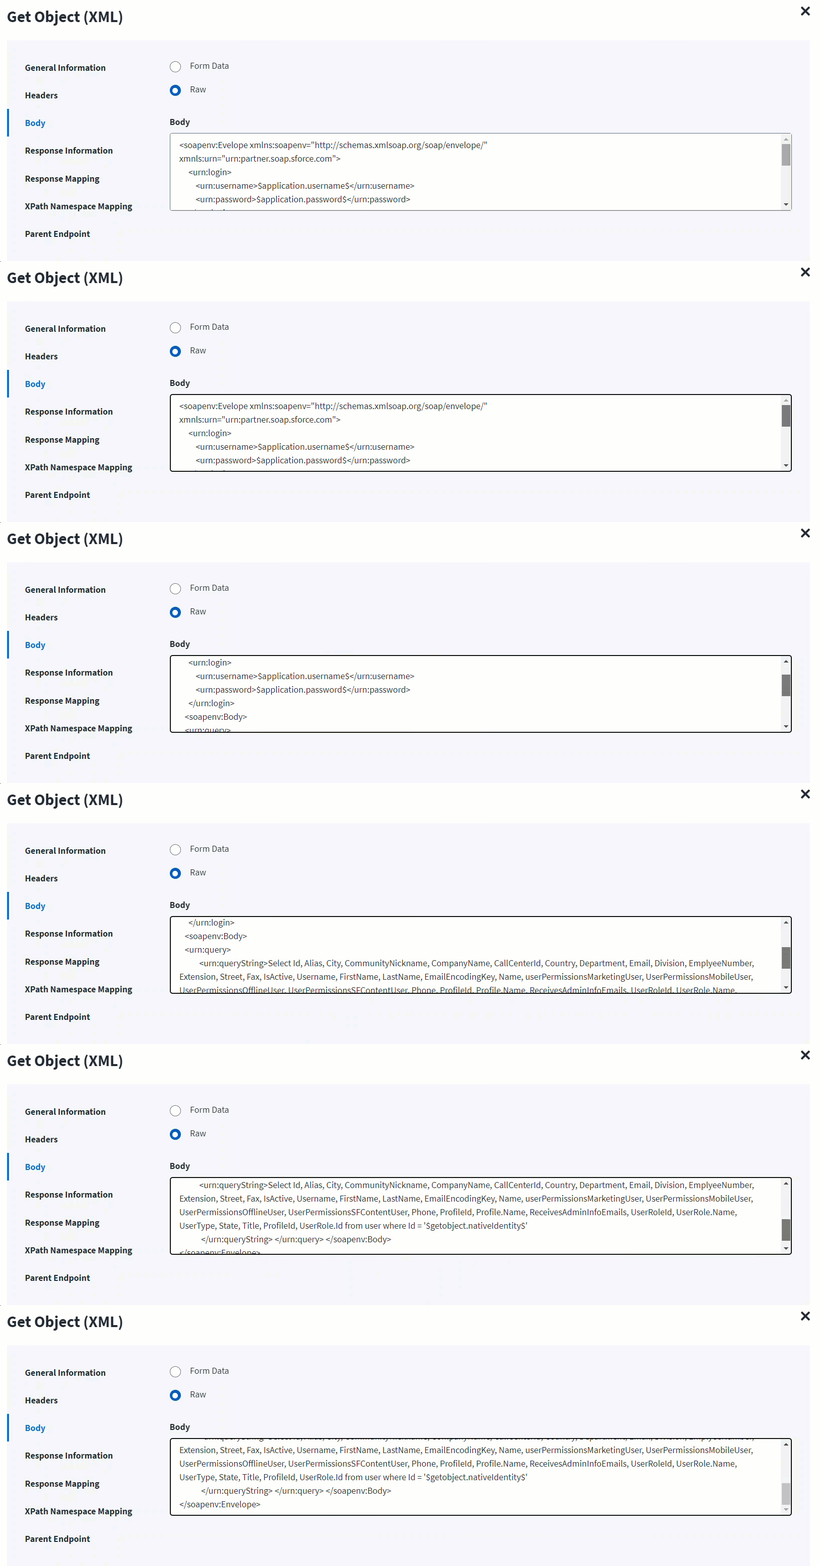
On the Response Information tab:
The Root Path is the common path present in the XML response. The Success Code is the successful HTTP response code expected by the respective Web Service operation. By default, the success code is 2**.
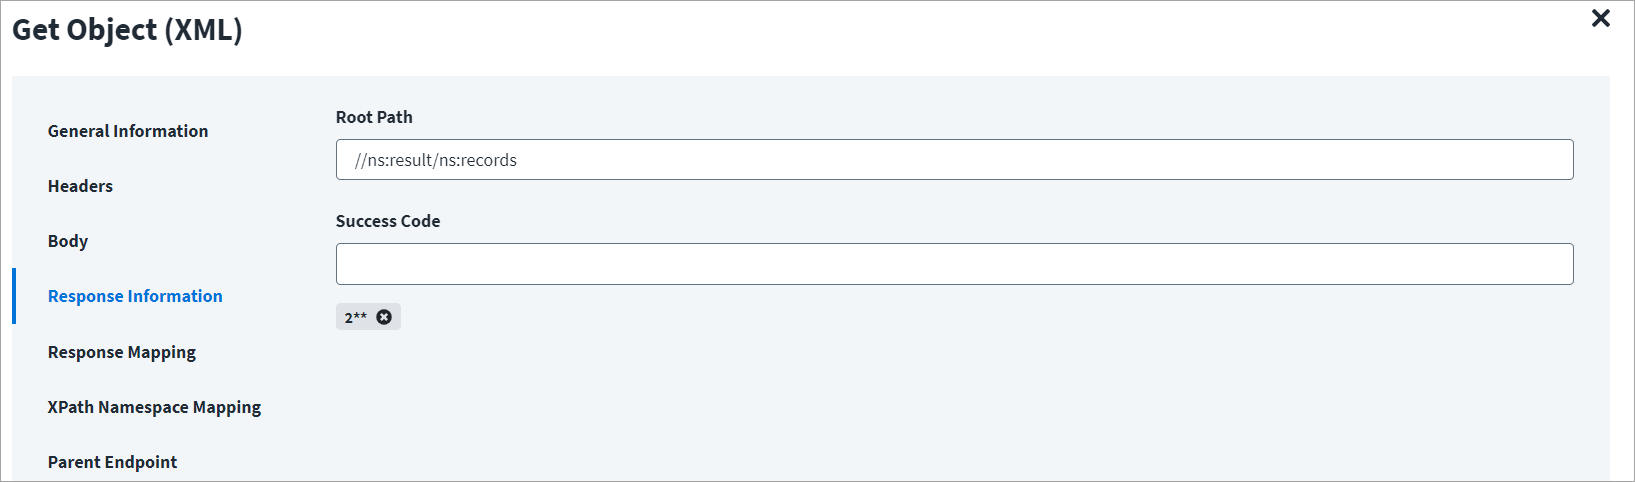
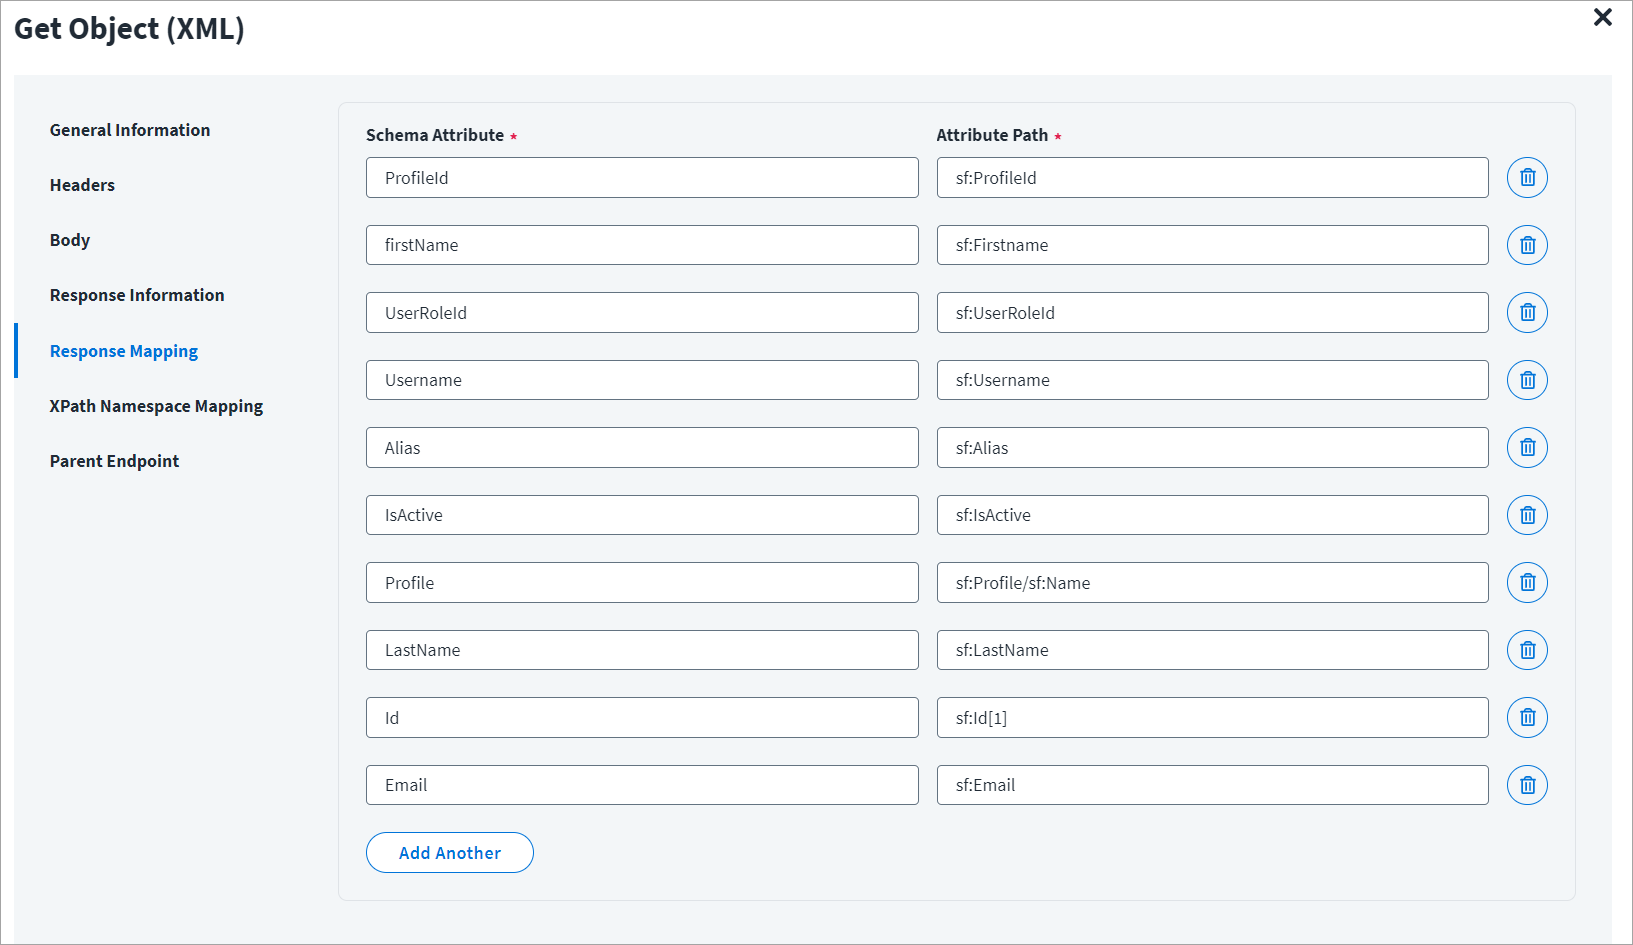
On the Response Mapping tab:
Below is an example of a schema that is mapped to XML response. Refer to Configuration for Response for more information.
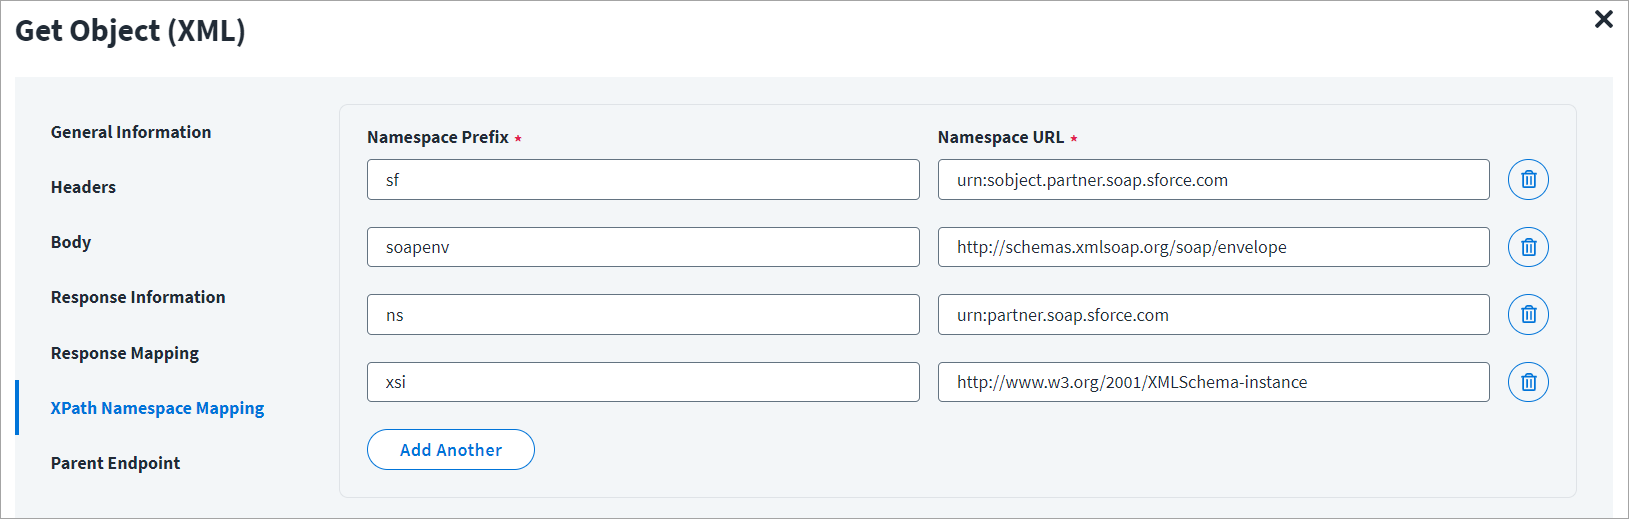
On the XPath Namespace Mapping tab:
The namespace xmlns is the default namespace for the example mentioned in this section, and it is represented as ns in the following screenshot.
Add Entitlement
This topic provides an example of an XML response for an add entitlement operation.
Add Entitlement Example
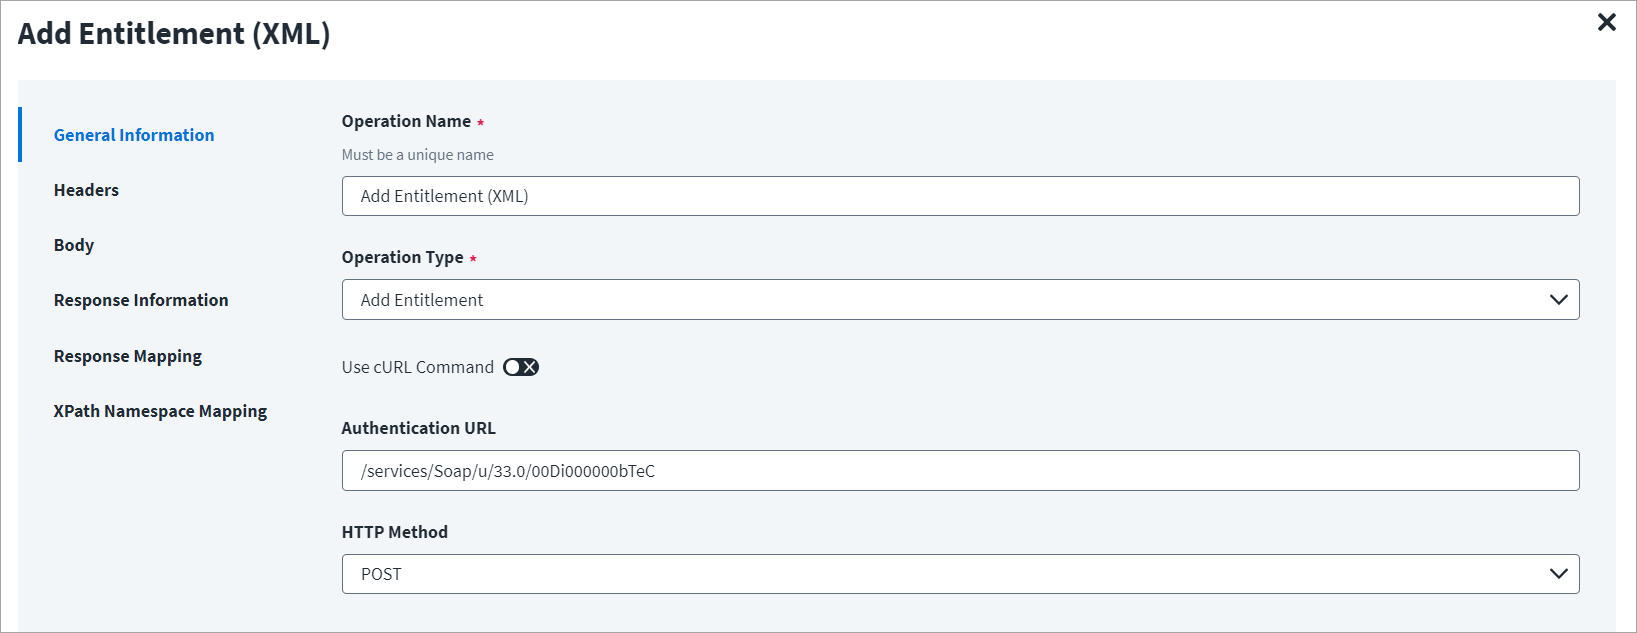
On the General Information tab:
- In the Operation Name field, enter
Add Entitlement (XML)as the operation name. - From the Operation Type dropdown list, select Add Entitlement.
- In the Context URL field, enter the URL specific to the entitlement.
- In the HTTP Method dropdown list, select POST.
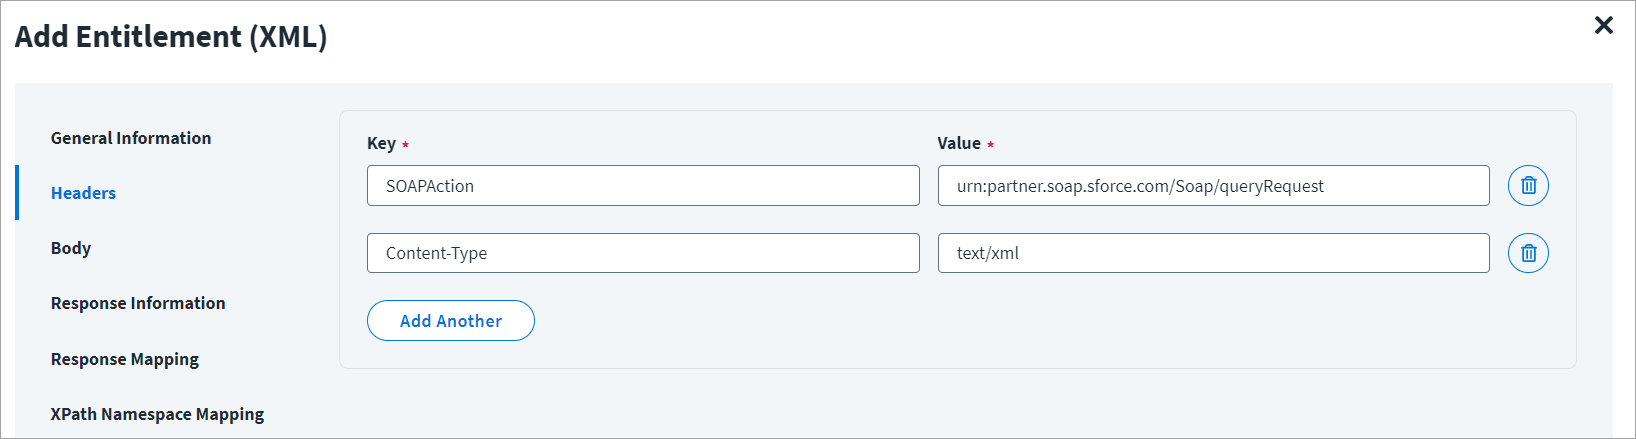
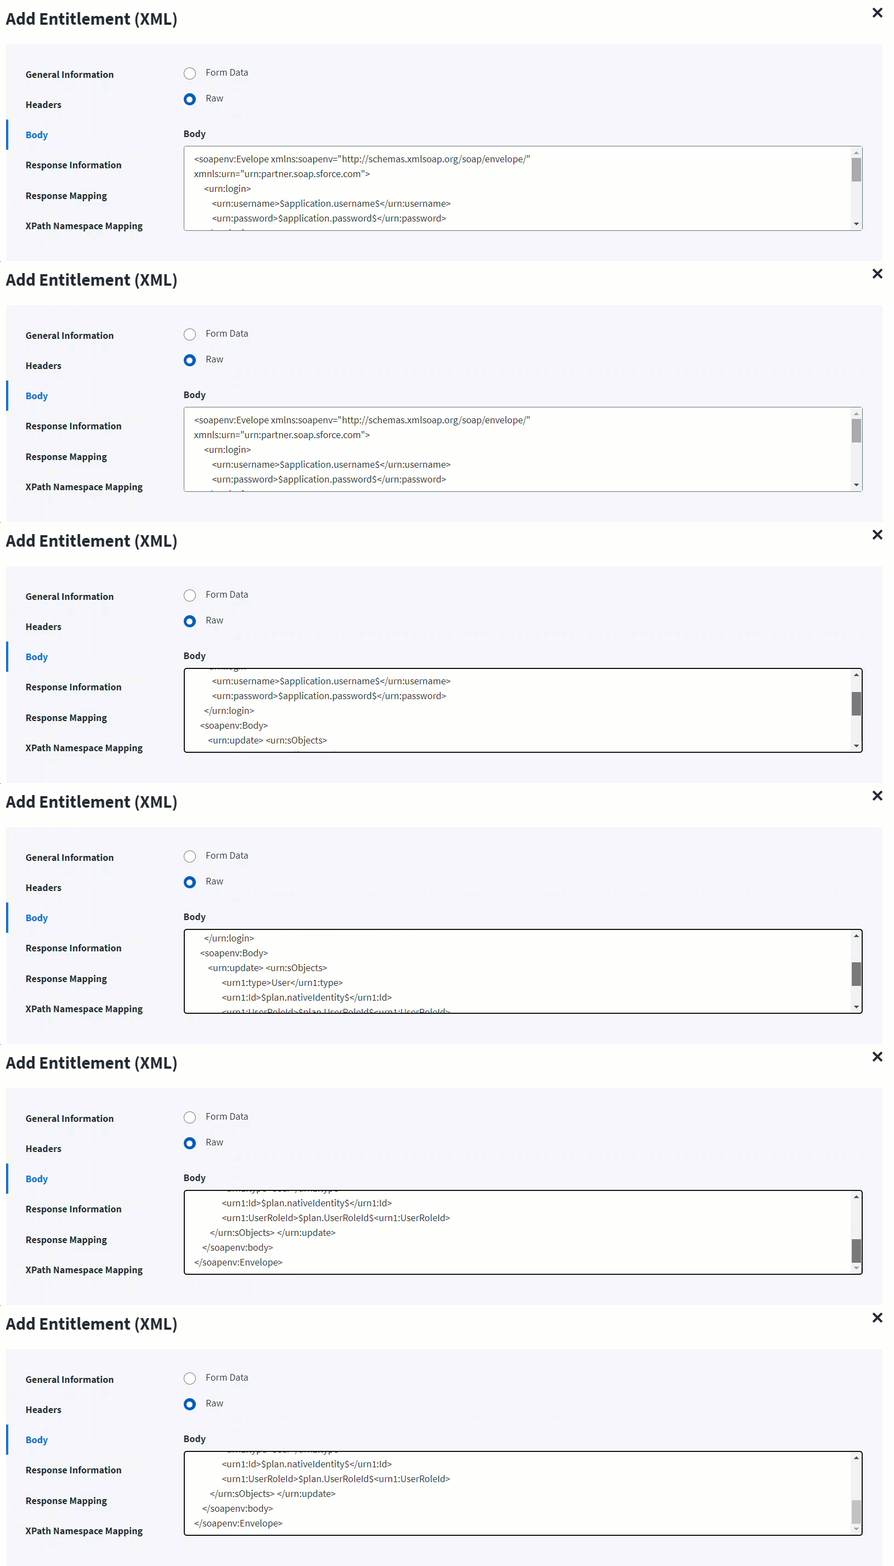
On the Header and Body tab:
The Header has the data keys and their corresponding values. These key value pairs will be sent as part of the Header in the HTTP Request.
The HTTP body is used for posting the data with a request. The body has two data entry types, Form Data and Raw. The XML format does not support Form Data.
In the Raw field, enter the XML payload for the entitlement.
On the Response Information tab:
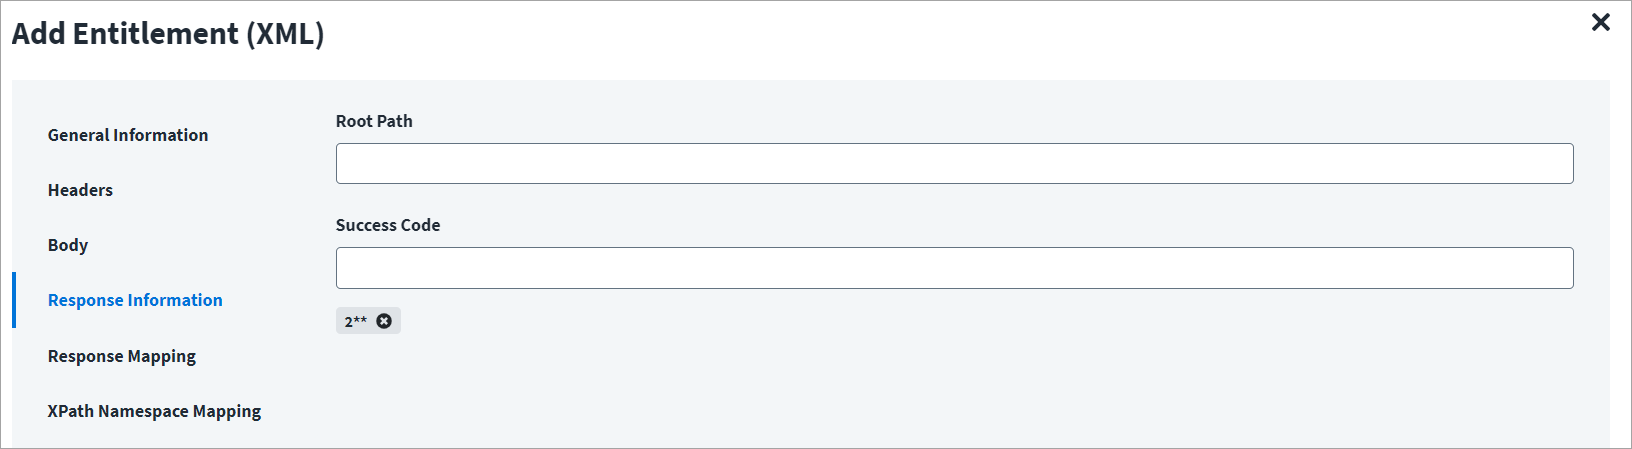
The Root Path is the common path present in the XML response. The Success Code is the successful HTTP response code expected by the respective Web Service operation. By default, the success code is 2**.
Enable Account
This topic provides an example of an XML response for an enable account operation.
Enable Account Example
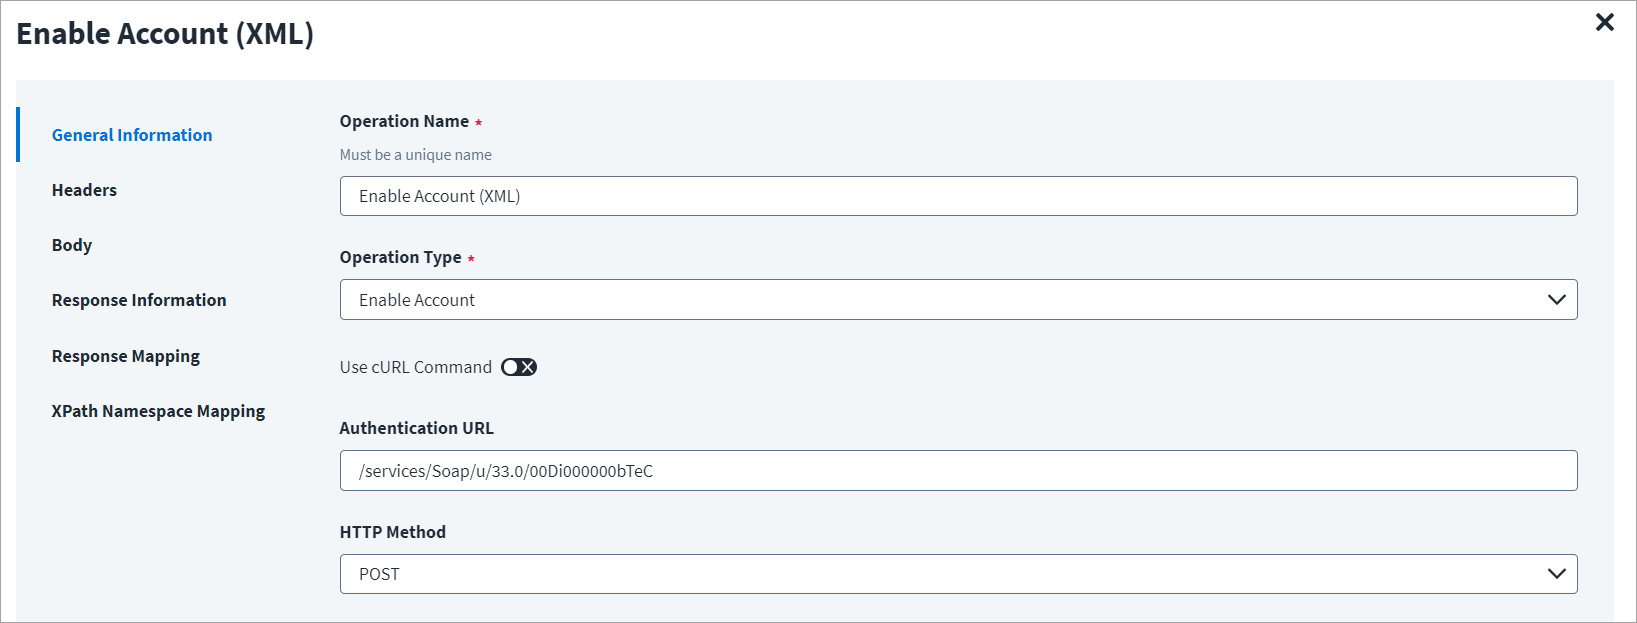
On the General Information tab:
- In the Operation Name field, enter
Enable Account (XML)as the operation name. - From the Operation Type dropdown list, select Enable Account.
- In the Context URL field, enter the URL specific to the account.
- In the HTTP Method dropdown list, select POST.
On the Header and Body tab:
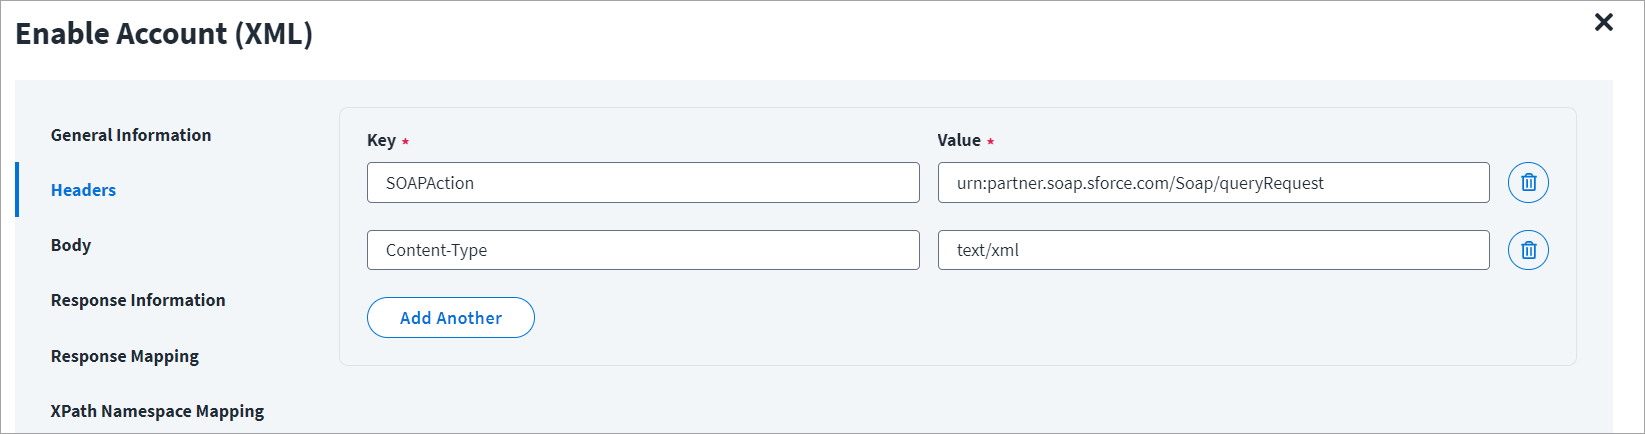
The Header has the data keys and their corresponding values. These key value pairs will be sent as part of the Header in the HTTP Request.
The HTTP body is used for posting the data with a request. The body has two data entry types, Form Data and Raw. The XML format does not support Form Data.
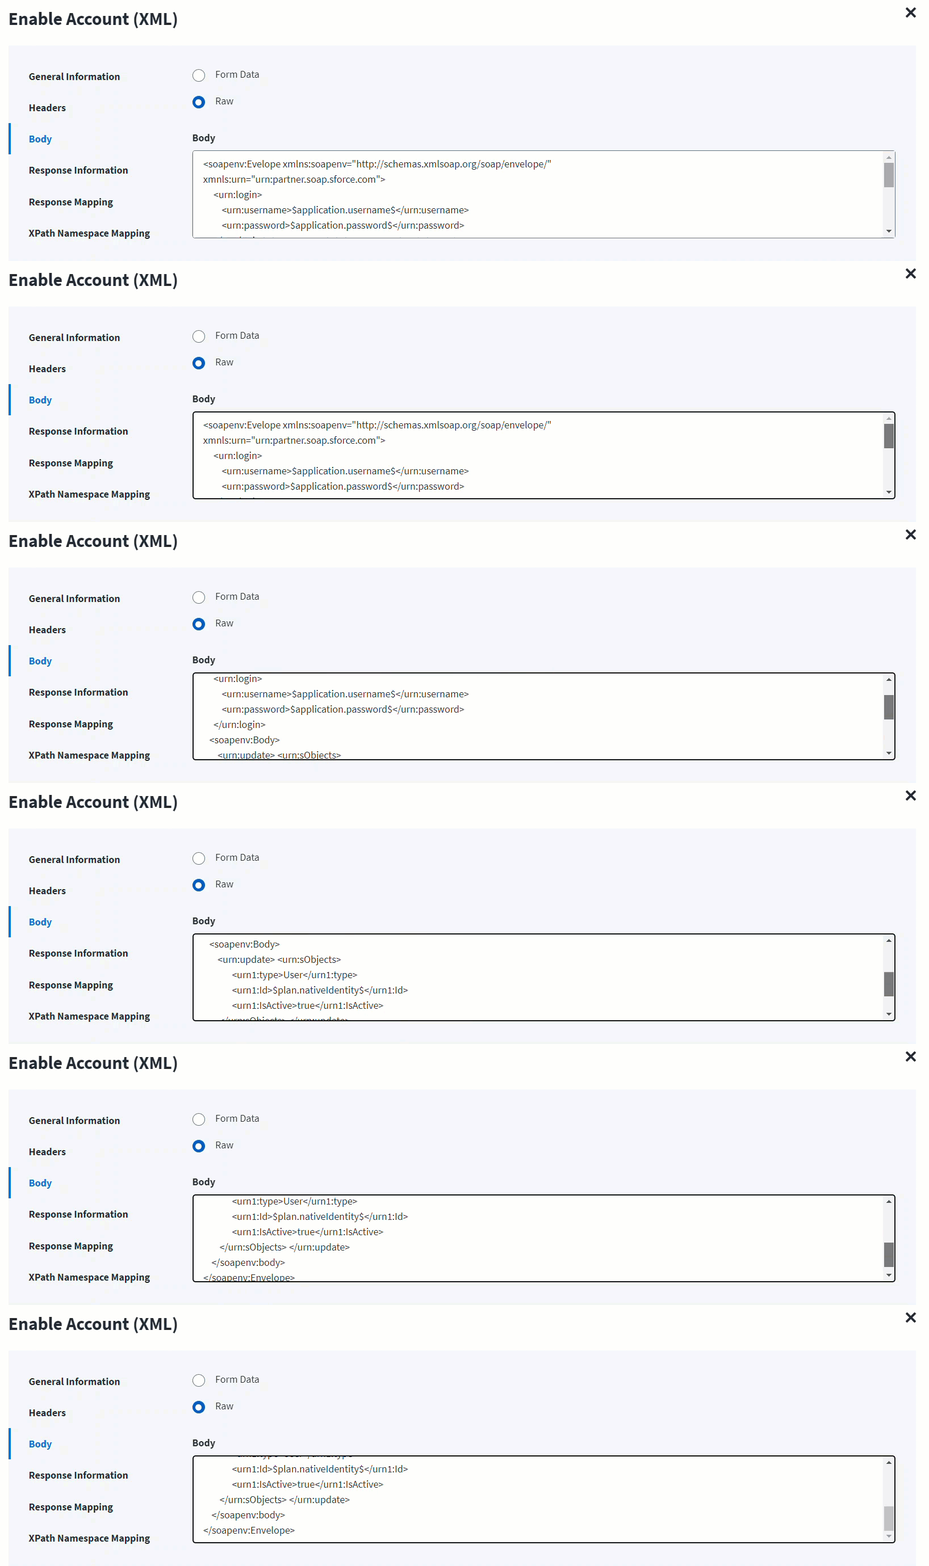
In the Raw field, enter the XML payload for the account.
Here the plan.nativeIdentity keyword signifies the AccountID (identity attribute) in the account request of the plan. For example, nativeIdentity is used along with the following keywords:
- getobject -
$getObject.nativeIdentity$ - plan -
$plan.nativeIdentity$
Note
If the target system expects the complete account object as payload, you must write a Before Operation Rule to fetch the complete object details and update the body attribute endpoint. Refer to Web Services Before Operation Rule for more information.
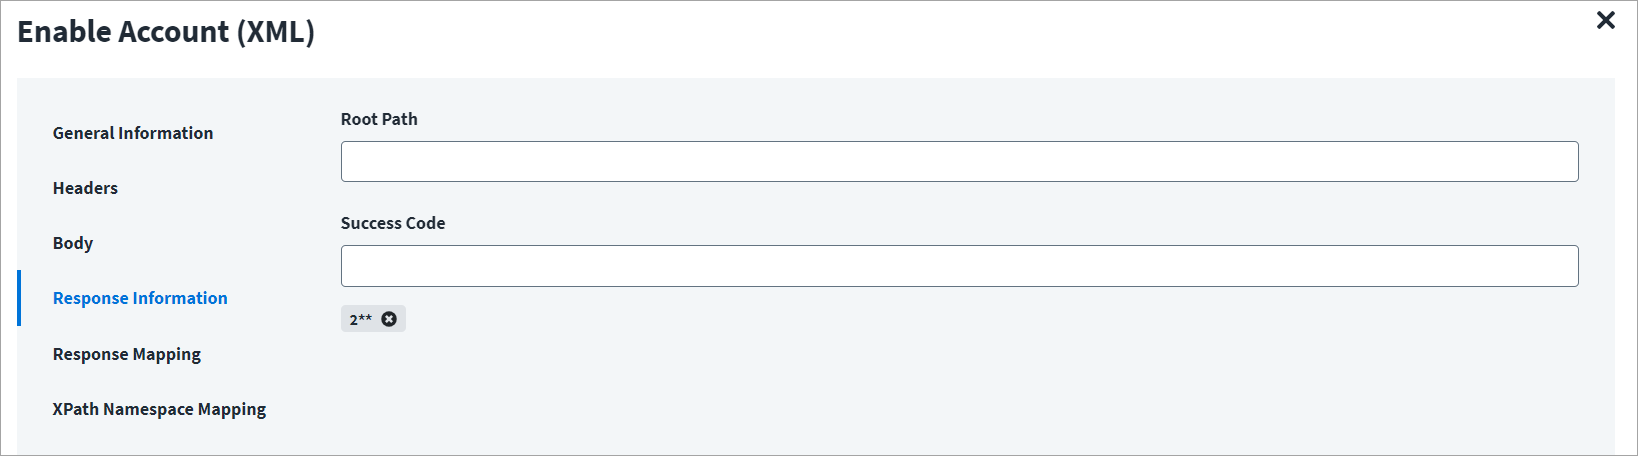
On the Response Information tab:
The Root Path is the common path present in the XML response. The Success Code is the successful HTTP response code expected by the respective Web Service operation. By default, the success code is 2**.
Disable Account
This topic provides an example of an XML response for a disable account operation.
Disable Account Example
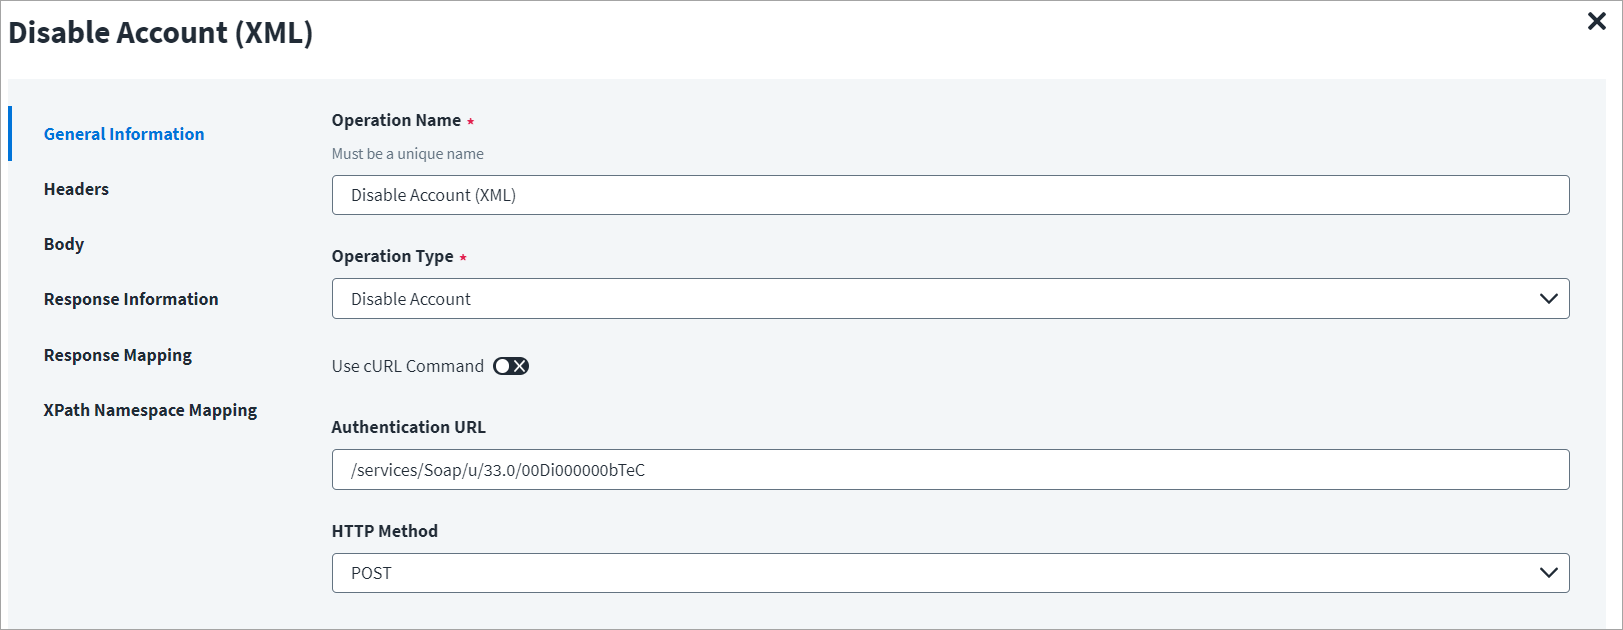
On the General Information tab:
- In the Operation Name field, enter
Disable Account (XML)as the operation name. - From the Operation Type dropdown list, select Disable Account.
- In the Context URL field, enter the URL specific to the account.
- In the HTTP Method dropdown list, select POST.
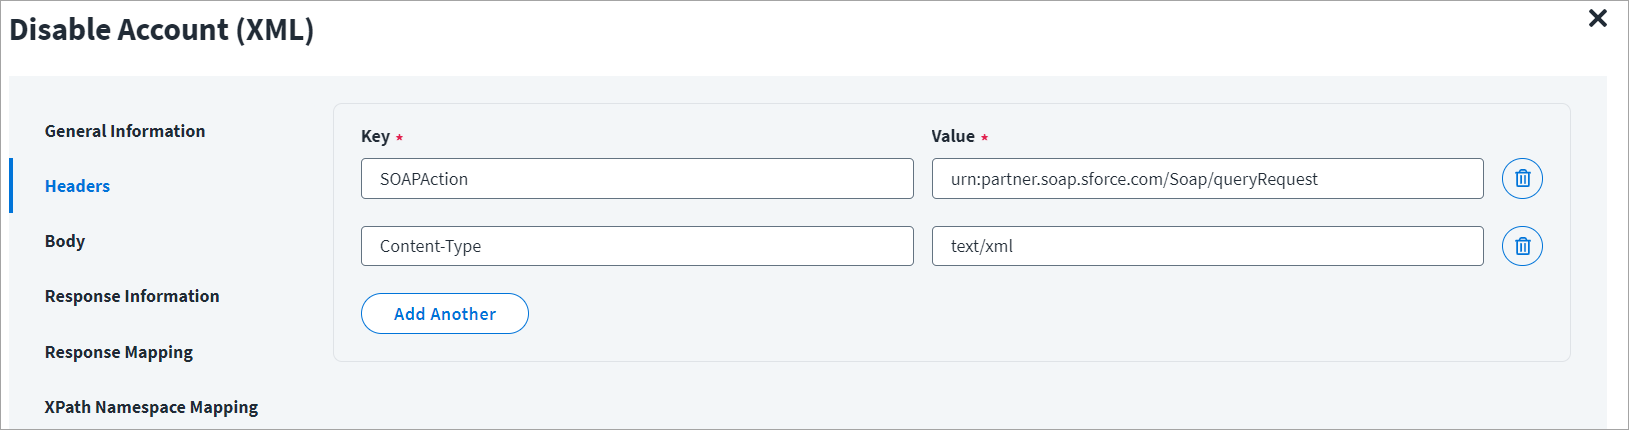
On the Header and Body tab:
The Header has the data keys and their corresponding values. These key value pairs will be sent as part of the Header in the HTTP Request.
The HTTP body is used for posting the data with a request. The body has two data entry types, Form Data and Raw. The XML format does not support Form Data.
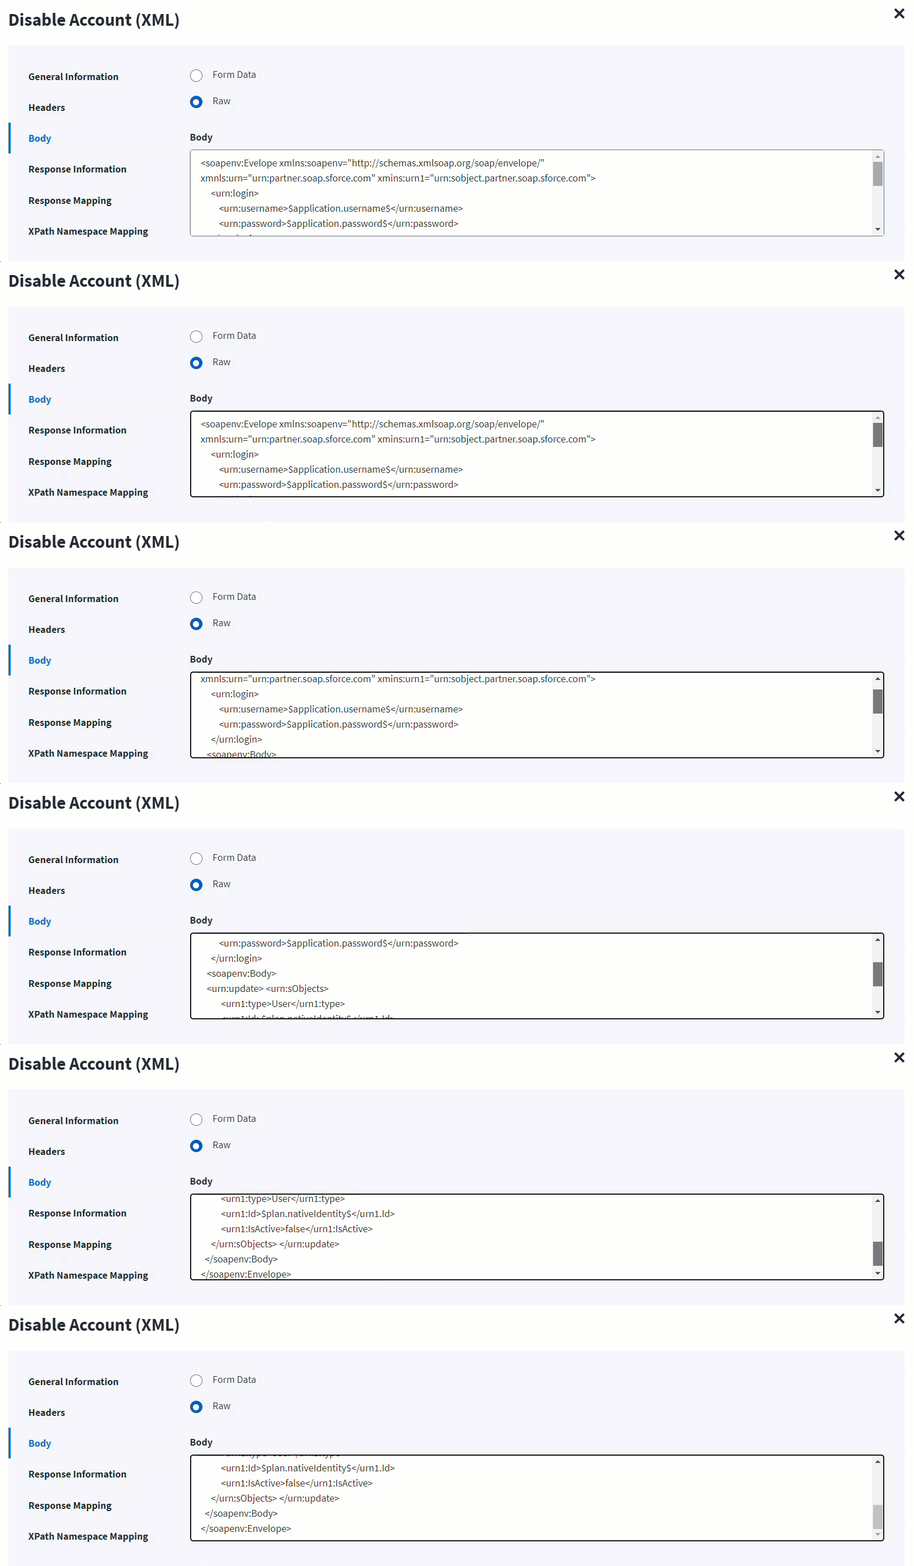
In the Raw field, enter the XML payload for the account.
Here the plan.nativeIdentity keyword signifies the AccountID (identity attribute) in the account request of the plan. For example, nativeIdentity is used along with the following keywords:
- getobject -
$getObject.nativeIdentity$ - plan -
$plan.nativeIdentity$
On the Response Information tab:
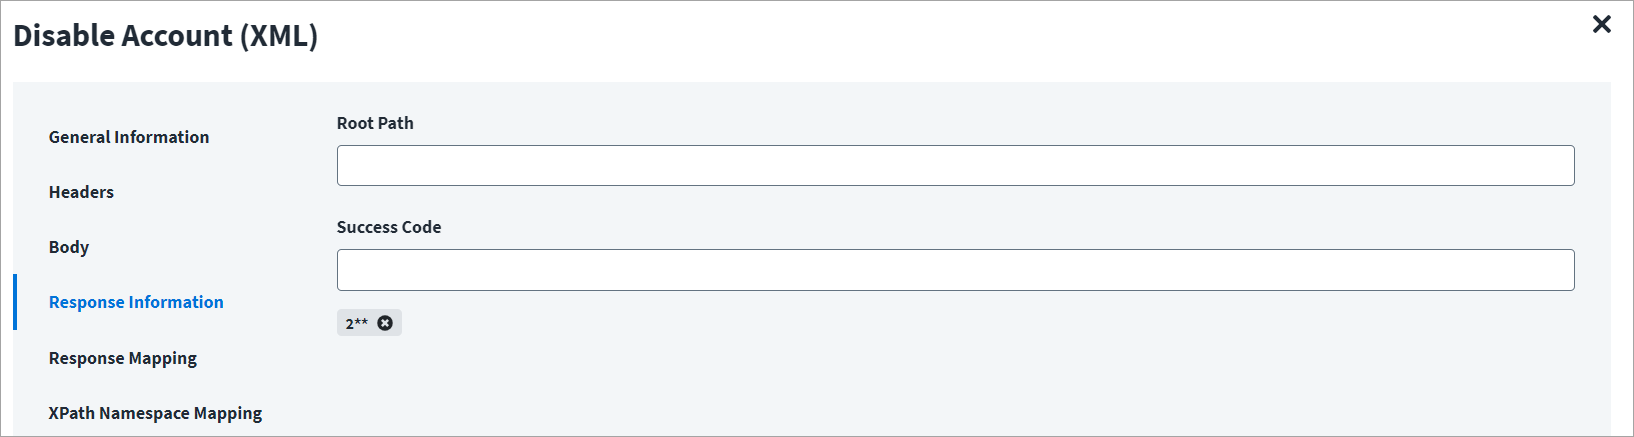
The Root Path is the common path present in the XML response. The Success Code is the successful HTTP response code expected by the respective Web Service operation. By default, the success code is 2**.
Update Account
This topic provides an example of an XML response for a disable account operation.
Update Account Example
On the General Information tab:
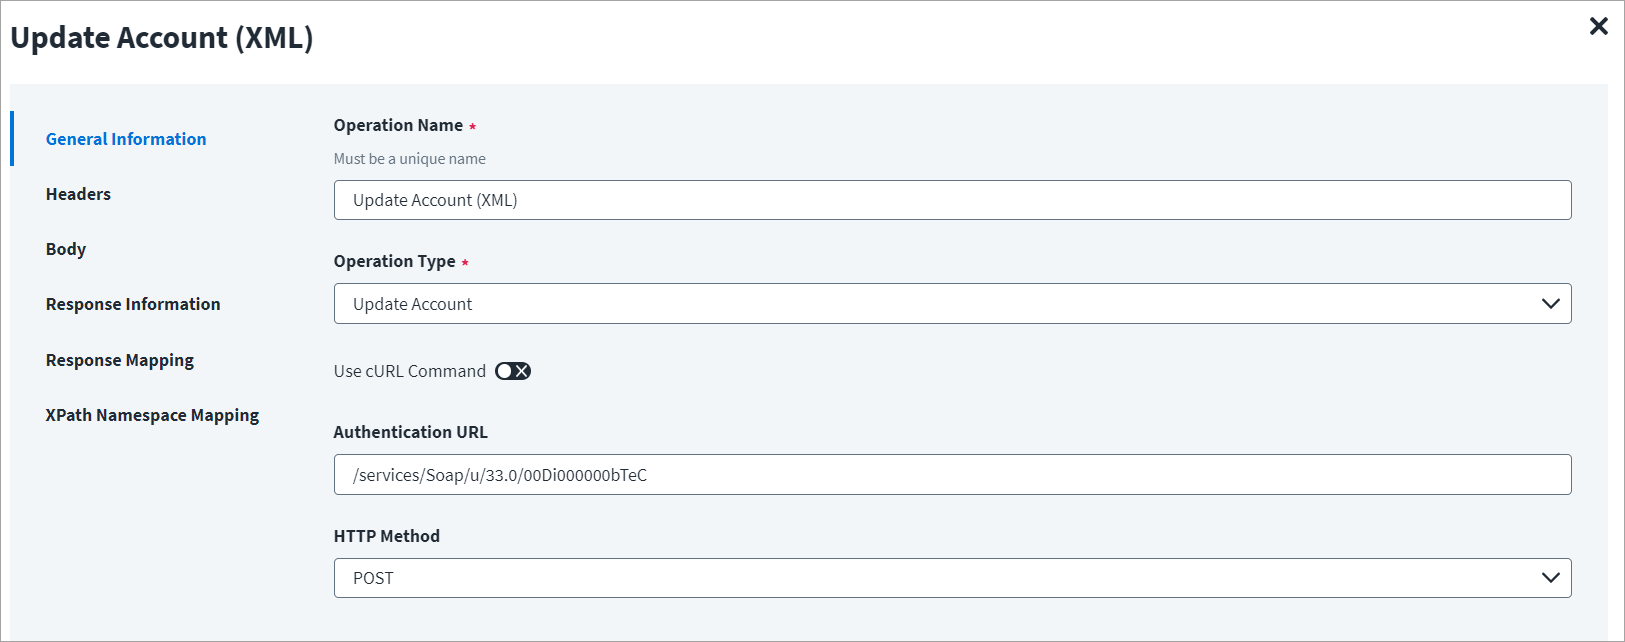
- In the Operation Name field, enter
Update Account (XML)as the operation name. - From the Operation Type dropdown list, select Update Account.
- In the Context URL field, enter the URL specific to the account.
- In the HTTP Method dropdown list, select POST.
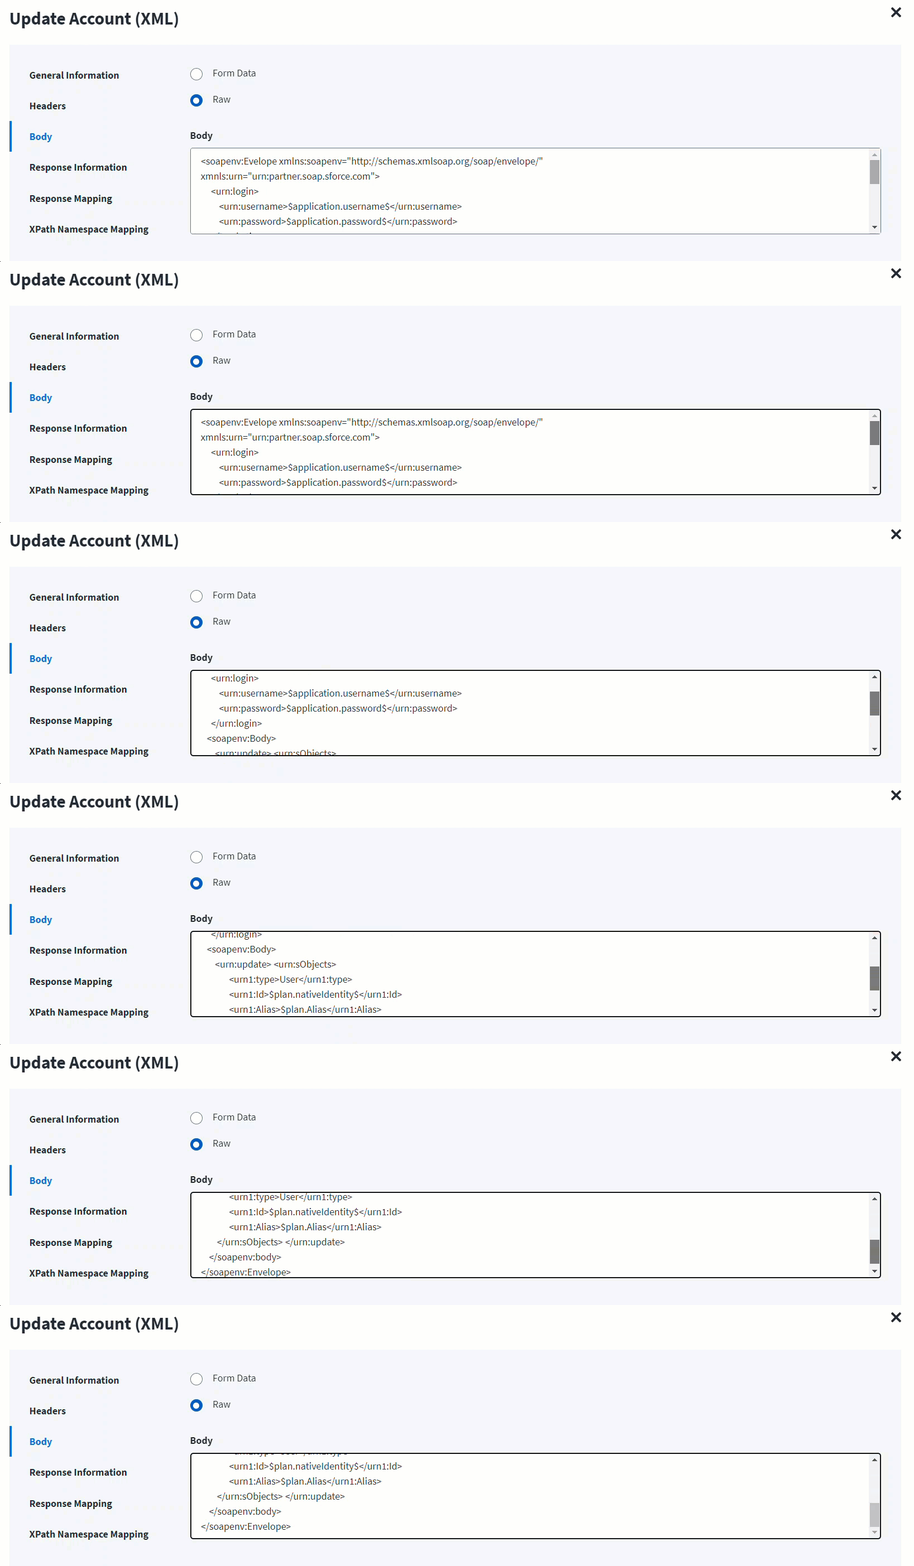
On the Header and Body tab:
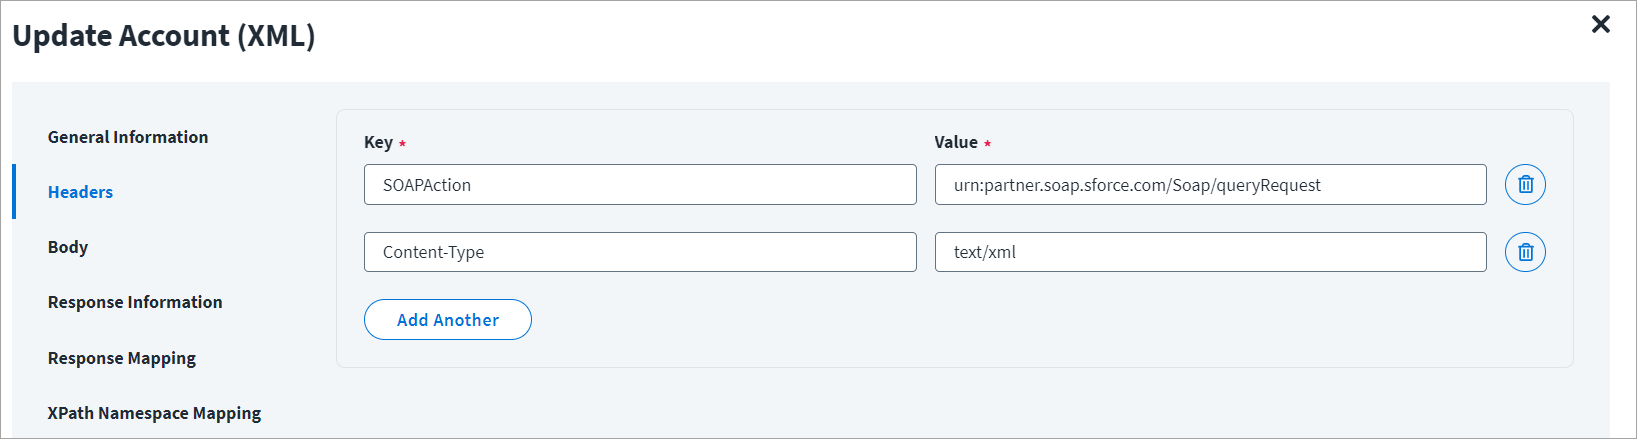
The Header has the data keys and their corresponding values. These key value pairs will be sent as part of the Header in the HTTP Request.
The HTTP body is used for posting the data with a request. The body has two data entry types, Form Data and Raw. The XML format does not support Form Data.
In the Raw field, enter the XML payload for the account.
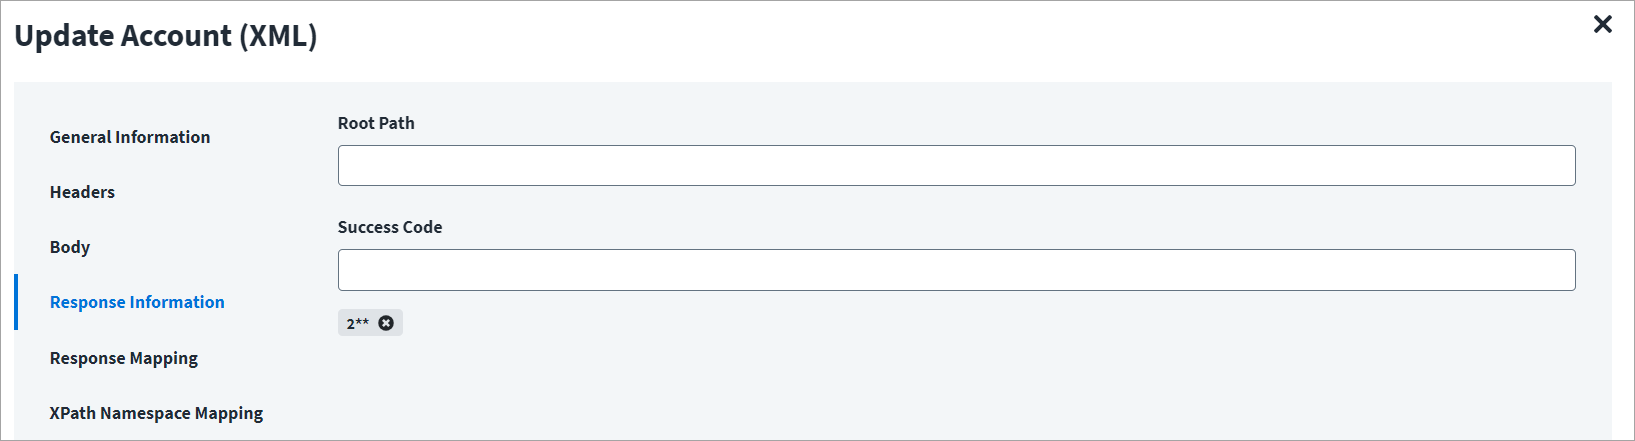
On the Response Information tab:
The Root Path is the common path present in the XML response. The Success Code is the successful HTTP response code expected by the respective Web Service operation. By default, the success code is 2**.
Change Password
This topic provides an example of an XML response for a disable account operation.
Change Password Example
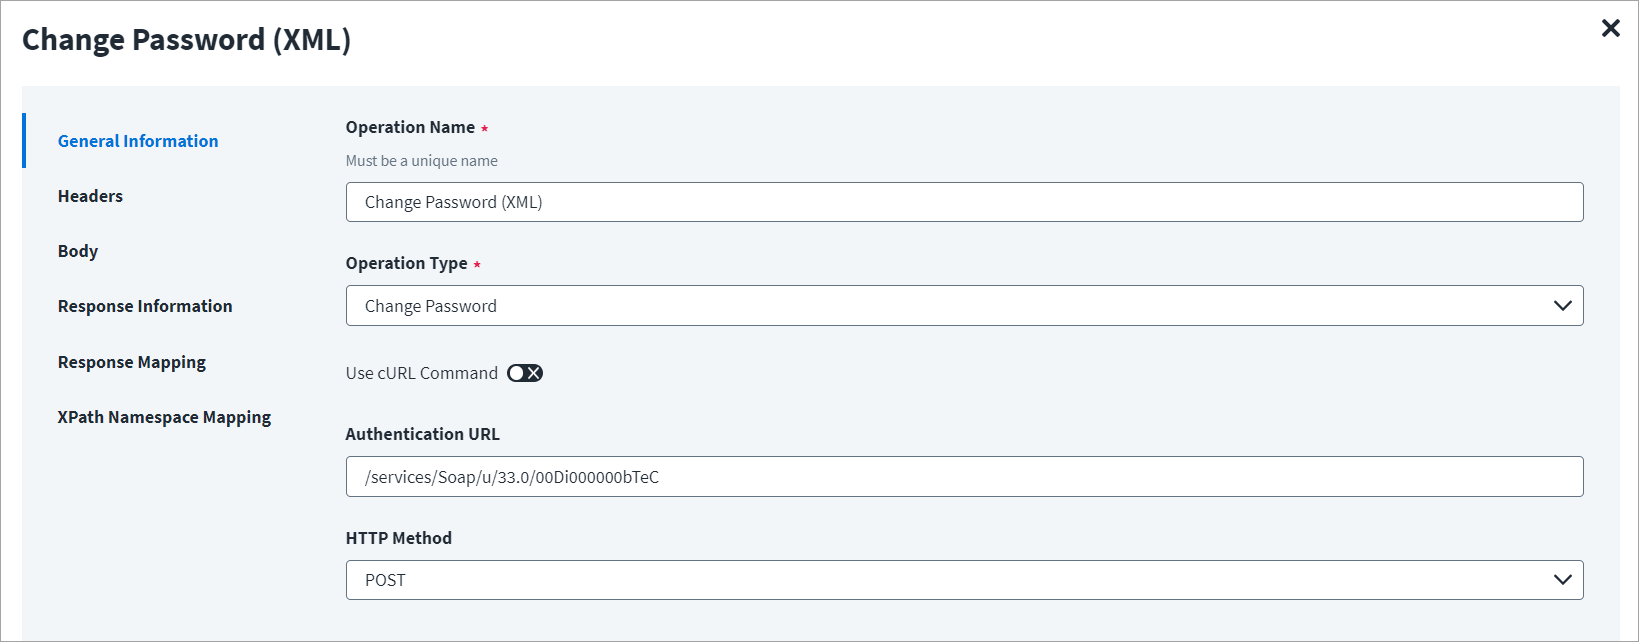
On the General Information tab:
- In the Operation Name field, enter
Change Password (XML)as the operation name. - From the Operation Type dropdown list, select Change Password.
- In the Context URL field, enter the URL specific to the password change.
- In the HTTP Method dropdown list, select POST.
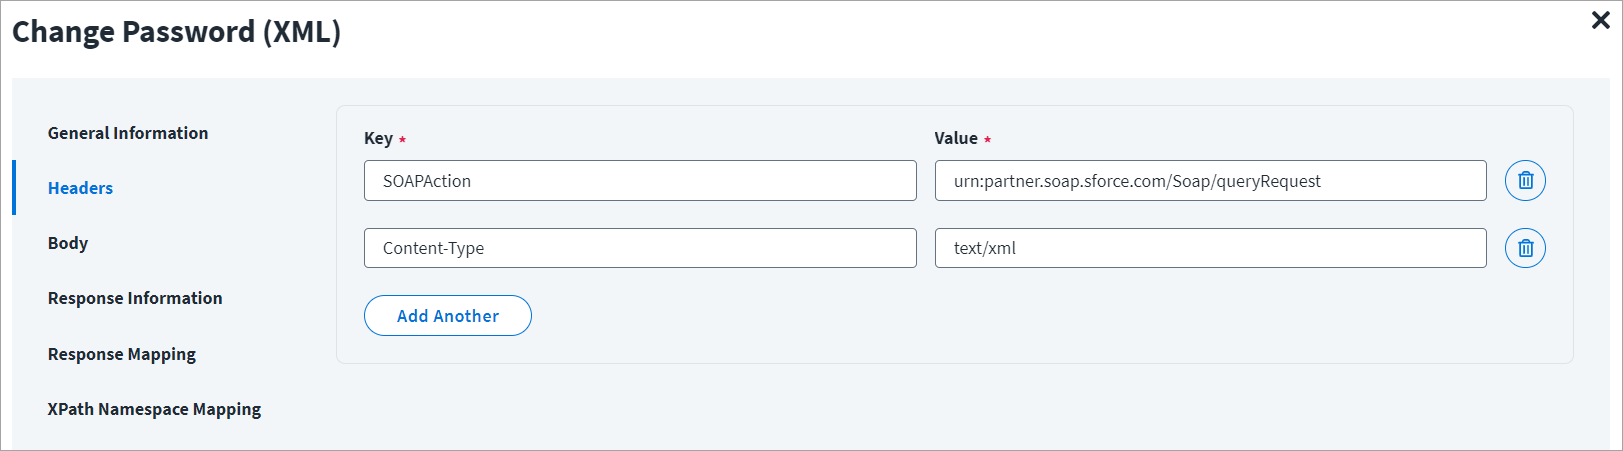
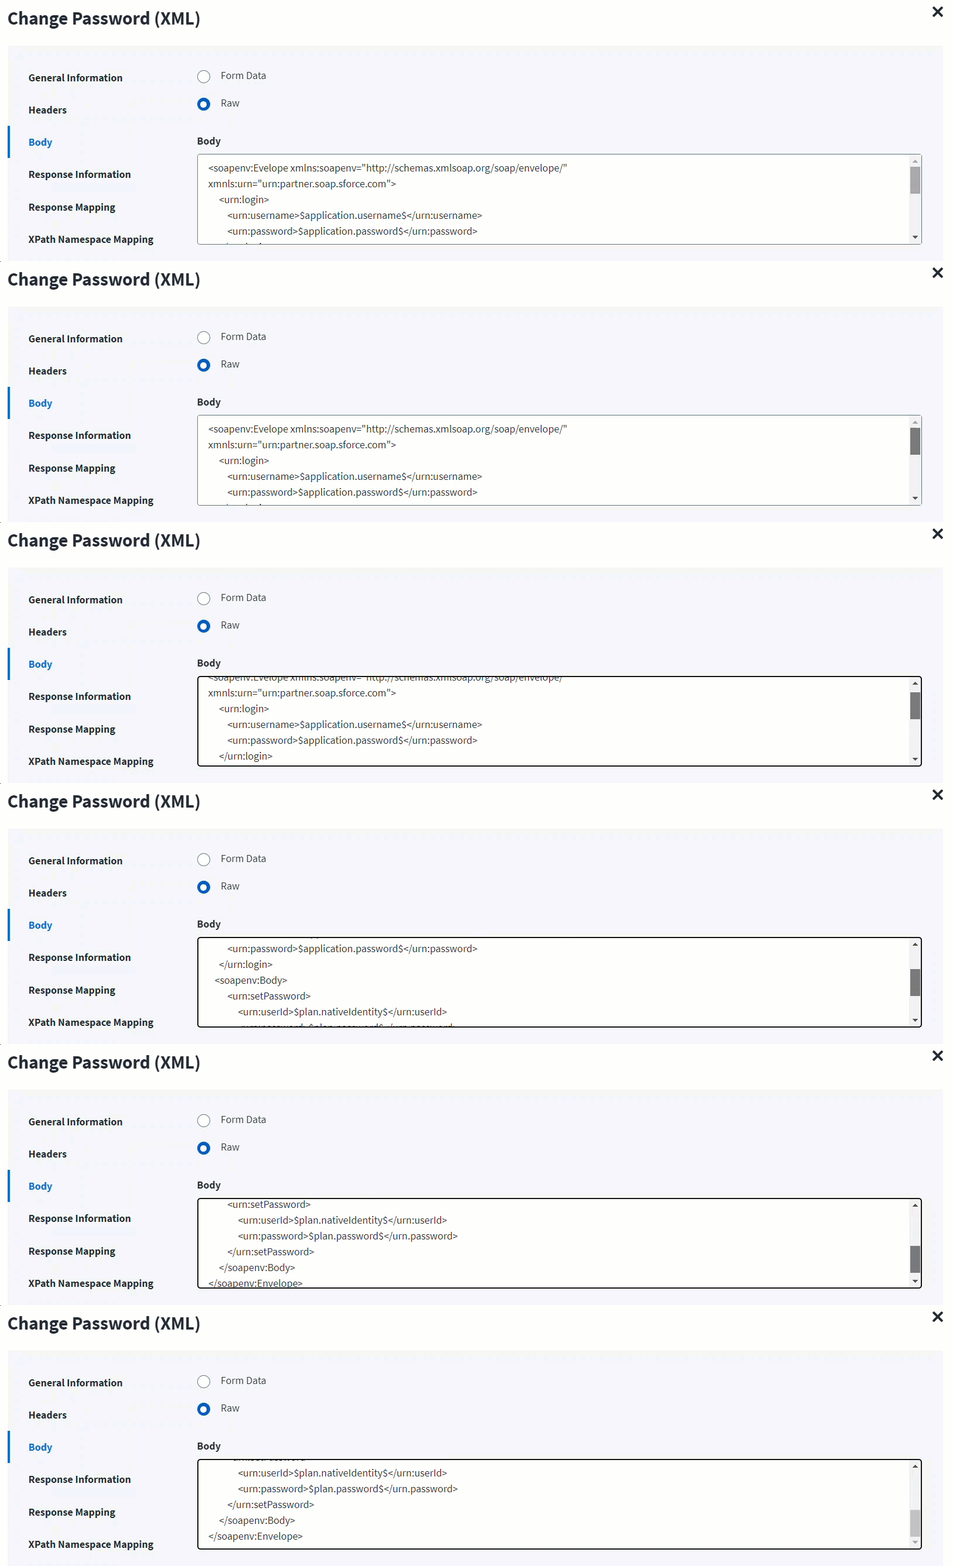
On the Header and Body tab:
The Header has the data keys and their corresponding values. These key value pairs will be sent as part of the Header in the HTTP Request.
The HTTP body is used for posting the data with a request. The body has two data entry types, Form Data and Raw. The XML format does not support Form Data.
In the Raw field, enter the XML payload for the account.
On the Response Information tab:
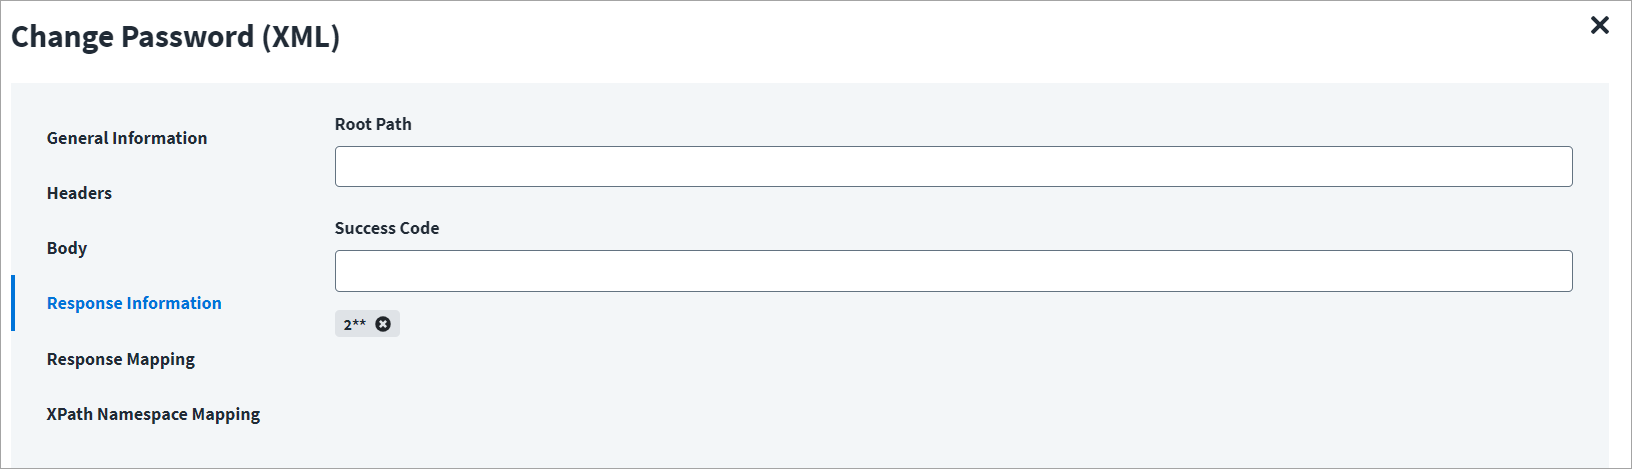
The Root Path is the common path present in the XML response. The Success Code is the successful HTTP response code expected by the respective Web Service operation. By default, the success code is 2**.
Documentation Feedback
Feedback is provided as an informational resource only and does not form part of SailPoint’s official product documentation. SailPoint does not warrant or make any guarantees about the feedback (including without limitation as to its accuracy, relevance, or reliability). All feedback is subject to the terms set forth at https://developer.sailpoint.com/discuss/tos.