Connectivity Agent Setup
Select Connectivity Agent > Enable and Continue.
Note
By selecting Enable and Continue, you agree to SailPoint's AI Terms.
Screenshot
Note
Select Learn more for more information about the following:
- Recommendations - Suggested source configuration settings in SailPoint, generated by the Connectivity Agent using available documentation. Depending on the target application, these can include endpoints, operations authentication types, and aggregation types and related settings.
-
Confidence Levels - The strength of the documentation backing a recommendation:
- High - The recommendation is based on the target application's official documentation.
- Low - The recommendation is based on third-party documentation rather than the target application's official documentation.
Important
-
Errors
- If an error occurs while generating suggestions, select Retry.
- If the error persists, select Switch to Standard Setup when the Connectivity Agent displays the option.
- Select the gear icon in the top-right corner to switch to Standard Setup.
-
Only REST-based APIs are supported.
Warning
Switching to Standard Setup is permanent. You cannot return to Connectivity Agent setup, even if you go to the Sources page, select your source, and attempt to resume your configuration.
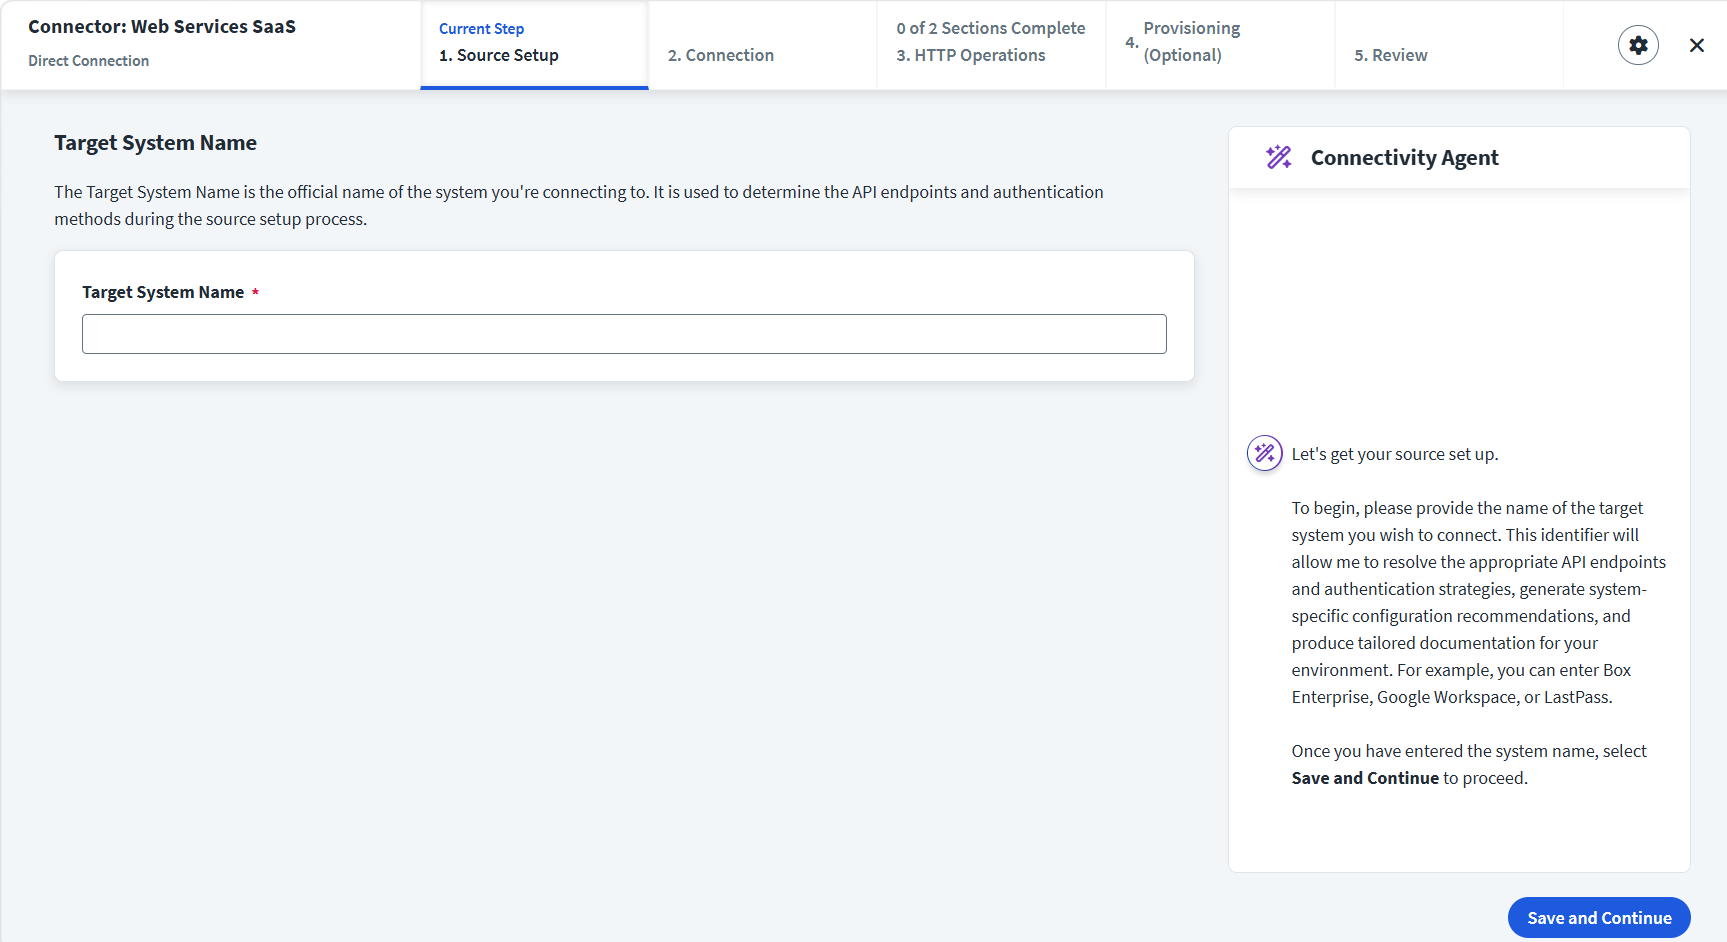
Source Setup
-
On the Source Setup tab, enter the source name in the Target System Name field.
Note
The name must be between 2 and 50 characters.
-
In the Connectivity Agent panel, select Save and Continue. Wait while the Connectivity Agent generates recommendations.
Note
To generate new recommendations, edit the Target System Name and select Refresh.
-
Depending on the results, perform one of the following actions:
- If a match is found, select the target system.
- If multiple target systems are listed, select one from the list.
- If no results are found, enter a different name, select Refresh, and select the target system. If the error persists, select Switch to Standard Setup.
-
Select Save and Continue. Wait while the Connectivity Agent locates the account objects associated with the target system.
-
Depending on the results, perform one of the following actions:
- If an account object is found, select the account object.
- If multiple account objects are listed, select one from the list.
-
Select Save and Continue. Wait while the Connectivity Agent generates the connection recommendations. You are navigated to the Connections tab.
Connections
- On the Connections tab, review the authentication types listed in the Connectivity Agent panel. The available authentication types vary based on the target system you selected.
-
Select an authentication type, and select Save and Continue. Wait while the Connectivity Agent configures the Test Connection endpoint.
Important
The Connectivity Agent does not support custom authentication.
- Once the Test Connection endpoint is configured, enter the authorization credentials to connect to the source.
- If you want to test the connection, select Test Connection. If the test connection fails, select View Test Connection Configuration and configure the test connection endpoint.
- If you want to configure authentication later, leave the fields blank.
-
Select Save and Continue. Wait while the Connectivity Agent generates recommendations for the account aggregation. You are navigated to the HTTP Operations tab.
HTTP Operations
Review and edit how the source accounts and its child endpoints are configured and how account entitlement information is collected.
Account Aggregation
Overview:
-
Account:
- Select the Edit icon for each account aggregation endpoint to review the configuration and update it if required. Refer to HTTP Operations for more information.
- You can manage the Account Schema and Preview the account aggregation configuration.
-
Select Save and Continue. Wait while the Connectivity Agent creates the child endpoints.
-
Child Endpoints (Optional):
- Select one or more child endpoints and select Save and Continue. Wait while the Connectivity Agent configures the child endpoints. Select Skip > Save and Continue to skip the child endpoint configuration and proceed with the next steps.
- Select the Edit icon for each child endpoint (if configured) to review the configuration and update it if required. Refer to HTTP Operations for more information.
- You can manage the Account Schema and Preview the account aggregation configuration.
Note
If an error occurs while generating suggestions, select Retry. If the error persists, select Save and Continue. You are navigated to the Entitlement Aggregation tab.
Account Schema
- Select the Account Schema tab.
-
Review and update the schema through the following actions:
-
To add a new attribute, select Add New Attribute and fill out all required fields. Select Save to save your changes and Cancel to discard your changes.
Note
Account attributes cannot exceed 128 characters.
-
To edit a source's Account Name and Account ID attributes, select Edit Schema. Under Account ID and Account Name, choose the attributes that should be used to provide those values and select Update.
- To edit an attribute, select Actions > Edit. Select Update to save your changes and Cancel to discard your changes.
- To delete an attribute, select Actions > Delete. You can also select the checkbox beside attributes in this list and select Delete Attributes.
-
Preview
- Select the Preview tab.
-
Select Preview to generate and review the account aggregation configuration.
- If an error occurs, review the error details and select Learn More to access the documentation and resolve the issue. After resolving the issue, select Preview again to view the updated configuration.
- While the preview is generating, you can edit the Overview and Account Schema pages and select Preview again to view the updated configuration.
-
Select Save and Continue. Wait while the Connectivity Agent performs the account's preview. You are navigated to the Entitlement Aggregation tab.
Entitlement Aggregation
Note
If an error occurs while generating recommendations, select Retry. To skip and proceed, select Save and Continue.
Overview:
Entitlement Aggregations: Select the Edit icon for each entitlement aggregation endpoint to review the configuration and update it if required. Refer to HTTP Operations for more information.
Entitlement Schema:
- Select the Entitlement Schema tab.
-
Review and update the schema through the following actions:
-
To add a new attribute, select Add New Attribute and fill out all required fields. Select Save to save your changes and Cancel to discard your changes.
Note
Entitlement attributes cannot exceed 128 characters.
-
To edit a source's Entitlement ID and Entitlement Name attributes, select Edit Schema. Under Entitlement ID and Entitlement Name, choose the attributes that should be used to provide those values and select Update.
- To edit an attribute, select Actions > Edit. Select Update to save your changes and Cancel to discard your changes.
- To delete an attribute, select Actions > Delete. You can also select the checkbox beside attributes in this list and select Delete Attributes.
-
Preview:
- Select the Preview tab.
-
Select Preview to generate and review the entitlement aggregation configuration.
- If an error occurs, review the error details and select Learn More to access the documentation and resolve the issue. After resolving the issue, select Preview again to view the updated configuration.
- While the preview is generating, you can edit the Overview and Entitlement Schema pages and select Preview again to view the updated configuration.
-
Select Save and Continue. Wait while the Connectivity Agent performs the entitlement's preview.
Note
If an error occurs while generating recommendations, select Retry. To skip and proceed, select Save and Continue.
-
Your aggregation configuration is now complete. Perform one of the following actions:
- Complete the Source Setup and review the final configuration.
- Enable and Configure Provisioning to configure provisioning operations.
-
Select Save and Continue. Wait while the Connectivity Agent performs the action. You are navigated to the respective tab.
Provisioning (Optional)
-
The Connectivity Agent discovers whether the application supports write capabilities and populates the matching provisioning operations based on its search results.
Note
If an error occurs while generating recommendations, select Retry. To skip and proceed, select Save and Continue.
-
Select one, multiple, or all provisioning operations that you want your source to support.
Note
To configure provisioning operations later in Standard Setup, select Skip and select Save and Continue. You are navigated to the Review tab.
-
Select Save and Continue. Wait while the Connectivity Agent configures the provisioning endpoints for each operation.
- On the Provisioning tab, select the Edit icon for each endpoint to review the configuration and update it if required. Refer to HTTP Operations for more information.
- Select Save and Continue. Wait while the Connectivity Agent completes the provisioning configuration. You are navigated to the Review tab.
Review
-
On the Review tab, review the source configuration details you configured during each step:
- Source Setup
- Connection Settings
- HTTP Operations
- Provisioning
-
Select Finish.
Note
Any settings or operations you skipped during the setup process appear empty or remain hidden.
After a successful configuration, the system creates your source and prompts you to run an aggregation.
-
If you want to aggregate now, select Aggregate. The system aggregates the account and entitlements and returns you to the Sources page.
- Go to Source, and continue with additional configuration if required.
- To see the latest account aggregation history, go to Source > Account Management > Account Aggregation.
- To see the list of aggregated source accounts, go to Source > Account Management > Accounts.
- To see the latest entitlement aggregation history, go to Source > Entitlement Management > Entitlements Aggregation.
- To see the list of aggregated entitlements, go to Source > Account Management > Entitlements.
-
If you want to aggregate later, select Cancel. This returns you to the Sources page. Your new source is listed, but contains no accounts or aggregation history yet.
Documentation Feedback
Feedback is provided as an informational resource only and does not form part of SailPoint’s official product documentation. SailPoint does not warrant or make any guarantees about the feedback (including without limitation as to its accuracy, relevance, or reliability). All feedback is subject to the terms set forth at https://developer.sailpoint.com/discuss/tos.