Connecting SailPoint and Freshservice
To connect SailPoint with Freshservice, perform the following tasks:
Adding the Source in SailPoint
To connect to SailPoint, perform the following steps. Once the connection is made, you can configure it to meet your company's needs.
Important
By default, the provisioning feature is disabled, and the connector only supports read-only operations. To support provisioning operations, you must manually enable the feature in the source configuration.
To configure a new source:
- Sign in to SailPoint.
- Go to Admin > Connections > Sources.
- Select Create New.
- Search for the connector by entering the name in the search box, and then select Actions.
-
In the Actions dropdown list, select the setup method:
-
Express Setup - Quickly create a read-only connection to your target system by providing minimal configurations and authentication. On completion, aggregation is automatically started.
Note
Express Setup supports Credential Providers. For information on supported credential providers and configuration, refer to Credential Providers. For more information, contact your SailPoint Customer Service Manager.
-
Standard Setup - Provide detailed basic configuration to create the source. Once the source is created, continue with source setup.
-
Configuring a Source Using Express Setup
Express Setup minimizes the initial configuration process so you can quickly connect the application and immediately begin aggregating user account and entitlement data.
- Review the directions and select Start Express Setup.
-
Review the pre-populated Source Name, Source Owner, and Description. To update, select Edit.
Note
The source name must be unique. You can change these settings later in the source configuration.
-
(Optional) If enabled for your organization, select the Use a Credential Provider checkbox to manage the source's authentication using a credential provider.
Note
To add a Credential Provider in SailPoint, go to Admin > Connections > Credential Providers. For more information about credential providers, refer to Credential Providers.
-
Configure the authentication to allow SailPoint to connect to the source. For more information, refer to the Connection Settings section.
-
Select Finish.
After a successful test connection, the system creates your source and prompts you to run an aggregation.
-
If you want to aggregate now, select Aggregate.
- To see the latest account aggregation history, go to Account Management > Account Aggregation.
- To see the list of aggregated source accounts, go to Account Management > Accounts.
-
If you want to aggregate later, select Exit. This returns you to the Sources page. Your new source is listed, but contains no accounts or aggregation history yet.
-
Configuring a Source Using Standard Setup
Use Standard Setup to configure the connector for full feature support.
- In the Source Name field, enter a unique and descriptive name for your source. Source names cannot exceed 128 characters.
- In the Description field, provide additional details about the source to help distinguish it from similar sources. This field allows a maximum of 2,000 characters.
- In the Source Owner field, begin typing the name of an owner. Matches appear after you type two or more letters. For more information, refer to Assigning a Source Owner.
- (Optional) Select a governance group to grant its members source or role sub-admin level oversight of the source and its access. For more information, refer to Creating and Managing Governance Groups.
- If this source represents a primary system containing your organization's personnel records, select the Authoritative Source checkbox. For more information, refer to Creating Identity Profiles.
- Select Continue. The source is created, and you are navigated to the Source Setup > Base Configuration page. Continue to configure your connected source there.
Base Configuration
Provide the base configuration parameters. Information you entered in the Create New Source dialog is automatically entered into the fields in the Base Configuration page. You can edit this information if necessary.
- Enter a unique name and description for the source.
-
In the Source Owner dropdown list, select the identity that owns this source.
- To find a source owner, begin entering their name.
-
(Optional) If enabled for your organization, select the Use a Credential Provider checkbox to manage the source's authentication using a credential provider.
Note
To add a credential provider, go to Admin > Connections > Credential Providers. For more information about credential providers, refer to Credential Providers.
-
Configure the authentication to allow SailPoint to connect to the source. Refer to Connection Settings for more information.
-
(Optional) In the Governance Group for Source Management dropdown list, select a governance group to associate with this source. For more information about governance groups, refer to Associating Governance Groups with a Source.
-
(Optional) Choose whether to enable or disable provisioning for the source. Provisioning is disabled by default.
-
Enable Provisioning - Set the toggle to Enabled to allow the source to create, update, and deactivate accounts in the connected source system.
-
Disable Provisioning - Set the toggle to Disabled to disable provisioning for the source. Disabling provisioning will prevent the creation, updating, or deactivating of accounts on this source.
-
-
Select Save.
Connection Settings
The following information is required for SailPoint to connect and interact with Freshservice.
Screenshot
- Select Connection Settings from the menu.
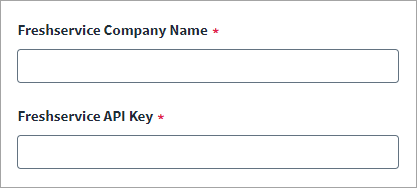
- Enter the Freshservice Company Name. This is the Freshservice account name. You can obtain its value from the base name of the company URL. Example: for URL as
https://sailpointservicedesk.freshservice.com, Company Name should besailpointservicedesk. - Enter the Freshservice API Key. This is the unique key that is required to access the Freshservice API. You can find it under your Profile setting.
- Select Save.
Aggregation Settings
For more information about aggregation, refer to Loading Account Data.
Screenshot
- Select Aggregation Settings from the menu.
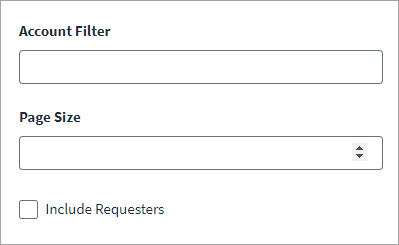
- Specify the Account Filter conditions. For example,
email=abc@example.com&active=true - Specify the Page Size for Account and Group aggregation. Default = 100. Maximum = 100.
- Select Include Requesters if you wish to include requesters in the account aggregation process in addition to agents. By default, only agent users are included.
- Select Save.
Activity Insights Settings
Activity Insights enables you to gather account information and activity data from the Freshservice source. SailPoint pulls activity data such as user logins, password changes, and content updates from the source in the form of events. Viewing a user’s source activity data can enable you to determine usage trends.
Important
Contact your SailPoint Customer Success Manager (CSM) for more information on Activity Insights. For more information on utilizing activity data, refer to Activity Insights.
Required Permissions
The SaaS connector service account requires the following permission to utilize Activity Insights.
| Scope | Description |
|---|---|
| IT Agent Role | Access across all groups in Service Desk. |
Enable Activity Insights Settings
To enable Activity Insights, complete the following:
Screenshot

- In the source configuration, go to the Activity Insights Settings tab.
- Select Enable Activity Insights to grant the connector access to data insights on the source and view source use activity.
- Select Save.
Review and Test
Perform a test to confirm the connection to SailPoint.
- Go to Review and Test.
-
Confirm that the entries in each field are correct.
If you note any mistakes, return to the section and make corrections.
-
Select Test Connection.
SailPoint Application Onboarding
SailPoint application onboarding enables you to easily onboard new applications and create sources following the successful onboarding of a discovery source. To use this feature, continue to Discovered Applications in the SailPoint user interface.
For more information, refer to Application Onboarding in the SailPoint SaaS documentation.
Documentation Feedback
Feedback is provided as an informational resource only and does not form part of SailPoint’s official product documentation. SailPoint does not warrant or make any guarantees about the feedback (including without limitation as to its accuracy, relevance, or reliability). All feedback is subject to the terms set forth at https://developer.sailpoint.com/discuss/tos.