Creating a Microsoft Teams Application for IdentityIQ in Azure
The Microsoft Teams application for IdentityIQ in Azure specifies the scope utilized by the IdentityIQ Microsoft Teams feature. Within this application, you configure authentication parameters, establish a client secret, and select the appropriate Microsoft API permissions. This application will be associated with the Azure bot resource. Values from this application will also be needed for the .env file used to configure the IdentityIQ service code.
Note: It is essential to follow the specified sequence of steps as mentioned in the document when creating the necessary applications for integrating IdentityIQ with Microsoft Teams. For a visual guide to the recommended setup order, refer to Best Practices for Configuring IdentityIQ Microsoft Teams.
Important: This guide ONLY provides instructions for configuring specific Azure component configurations required to support IdentityIQ’s Notifications and Access Request Approval work item features in Microsoft Teams. It is intended as an aid to implementers but should be used in conjunction with Microsoft’s official documentation to ensure access to the most accurate and up-to-date information. For broader information on Azure or general setup tasks related to Microsoft Teams and SSO, please refer to Microsoft's official documentation.
Perform the following steps to create a Microsoft Teams application for IdentityIQ:
-
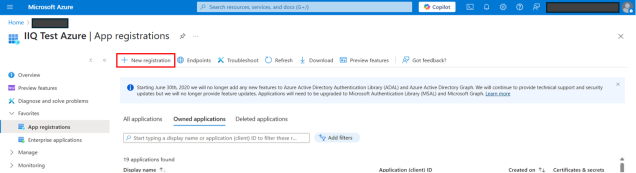
Sign into Azure portal and navigate to your Microsoft Entra ID.
-
Under Manage > App registrations, select + New registration.
-
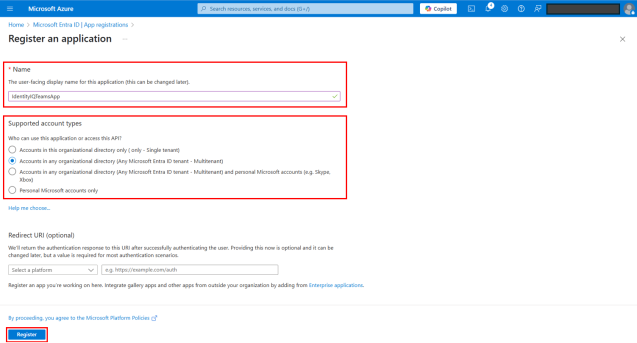
On the Registration page, provide the following details:
-
Name - Type a name for Microsoft Teams application for IdentityIQ. See Best Practices for Configuring IdentityIQ Microsoft Teams to define an appropriate application name.
-
Supported account types – Select Accounts in any organizational directory (Any Microsoft Entra ID tenant - Multitenant).
-
Redirect URL (Optional) – Leave this field blank.
-
Select Register.
Note: Once created, overview details of the application including Display name, Application (client) ID, Object ID, Directory (tenant) ID etc. will be displayed. Copy and save Application (client) ID for use during Creating an Azure Bot for IdentityIQ's Microsoft Teams , Creating an Azure Active Directory Application in IdentityIQ, and Installing and Configuring the IdentityIQ Service Code.
-
-
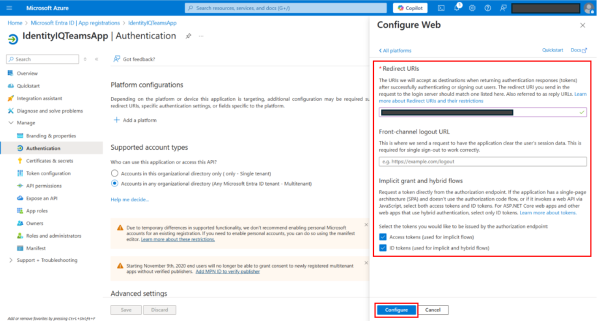
Configure an Authentication redirect URI:
-
In the left navigation, select Authentication.
-
Select + Add a platform.
-
On the Configure platforms dialog, select Web.
-
On the Configure Web dialog, provide the following details:
-
Add https://token.botframework.com/.auth/web/redirect as the Redirect URIs.
-
Under Implicit grant and hybrid flows section, select the checkbox for Access tokens and ID tokens.
-
Select Configure.
-
-
-
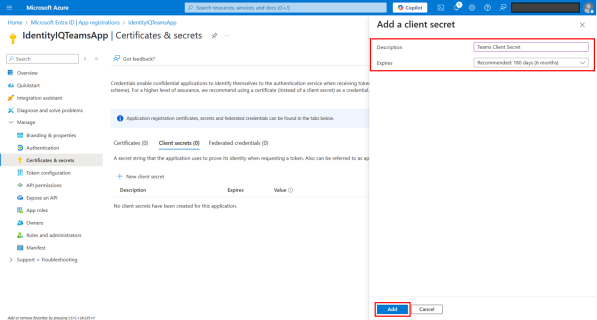
Create a client secret for the application:
-
In the left navigation, select Certificate and secrets.
-
Under the Client secrets tab, select + New client secret.
-
In the dialog that displays:
-
Provide a Description for the secret.
-
Select a time of expiration in Expires field.
-
Select Add.
Note: After the client secrets are added, its details are displayed including description, expiration, value, and secret ID. These details will be required for the IdentityIQ service code configuration in Creating an Azure Bot for IdentityIQ's Microsoft Teams and Installing and Configuring the IdentityIQ Service Code. Therefore, make a note of all the details and keep it safe.
-
-
-
Configure the API permissions for the application:
-
In the left navigation, select API permissions.
-
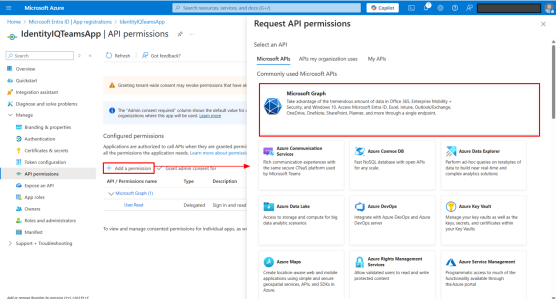
Select + Add a permission.
-
In the dialog that displays:
-
Under the Microsoft APIs tab, select Microsoft Graph.
-
Select Delegated permissions.
-
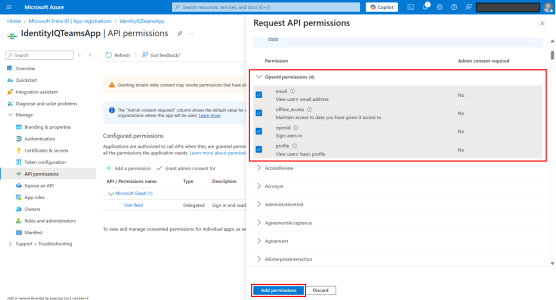
Under OpenId permissions, add the following:
-
email
-
offline_access
-
openid
-
profile
-
-
Select Add permissions
-
-
Select + Add a permission.
-
In the dialog that displays, perform the following steps:
-
Under the My APIs tab, select API Access application created.
Note: A dialog appears and displays the API Access Application name, and the Application ID URI which was set in Creating an API Access Application in Azure.
-
Select Delegated Permission.
-
Select GetToken checkbox.
Note: GetToken was created in Creating an API Access Application in Azure.
-
Select Add permissions.
-
-
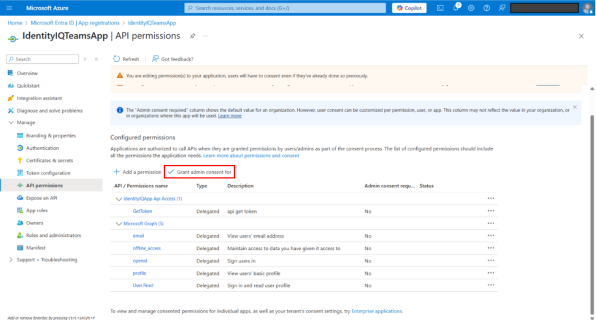
On the API permissions page, select Grant admin consent for <tenant name>.
-
Select Yes on the confirmation pop-up. The page displays all the permissions that are now granted.
-
-
In the left navigation, select Expose an API.
-
Select Add for Application ID URI.
-
On the pop-up that displays, add botid- to the URI syntax.
For example, if the URI syntax is, api://<application (client) id>, update it to, api://botid-<application (client) id>.

-
Select Save.
-
Add a GetToken scope:
-
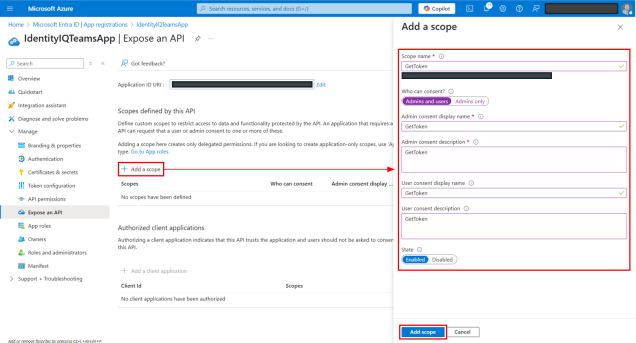
On the Expose an API page, select + Add a scope.
-
In the dialog that displays:
-
Scope name – Type GetToken.
-
Who can consent – Select Admins and users.
-
Add display names and descriptions for Admin consent and User consent.
-
Select Enabled state.
-
Select Add scope.
-
-
-
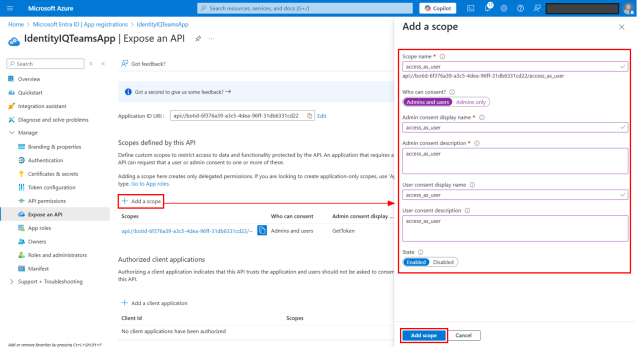
Add an access_as_user scope:
-
On the Expose an API page, select + Add a scope.
-
In the dialog that displays:
-
Scope name – Type access_as_user.
-
Who can consent – Select Admins and users.
-
Add display names and descriptions for Admin consent and User consent.
-
Select Enabled state.
-
Select Add scope.
-
-
-
Authorize desktop and mobile applications to use this application.

-
On the Expose an API page, select + Add a client application.
-
In the dialog that displays:
-
Add 5e3ce6c0-2b1f-4285-8d4b-75ee78787346 into Client ID field.
Note: This is Global Client ID for Microsoft Teams web. This value is provided by Microsoft; refer to Microsoft's documentation for details about the Client ID.
-
Select the Authorized scopes for GetToken and access_as_user.
-
Select Add application.
-
-
On the Expose an API page, select + Add a client application.
-
In the dialog that displays:
-
Add 1fec8e78-bce4-4aaf-ab1b-5451cc387264 into Client ID field.
Note: This is Global Client ID for Microsoft Teams mobile. This value is provided by Microsoft; refer to Microsoft's documentation for details about the Client ID.
-
Select the Authorized scopes for GetToken and access_as_user.
-
Select Add application.
-
-
You now have successfully created a Microsoft Team application in Azure. For next step, refer Creating an Azure Active Directory Application in IdentityIQ.