Creating an Azure Bot for IdentityIQ's Microsoft Teams
The Azure bot utilizes Microsoft's AI chatbot framework to facilitate messaging between Microsoft Teams and IdentityIQ. Additionally, it stores the configuration necessary to access the IdentityIQ service code. This setup enables seamless communication and integration between the two platforms.
Note: It is essential to follow the specified sequence of steps as mentioned in the document when creating the necessary applications for integrating IdentityIQ with Microsoft Teams. For a visual guide to the recommended setup order, refer to Best Practices for Configuring IdentityIQ Microsoft Teams.
Important: This guide ONLY provides instructions for configuring specific Azure component configurations required to support IdentityIQ’s Notifications and Access Request Approval work item features in Microsoft Teams. It is intended as an aid to implementers but should be used in conjunction with Microsoft’s official documentation to ensure access to the most accurate and up-to-date information. For broader information on Azure or general setup tasks related to Microsoft Teams and SSO, please refer to Microsoft's official documentation.
Perform the following steps to create Azure bot:
-
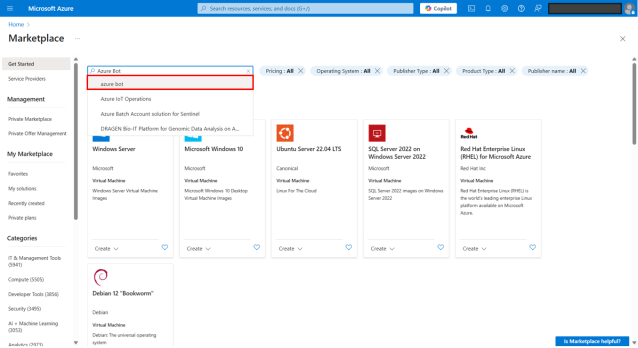
From your Azure home, use the search field to search for Azure Bot.
-
Select the result that appears in the Marketplace category.
-
Select Create for Azure Bot.
-
On the Create an Azure Bot page, provide the following details:

-
Enter a Bot handle name.
Note: This is the name of your bot, that your users will see in the Microsoft Teams application. See Best Practices for Configuring IdentityIQ Microsoft Teams to define an appropriate application name.
-
Select Subscription from drop down.
-
Select your resource group for the bot.
-
For Data Residency, select Global.
-
Select your pricing plan.
-
For Type of app, select the Multi Tenant option.
-
For Creation type, select Use existing app registration. This is how you link the bot to your Microsoft Teams application.
-
Enter App ID from the Microsoft Teams application that was created in Creating a Microsoft Teams Application for IdentityIQ in Azure.
-
Select Review + create to create the bot and link it to your Microsoft Teams application.
-
-
On the review screen, select Create to confirm the bot creation.
-
When the deployment process is complete, configure the bot:
-
Select Go to Resource.
-
In the left navigation, select Settings > Configuration.
-
Enter a Messaging endpoint. The Messaging endpoint for the bot service needs to be the external URL of the chat bot proxy. For example: https://<iiqchatproxy_external_url>/<idenityiq_teams_id_withoutdash>/api/message.
Note: Messaging endpoint is the External Url of Chat Application Proxy. See Creating a Chat Application Proxy for IdentityIQ in Azure for details
-
Select Apply.
-
Select Add OAuth Connection Settings - this connection manages tokens for SSO authentication.
-
Enter a Name for the new connection setting. Do not include spaces in the name.
-
For Service provider, select Azure Active Directory v2.
-
Enter the Client ID and Client secret from your Microsoft Teams application. See Creating a Microsoft Teams Application for IdentityIQ in Azure for details.
-
For Token Exchange URL, enter the Application ID URI that was created during Creating an API Access Application in Azure.
-
Enter your Tenant ID.
-
For Scope, enter the scope created for your API Access application. To find this value, navigate to your API Access application, select Expose an API, and copy the full scope from the Scopes field, to enter here. See Creating an API Access Application in Azure for details.
-
Select Save.
-
Select Add an OAuth connection settings button.
-
Select Test Connection.
Note: You can run a test to obtain a token, which can be useful, though it doesn’t guarantee that everything is configured properly. However, if there is an issue, the test will fail.
-
On the left navigation, select Channels.
-
Navigate to Available channels.
-
Select Microsoft Teams.
-
Select and accept Terms of service.
-
Select Microsoft Teams Commercial.
-
Select Apply to save all your changes.
-
-
You now have successfully created an Azure Bot. For next step, refer Installing and Configuring the IdentityIQ Service Code.