Creating an API Access Application in Azure
To enable token-based authentication between Microsoft Teams and IdentityIQ, you must create an API access application in Azure, then use some of the values from the API application within IdentityIQ, to enable authentication. It includes the GetToken scope and the proper audience value. When IdentityIQ received an API token request, it checks for specific values to validate the token. If the token is valid, IdentityIQ generates an Access Token for the user, which is then used by the bot to perform its task.
Note: It is essential to follow the specified sequence of steps as mentioned in the document when creating the necessary applications for integrating IdentityIQ with Microsoft Teams. For a visual guide to the recommended setup order, refer to Best Practices for Configuring IdentityIQ Microsoft Teams.
Important: This guide ONLY provides instructions for configuring specific Azure component configurations required to support IdentityIQ’s Notifications and Access Request Approval work item features in Microsoft Teams. It is intended as an aid to implementers but should be used in conjunction with Microsoft’s official documentation to ensure access to the most accurate and up-to-date information. For broader information on Azure or general setup tasks related to Microsoft Teams and SSO, please refer to Microsoft's official documentation.
To create the API access application in Azure, perform the following steps:
-
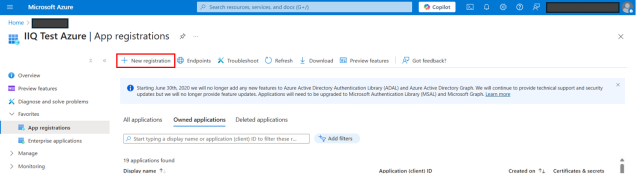
Sign into Azure portal and navigate to your Microsoft Entra ID.
-
Under Manage > App registrations, select + New registration.
-
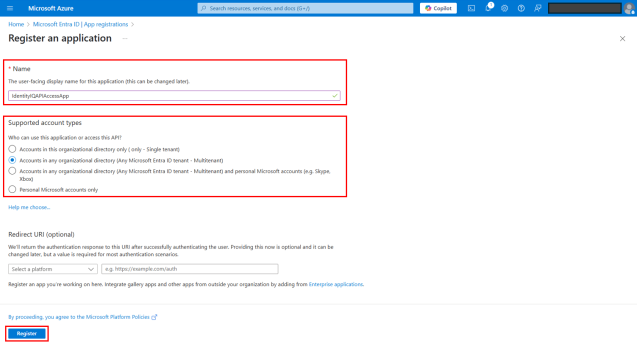
On the Registration page, provide the following details:
-
Name – Provide a meaningful name for the application. See Best Practices for Configuring IdentityIQ Microsoft Teams to define an appropriate application name.
-
Supported account types – Select Accounts in any organizational directory (Any Microsoft Entra ID tenant - Multitenant).
-
Select Register.
-
-
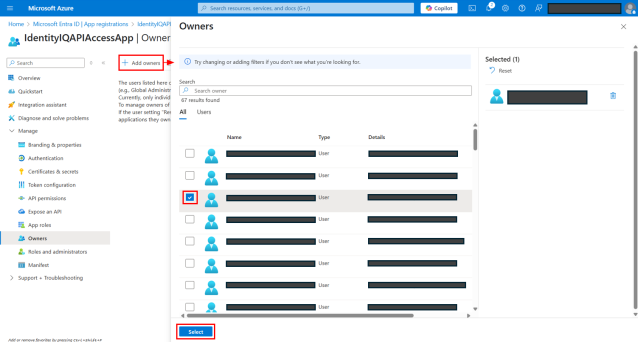
Create an owner for the application:
-
In the left navigation, select Owners.
-
Select + Add owners.
-
Search and select your name or email.
-
Select the Select button.
-
-
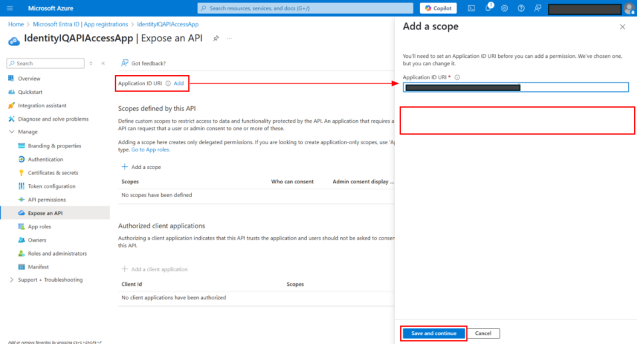
In the left navigation, select Expose an API.
-
Select Application ID URI. The Application ID URI field is populated in the format; api://<IdentityIQ API Access APP ID>.
-
Add ‘/identityiq/api’ to it so it becomes; api://<IdentityIQ API Access APP ID>/identityiq/api.
Note: You can add any other suffix to the Application ID URI. Make sure to use the same suffix during API Token Settings in Configuring API Authentication for Microsoft Teams in IdentityIQ.
-
Select Save and Continue.
-
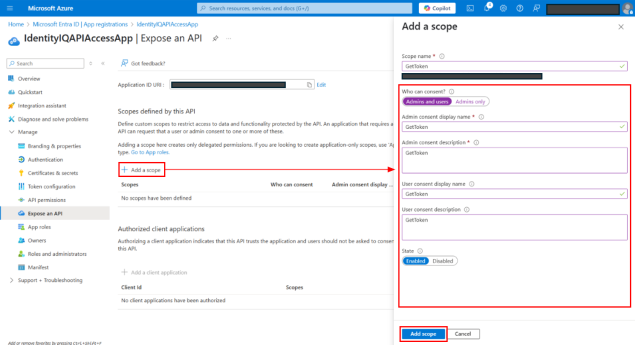
Add a GetToken scope:
-
On the Expose an API page, select + Add a scope.
-
In the dialog that displays:
-
Scope name – Type GetToken.
-
Who can consent – Select Admins and users option.
-
Add display names and descriptions for Admin consent and User consent.
-
Select Enabled state.
-
Select Add Scope.
-
-
You now have successfully created an API Access application in Azure. For next step, refer Creating a Microsoft Teams Application for IdentityIQ in Azure.