Connecting SailPoint and OnGuard
To connect SailPoint with OnGuard, perform the following tasks:
Adding the Source in SailPoint
To connect to SailPoint, perform the following steps. Once the connection is made, you can configure it to meet your company's needs.
Important
By default, the provisioning feature is disabled, and the connector only supports read-only operations. To support provisioning operations, you must manually enable the feature in the source configuration.
To configure a new source:
- Sign in to SailPoint.
- Go to Admin > Connections > Sources.
- Select Create New.
- Search for the connector by entering the name in the search box, and then select Configure.
- In the Source Name field, enter a unique and descriptive name for your source. Source names cannot exceed 128 characters.
- In the Description field, provide additional details about the source to help distinguish it from similar sources. This field allows a maximum of 2,000 characters.
- In the Source Owner field, begin typing the name of an owner. Matches appear after you type two or more letters. For more information, refer to Assigning a Source Owner.
-
Under Connection Type, select Direct Connection or Flat File.
- Direct Connection - A direct connection fetches data from the Virtual Appliance Cluster you choose as the application connector for the source. A direct connection configuration allows for real-time updates. For more information about configuring and deploying virtual appliances, refer to the Virtual Appliance Reference Guide.
- Flat File - Select the flat file if no connector is available, or if another system restricts the connection. This option allows only reading and aggregating data as a generic/delimited application. Provisioning activity is unsupported, and additional configuration pages like connection settings and aggregation settings are unavailable.
-
If you selected Direct Connection, in Virtual Appliance Cluster, select the virtual appliance cluster that will be used as the application connector for the source.
- (Optional) Select a governance group to grant its members source or role sub-admin level oversight of the source and its access. For more information, refer to Creating and Managing Governance Groups.
- If this source represents a primary system containing your organization's personnel records, select the Authoritative Source checkbox. For more information, refer to Creating Identity Profiles.
- Select Continue. The source is created, and you are navigated to the Source Setup > Base Configuration page. Continue to configure your connected source there.
Base Configuration
Provide the base configuration parameters. Information you entered in the Create New Source dialog is automatically entered into the fields in the Base Configuration page. You can edit this information if necessary.
- Enter a unique name and description for the source.
-
In the Source Owner dropdown list, select the identity that owns this source.
- To find a source owner, begin entering their name.
-
In the Virtual Appliance Cluster dropdown list, select the virtual appliance to use when communicating with your organization's systems. For more information, refer to SailPoint Virtual Appliances.
-
(Optional) If enabled for your organization, select the Use a Credential Provider checkbox to manage the source's authentication using a credential provider.
Note
To add a credential provider, go to Admin > Connections > Credential Providers. For more information about credential providers, refer to Credential Providers.
-
Configure the authentication to allow SailPoint to connect to the source. Refer to Connection Settings for more information.
-
(Optional) In the Governance Group for Source Management dropdown list, select a governance group to associate with this source. For more information about governance groups, refer to Associating Governance Groups with a Source.
-
(Optional) Choose whether to enable or disable provisioning for the source. Provisioning is disabled by default.
-
Enable Provisioning - Set the toggle to Enabled to allow the source to create, update, and deactivate accounts in the connected source system.
-
Disable Provisioning - Set the toggle to Disabled to disable provisioning for the source. Disabling provisioning will prevent the creation, updating, or deactivating of accounts on this source.
-
-
Select Save.
Connection Settings
Provide the information required to connect to and interact with the source.
Screenshot
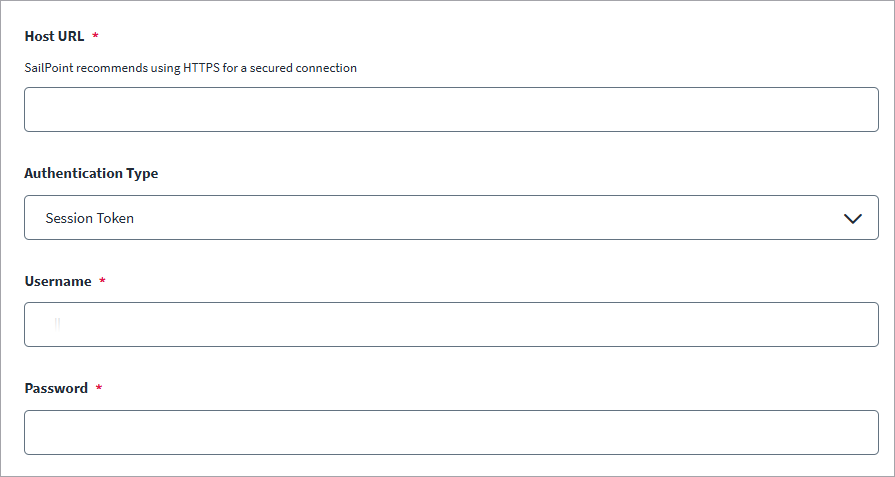
To configure connection settings, complete the following:
-
Enter the Host URL to connect to the OnGuard Instance. For example, you can use the following:
https://<host>:<port>Contact your OnGuard Administrator for the host URL.
-
Select the Authentication Type used to connect to the OnGuard system.
- Enter the service account Username required to connect to the OnGuard system.
- Enter the Password required to connect to the OnGuard system.
- Select Save.
Time Zone Settings
To configure connection settings, complete the following:
Screenshot

-
Select the Time Zone of the system hosting the OnGuard service to ensure that connector operations are synchronized with the correct local time.
If the system where the OnGuard solution is running uses the UTC timezone, the same timezone should be selected here.
Note
If the selected timezone does not match the actual timezone of the OnGuard system's machine, it may result in operation failures or data inconsistencies.
-
Select Save.
Segment Settings
Note
If segmentation is not enabled in the OnGuard system, you may skip this section.
To configure segment settings, complete the following:
Screenshot
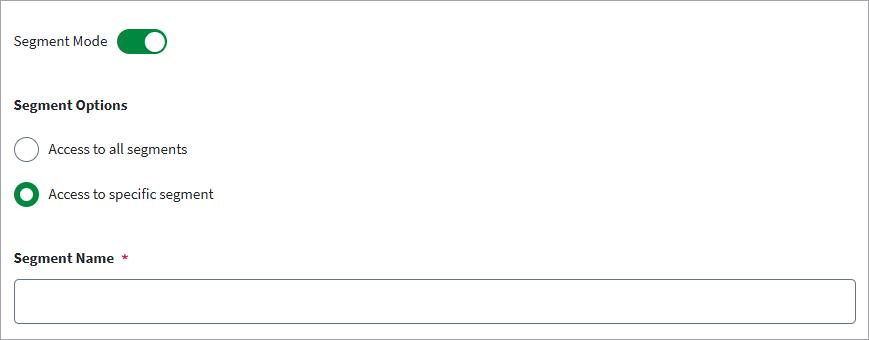
- Enable Segment Mode to manage the connector's operations to specific data segment.
- In the Segment Options field, select Access to all segments to allow the connector to manage cardholders across all segments.
- Select Access to specific segment to allow the connector to manage cardholders only within the segment specified in the Segment Name field.
- In the Segment Name, provide exact segment unit or segment group name as configured in OnGuard System.
- Select Save.
Important
- If segmentation is enabled in the OnGuard system, ensure that the connector's Segment Settings match exactly with the OnGuard configuration.
- Incorrect or mismatched segment configurations can result in:
- Connector operation failures
- Incorrect data read or update operations
Aggregation Settings
Use the settings available in Aggregation Settings to adjust aggregation processes as required for your organization.
For more information about aggregation, refer to Loading Account Data.
Configuring Page Size
Screenshot

- In the Page Size field, enter the number of records to aggregate in a single page when iterating over large datasets. You can set from 1 to 100. The default is 100.
Filtering Cardholders
By default, the OnGuard connector only aggregates cardholders with active badges.
Screenshot

Configure the connector to include additional cardholders as well.
- Select Aggregate Cardholders with Inactive Badges checkbox to include cardholders who have inactive badges assigned to them in aggregation processes.
- Select Aggregate Cardholders without Badges checkbox to include cardholders without badges in aggregation processes.
- Select Save.
Account Aggregation
If Segment Settings are enabled, account aggregation is performed as follows:
-
Segment Unit
Segment name: Austin (Segment Unit)
- All cardholders whose primary or additional segment is Austin.
- All cardholders assigned to the
<All Segments>(-1) segment.
-
Segment Group
Segment name: United States (includes Austin, New York)
The connector aggregates:
- Cardholders whose primary or additional segment is United States.
- Cardholders whose primary segment is Austin or New York.
- Cardholders assigned to
<All Segments>(-1).
Group Aggregation
If Segment Settings are enabled, group aggregation is performed as follows:
- In group aggregation, Segment Filter settings apply only to Access Levels, not to Badge Types.
-
The connector aggregates Badge Types from all available segments, regardless of segment selection.
-
Segment Unit
Segment name: Austin (Segment Unit)
The connector aggregates:
- All Badge Types from the system.
- Access Levels whose primary segment is Austin.
-
Segment Group
Segment name: United States (includes Austin, New York)
The connector aggregates Access Levels whose primary segment is United States, Austin, or New York.
Deactivation Settings
With these settings, SailPoint needs to know which badge statuses of the cardholder should be considered inactive. If a badge has a status listed in the Deactivation Status List, that badge is considered inactive.
Cardholders with a status listed in the Deactivation Status List are considered disabled by SailPoint. If a cardholder's status is not in the list, SailPoint treats the cardholder account as enabled.
Screenshot
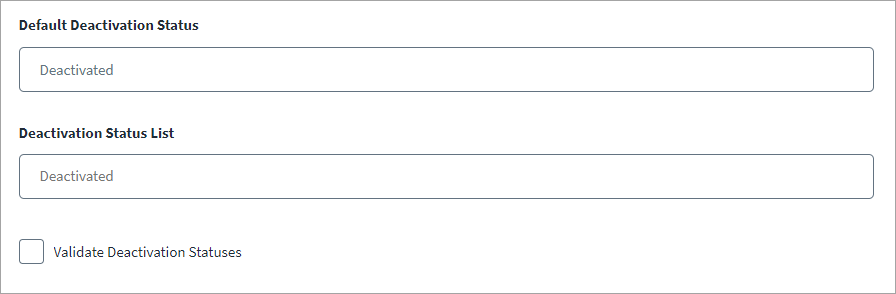
- In the Default Deactivation Status field, enter the default status for deactivated cardholders.
- In the Deactivation Status List field, enter deactivation statuses as configured in the source system. Type each status and press Enter to add it to the list.
- Select the Validate Deactivation Statuses checkbox to entered deactivation statuses are valid.
Checking Deactivation Status in OnGuard System
To find the deactivation status in the OnGuard system, follow these steps:
- Log in to the System Administration.
-
Navigate to the following path:
Administrator > List Builder > Badge Status
Delta Aggregation Settings
The first full account aggregation is a one-time operation performed using the OpenAccess API. After the initial full aggregation completes successfully, all further account aggregations must be performed as delta aggregations. These updates are managed by the OnGuard Event Subscriber Service, which subscribes to relevant business events.
SailPoint Use of Durable Subscription in OnGuard Event Subscription Service
Note
Acceptable Limitation (Durable Subscription)
The SailPoint OnGuard Integration subscribes to Cardholder and Badge changes via the Web Event Bridge.
Due to a limitation of the Web Event Bridge, the following behavior applies:
- If a disconnect between the Web Event Bridge and the durable event subscriber lasts less than 30 seconds, all events that occurred during that time are still delivered once the subscriber reconnects.
- If the disconnect lasts more than 30 seconds:
- Events that occurred during the first 30 seconds of the disconnect will not be delivered.
- Events occurring after the first 30 seconds will be queued and delivered once the durable event subscriber resumes the existing subscription.
Configuring Delta Aggregation
Screenshot

- The Delta Aggregation toggle button is enabled by default. After the first successful full account aggregation, all subsequent aggregations must be delta aggregations using OnGuard Event Subscriber Service.
- Full aggregation is only supported during the initial run.
- Make sure the system running the Event Subscriber Service is always accessible to ensure delta aggregations work correctly.
Installing the OnGuard Event Subscriber Service
Screenshot

- The OnGuard Event Subscriber Service is a prerequisite for the OnGuard Connector to function correctly. It is responsible for managing delta aggregations and must be installed and configured before using the connector.
- To install the service, follow the instructions provided in the OnGuard Event Subscriber Service Documentation. Ensure the service is running and accessible before proceeding with the connector configuration.
-
Once service installed, configure the API settings in the OnGuard Event Subscriber Service API Configuration for Delta Aggregation section.
Note
You are only entitled to download and use components for which you have an active license with SailPoint. The availability of a component for download does not grant you a license to use it. For more information, contact your SailPoint Account Representative or Customer Success Manager (CSM).
Configuring the Event Subscriber Service API for Delta Aggregation
Screenshot
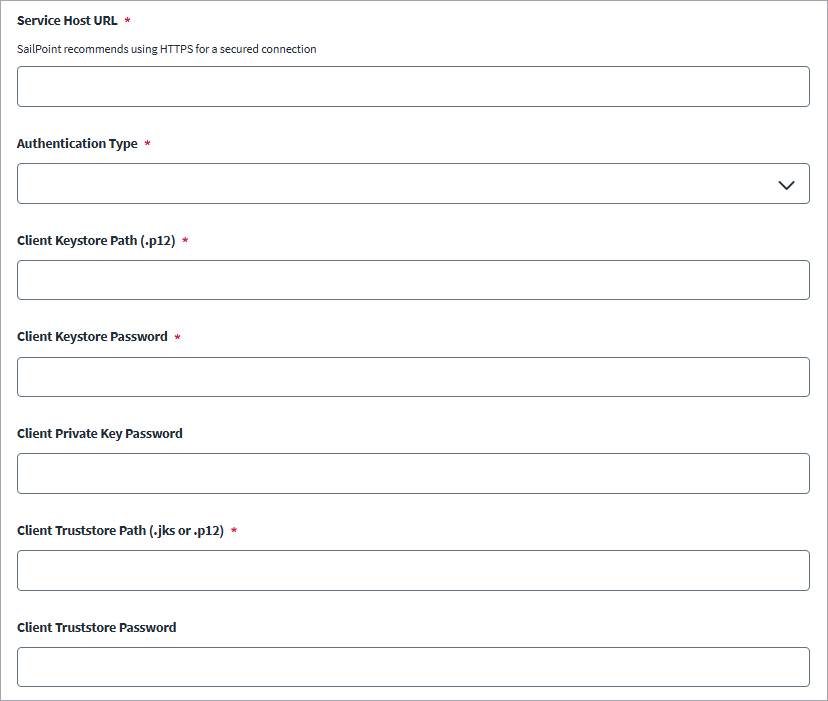
Configure the OnGuard Event Subscriber Service API settings for delta aggregation.
-
In the Service URL field, enter the URL of the OnGuard Event Subscriber Service API.
https://<host>:<port> -
In the Authentication Type field, select the type of authorization required to connect with the SailPoint OnGuard Event Subscription Service.
-
In the Client Keystore Path (.p12), enter the file path to the client identity file (.p12) that contains both the certificate and private key.
/home/sailpoint/client/client.p12 -
In the Client Keystore Password field, enter the password for the .p12 file.
- In the Client Private Key Password field, enter the private key password if it is different from the keystore password. Leave this blank if the private key uses the same password as the keystore.
-
In the Client Truststore Path (.jks or.p12) field, enter the file path to the truststore (.jks or .p12) that contains the CA certificates used to validate the server.
/home/sailpoint/client/client-truststore.jks -
In the Client Truststore Password field, enter the password for the client truststore.
- Select Save.
Provisioning Settings
Configure below settings for remove entitlement operations.
Screenshot

- Select Deactivate Access Level to deactivate the access level without removing it from the cardholder. If this option is not selected, the connector will permanently remove the access level.
- Select Save.
Review and Test
Perform a test to confirm the connection to SailPoint.
- Go to Review and Test.
-
Confirm that the entries in each field are correct.
If you note any mistakes, return to the section and make corrections.
-
Select Test Connection.
SailPoint Application Onboarding
SailPoint application onboarding enables you to easily onboard new applications and create sources following the successful onboarding of a discovery source. To use this feature, continue to Discovered Applications in the SailPoint user interface.
For more information, refer to Application Onboarding in the SailPoint SaaS documentation.
Documentation Feedback
Feedback is provided as an informational resource only and does not form part of SailPoint’s official product documentation. SailPoint does not warrant or make any guarantees about the feedback (including without limitation as to its accuracy, relevance, or reliability). All feedback is subject to the terms set forth at https://developer.sailpoint.com/discuss/tos.