Integrating SailPoint with Microsoft SharePoint Online
Microsoft SharePoint Online is a cloud-based service that helps organizations share and manage content, knowledge, and applications. The SailPoint Microsoft SharePoint Online connector manages SharePoint users and groups from all site collections present on the Microsoft SharePoint Online directory.
This document is designed to give specific information about the requirements and field definitions needed to get a working instance of a Microsoft SharePoint Online.
Note
To view the latest features, enhancements, and fixes for all SaaS connectors, refer to the SaaS Release Notes page.
Supported Features
The Microsoft SharePoint Online connector supports the following features:
Note
Before you can use any of the following items marked with an asterisk (*), SailPoint must activate the feature for your site.
Account Management
- Manage Microsoft SharePoint Online Users as Accounts
- Account Aggregation and Account Refresh
- Create
- *Add or Remove Entitlements (Groups from Sites and Subsites)
- *Access Certifications (certification of entitlements connected to accounts)
- *HTTP and HTTPS Proxy Configurations
Entitlement Management
- Manage Microsoft SharePoint Online Groups as Entitlements
- Aggregate Groups (from Sites and Subsites)
Supports Native Before/After Scripts for Provisioning Requests
This feature requires installation and registration of IQService. For more information, refer to IQService Administrator's Guide.
Supports OAuth2.0 Authentication
The Microsoft SharePoint Online connector supports OAuth 2.0 authentication. For more information, refer to OAuth 2.0 Authentication Methods.
For more information on features, refer to Source Features.
Prerequisites
- The SharePoint Online connector must be registered in Microsoft Entra ID with tenant level access for all the configured Site Collections. For more information, refer to Registering an Application Using the Azure AD Portal.
- (Deprecated) The SharePoint Online connector must be registered on SharePoint Online with tenant level access for all the configured Site Collections. For more information, refer to Registering Application with OAuth Client Credentials from SharePoint Portal.
- (Deprecated) The SharePoint Online administrator must be the primary administrator and must have 'FullControl' permissions for all the configured Site Collections. For more information, refer to Grant Access and Full Control Permissions.
Note
Microsoft recommends using JWT Certificate Credentials for authentication, as other grant types (Client Credentials, SAML Bearer Assertion, Refresh Token/Auth Code) are deprecated and will stop working after April 2, 2026. Use JWT Certificate Credentials for all new and existing source configurations.
- You must install IQService to use this feature. For more information, refer to IQService.
Important
IQService installation now enforces TLS configuration by default to improve security and safeguard your environment. To proceed with the installation, ensure you have completed the necessary prerequisites for TLS configuration. For more information, refer to Configuring TLS and Client Authentication for IQService.
-
Configure at least one virtual appliance cluster and successfully test the connection. For instructions, refer to the Virtual Appliance Reference Guide.
-
Before/After scripts can be executed by the latest version of IQService. You can use this feature to write custom PowerShell scripts that can be invoked before and after provisioning operations for this connector.
Warning
To enhance security, it is mandatory to configure the TLS for IQService. If you continue using non-TLS configuration, any before and after script execution will be disabled to safeguard your environment. Remove non-TLS configuration for IQService to execute any rules and scripts.
-
SailPoint recommends that you secure the communication path between the connector (VA) and IQService for the overall security of the Microsoft SharePoint Online connector. For more information, refer to TLS Configuration Between VA and IQService.
-
For specific prerequisites by authentication method, refer to OAuth 2.0 Authentication Methods.
- If you are using a custom application authentication, you must manually enable it. For more information, refer to Enabling Custom App Authentication.
Registering an Application Using the Azure AD Portal (Recommended)
Register a New Application in Microsoft Entra ID:
- Sign in to the Microsoft Entra admin center.
- Go to Identity > Applications > App registrations.
- Click on New Registration.
-
Fill in the application details:
- Name: Give your application a descriptive name. For example,
SharePoint API Client. - Supported account types: Select Accounts in this organizational directory only.
- Name: Give your application a descriptive name. For example,
-
Click Register
Creating OAuth2.0 JWT Certificate Credentials (Recommended)
The following are the steps for creating JWT certificate credentials for OAuth2.0 authentication. For more information refer to OAuth 2.0 Authentication Methods.
Steps for registering an application and assigning API permissions
-
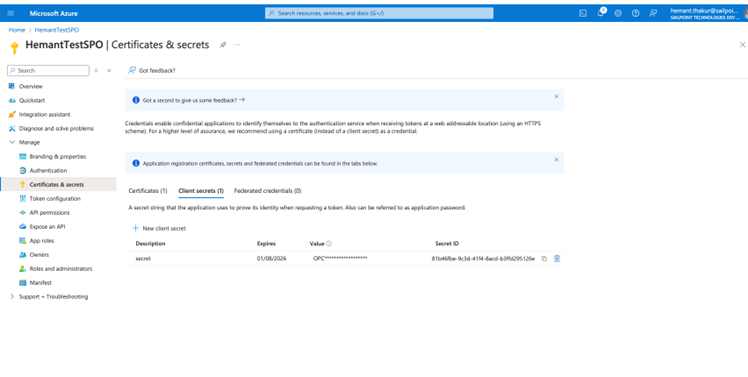
Create an application in Azure and register it. For more information, refer to register a new application in the Microsoft documentation.
Screenshot
-
Get an Application ID (Client ID) after the app registration, and then generate a Client Secret for it.
-
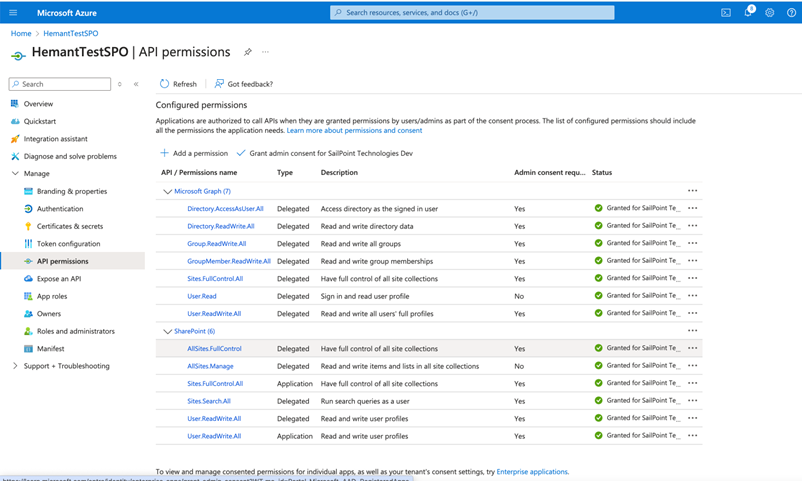
Assign API permissions to the Application ID (Client ID). For more information, refer to API permissions in the Microsoft documentation.
Screenshot
If you have already completed the above steps, you can skip them and proceed directly to the steps for creating and using the certificate.
Steps for creating and using the certificate
-
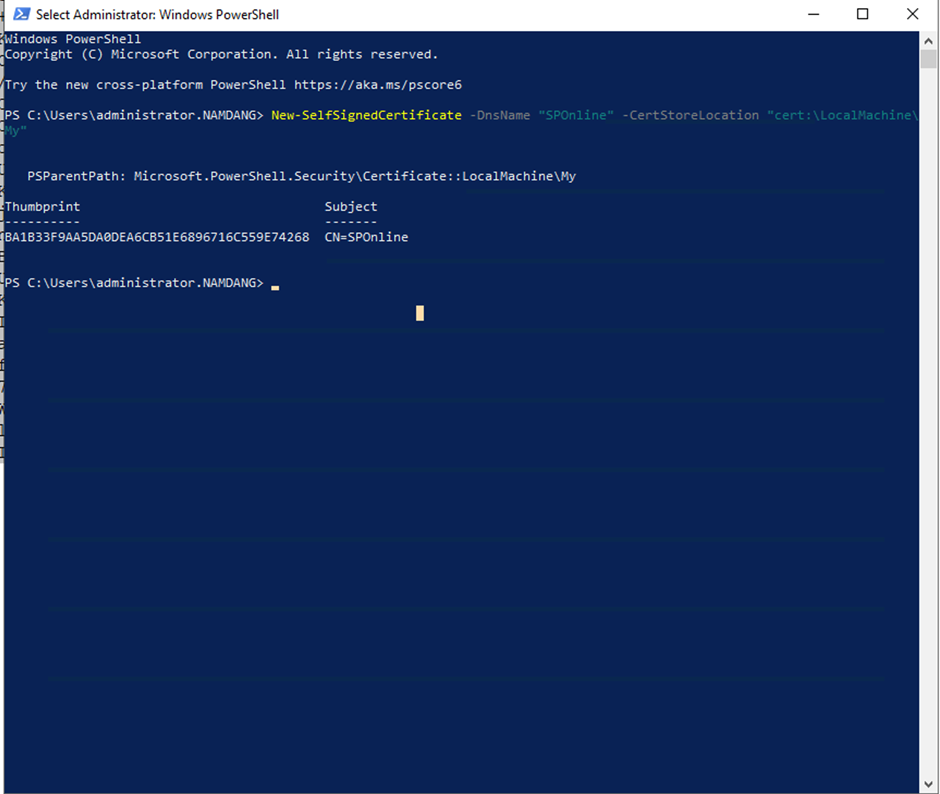
Run PowerShell as an administrator on any of the windows machine, and then generate a self-signed certificate with the following command:
Screenshot
-
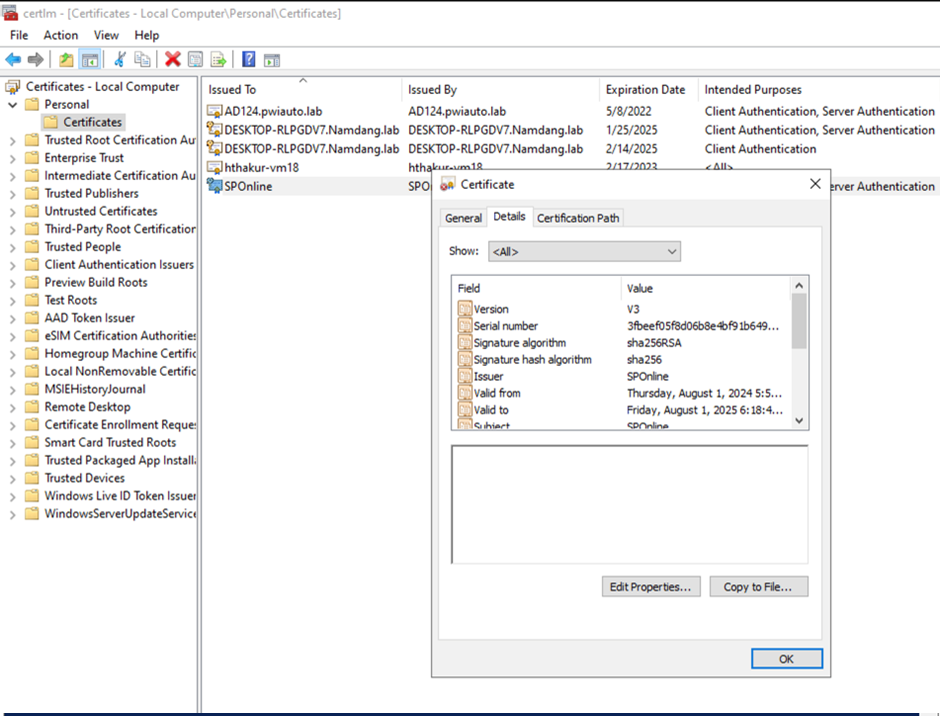
Go to certlm.msc > Personal > Certificates > Export, the export wizard will open and you can step through the process to export the certificate in PFX format.
Screenshot
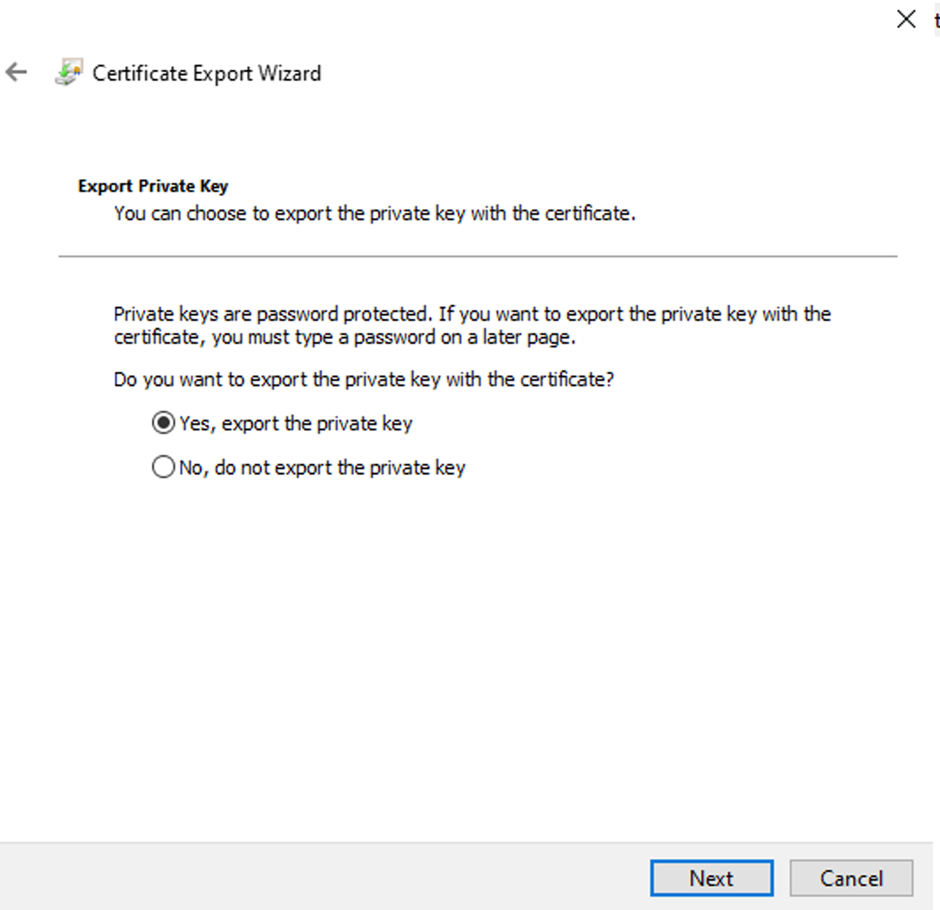
-
Select Include all certificates in the certification path if possible and Enable certificate privacy.
Screenshot
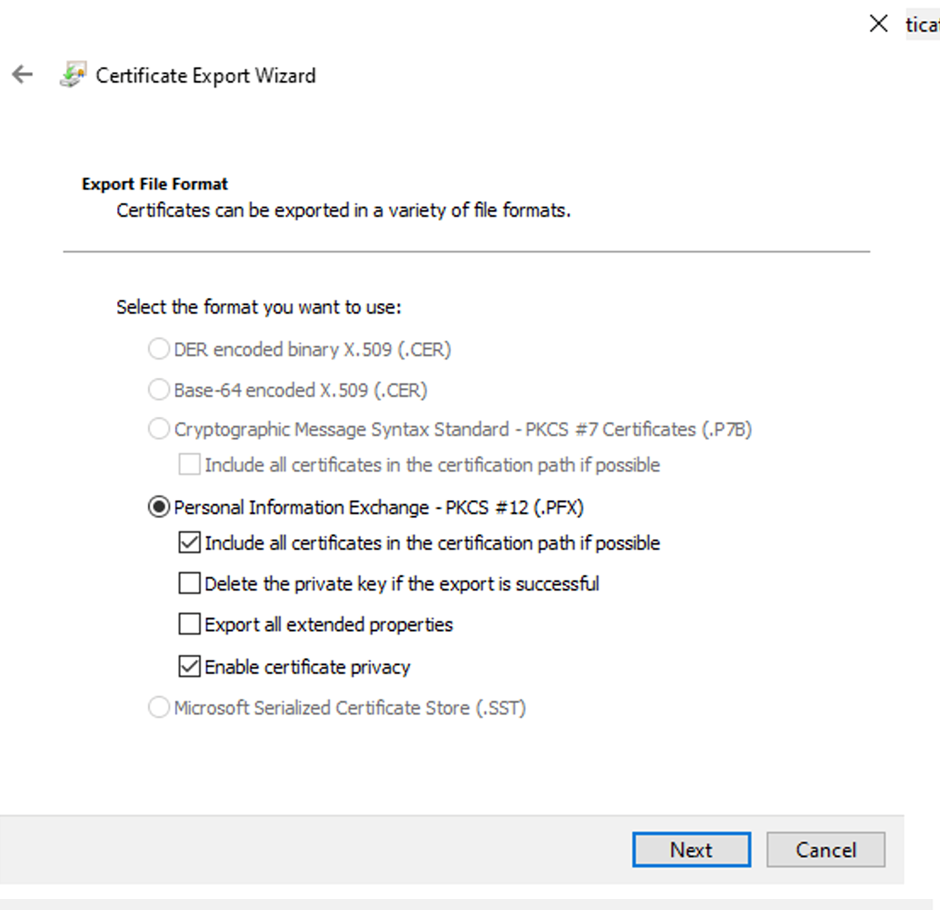
-
Provide a password to protect the private key using AES-256-SHA256 encryption. This password will be required when you sign your applications using the PFX file you are generating.
Screenshot
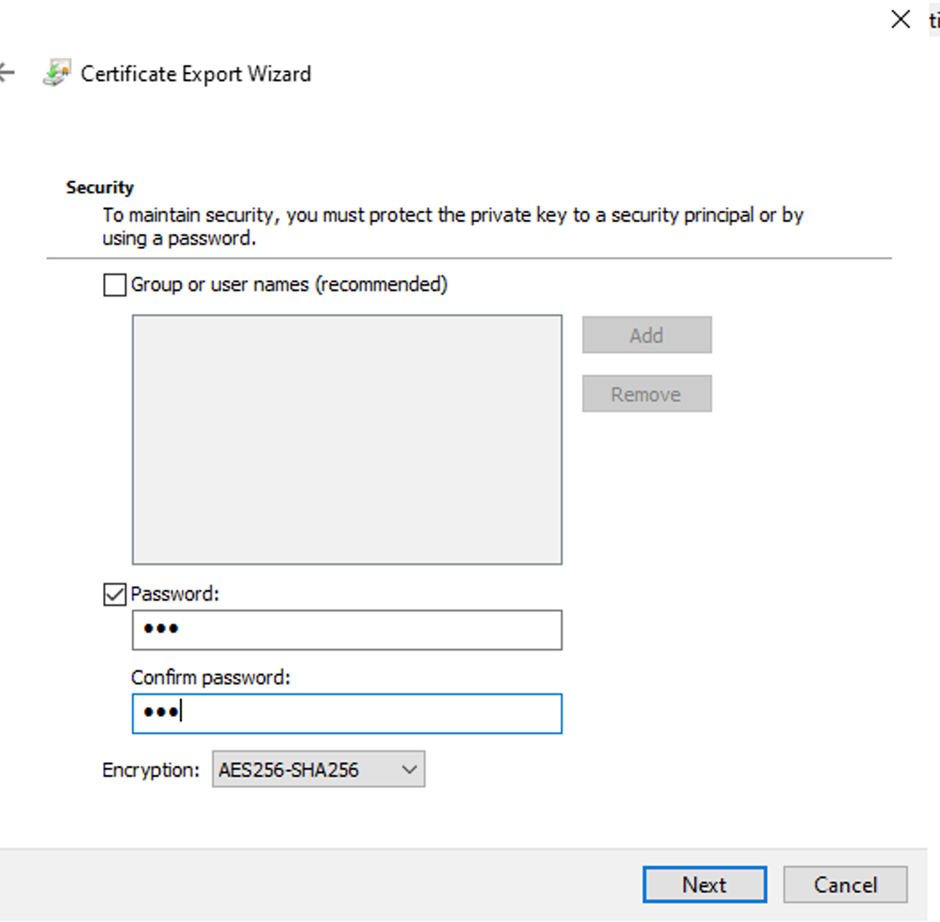
-
Save on any directory of your choice. Download openssl or use Git Bash.
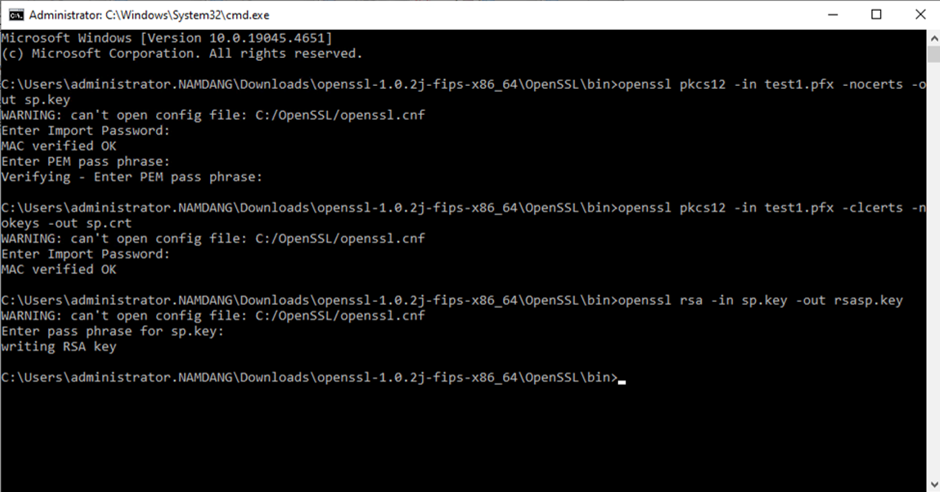
Copy the PFX file into the same directory where the command prompt or terminal is opened as an administrator, and run the following commands one by one, pressing Enter after each:
openssl pkcs12 -in test1.pfx -nocerts -out sp.key
openssl pkcs12 -in test1.pfx -clcerts -nokeys -out sp.crt
openssl rsa -in sp.key -out rsasp.key
Screenshot
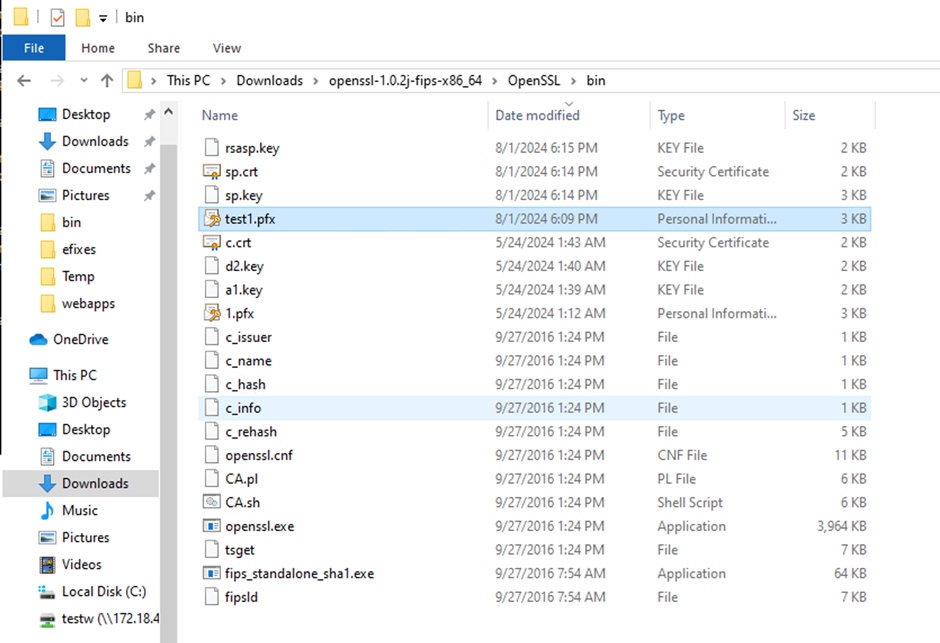
-
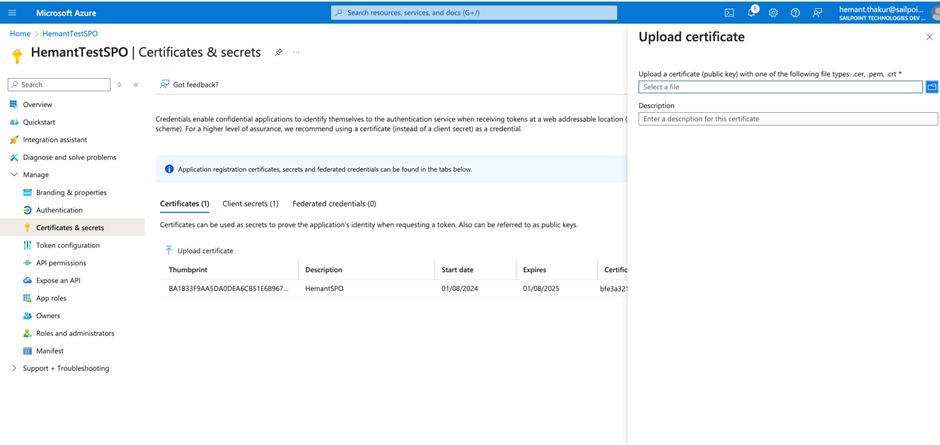
Upload the crt file on the Azure system.
Screenshot
-
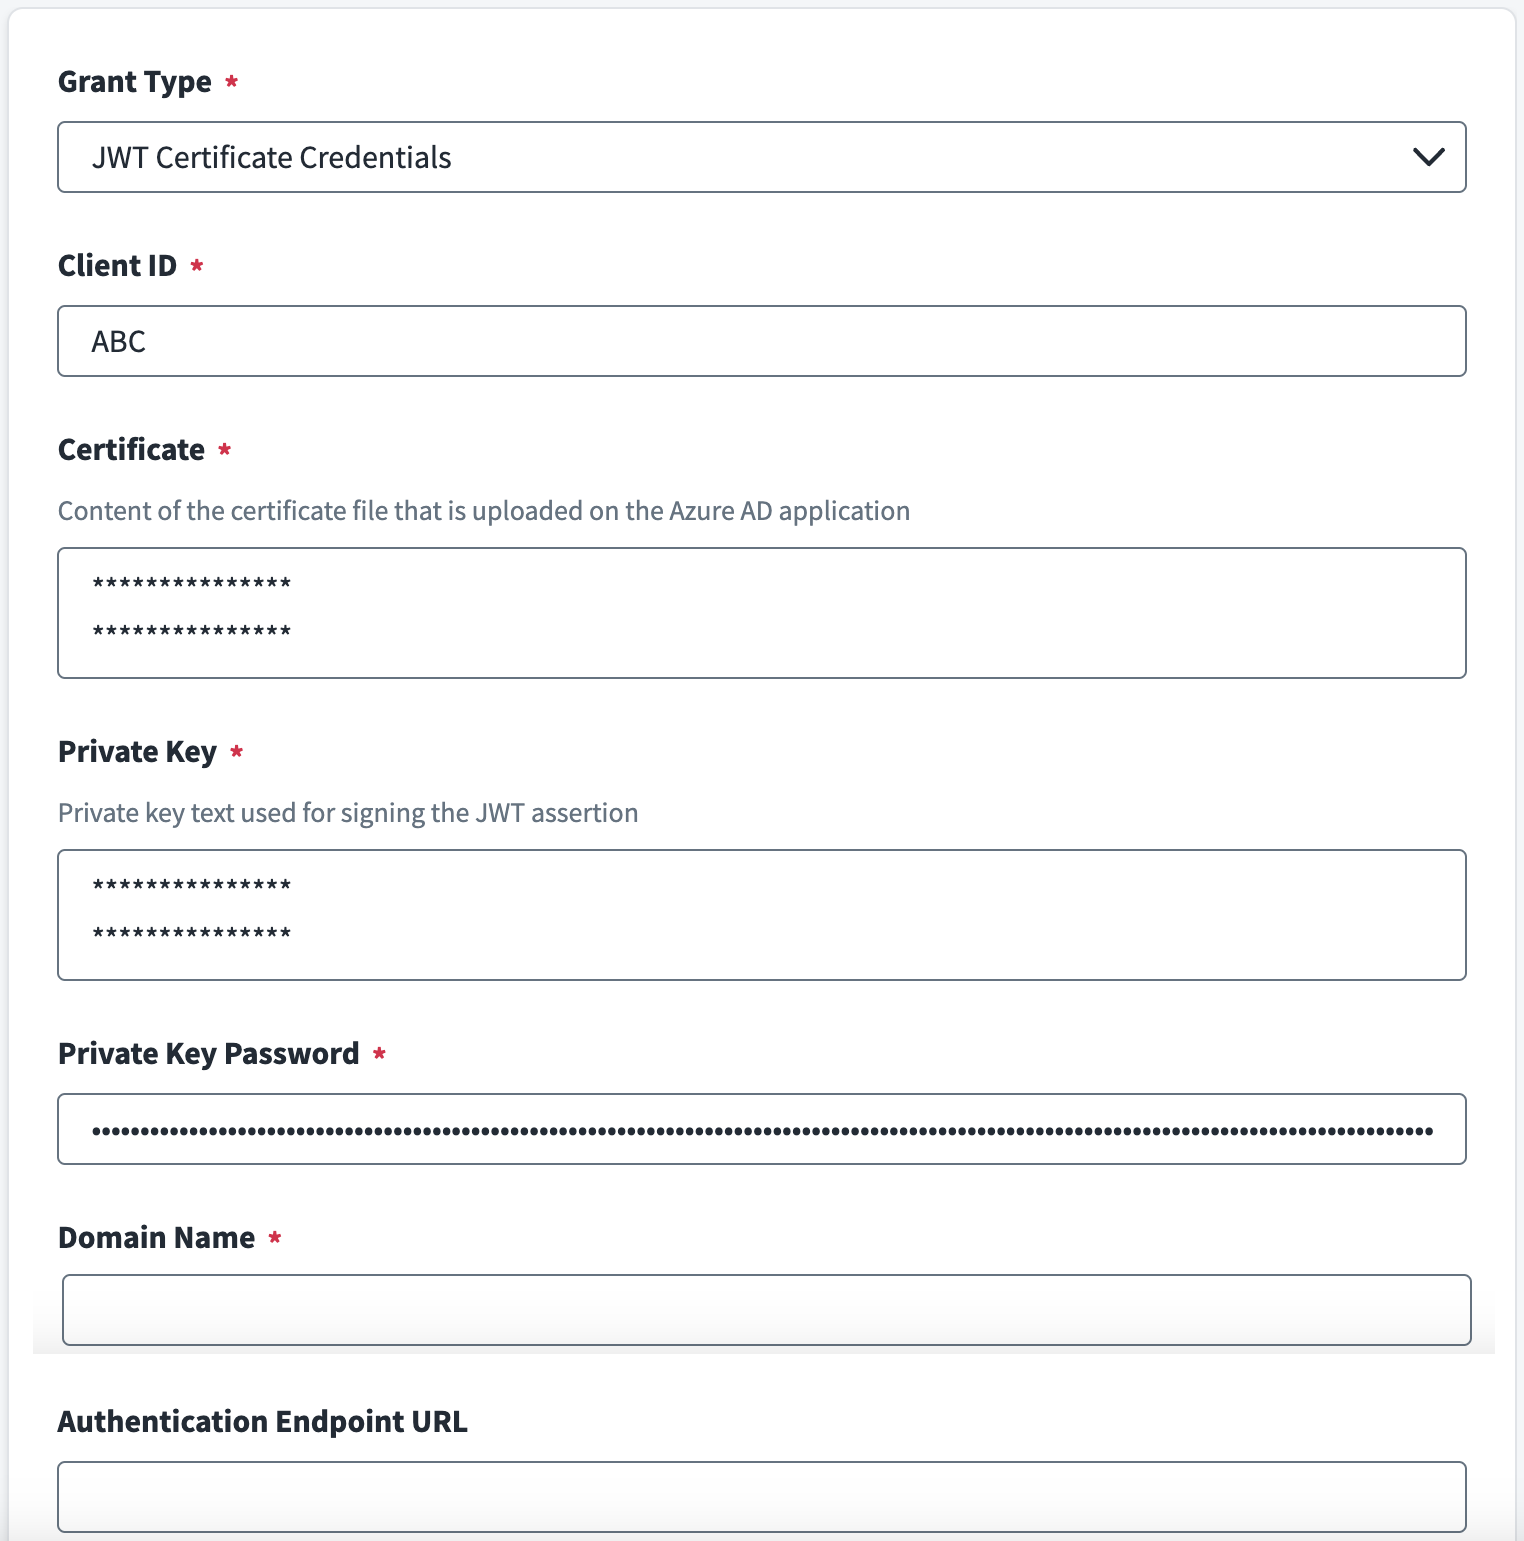
In the SailPoint user interface Connection Settings section, enter the details for SharePoint Online application in text for
rsasp.keyandsp.crtin Private Key. For more information, refer to Connection Settings.The Private Key Password is the pass-phrase you provided when generating the
sp.key.Screenshot
Registering Application with OAuth Client Credentials from SharePoint Portal (Deprecated)
Note
Microsoft recommends using JWT Certificate Credentials for authentication, as other grant types (Client Credentials, SAML Bearer Assertion, Refresh Token/Auth Code) are deprecated and will stop working after April 2, 2026. Use JWT Certificate Credentials for all new and existing source configurations. For more information, refer to Registering an Application Using the Azure AD Portal.
To register the SharePoint Online connector on SharePoint Online portal, complete the following:
-
Sign in to the following URL with the account that has the global administrator role and generate the Client Id and Client Secret:
https://<sitename>.SharePoint.com/_layouts/15/appregnew.aspxEnter the respective values for the following fields:
Fields Values Title Add-In App Domain localhost Redirect Url https://localhost -
Select Create. This registers the Add-In and returns a success message with the created information.
-
Grant permissions to the Add-In to access the SharePoint data.
Note
Provide
Full Controlpermission level to the tenant scope to enable the ability to read, write, and manage the Site Collections information.
Grant Access and Full Control Permissions
The connector you registered in the previous section must also be registered on SharePoint Online with tenant level access with Full Control permissions for all configured Site Collections.
To register the connector with the correct access level and permissions, complete the following:
- Enter the following URL to redirect to the Grant Permission page (where sitename is the URL of your SharePoint site):
https://<sitename>-admin.sharepoint.com/_layouts/15/appinv.aspx - In the AppId field, enter the Client ID you generated in the previous section.
- Select Lookup. This populates the values in the following fields: Title, App, Domain, and Redirect URL.
-
In the Permissions Request XML field, enter the following permission request (in XML format):
-
Select Create. You are redirected to a page where you must click Trust In.
Enabling Custom App Authentication
If you are using a custom authentication method with your application you must manually enable it using PowerShell cmdlets.
Run the following PowerShell cmdlets on Windows PowerShell:
- Install the SharePoint Online PowerShell module (if you don't have it) and execute the following command:
$orgName = "<your-org-name>" - Authenticate as the SharePoint administrator using the following command:
Connect-SPOService - Url https://$orgName-admin.sharepoint.com - Enable the custom application authentication using the following command:
Set-SPOTenant -DisableCustomAppAuthentication $false
Documentation Feedback
Feedback is provided as an informational resource only and does not form part of SailPoint’s official product documentation. SailPoint does not warrant or make any guarantees about the feedback (including without limitation as to its accuracy, relevance, or reliability). All feedback is subject to the terms set forth at https://developer.sailpoint.com/discuss/tos.