Installing SailPoint Desktop Password Reset
Desktop Password Reset (DPR) can be installed on end-user computers using one of the following methods:
Important
If an older version of Desktop Password Reset (DPR) is already installed on the system, you must uninstall it before running the installer for the current version of DPR.
System Requirements
The following are the software requirements for Desktop Password Reset:
System Requirements for Windows
Operating System
- Microsoft Windows 11
- Microsoft Windows 10
Software Platform
- Microsoft .NET Desktop Runtime 8.0.x, 9.0.x or 10.0.x
System Requirements for macOS
Operating Systems
- macOS 14.6 (Sonoma)
- macOS 15 (Sequoia)
Processor
- Apple Silicon-based chipset
Downloading DPR
Important
You are only entitled to download components for which you have an active license with SailPoint. The availability of a component for download does not grant you a license to use a component or entitle you to use a component for which you do not have an active license. Please contact your Account Representative or CSM for more information.
Download the latest version of Desktop Password Reset to your system. For information about the latest release and to get the download, visit the following resources:
Downloading DPR for Windows
Refer to Desktop Password Reset for Windows Release Notes.
Downloading DPR for macOS
Refer to Desktop Password Reset for macOS Release Notes.
Administrator Permissions
For Windows
You must have Administrator permissions to install Desktop Password Reset and edit the Deploy Configurator.
Note
For silent installation, open the command prompt or Powershell with Administrative privileges by selecting Run as an administrator from the context menu in Windows.
Interactive Installation
Follow the steps below to interactively install Desktop Password Reset (DPR) on your system:
Interactive Installation on Windows
To install the Desktop Password Reset (DPR) for Windows, perform the following:
-
Extract DesktopPwdReset_x.x.x.zip to a directory.
-
(Optional) To set a custom icon of the Desktop Password Reset tile on the Windows Logon screen, save an image file to the provided location below. The file name of the customized image must be PMIcon.bmp. It needs to be a bitmap (.bmp) file.
- (For 64-bit):
pathOfDesktopPasswordReset\x64\
- (For 64-bit):
-
Depending on the operating system navigate to the following appropriate directory and run setup.exe:
- (For 64-bit):
pathOfDesktopPasswordReset\x64\setup.exe
Where
pathOfDesktopPasswordResetis the path where DesktopPwdReset_x.x.x.zip file was extracted to. - (For 64-bit):
-
On the Welcome dialog box, select Next to continue the installation.
-
On the License Agreement dialog box, select I Agree and select Next.
-
Select the directory for the installation and select Next.
-
Enter the following configuration parameters on the Configuration Options dialog box and select Next:
Key Name Description Values URL Specify the product-specific URL accessible from the Desktop Password Reset restricted browser.
Specific requirements for SailPoint are described in the Values column.
Ensure that this URL (host) is added as a Trusted Site through Internet Properties > Security TAB > Trusted Sites [Sites].
Note: For better security posture, DPR supports accessing only HTTPS URLs.https://<SailPoint URL>/passwordreset
For example:https://abc.identitynow.com/passwordreset
This example refers to the Password Management Solution.Link Text on Logon Screen Text for the link that appears on the Windows Logon screen. This link launches the Desktop Password Reset Restricted Browser. (Maximum length : 1024) Forgot Password? Language Options Specify the languages supported by the password management solution. The restricted browser sets the language to the browser depending on the user's selection, as long as the language is configured. The value must be in following format: languageName, languageCode;
where:
-languageNamecan be the name of the language that needs to be displayed to the user in the Restricted Browser.
-languageCodeis the code of the language. Refer to Available languages for Windows to get the code of different languages.
For example:English(US), en-US;French(Canada), fr-CA;
Separate the language name and language code with a comma (,). End each language setting with a semicolon (;).
Default value:English(US),en-US; -
(Optional) If required, select the following options on the Configuration dialog box:
Key Name Description Values Unblock AltGr Key Indicates if AltGr Key is Unblocked. Possible values are YandN.N- AltGr key is blocked.Y- AltGr key is unblocked.
Default value:N -
(Optional) Enable Deploy Configuration Utility if the configuration utility needs to be installed.
The product has a built-in application called the Configuration Utility used to customize and configure the product settings. You can select to install this application along with the product. Alternatively, you can configure the product settings during installation itself or distribute the configurations remotely as described in Remote Installation section.
Enable Allow Off Corporate-Network Password Reset to enable the off-corporate network password reset feature for SailPoint. This feature enables users off the corporate network to reset their password.
-
Select Next to proceed.
The screen displays the Confirm Installation page. Select Next.
-
In the Installation Complete dialog, select Close to exit.
-
If the Certificate Authority (CA) for the certificate securing your SailPoint instance is not already trusted, follow the process outlined below:
-
Obtain the SSL certificate of your SailPoint instance in the desired format. This can be done in the following ways:
- Select the Secure button (a padlock) in an address bar.
-
Use the
s_clientOpenSSL command.For example:
-
Import the certificate into the Windows trust store (Trusted Root Cert authority).
-
Interactive Installation on macOS
Desktop Password Reset (DPR) is distributed as an installer package. You can install the product interactively with administrator privileges by following these steps:
-
Double-click the installer package file.
-
Follow the on-screen instructions provided by the installation wizard.
Remote Installation
Remote installation enables you to distribute and install the Desktop Password Reset (DPR) silently on end-user computers. Follow the steps below to remotely install DPR on your system:
Remote Installation on Windows
To install DPR remotely on Windows computers, follow these steps:
Note
For silent installation, open the command prompt or Powershell with Administrative privileges by selecting Run as an administrator from the context menu in Windows.
Prepare for Remote Installation
Pre-configure Desktop Password Reset before distributing it for remote installation.
-
Install Desktop Password Reset on one system as described in the Interactive Installation task. Choose the option to Deploy Configuration Utility during this setup. For example purpose, this system is named master system. Configurations done on this setup (except for the configurations mentioned in the below table) are duplicated on the remote systems.
-
Extract DesktopPwdReset_x.x.x.zip to a directory.
-
Open the command prompt as an Administrator.
-
In the command prompt, go to
pathOfDesktopPasswordReset\SailPoint Technologies\Desktop Password Reset. -
Run the following command and press Enter. It generates the dprconfig.export, dprkey.export, browserruntime.zip, and bouncycastleruntime.zip files in that location.
-
Copy these files to the following directory, depending on the operating system:
- (For 64-bit) -
pathOfDesktopPasswordReset\x64\
Where
pathOfDesktopPasswordResetis the path where the DesktopPwdReset_x.x.x.zip file was extracted earlier. - (For 64-bit) -
-
Obtain the SSL certificate of your SailPoint instance in the desired format. It can be done in various ways such as:
- Select the Secure button (a padlock) in an address bar.
-
Use the
s_clientOpenSSL command. For example:
-
Copy the required SSL certificate to the pathOfDesktopPasswordReset directory.
-
(Optional) To set a custom icon of the Desktop Password Reset tile on the Windows Logon screen, save an image file to the provided location below. The file name of the customized image must be "PMIcon.bmp". It needs to be a bitmap (.bmp) file.
- (For 64-bit) -
pathOfDesktopPasswordReset\x64\
- (For 64-bit) -
Install DPR Using the Remote Installation Method
To remotely install Desktop Password Reset:
-
Copy the directory created earlier to the remote system.
-
On the remote machine, open the command prompt as an Administrator.
-
Depending on the operating system navigate to the following directory:
- (For 64-bit) -
pathOfDesktopPasswordReset\x64\
Replace
pathOfDesktopPasswordResetwith the path from where the directory was copied earlier. - (For 64-bit) -
-
Enter the following command with the appropriate parameters:
For example:
-
Run the following command to install the certificate. In the command,
certificateNameis the name of the certificate file. For example, SSLCertificate.cer:
The following table describes available installation parameters:
| Name | Description |
|---|---|
| TARGETDIR | Path of the installation directory. Default: "C:\Program Files"For example: TARGETDIR="C:\Program Files" |
| DEPLOYCONFIGURATOR | Deploys the configurator on a target machine. SailPoint does not recommend that you deploy the configurator on a target machine if end users shouldn't make configuration change. Default: It is not deployed. For example: DEPLOYCONFIGURATOR=1 |
| PRECONFIG | Indicates if the Desktop Password Reset is preconfigured. Set this to 1 if the configurations and encryption key are going to be imported during this installation. Refer to Preparing for Remote Installation for more details. For example: PRECONFIG=1 |
| -afterreboot | Run pre-requisites in silent mode. For example: -afterreboot |
| quiet | Run installer in silent mode. For example: /quiet |
Remote Installation on macOS
Administrators can distribute the .pkg file to remote devices using any existing Mobile Device Management (MDM) solution. In addition to the .pkg file, administrators must also distribute the configuration file generated by the DPR Configurator app. For more information, refer to Managing Desktop Password Reset on macOS.
MDM Profile Configuration
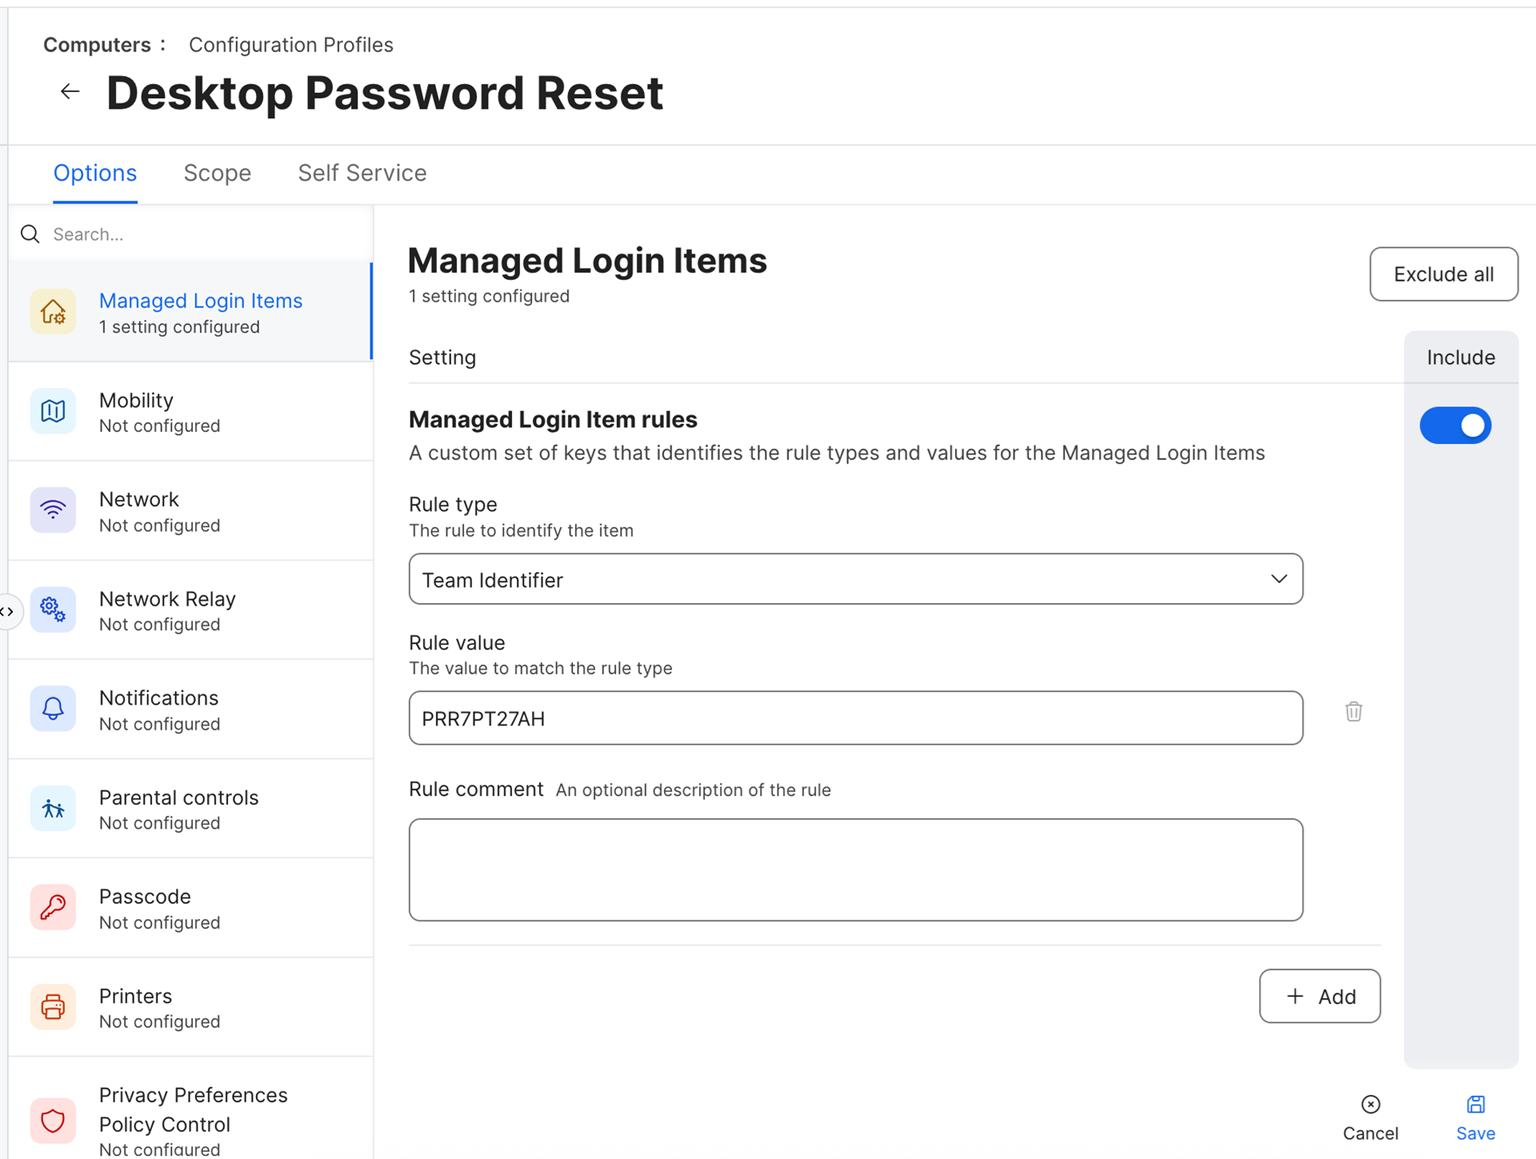
To prevent users from seeing a system notification when Desktop Password Reset (DPR) is installed on macOS, you can deploy the following configuration profile settings using Jamf.
Screenshot
-
Go to Computers > Configuration Profiles.
-
Select the configuration profile where you want to apply login item settings.
-
Go to Options tab and then, select Manage Login Items.
-
Within Manage Login Items, make sure to include Manage Login Item rules section.
Define and apply your required login item rules to control what applications or services launch at login.
Documentation Feedback
Feedback is provided as an informational resource only and does not form part of SailPoint’s official product documentation. SailPoint does not warrant or make any guarantees about the feedback (including without limitation as to its accuracy, relevance, or reliability). All feedback is subject to the terms set forth at https://developer.sailpoint.com/discuss/tos.